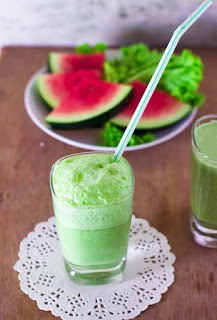
Kharbuja Panaka is a muskmelon based beverage that is traditionally served during the festival of Ram Navami in South India.
In a hurry? Jump to Recipe
In a hurry? Jump to Recipe

Night Fury completes one year on Sunday, well, at least as per the Hindu calendar. Yay!!
Sunday, the 14th is Ram Navami. And Night Fury isn’t our dragon, although Raj almost drives it as if it is, instead it is our car. When we bought it, we thought hard on what we should name it. Did you know there are websites out there that suggest names for your car based on color, type etc. They weren’t much help though. But after one hard look at the front grille of the car, and we both thought it looked like “Toothless” smiling. If you are totally lost right now, then all my references to night fury, toothless and dragons is from the movie “How to train your dragon”. It is a very good animated movie, and you should watch it.
So now there are 2 reasons to celebrate the day, one of course cause it is Ram Navami, a festival, and second it is also birthday number 1.
Ram Navami has always been a festival that invokes mixed feelings in me. As children, my mom took/dragged us to her family temple near Mangalore as Ram Navami is celebrated with a lot of grandeur there. While the festivities were nice and grand, what killed me there was the heat. April to me marks the beginning of Summer and Summer and the tropics don’t really work well together. While the tropics are always warm, Summer can literally roast you. And with Mangalore being on the coast, the humidity is very high too. So I was always sweating buckets and rushing to hydrate myself.
The good thing was that any Ram Navami celebration always has cooling drinks being served. You are bound to find either Panaka or Majjige (buttermilk) being served to keep everyone hydrated. Last year I posted the recipe for a simple Panaka. Today I'm sharing another version - Kharbuja Panaka or Muskmelon Sherbat. To make the Kharbuja Panaka, muskmelon or cantaloupe is juiced and cardamom, lime juice, pepper and jaggery are added for flavor. Chill it and serve it along with some diced muskmelon.
If you are in the mood, you can also make this Bele Holige, that is traditionally made for all festivals in South India.
Happy Ram Navami!!

If you made this recipe, let me know! Leave a comment here or on Facebook, tag your tweet with @oneteaspoonlife on Twitter and don't forget to tag your photo #oneteaspoonoflife on Instagram. You can also email me at onetspoflife@gmail.com I'd love to see what you are upto.
If you like this recipe, do not forget to share it with your friends and family!
--------------------------------------------------------------------------------------------------------------------------
Kharbuja Panaka | Muskmelon Sherbat
Kharbuja Panaka is a muskmelon based beverage that is traditionally served during the festival of Ram Navami in South India.Recipe Type: Beverage
Cuisine: South Indian
Prep Time: 10 minutes
Cook time: 0 minutes
Total time: 10 minutes
Yield: Serves 2
Ingredients:
2 cups chopped Muskmelon
0.5 Lime
2 Green Cardamom
0.25 tsp Pepper, freshly crushed
2 cups Water
Jaggery to taste
Muskmelon pieces for garnish
Ice cubes as required
Method:
1. Blend the chopped muskmelon along with lime juice, 0.5 cup water, pepper and jaggery until smooth.
2. Start by adding 2-3 tsp of jaggery and increase as per the desired sweetness.
3. Peel the cardamom and crush the seeds into a fine powder.
4. Add the cardamom, remaining water and ice cubes to the blender and give it a quick whizz.
5. Serve it chilled. Top with muskmelon pieces before serving.
If you liked this, you may also like:
|
|
|