Showing posts with label Rice. Show all posts

Vegetable Fried Rice

Who doesn't like the greasy Indian Chinese fried rice? Pair that with some spicy manchurian, and we have a dinner going... It has become so popular that tiny roadside carts also sell you some tasty fried rice at lower cost... But some of the best things are made at home when you know how hygienic it is... And this works perfectly for a busy week night dinner as it hardly takes any time to prepare.


Vegetable Fried Rice


Rice and vegetables stir fried together.

Recipe Type:  Main Course
Cuisine:          Indian Chinese
Prep Time:     30 minutes
Cook time:     60 minutes (Includes cooking rice)
Yield:              2-3 Servings

Ingredients:

3/4 cup uncooked or 2-3 cups cooked Rice
1 Carrot
10-12 Green Beans
1/2 Capsicum
2 Spring Onions or 1 Onion
1" piece Ginger
3-4 cloves Garlic
1-2 Tbsp Soy sauce
1/2 tsp Ajinomoto / Maggi magic cube (Optional)
1 tsp Pepper
1/2 tsp Vinegar
3 tsp Oil
2-3 drops Lime juice
Salt

Method:


  • Rice needs to be slightly under cooked and dry for fried rice. So cook the rice with a little less water than usual and for little less time. I cooked with a tbsp less than 1.5 cups of water and it generally takes 5 whistles or 10 mins for my rice to cook in the pressure cooker. I cooked for 4 whistles instead. Add a few drops of lime juice so that the cooked rice has separate grains.
  • Once the rice is cooked, spread it out on a large plate until ready to use.
  • Chop the carrot and beans into small cubes and boil them until half done.I microwaved them for around 6 mins.
  • Julienne the capsicum and onions. If the spring onions are very small, you can use more.
  • Crush the ginger and garlic into a fine paste.
  • Heat oil in a kadhai / wok and once it is hot, add the onion and fry.
  • Once the onions are slightly translucent, add the ginger garlic paste and capsicum and fry for 1 min
  • Add the beans and carrot and cook until the vegetables are almost 90% done. They should retain their bite. Do not overcook them.
  • Add the 1 tbsp soya sauce, pepper, vinegar, ajinomoto or maggi magic cube and mix well.
  • Add the rice and mix well
  • Add salt and any other sauce as per taste
  • Serve hot with some spicy manchurian
Read more ...

Vegetable Biryani (2 ways)

After a short trip to Sri Lanka where we struggled to find veg food, our taste buds were craving for some spice and lots of vegetables. I wanted to make and eat something that celebrated our wonderful Indian cuisine. It had also been a long time since I had made biryani, I'd almost forgotten the recipe taught to me by my friend's mom. So I tried to recollect all I could and gave it a go. It definitely was the tastiest biryani I've ever eaten (may be cause I made it :P) Below is the recipe how I made it (1st one). There are a few things missing here that are present in an authentic biryani as I made it with things readily available. I have not added potato, black cardamom and saffron/kesar. You can add the potato along with the other vegetables. Black cardamom needs to be added to the rice as well as the masala (1 each). Few saffron strands are mixed with milk and added to the rice. I skipped all this and as I know it, it made no difference to the biryani tastewise. Also, I used regular rice and not Basmati. I highly recommend using Basmati as it adds to the fragrance. I am listing down 2 recipes below, 1st one is how I made it and the 2nd one is an easier method.


Vegetable Biryani


The masala before layering


Recipe 1 : How I made it:

Vegetable Biryani


Rice cooked with vegetables and a spicy masala

Recipe Type:  Main Course
Cuisine:          Indian
Prep Time:     30 minutes
Cook time:     60 minutes
Yield:              2-3 Servings

Ingredients:

1 cup / 10-12 florets Cauliflower
1 Carrot
1/2 cup Peas
12-15 Beans
2 medium Onions
2 medium Tomatoes
4-5 cloves Garlic
1 " piece Ginger
1/2 cup Curd/ Yoghurt
1/2 cup Mint
1 cup uncooked Rice
3.5 cups Water
4 Cloves
2 1" pieces Cinnamon
4 Green cardamom
2 Bayleaf
A few strands Mace
8-10 Peppercorns
1/2 tsp Cumin seeds
1/4 tsp Ajwain
6 tsp Oil
1 tsp Red Chilli powder
1 tsp Turmeric powder
1/2 tsp Garam masala
2 tsp Coriander powder
1/2 tsp Cumin powder
2 Tbsp Milk
Salt


Method:

  • Take 3 cups of water in a kadhai/pan. Add 2 cloves, 1 bayleaf, 1 piece of cinnamon, 2 Green cardamoms, few strands of mace and 1/2 tsp of salt.
  • Wash the rice and add to the water and boil until the rice is almost done.
  • Remove the spices from the rice and drain excess water if any.
  • Heat 4 tsp oil in another kadhai and add the cumin seeds.
  • Once they brown, add the 1 chopped onions, remaining cloves, cardamom, bayleaf, peppercorns, ajwain and cinnamon.
  • Cook until the onions are translucent.
  • Grind together the tomatoes, ginger and garlic.
  • Add it to the kadhai with the onions.
  • Add chilli powder, turmeric powder, cumin powder, coriander powder and the garam masala and cook for 1 min.
  • Add all the roughly chopped vegetables and 1/4 cup water and cover and cook on low flame until the vegetables are almost done.
  • Add more water if needed.
  • Grind the mint leaves with a little water and add it to the curd and whisk to remove any lumps.
  • Add this to the masala and cook for 1 min.
  • Add salt and remove from heat.
  • In another pan, add the remaining oil.
  • Once the oil is hot, add the remaining onion sliced lengthwise and fry until brown.
  • Add one layer of the masala over the onions
  • Add one layer of rice
  • Again add a layer of masala and then one layer of rice.
  • Sprinkle 2 tbsp of milk and cover the kadhai and cook on low flame for 10-15 mins.
  • Mix well and serve hot with raita.

Recipe 2: Easy way out


Ingredients:

Cauliflower - 1 cup / 10-12 florets
Carrot - 1
Peas - 1/2 cup
Beans - 12-15
Onion - 2 medium
Tomato - 2 medium
Garlic - 4-5 cloves
Ginger - 1 " piece
Curd - 1/2 cup
Mint - 1/2 cup
Rice - 1 cup
Water - 2 cups + 1/2 cup
Cloves - 2
Cinnamon - 1" piece
Green cardamom - 2
Bayleaf - 1
Mace - few strands
Cumin seeds - 1/2 tsp
Oil - 6 tsp
Chilli powder - 1 tsp
Turmeric powder - 1 tsp
Biryani masala - 1-2 tbsp
Salt

Method:

  • Cook rice along with cloves, cinnamon, green cardamom, bayleaf, mace and 1/2 tsp of salt. You can pressure cook the rice until it is done. Add a little less water than you regularly do so that the rice is not too mushy. We need the rice grains to be separate.
  • Remove the spices from the rice and keep aside.
  • Parboil the vegetables outside until they are half done. Especially carrot and beans that take a little longer to cook. You can microwave them on high for 3-4 mins.
  • Heat 4 tsp oil in another kadhai and add the cumin seeds.
  • Once they brown, add 1 chopped onion. Cook until the onions are translucent.
  • Grind together the tomatoes, ginger and garlic.
  • Add it to the kadhai with the onions.
  • Add chilli powder, turmeric powder and biryani masala and cook for 3-5 mins.
  • Add the vegetables cook on low flame until the vegetables are done.
  • Add more water if needed.
  • Grind the mint leaves with a little water and add it to the curd and whisk to remove any lumps.
  • Add this to the masala and cook for 1 min.
  • Add salt and remove from heat.
  • In another pan, add the remaining oil.
  • Once the oil  is hot, add the remaining onion sliced lengthwise and fry until brown.
  • Mix the fried onion, masala and rice. Heat once again if needed.
  • Serve hot with raita
Read more ...

Nippattu | Thattai

Same story as my Kaju Katli post. I asked hubby dearest what khara/ namkeen/ spicy snack should I make for Diwali and the reply was Nippattu. Again, I had tried this earlier and it was something I couldn't brag about. Tried it again and presto! it tasted good this time. I did struggle a little initially even this time, but I got the correct advice from multiple people and managed to salvage my nippattu mission. I was not rolling them thin enough and hence they were not cooking properly in the center giving them soft centers and crispy sides. After about 7-10 turning out soft, I took the advice and patted them out evenly and thinner and they turned out nice and crisp. The recipe made close to 40 nippattus.


Nippattu | Thattai


Spicy flat South Indian crisps made from Rice flour

Recipe Type:  Snacks
Cuisine:          South Indian
Prep Time:     30 minutes
Cook time:     45 minutes
Yield:              40

Ingredients:

2 cups Rice flour
1 cup Maida / Flour
1-2 tsp Red chilli powder
50 gms or 3 Tbsp Butter
2 Tbsp Oil (hot)
2-3 sprigs Curry leaves
2 Tbsp Coriander leaves (chopped)
1/2 cup Peanuts
1/4 cup Puthani / Roasted gram
1/4 tsp Asafoetida / Hing
A pinch of Cooking soda
Salt
Water
Oil for deep frying

Method:

  • Dry roast the peanuts and peel them. Crush the peanuts into 2-3 pieces, just be careful not to powder it.
  • Mix the rice flour, maida, red chilli powder, butter, chopped curry leaves, coriander leaves, peanuts, roasted gram, hing, cooking soda and salt.
  • Heat 2 tbsp of oil and add to the mix.
  • Add water and knead into a smooth dough.
  • Cover and keep aside for 10-15 mins
  • Take a small ball of dough and place it on a butter paper or any other greased surface and pat it down into a disk using your fingers. The disk should be around 2mm in thickness. Make sure it is evenly thick.
  • Heat the oil in a kadhai for deep frying. After the oil is hot, reduce the stove to medium flame.
  • Deep fry the nippattu on medium flame until they are brown on both sides.
  • Allow it to cool a little to check if they have crisped up.
  • Allow it to cool and then store in an air tight container.

Read more ...

Vegetable Pulao

In the early 1990s, cable TVs had just entered homes, infact, TVs had just entered a few homes. International brands were unknown to most except probably those who had travelled abroad. Internet was virtually unheard of and computers unseen by most. Weekends were 1.5 days long and travels by Bajaj scooters. The only McDonald we had heard of was the old farmer who had pigs and ducks on his farm. Eating out was restricted to local foods like pao bhaji, sev puri, samosas and dosas. Eating out was an extravagance, a luxury. Families ate out once in 1-2 months. Sundays became special affairs. Sunday was a day to cook out specialities by the woman of the house. The menu for sunday until lunch was pretty much fixed. Idlis with hot sambhar and spicy chutney for breakfast. And my mom's special Pulao and Chana masala for lunch. How we lusted for the lunch. All the while, playing in the street, the mind was still in the kitchen smelling in the aroma of pulao. My mom's simple yet delicious vegetable pulao was always a favourite among friends and relatives. I use the same recipe, the same ingredients, but I can never match up to the pulao of those early sunday afternoons of my life. But each time I make this pulao, the feeling of nostalgia envelopes me.


Vegetable Pulao


Indian rice pilaf made with vegetables and whole spices

Recipe Type:  Main Course
Cuisine:          Indian
Prep Time:     30 minutes
Cook time:     20 minutes
Yield:              2-3 Servings

Ingredients:

1 cup Rice
2 cups Water (Or how much is needed to cook 1 cup of rice in a pressure cooker)
1 cup Assorted vegetables  (Roughly chopped Cauliflower, Potato, French beans. Carrots and Green Peas)
1 Onion
1 Tomato
2-3 Green Chillies
5-6 Black peppercorns
1-2 Cloves
1" stick Cinnamon
1 Bayleaf / Tej patta (dry)
1 cube Maggi magic cube (veg)
2 Tbsp Oil
Salt

Method:
  • Wash the rice and spread on a muslin cloth to dry until ready to use.
  • Heat oil in a pressure cooker
  • Add the finely chopped onions and slit green chillies
  • Add all the whole spices and fry until the onions are light brown
  • Add the tomato and fry for 1 min
  • Add the rice and fry for 30secs - 1 min
  • Add the water. Crush the magic cube and add it to the cooker.
  • Add salt. The magic cube itself has salt, keep that in consideration while adding salt.
  • Pressure cook for 3-4 whistles or until the rice is done.
  • Serve hot with raita or pickle


Read more ...

Kadle Bele Payasa | Chana Dal Payasam


Guysss !!! "100" H-U-N-D-R-E-D... This is my 100th post on OneTeaspoonOfLife...

How to make Kadale Bele Payasa or Chana Dal Payasam at www.oneteaspoonoflife.com

My first milestone in my blogging journey. Ever since I reached the nervous 90's, I started thinking about what my 100th post should be. I asked for suggestions from family, but I was more confused than ever. I wanted it to be something sweet, something influenced by my roots and most of all, something I love.

Kadle Bele Payasa has been a favourite since childhood. And to top it, this was a part of the naivedyam (offering) to Lord Ganesha for Ganesh Chaturthi. I made it long back, but held on, on posting it, so I could make it my 100th. So blessed by Lord Ganesha, comes my 100th recipe on this blog for the simple, delicate and delicious Kadle Bele Payasa or Chana Dal Payasam.

Kadle Bele Payasa is a South Indian Kheer or pudding made using Chana Dal (Split Bengal Gram) and Rice. The dal and rice are cooked in coconut milk along with cardamom and jaggery.

How to make Kadale Bele Payasa or Chana Dal Payasam at www.oneteaspoonoflife.com

The base of this payasa or kheer is the Chana Dal. The dal needs to be soaked for at least 2-3 hours to make cooking it easier. I pressure cooked it, but you can easily cook it in a deep saucepan. Usually, dal is cooked until it disintegrates and is mushy, but not in this case. The dal should be just cooked. It should still retain its shape and should still have a slight bite to it.

The other major ingredient here is the rice. And just like the chana dal, it needs to be just cooked. The rice grains should not be mushy. They should still have a bite to them.

Coconut is the soul of South India and also of this Kadle Bele Payasa. The Kadle Bele Payasa gets its creaminess from coconut. You can add coconut milk or finely ground coconut flesh. I sometimes add coconut milk and sometimes the ground coconut. The difference is not in taste, but in texture. Coconut milk gives it smooth creaminess while the ground coconut gives the payasa a coarse texture.

How to make Kadale Bele Payasa or Chana Dal Payasam at www.oneteaspoonoflife.com

Jaggery is unrefined cane sugar. If you don't have access to jaggery, you can add palm sugar or brown sugar or any unrefined sugar. If you are using jaggery, I suggest using the darkest variety you get. Dark jaggery has the least amount of additives it in and has a richer taste.
No Indian sweet is complete without ground Cardamom. Just the fragrance of cardamom reminds me of dessert.

Dry fruits are totally optional for this Kadle Bele Payasa, but I don't know any dish where the addition of dry fruits has ruined it. Add them just chopped or fry them in ghee like I did. If you are vegan or want to make a vegan dessert, skip the ghee and just lightly toast the dry fruits. I added cashew nuts and raisins, you can add almonds as well.

If you are making this for Naivedyam or as an offering to god, refrain from tasting it. Follow the recipe and you should be good. Hold off on the jaggery if you are concerned it being too sweet while offering it in Naivedyam. You can heat a little water and dissolve jaggery in it and mix it to the payasa while eating.

How to make Kadale Bele Payasa or Chana Dal Payasam at www.oneteaspoonoflife.com

If you liked this, you may also like:
  • Modak - Modaks are traditional steamed Indian dumpling made from rice flour, coconut and jaggery. Served as an offering to Lord Ganesha in West and South India. 
  • Coconut Laddoo - Instant Fudge balls made with coconut and condensed milk.
  • Mavinahannu Seekarne - Maavina Hannu Seekarne or Aamras is a simple traditional dessert made with mango pulp and milk and flavored with cardamom.


Kadle bele payasa | Chana dal payasam
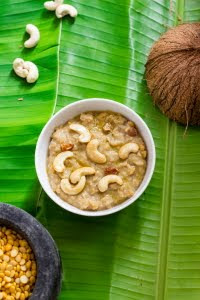
How to make Kadale Bele Payasa or Chana Dal Payasam at www.oneteaspoonoflife.com
Kadle Bele Payasa or Chana Dal Payasam is a South Indian kheer or pudding made with rice, lentils and fresh coconut.

Recipe Type:  Dessert
Cuisine:          South Indian
Prep Time:     2 Hours (Includes lentil soaking time)
Cook time:     60 minutes
Yield:              2-3 Servings

Ingredients:


0.5 cup Kadle bele / Chana dal
2-3 Tbsp Cooked rice
0.5 cup desiccated fresh Coconut or 1 cup Coconut Milk
0.5 cup Jaggery (grated or shaved)
1 tsp or 4 pods of Cardamom
8-10 Cashew nuts(Split) (Optional)
8-10 Kismis / Raisins(Optional)
1 Tbsp Ghee (Optional)
Water as required

Method:


Soak the kadle bele for 2-3 hours.
Pressure cook it with water until done. It should be cooked but not mushy. I cooked it in 2 cups of water for around 10 mins/ 2-3 whistles.
Pour the kadle bele along with 1 cup of the water it was cooked in, into a kadhai. Keep the flame low.
Add the cooked rice to it.
If using coconut milk, just pour it to the kadhai with the kadle bele and rice. If using fresh cococut, grind it with water until it is is fine and then add this to the kadhai.
Add the grated jaggery and cardamom and cook for 5-10 mins until the jaggery melts and mixes evenly. I suggest adding it by the spoonful until the sweetness is right for you. Add water as required. The consistency is usually on the thicker side.
In another small pan, heat the ghee and lightly fry the cashew nuts and raisins until the cashews are light brown and add this to the payasa. If you are vegan, toast the cashews lightly instead of frying in the ghee and add to the payasa.
How to make Kadale Bele Payasa or Chana Dal Payasam at www.oneteaspoonoflife.com


Read more ...

Lemon rice | Chitranna


how to make chitranna, lemon rice recipe at One Teaspoon Of Life


Again, this is a mandate on your banana leaf for festivals and functions. It is served on the bottom left side of your banana leaf or plate right next to the plain rice. If you are eating this for breakfast, you can make many different versions. You can add vegetables like onion, capsicum, carrots, potato or peas. You can add avarekalu or lima beans. You can add raw mango. But again, at the end of the day if this is for festival, the simplest version is served with just peanuts. This is the recipe that follows…

how to make chitranna, lemon rice recipe at One Teaspoon Of Life


Lemon rice | Chitranna

how to make chitranna, lemon rice recipe at One Teaspoon Of Life
Lemon Rice or Chitranna (Kannada) is a South Indian dish in which rice (usually leftover) is flavored with lemon and turmeric. Peanuts can be added for additional texture.

Recipe Type:  Main Course
Cuisine:          South Indian
Prep Time:     10 minutes
Cook time:     15 minutes
Yield:              2 cups

Ingredients:


2 cups Cooked Rice
2-3 Green Chillies
6-8 Curry leaves
2 Tbsp Peanuts
A handful of Coriander leaves (Optional)
1 Tbsp desiccated fresh Coconut(Optional)
1 tsp Mustard seeds
3 tsp Oil
1 tsp Turmeric powder
1 Lemon
Salt

Method:


Heat oil in a kadhai and add the mustard seeds to it
After they splutter, add the peanuts and fry until the peanuts are slightly brown.
Add the slit green chillies and curry leaves.
Add the turmeric powder and lime juice
Add the rice and salt and mix well until the rice is coated with the turmeric powder
Cook for 1-2 mins while stirring
Garnish with desiccated coconut and chopped coriander leaves


Read more ...

Steamed Modaks | Ukadiche Modak | Sihi Kadabu


How to make Ukadiche Modak Recipe at www.oneteaspoonoflife.com

Lord Ganesha's birthday aka Ganesh Chaturthi is celebrated with fervor and grandeur in Goa. People take a nice vacation from their hectic lives and move into their ancestral houses for a week usually. The entire family gets together to welcome Ganesha into their house and hearts. You can see colorful idols of Ganesha everywhere you turn. His throne is decorated with flowers and banana leaf. Everyone is dressed in their festive best.

And when everything is at its best, so is the Food. In India, every festival revolves around Food. Ganesh Chaturthi is no exception. While one may not make as many variety of sweets and snacks as one does for Diwali, there are a few that are made especially for beloved Ganesha only.

How to make Ukadiche Modak Recipe at www.oneteaspoonoflife.com

Modaks are considered to be Lord Ganesha's favorite sweet and a must on Ganesh Chaturthi.
Modaks are made in myriad different ways. Some deep fry it while some steam it. Sometimes the filling is of fresh coconut and jaggery, while sometimes it is dry coconut and sugar. I have also seen a recipe where it is filled with chocolate. Sometimes all this is skipped and modaks are just modak shaped pedas.

In our culture, we do not deep fry modaks. My grand mother was totally against deep frying anything on Ganesh chaturthi so we always made the steamed version stuffed with fresh coconut and jaggery. And this is the version I absolutely LOVE.
Steamed Modaks or Ukadiche Modak or Sihi Kadabu have the outer layer made of a rice flour dough and a stuffing of fresh coconut, jaggery (unrefined sugar) and cardamom powder.

To make the outer layer of rice flour, the rice flour is added to boiling water and mixed until it forms a stiff dough. Getting the consistency of the dough right is probably the toughest part of making the Modak. If the dough isn't made properly, there are chances that the modaks will split while steaming, which, believe me isn't really as disastrous as it sounds. They still taste great and means just some more modaks for the Cook. Hurray!!

How to make Ukadiche Modak Recipe at www.oneteaspoonoflife.com

The filling is made by cooking together grated fresh coconut and jaggery. In this recipe, the jaggery cannot be replaced with refined sugar, as it just will not live up to the taste and texture of the modak. The mixture is cooked until it the water almost evaporates. Cooking it beyond that will cause the jaggery to crystallize and the filling will become one big hard lump.

These days there are moulds available to shape the modaks after filling them. Unfortunately, as you can see in the pictures, I wasn't aware of it until I'd finished making them, hence very amateurish looking modaks in my house this year. But who is worried about the looks when they tasted SO delicious.

If you are making this for Naivedyam for Lord Ganesha, please do not taste anything and follow the recipe and your instincts and it will turn out great.

How to make Ukadiche Modak Recipe at www.oneteaspoonoflife.com

If you liked this, you may also like:
  • Khova Peda - Simple peda made from milk solids and sugar.
  • Kaju Katli - Fudge or Barfi made from cashewnuts and sugar. A favorite in every household.
  • Coconut Laddoo - A simple laddoo made from coconut powder and condensed milk in under 1 hour.
  • Kadle Bele Payasa - Kheer made with rice, chana dal and coconut
How to make Ukadiche Modak Recipe at www.oneteaspoonoflife.com


Steamed Modaks | Kadabu | Sweet Dumplings


How to make Ukadiche Modak Recipe at www.oneteaspoonoflife.comModaks are traditional steamed Indian dumpling made from rice flour, coconut and jaggery. Served as an offering to Lord Ganesha in West and South India. 

Recipe Type:  Dessert
Cuisine:          Indian
Prep Time:     30 minutes
Cook time:     60 minutes
Yield:              9

Ingredients:


0.75 cup Coconut
0.5 cup Jaggery
1 tsp Cardamom
0.75 cup Rice flour
1.5 cups Water
1 tsp Ghee or Oil
0.25 tsp Salt

Method:


In a kadhai, mix the coconut and jaggery and cook on low flame. Keep stirring the mixture to avoid burning. Cook until the mixture is almost dry. Do not overcook as then the jaggery will harden. Add the cardamom powder and keep aside to cool.
In another pan, bring 1 cup of water to a  rolling boil. Add the salt and the ghee and remove it from the heat.
Add rice flour by the spoonful and keep stirring to avoid forming lumps.
Add more water if needed. The dough should be slightly stiff yet malleable.
Keep the pan back on the stove and keep the flame low.
Keep stirring until the whole dough becomes one mass. It will start sticking to the spoon/ spatula. It took me around 5 mins. Take a small marble sized piece of dough and press it using  your thumb and index finger, it should not break into pieces. Nor should it stick to your hand. If the consistency or the texture is not correct, the modaks may split while cooking. If it is your first time, do not fret over a few split ones.
Allow this to cool for some time.
While it is still warm, take a small ball of flour and flatten it. Place a small ball of the filling inside it and use your hands and stretch the flour to cover the filling.
Shape the modaks accordingly.
Steam the modaks in a steamer for around 8-10 mins. I used an idli steamer, you can use a cooker without the whistle.
Read more ...

Masala Rice with Capsicum and Carrots

It was a Friday night and all my fridge had was one tiny carrot and one capsicum... bored to venture out in the rain to buy more veggies, I decided to make do with what I had.... This was the first time I made masala rice and all I can say is it will soon become a regular item on my menu... so easy to make and yet so tasty and filling. You can use any vegetable you have left over, or if you have no veggies around, just make it plain, it tastes just as good....


Masala Rice with Capsicum and Carrots


Rice cooked with vegetables and a coconut-spice based masala.

Recipe Type:  Main Course
Cuisine:          Indian
Prep Time:     30 minutes
Cook time:     30 minutes
Yield:              2-3 Servings

Ingredients:

1 Capsicum / Green bell pepper
1 Carrot
1 small Tomato
6-8 Curry leaves
1 cup uncooked Rice
1 tsp Cumin seeds
2 tbsp Urad dal / Split black gram
1 tbsp Chana dal / Split Bengal gram
1 small stick Cinnamon
2 tbsp Peanuts
2-4 dry Red Chillies
2 tbsp Coriander seeds
1/2 tsp Amchur
1 tsp Turmeric powder / haldi
2 tbsp grated fresh coconut(Optional)
1 tsp Mustard seeds
2 tbsp Ghee / Clarified butter / Oil
Salt

Method:

  • Cook rice as per instructions or as you regularly do. I pressure cook it with twice the quantity of water.
  • Heat 0.5 tbsp. of ghee in a pan and add the cumin seeds, urad dal, chana dal, coriander seeds, peanuts and red chillies. Fry until the chillies crisp up and the urad dal turns light brown.
  • Allow this masala to cool and then grind it to a coarse paste along with coconut.
  • Julienne the capsicum and carrots or slice them finely. Chop the tomato finely.
  • Heat the remaining ghee in a pan and add the mustard seeds
  • Once they splutter, add the curry leaves and the vegetables
  • Fry until the vegetables are done and then add the ground masala and cook for 1 min
  • Add the haldi and amchur and mix well
  • Add the rice and mix well with the masala
  • Add salt and cook for another 2 mins
  • Enjoy it while it is hot


Read more ...

Rice tikkis

This was a busy week and an even busier weekend, so nothing much was cooked. Lunches and dinners were eaten out, cornflakes made it to the breakfast table. That left me with a little leftover rice from friday. So I decided to make rice tikkis as saturday evening snacks. These were relished by hubby dearest and one could not tell these were made from leftovers.


Ingredients:

Rice - 1.5 cups (cooked)
Sweet potato / Potato - 3/4th cup (peeled and grated)
Coriander leaves - 1/4 cup (Chopped)
Curry leaves - 5-6
Chilli sauce - 2 tbsp
Red chilli powder - 1/2 tsp
Garam masala - 1/2 tsp
Salt
Oil for frying

Method:

Pulse the rice in the mixer for around 2-5 seconds until it is slightly mashed.
Mix the rice with the grated potato/ sweet potato
Add the coriander leaves, curry leaves, chilli sauce, red chilli powder, garam masala, salt and around 3 tsp of oil
Knead for a few minutes to ensure everything is well mixed
Make small balls from the dough and flatten them
Heat a tava and grease it. You can also deep fry these. Deep fried ones taste better (as usual :))
Place the tikkis on the tava and spoon oil over them. I used at least 1 tsp oil per tikki.
Fry until brown on both sides.
Enjoy with ketchup.
Read more ...

Akki rotti / Rice flour flatbread with cucumber (sautekai)

Hot hot akki rottis with fresh homemade butter… yummmmm…. What in it is not to like? Akki means rice and rotti means roti/bread. It is a flatbread or roti made of rice flour. Akki rottis can be enjoyed as breakfast, lunch or dinner. So many different things can be added or the ingredients varied a little to get various types of akki rottis, each to suit a different palate. Akki rottis are probably unique to Karnataka, and are very easily available in any darshini and sagars across Bangalore. Very easy and quick to make. Below is a recipe with cucumber or sautekai in it. Let’s go ahead and add a teaspoon of life into akki rottis… 

Akki rotti

Make balls from dough

Flatten the dough on a butter paper

Roll out the rotti using hand

Rotti after rolling

Place the rotti on the tava

Flip the rotti after one side browns

Cook on both sides


Enjoy rotti with homemade butter or chutney


Ingredients:
Akki hittu/ Rice flour – 1.5 cups
Cucumber – 1
Green chillies -1-2
Coriander leaves – a handful
Jeera/ Cumin seeds – 1 tsp
Oil – 2-3 tbsp
Salt
Warm water
Method:
Peel and grate the cucumber
Chop green chillies finely. You can slit them and remove the seeds and then chop if you find them very spicy.
Chop the coriander leaves finely.
Add the chillies and the coriander to the cucumber.
Add the rice flour and cumin seeds also to the cucumber.
Use warm water to knead it into a smooth dough.
Divide into balls.
Grease a paper or a plastic sheet. An A4 size or quarter of a single newspaper sheet should do. I avoid using newspaper as sometimes the print makes an impression on the rotti. Using a good quality butter paper is suggested.
Place the ball of dough on it and flatten it out as thinly as you can using your hands.
You can use a greased rolling pin if you find it difficult to flatten using your hands.
Heat a tava/griddle. Grease the tava.
Once the tava is hot, gently remove the rotti from the paper and place it on the tava. I gently overturn the paper in one hand and peel off the paper using the other hand.
Spoon oil onto the tava and cook until brown spots appear on both sides.
Enjoy when hot along with chutney, chutney pudi, pickle or butter.

Read more ...

Neer dose ( a thin rice pancake)

This is literally translated from kannada into english by many restaurants these days giving us a hilarious translation of "Water dose". Although "Neer" does mean water in kannada, it actually is a dosa made with a very watery batter. As a kid, neer dose was a breakfast I simply hated. I used to wonder how people enjoy eating it. My perspective totally changed when I had this with the local Mangalorean midigai pickle (it is small raw mangoes pickled whole) at a distant relatives place once. I don't even remember the relative, but I do remember how it felt to eat the neer dose with that pickle. I still think that is probably the most wonderful combination. I knew only one type of neer dose my mom used to make before I came to Bangalore. Bangalore serves this simple dish in various styles. Some add coconut to it, while some cook it differently, some serve it with freshly grated coconut and jaggery, some with regular chutney. Although, each of these does taste nice, I think what we eat as kids is always considered the best by us. So here goes the recipe for the simplest neer dose...


Ingredients:

Rice - 1 cup
Water - 5 cups
Salt
Oil for frying

Method:

Wash and soak the rice in 2-3 cups water overnight.
In the morning, drain out the water and grind the rice finely with very little water in a mixer/grinder.
Add salt and 1.5 cups of water to the rice batter.
The consistency of the batter should be around that of buttermilk.
Add more water if needed.
Heat a dosa tava/griddle. Grease the tava.
Once tha tava is hot, pour a spoonful of the batter on the tava.
Cover and cook until done. It should be done in 1-2 mins.
Generally, neer dose is cooked only on one side and isn't flipped on the tava.
If you feel it isn't cooking all the way through to the top, you may flip it and cook it.
Serve hot with coconut chutney or pickle
Read more ...

Palak Rice / Spinach Rice


My friend recommended me to try the unique fare a restaurant in Bangalore has to offer. This restaurant has added a certain twist to the dishes we know to make them different. It was at this place I ordered a Spanish fried rice. Although the name is exotic, and the taste was also good, I doubt it has anything Spanish about it. But this rice got me craving for it. Generally, when I crave something, I try to recreate it at home, instead of going out again to eat it. So it was decided that Spain would enter my kitchen with this Spanish aka Spinach rice... I was not disappointed, my experiment tasted very much like the original and had my friends digging into my lunch box more than usual.


Ingredients:

Palak/ Spinach - 2 bunches
Rice - 1 cup (raw)
Onion - 1 small
Tomato - 1 small
Potato - 1 medium
Peas - 1/2 cup
Carrot - 1
Baby Corn - 5-6 (Optional)
Broccoli - 1/2 cup split into florets (Optional)
Green chilies - 2-3
Ginger - 1" piece
Garlic - 2-3 cloves
Biryani masala/ Garam masala - 1 tsp
Maggi veg cubes - 1
Salt
Water
Oil - 1 tbsp

Method:

Cook the rice with the water until done.
Boil water in a pan and add the spinach to it. Once you add the spinach, make sure you don't cover the pan. Let the spinach blanch for around 5 minutes.
Immediately move the spinach to ice cold water.
Once cooled, grind the spinach with the green chillis. Use more green chillis if the ones you are using are not spicy.
Make a coarse paste of the ginger and garlic.
Boil the potato and green peas.
Blanche/ boil the broccoli until done.
Heat oil in a pan, add the onions and fry them until they are translucent. Add the ginger garlic paste,tomatoes, boiled peas, baby corn, broccoli and cut boiled potato and fry for 1-2 minutes.
Add the palak paste and cook for 1 minute.
Add the salt, maggi cubes, biriyani masala and chilli powder (if needed).
Cook for another 2-3 minutes.
Add the rice and mix well.
Serve hot with raita.
Read more ...

Paddu | Appe | Gundpangla

It's been super hot today. I wish the someone could just turn down the Sun a bit. I feeling all icky and sweaty. Definitely not in a mood to slog in the kitchen. All I want to do is slump on my bean bag and sit under the fan and not move a muscle. I would love to have some Cold Coffee or Lassi to complete my mid summer's day dream.


No matter what I eat for dinner or what time I go to sleep, I have this quirk that at around 7 ish in the morning I get very hungry, even in my sleep. And while I can have a liquid diet, an absolute essential in this heat, for all other meals of the day, I need carbs for breakfast. 

These Paddu or Appe or Gundpangla as they are called in many languages are perfect for days like today, when I want something filling but not something that leaves me feeling full and bogged down the whole morning. Paddu is light yet it fills you up. It gives you energy to power through the morning.

Paddu is a South Indian dumpling made from leftover Dosa Batter. You can either buy Dosa batter from the supermarket or make your own. 

How to make paddu appe gundpangla gundapangala recipe at www.oneteaspoonoflife.com

Making your own Dosa Batter:

To make your own dosa batter, you need planning. It takes at least 24 hours before dosa batter is ready from start to finish. A lot of it is just resting time, but it needs that time for the flavor to develop. 
  • Dosa batter measurements vary from state to state in South India, I use the 3:1 ratio i.e. 3 cups of rice for every 1 cup of urad dal. 
  • Wash the rice and urad dal and soak them along with 1/2 tsp of methi or fenugreek seeds for at least 8 hours. 
  • Then drain out the water and grind into a smooth batter using very little water.
  • Cover and let it ferment overnight or for 10-12 hours. 
  • The batter is ready when it rises and taste sour. 
  • Add salt and water as required and you can now use this batter to make fluffy dosas or to make Paddu. 
  • If you are only planning to make paddu, I suggest halving the above recipe for dosa batter. 
  • The batter stays well in the fridge for almost a week if you don't add salt to it. So my tip is to remove how much batter you need into a different vessel and adding salt only to that. 

To make Paddu, you need a special Tava - Paddu Tava. A paddu tava has little depressions where you pour in the batter. You get them easily in any steel shop. There are nonstick ones as well as the old fashioned cast iron ones. 

You can make plain paddus that have nothing added to them or you can make them like I do with finely chopped onions, green chillis, coriander and curry leaves. Paddu tastes best with spicy coconut chutney.


If you liked this, you may also like:

  • Idli - Another popular South Indian breakfast of steamed rice and lentil cakes.
  • Mysore Masala Dosa - Rice and lentil pancake smeared with spicy red chutney and stuffed with potato sabzi
  • Battalu Kadabu - Steamed bowls made using rice semolina or rava.
  • Rava Idli - Steamed cake made with an instant batter of semoline or rava and yogurt. No fermenting required.


Paddu - Dumpling made with fermented rice and urad dal

Paddu | Appe | Gundpangla


Paddu / Appe / Gundpangla is a dumpling made from fermented rice and urad dal batter or leftover dosa batter. Popular South Indian breakfast or snacks

Recipe Type:  Breakfast
Cuisine:            South Indian
Prep Time:     10 minutes
Cook time:     20 minutes
Yield:                15-18


Ingredients:


2 cups Dosa Batter (See recipe for dosa batter above)
1 Onion, finely chopped (optional)
1 Green Chilli, finely chopped (optional)
1 Tbsp Coriander Leaves, finely chopped (optional)
1 sprig Curry Leaves
Salt to taste
Oil

Method:


Add the onion, chilli, coriander and curry leaves to the dosa batter. Make sure the dosa batter is salted, else add salt as per taste. Remember the chutney will have salt, so do not add too much salt the batter.
In case you wish to have it plain, do not add anything to the dosa batter except salt.
Grease the paddu tava the first time. After that you can spoon in about 1/4-1/2 tsp oil before pouring in the paddu batter.
Spoon in the batter in all the cups.
Cover with a domed lid so that the lid does not touch the paddus.
Once the paddus are cooked on the bottom, flip them using a small spoon or a fork.
Poke a knife or a fork through them, if it comes out clean then it is cooked.
Remove from tava and serve hot with chutney.

Read more ...

Idli

Sunday morning always made me happy as a kid... My mom would cook some of the yummiest things on sundays... Breakfast would generally be idli or dosa. Personally I have always liked idlis more. Though idlis and dosas are so commonly available in south India, it wasn't the case where I grew up. So sundays were a treat. Below is the traditional way of making idlis..


How to make idli with idli rava rice rava recipe at www.oneteaspoonoflife.com

How to make idli with idli rava rice rava recipe at www.oneteaspoonoflife.com

How to make idli with idli rava rice rava recipe at www.oneteaspoonoflife.com

How to make idli with idli rava rice rava recipe at www.oneteaspoonoflife.com

Ingredients:


2 cups Idli Rava or Rice Rava
1 cup Urad Dal
Salt to taste
Oil to grease
Water as required

Method:


Soak the urad dal for 3-4 hours. If it is a cold day, then soak in lukewarm water.
Just before you start grinding the urad dal, soak the idli rava in warm water. Make sure the water is not very hot, else, you will end up cooking the idli rava. 
Grind urad dal with water till smooth. 
Drain out the idli rava and mix with the urad dal.
Cover it and allow to ferment overnight or for 8-10 hours in a warm place. If it is a cold day, you may need to let it rest for longer. You can also keep it an oven that is at no greater than 40 degree celsius.
Add salt in the morning. Adding salt at night may prevent the batter from fermenting.
Add a little water to achieve a pouring consistency. Batter must be thicker than what is used for dosa.
Grease the idli plates/bowls with oil and spoon in the batter.
Steam in an idli cooker for around 10-15 mins.
When you put a knife through the idli, it should come out clean.
Serve with chutney or sambhar.
Read more ...