Showing posts with label gluten free. Show all posts

Grilled Eggplant and Coriander Hummus Rolls


My latest addition to Finger Food that is finger licking good - Grilled Eggplant and Coriander Hummus Rolls. Silky smooth garlicky coriander hummus rolled in thinly sliced grilled eggplant. This recipe is super quick to make and has all makings of a healthy snack.

How to make grilled aubergine or brinjal hummus rolls at www.oneteaspoonoflife.com

Who is a Hummus fan?? Obviously, Me, well so is Raj, there's Gee too... Well, the whole family is nuts about Hummus. The usual combination for hummus is Pita, but when you are bored to knead dough and roll out those light little pockets of Pita, I recommend trying this simple gluten free option to enjoy that amazing hummus.

As much as I like Hummus, I love Coriander or Cilantro just as much, or may be a little more. A sprinkle of coriander here, a tablespoon of coriander there. I literally, use it in everything I make. That vibrant fresh sprinkling of green, just brightens up any curry. It does the same to this Hummus. This Coriander Hummus is just one level above the regular Hummus in terms of flavor and color. I mean who does not find this lovely green appealing?

How to make Cilantro Hummus Recipe at www.oneteaspoonoflife.com

I can eat this Coriander Hummus with anything - crackers, chips, regular bread, chapati, roti, naan. I think I'm only yet to try it with rice. But on days that you are too bored to knead the dough and make your own light Pita pockets or you just fancy going gluten free, try this awesome combination of eggplant and hummus and tell me if you hear complains.

How to make grilled aubergine or brinjal hummus rolls at www.oneteaspoonoflife.com

Ever since I bought my AWESOME new grill pan, I've been grilling EVERYTHING. Paneer, Eggplant, Peppers... this is just a small list. Grilling is so much fun, I love that nice char marks that I get from my new pan. Check out this super delicious Grilled Paneer Sandwich I made using the same pan.

However, I think I should warn you, these rolls are addictive and may never be enough for your family. They are also quite filling.

If you don't want to make your own hummus, you can just use your favorite store bought hummus. Roasted Pepper Hummus will also go great with the Eggplant.

coriander cilantro chickpeas kothmir chutney dip kabuli chana Mediterranean

If you like this, you may also like:
How to make grilled aubergine or brinjal hummus rolls at www.oneteaspoonoflife.com


Grilled Eggplant and Coriander Hummus Rolls


How to make grilled aubergine or brinjal hummus rolls at www.oneteaspoonoflife.comThese Eggplant Rolls are made by grilling finely sliced eggplant and spreading coriander hummus on them before rolling them into bite sized rolls.

Recipe Type:  Appetizer
Cuisine:            Middle Eastern
Prep Time:     15 minutes
Cook time:     30 minutes
Yield:                Makes 13-15

Ingredients:


For Coriander Hummus:


1 cup cooked Chickpeas
1/2 cup Coriander leaves
2-3 Garlic cloves
2 Tbsp Water
3 Tbsp Olive Oil
Salt to taste

For Grilled Eggplant:


1 large Eggplant or Bharta Baingan
Water
Salt to taste
Pepper to taste
3-4 tsp of Oil

Method:


To make Coriander Hummus:


Chop the coriander leaves and garlic.
Blend together the chickpeas, coriander leaves, garlic and salt with water and Olive oil until it is a smooth creamy paste.
Add more Olive oil if required.

To make Grilled Eggplant:


Take a large bowl of water and add 1/2 tsp of salt to
Slice the eggplant into fine slices lengthwise and put them in the salted water. Leave them soaked for 10-15 minutes.
Pat the eggplant fry using a tea towel or kitchen napkins and rub them with oil, salt and pepper.
Heat a grill pan or a griddle. Once it is hot place the eggplant slices on it in a single layer without overlapping them.
Spoon oil on the eggplant if required. Grill for 2-3 minutes on each side until the eggplant is cooked.

To make the Rolls:


Spread the coriander hummus on the grilled eggplant slices and roll them to make Grilled Eggplant and Coriander Hummus rolls.


Read more ...

Healthy Millet Salad

This Healthy Millet Salad is made from Foxtail Millet, kidney beans, sprouts and mix vegetables. It is very healthy, very tasty and very filling. 

foxtail millet navane sprouts carrot capsicum cucumber beans healthy proteins thinai tabouleh

You go to the supermarket and are immediately drawn to the shelf that holds these exotic ingredients that you've only heard of but never eaten. It looks nice in it's classy looking packaging. You start remembering that recipe you saw on TV or that food photo that featured in the Magazine, wondering which of them should you cook. You glance at the price, and that wonderful dream of cooking with something exotic just evaporates. Smile replaced by shock. Deja vu, anyone?

foxtail millet navane sprouts carrot capsicum cucumber beans healthy proteins thinai tabouleh


I replay this scene everytime I go to stores like FoodHall or Godrej Nature's Basket. And sometimes I do it knowing that it will be an anti-climax. By now I know I will never buy Quinoa because of it's insane cost. Quinoa is being touted as THE superfood. High in protein, not high in calories, it's kind of  a win-win for those who can access it easily.

Quinoa is not Indian. Although, recently, some farmers are toying with the idea of growing Quinoa, it is still not popular enough to replace any of our ancient grains and seeds.

foxtail millet navane sprouts carrot capsicum cucumber beans healthy proteins thinai tabouleh


I use Millet instead. India has been the home of millet for centuries. Millets are just as rich as Quinoa. It is rich in fibre and magnesium. It has a low glycemic index and is a rich source of protein. And it is very light on your pocket. In short, millet is affordable super food that are easily available anywhere.

There are various types of Millet:

  • Pearl Millet or Bajra
  • Foxtail Millet or Navane
  • Finger Millet or Ragi
  • Sorghum Millet or Jowar
There are so many more, but these are the famous ones.

navane millet thinai foxtail sama rice

Let's  get back to this super tasty and healthy Foxtail Millet Salad. I've had it two days in a row and I just cannot have enough of it !!! 

This is a super simple salad. The dressing is made with just Olive oil, lime juice, honey, salt and pepper. Everything you already have at home, so there is no excuse to skip making it. Use any oil you like if you have run out of Olive Oil.

Now, usually, I say that there are things that are optional in a recipe. But in this one, the beans are definitely not optional. They are one the major building blocks of this salad. I really don't believe this salad will taste as good if you skip them. Also really needed are the fresh ingredients - tomatoes, cucumbers and mint. Everything else in the salad can either be skipped or replaced. You can substitute the coriander with parsley. Skip the sprouts if you don't have any. I personally like the light sweetness of the carrots in the salad and would recommend keeping it in there.

foxtail millet navane sprouts carrot capsicum cucumber beans healthy proteins thinai tabouleh


This salad was pretty filling due to all the protein in it and the slowly digesting millet. Hope you enjoy it as much as I did. 

If you liked this, you may also like:

  • Kabuli Chana Chaat or Chickpea Salad - Street side style salad made with chickpeas, tomatoes, onions and spices. Hot and Tangy - explosive on your taste buds.
  • Radish Salad - Fresh salad made from finely chopped radish or daikon (mooli) and it's leaves.


foxtail millet navane sprouts carrot capsicum cucumber beans healthy proteins thinai taboulehHealthy Millet Salad


Healthy salad made with mixed vegetables, beans, sprouts and Foxtail Millet. 

Recipe Type:  Salad
Cuisine:            Indian
Prep Time:     30 minutes
Cook time:     30 minutes
Yield:                Serves 2

Ingredients:


1/4 cup Foxtail Millet or  Navane
1 cup cooked Red Kidney Beans or Rajma
1/4 cup Sprouts
2 ripe Tomatoes
1 small Cucumber
1/2 Carrot
1/2 Capsicum
Handful Coriander leaves
Handful Mint leaves
2 Tbsp Olive Oil
1 tsp Honey
2-3 tsp Lime Juice
Salt to taste
Pepper to taste
1/2 cup Water

Method:


Wash and soak the millet for 30 minutes.
Drain the millet and pressure cook it with 1/2 cup water until done. In a pressure cooker it takes around 1 whistle or 4-5 minutes after the pressure builds up.
If not using a pressure cooker, cook it the same way you would cook rice.
Allow the millet to cool to room temperature.
Finely chop the tomatoes, cucumber, carrot and capsicum and add to the millet.
Add the red kidney beans and the sprouts to the millet.
Roughly chop the coriander and mint leaves and add to the millet.
In a small bowl, mix olive oil, honey, lime juice, salt and pepper until completely blended.
Pour the dressing over the millet and vegetable mixture and mix well.
Serve at room temperature or chilled.


foxtail millet navane sprouts carrot capsicum cucumber beans healthy proteins thinai tabouleh


Read more ...

Baby Corn Masala (Vegan)

Baby Corn Masala is a semi dry curry made by tossing stir fried Baby Corn in a North Indian style tomato masala gravy.

baby corn masala tomato gravy north indian curry

I’m all into Baby Vegetables this week. First came the baby potatoes simmers in a delicate creamy gravy a.k.a Punjabi Dum Aloo. In case you missed it, check it out here.

Now it is the time for Baby Corn to shine in this super simple Vegan Baby Corn Masala.

I go through phases in my cooking. One week it is the all down to earth pure South Indian meals with simple vegetables cooked in their own juices with just a simple tempering of mustard, green chilli and curry leaves and finished off with a generous helping of grated coconut. Ah! I just LOVE love love fresh Coconut. I even made Raj get me some fresh Coconut oil from Karkala and it tastes amazing.

baby corn masala tomato gravy north indian curry

Anyway, my next week is all full blown Masala curries or other cuisines I love – Italian, Chinese or Thai. This last week was full on North Indian week. I’ve been busy making grilled Paneer, Punjabi Dum Aloo and now Baby Corn Masala.

Now this recipe is very similar to most North Indian curries you have made and very similar to the Vegatable Jalfrezi that I made earlier (which was super AWESOME, btw). 

It is made by sautéing onions, ginger-garlic paste and tomato puree until the oil separates. But don’t be upset if this never happens for you. It rarely happens when I cook too. For oil to separate, there needs to be sufficient quantity of oil in the pan before you add the ingredients, and I usually skimp on the oil. As far as you fry it sufficient enough, the oil-no oil should not be any problem. 

Then add the tomatoes and cook them until oil “separates”, but seriously, don’t worry about it separating, just as long as the tomatoes are cooked and the flavor has intensified, you should be good to go.

baby corn masala tomato gravy north indian curry

I stir fried the baby corn separately and added it. I’ve found that baby corn never softens, no matter how much I cook it. I like that in a way, since I don’t need to worry about over cooking it, but sometimes I wonder if I’m doing it wrong. But I’m still okay with it since it tastes great with that crunch.

This Baby Corn Masala tastes really good with Naan bread or Roti. 

baby corn masala tomato gravy north indian curry


If you liked this, you may also like:


Baby Corn Masala


baby corn masala tomato gravy north indian currySemi-dry North Indian style curry made with Baby Corn tossed in a tomato based masala gravy.

Recipe Type:  Main
Cuisine:            North Indian
Prep Time:     15 minutes
Cook time:     45 minutes
Yield:                Serves 2

Ingredients:


18-20 Baby corn cobs
1 large Onion
1 large Tomato
1 tsp Ginger Paste
1 tsp Garlic Paste
1/2 tsp Turmeric Powder
1 tsp Red Chilli Powder
1/2 tsp Coriander Powder
1/2 tsp Kitchen King Masala or Garam Masala
1/2 tsp Cumin Seeds or Jeera
4-5 tsp Oil
1/4 cup Water
Coriander leaves for garnish

Method:


Cut the baby corn cobs into chunks.
Heat 1-2 tsp of oil in a pan. Once it is hot, add the baby corn and stir fry for 3-4 minutes.
Remove from heat and keep aside.
Chop the onion finely and puree the tomato.
Heat the remaining oil and add the cumin seeds.
Once the cumin seeds brown slightly, add the onions and fry until translucent.
Add the ginger and garlic paste and fry for 1-2 minutes until fragrant.
Add the tomato puree and cook on low heat for 5-6 minutes. Stir occasionally.
Add all the spices and salt. Mix well. Cook on low heat for another 3-4 minutes. Stir occasionally.
Add the fried baby corn and the water. Cook on medium heat for 4-5 minutes.
Garnish with chopped coriander leaves and serve hot with Rotis.


Read more ...

Kashmiri Green Apple and Brinjal Curry | Bom Chount Wangan


This Green Apple and Brinjal Curry also called Bom Chount Wangan is a specialty of the Himalayan state of Kashmir.

Kashmiri Apple Granny Smith Brinjal Eggplant aubergine curry bom chount wangan

If you’d told me last month that I would be cooking a Green Apple and Brinjal Curry, I would have laughed it off. “NEVER!!!” would have been my reaction. Apples? In a savory curry? No way, right? I had the same thought process, until NOW.

Over a cup of tea when we were discussing recipes and blogs (this is the direction most of my conversations take, not surprisingly!), my cousin mentioned her Kashmiri friend makes this awesome Green Apple and Brinjal Curry. I was intrigued. I would have never tried it out had I just found this recipe somewhere, but when someone you know recommends something, you feel like at least giving it a try.

Kashmiri Apple Granny Smith Brinjal Eggplant aubergine curry bom chount wangan

Since I did not have the recipe, just the idea of the dish, I did what I do like a 100 times a day – I googled for it. I found this great site for Kashmiri Food by Anjali Pandita. I followed her recipe for the Green Apple and Brinjal Curry, all I did was alter the quantities as I was making a much smaller quantity. You can find her recipe here.

This recipe is interesting. Interesting because I never imagined it would taste the way it did. Spicy and Tangy with a lot of different textures.

Kashmiri Apple Granny Smith Brinjal Eggplant aubergine curry bom chount wangan

Granny Smith or Green Apples are used in this curry. When I tasted them before cooking, they seemed sweet yet slightly tart. But after cooking, they began tasting like raw mango. Most of the apple’s sweetness seeped into the slight gravy it has while the apple pieces retained their tartness.

The recipe originally only calls for Amchur or dried Mango powder to enhance the tartness of the dish if the apples are too sweet. However, due to the transformation of the apples, I added in Jaggery to add sweetness. I've made it an semi-dry curry, that goes well with Roti or Naan. Adjust the consistency if you plan on having it with rice.

Kashmiri Apple Granny Smith Brinjal Eggplant aubergine curry bom chount wangan


Kashmiri Green Apple and Brinjal Curry | Bom Chount Wangan


Kashmiri Apple Granny Smith Brinjal Eggplant aubergine curry bom chount wanganA spicy semi-dry curry made from Green Apples and Brinjals in Kashmiri style. 

Recipe Type:  Main
Cuisine:            Kashmiri
Prep Time:     15 mins
Cook time:     40 minutes
Yield:                Serves 2-3

Ingredients:


1 Green Apple
4-5 small Brinjals
4-5 Tbsp Oil
1 tsp Fennel seeds
1 tsp Cumin seeds
1/2 tsp of Ginger paste
2-3 tsp Red Chilli Powder
1/2-1 tsp Garam Masala
1/2 tsp Jaggery or Sugar (Optional)
1/2 tsp Amchur or dried Mango powder (Optional)
3/4 cup Water
Salt to taste
Coriander leaves for Garnish

Method:


Dice the apple and the brinjals into equal sized pieces.
Heat oil in a deep pan and fry the brinjals and apple until they are cooked and keep aside. Insert a knife to check if they are done. If it slides smoothly, they are. I did not cook the apple for long as I like the crunch of the apples. I fried them in batches. If you plan to fry all together, you may need more oil.
Remove the excess oil, leaving only about 1-2 tsp in there.
Add the cumin seeds and crushed fennel seeds.
Once they brown slightly, add the chilli powder and 1/4 cup of water and cook until the water evaporates and the oil separates.
Now add the fried apple and brinjal.
Add the remaining water, garam masala, ginger paste, and salt and simmer on low heat for 5-8 minutes.
Add amchur if the apple is too sweet and the jaggery if the apple is too sour.
Garnish with chopped coriander leaves and serve hot with rice or roti.


Read more ...

Stuffed Potato Skins

Crispy potato, crunchy green Capsicum, punchy tomato sauce and oozy mozzarella cheese. That’s what this whole blog post it about.

 Baked Stuffed Potato Skins Capsicum Tomato Mozzarella Cheese Olive oil gluten free


I’ve never baked a potato. Or rather, until last week, I had never baked a potato. And now that I have, I feel I’ve opened a door with many many possibilities.

This recipe is a result of entering a competition that asked contestants to cook with 5 ingredients – Potato, Tomato, Capsicum, Cheese and Olive Oil. You couldn’t leave out an ingredient.
I thought of a few options but decided I really wanted to stuff something. Stuffed capsicum or stuffed tomato may be? But when I mentioned stuffed potato skins, I saw Raj’s eye light up. It’s no secret he loves Potato. That was it then – Baked Potato Skins.

 Baked Stuffed Potato Skins Capsicum Tomato Mozzarella Cheese Olive oil gluten free


Now there is a lot you can do with these Potato Skins, I myself had a dozen ideas, but then I was restricted by the competition rules. Not that I regret that, they were AWESOME just like that.

These little boats to taste-bud-heaven have some lightly stir fried capsicum and an easy-to-make awesome INSTANT super punchy tomato sauce. Apart from the 5 ingredients mentioned above, all you need is oregano or any pizza seasoning, garlic, salt and loads of pepper. This sauce goes amazingly well with pasta and pizza. So increase the quantity and freeze it for rainy days if you wish.

Baked Stuffed Potato Skins Capsicum Tomato Mozzarella Cheese Olive oil gluten free

Step one: Crisping up the potato skins. You want them crisppyyyy:
Wash and scrub those potatoes clean. This is how you build muscles working at home. Exercise for today – DONE. Dry them and rub olive oil all over them. Watch out for those slippery ones that go bouncing all over your counter. Use a fork and prick them all over.
Bake them for 1 hour at 200 C of 400 F. In the meanwhile, move on to steps 2 & 3 and come back to one later.

Step two: Making the AWESOME Tomato sauce.
Chop those tomatoes roughly and fry along with some garlic in a pan with some olive oil. Once the tomatoes are soft, add in the oregano, salt and pepper. If you are like me, pepper == lots and lots of pepper.
Blend it into a coarse sauce. This is a thick sauce. If you plan on using it for pasta, you may want to thin it a little.

Step three: Crunchy crunchy Capsicum.
Chop the capsicum into small pieces. Stir fry in some olive oil until it is slightly cooked. Don’t let it mush up. Sprinkle some salt and keep aside.

Baked Stuffed Potato Skins Capsicum Tomato Mozzarella Cheese Olive oil gluten free

Step one again: Crispy skin dreams come true here.
Once the potatoes have cooled enough to handle, slice them lengthwise into  half. Using a sharp edged spoon, scoop out the potato gently. Leave around ¼ inch or 0.5 cm of potato still in the skin so it holds it’s shape. Brush generously with olive oil on the inside and outside. Rub some salt.
Now bake it skin side down for 5 mins @ 220 degree C and then flip them over and bake again for 5 mins until the skins are crispy.

Step four: Let’s get the cheese BUBBLING
Assembly is all that it left before oozy cheese. Spoon in the capsicum and the sauce. Then grate over some mozzarella or any stringy melty cheese. This is what my food dreams are made of! Back into the oven for 4-5 mins until the cheese melts and it all bubbly.

Step five: Finish them off immediately!!!

Let’s face it, step five isn’t really a cooking step, but it is the most important step in the process.

 Baked Stuffed Potato Skins Capsicum Tomato Mozzarella Cheese Olive oil gluten free


I did not use the scooped out potato in this recipe. You can stuff it back in. I used it up to make some buttery Aloo Paratha.


Stuffed Potato Skins


 Baked Stuffed Potato Skins Capsicum Tomato Mozzarella Cheese Olive oil gluten freeBaked potato skins stuffed with an instant tomato sauce, fried green Capsicum and Mozzarella cheese.

Recipe Type:  Appetizers / Snacks
Cuisine:            International
Prep Time:     20 mins
Cook time:     1 hour 45 minutes
Yield:                6 skins

Ingredients:


3 large Potatoes
2 Tomatoes
1 Capsicum
2-3 Tbsp Olive Oil
5-6 Tbsp Mozzarella Cheese
2 Garlic Cloves
1 tsp Oregano
1-2 tsp Pepper
Salt to taste

Method:


Preheat the oven to 200 degree C.
Wash, scrub and dry the potatoes.
Rub with olive oil and Ppick them with a fork all over.
Bake in the oven for 1 hour.
Heat 1/2 Tbsp of Olive oil and add crushed garlic and chopped tomato to it. Cook until the tomatoes have become soft and mushy
Add salt, pepper and oregano. Mix well.
Allow it to cool and then grind to a coarse sauce.
Heat 1/2 Tbsp of Olive oil and fry chopped capsicum in it.
Slice the potatoes lengthwise and with a spoon gently scoop out the potato. Leave at least 1/4 inch of potato with the skin.
Rub olive oil and salt on the inside of the potato and outside.
Increase the temperature of the oven to 220 degree C.
Bake the potato skins in oven for 10 minutes, turning the potatoes after 5 minutes.
Remove the potatoes from the oven and when they are cool enough to handle, stuff them with capsicum, tomato sauce and top with cheese.
Bake for 4-5 minutes until the cheese has melted.


Read more ...

Mint Peanut Chutney | Pudina Mungfali Chutney


Call it what you like - Mint and Peanut Chutney or Mint Pesto, there is no doubt you will fall in love with it.

mint peanut dip chutney pudina mungfali

I'm sure by now you are aware of my complete and total obsession with Mint. I simply cannot get over it. While the pot in the balcony keeps spilling over with fresh Mint, I will continue to use it in my kitchen. 

This Mint Peanut Chutney is a hand me down recipe. I got it from my sister Gee and she got it from her Mother-in-Law. I totally hated hand me downs when I was a kid. The books, the clothes, the toys. But I'm always open to hand me down recipes. It only means the recipe is tried, tested and loved. This one is all three and more. It is so simple and so versatile. I eat it as a chutney with Dosa, I use it as a dip for my chips, I use it as a spread on bread. 

mint peanut dip chutney pudina mungfali

I was very excited about this post. Most of all because of my cute little mason jars. Do you see how cute they are? I've always had my eyes open for them, but they are expensive and I never found the size I liked. Finally, last weekend I got the size I wanted at a price I wanted, ain't I lucky? I had to use them in photos and this mint chutney was the perfect recipe to showcase my little jars. 

Back to my Mint Peanut Chutney - because all the ingredients are cooked before grinding into a chutney, this chutney keeps well for almost 10 days in the fridge. But don't worry, it never lasts that long. It will be over in the blink of an eye.


Step by Step Instructions:


1) Wash the mint leaves thoroughly.
2) Heat oil in a pan and add the mint leaves to the pan along with slit green chillies.
3) Fry for 5 minutes.


4) Add chopped tomato, peanuts and salt into the pan and cook for another 3-5 minutes. Keep stirring occasionally.
7) Remove from heat and allow it to cool.
8) Grind with a little water. The chutney should not be very smooth, it should be slightly coarse.

Mint Peanut Chutney | Pudina Mungfali Chutney


mint peanut chutney dip pudina mungfaliSimple cooked chutney made with mint and peanuts.


Recipe Type:  Chutney
Cuisine:            Indian
Prep Time:     15 mins
Cook time:     25 mins
Yield:                200 ml

Ingredients:


5 cups Mint (loosely packed)
1/3 cup Peanuts
1 Tomato 
1-2 Green Chillies
2-3 tsp Oil
Salt to taste
2-3 Tbsp Water

Method:


Wash the mint leaves thoroughly.
Heat oil in a pan and add the mint leaves to the pan along with slit green chillies.
Fry for 5 minutes.
Add chopped tomato and peanuts into the pan and cook for another 3-5 minutes.
Add salt.
Keep stirring occasionally.
Remove from heat and allow it to cool.
Grind with a little water. The chutney should not be very smooth, it should be slightly coarse.
Store in an airtight container in the fridge. It keeps well for 7-10 days.


Send me pics, comment on this post, tweet or share on FB if you've made this Mint Peanut Chutney. I wanna seeee.
Read more ...

Mysore Masala Dosa

Mysore Masala Dosa is a rice and lentil pancake that has a chilli and garlic chutney spread on the inside and stuffed with a potato bhaji and served with a simple coconut chutney.

How to make Mysore Masala Dosa recipe at www.oneteaspoonoflife.com


Weekends are meant to be slept in. Aren't they? But sometimes, waking up early on a weekend has it's own excitement - that slight chill in the air, the sky all grey and cloudy, birds chirping away from their hiding places and an occasional car or bus on the road. At times like this, all I need is a steaming hot cup of coffee and a blanket to wrap myself as I sit in the balcony watching the world go by. And you know what's better than that? Having a plate of absolutely delicious homemade Mysore Masala Dosa to eat.

There is absolutely nothing like a Mysore Masala Dosa for breakfast. The good thing about Bangalore is you can eat a Masala Dosa morning, evening or night and for as little as Rs.20 and for as much as Rs.200. But this homemade Masala Dosa is sooo much better than the restaurant ones. I swear you won't like those once you have tasted one that YOU made at home.

How to make Mysore Masala Dosa recipe at www.oneteaspoonoflife.com

A Mysore Masala Dosa is crisp and golden brown on the outside and soft and fluffy on the inside. It has a spicy red chilli and garlic chutney spread on the inside and is always stuffed with a potato bhaji. Served with a simple coconut chutney, it actually makes one of the most delicious breakfast. Sometimes, dinner too. Skip the red chilli chutney, to get a regular Masala Dosa.

In the age of fast food, a Dosa is a mix of both food movements - slow and fast. It needs to go through the slow process of fermentation but after that, it is a matter of minutes to cook it. 

How to make Mysore Masala Dosa recipe at www.oneteaspoonoflife.com

Points to keep in mind:

  • There are many recipes out there that replace the rice with rice flour or with all purpose flour, but a Dosa tastes authentic only when it is made with with rice grains as opposed to flour. 
  • I ALWAYS use an age old cast iron griddle or tava to make Dosa. It gives it that amazing color and crispness, but my sister swears by her non stick tava or griddle. Either way, a Dosa tava is meant to be absolutely flat, non stick or cast iron. You can also use a flat frying pan. 
  • In winters or if the day is cold, you may need more time to ferment the batter. Keeping it near a warm stove or oven helps. If you live in a hot region or it is summer, you may need only 6-8 hours for the batter to ferment. 
  • You will know that the batter is fermented when it has risen and tastes sour. 
  • If you do not plan to use the entire batter at one go, remove the excess and only add salt to the batter you plan to use immediately. 


How to make Mysore Masala Dosa recipe at www.oneteaspoonoflife.com


Mysore Masala Dosa


How to make Mysore Masala Dosa recipe at www.oneteaspoonoflife.comMysore Masala Dosa is a rice and lentil pancake that has a chilli and garlic chutney spread on the inside and stuffed with a potato bhaji.

Recipe Type:  Breakfast
Cuisine:            South Indian
Prep Time:     24 Hours (Including soaking and fermenting)
Cook time:     5 minutes per Masala Dosa
Yield:                Makes 12-15

Ingredients:


For the Dosa:


1.5 cups Dosa Rice (Use regular rice if you don't have dosa rice)
0.5 cup Urad Dal or Split Black Gram
1 tsp Fenugreek seeds or Methi seeds
Water to grind
1-2 tsp Salt
1.5-2 tsp Oil per Dosa

For the Red Chilli Chutney:


8-10 dry Red Chillies
1-2 Garlic cloves
1-2 Tbsp Water
1/2-1 tsp Salt

For the Potato Bhaji:


3-4 medium sized Potatoes (Boiled and Peeled)
1 large Onion
3-4 Green Chillies
1 sprig Curry Leaves
1 tsp Mustard Seeds
1 tsp Turmeric Powder
3-4 tsp Oil
Salt to taste
2 Tbsp finely chopped Coriander Leaves

Method:


To make the Dosa Batter:


Soak the rice, urad dal and methi seeds for 8-10 hours. To make Dosa for breakfast, soak the grains the previous morning. So you can grind the batter at night.
Drain the water and grind the soaked rice and dal into a fine batter. Use as little water as possible while grinding. Adding too much of water will not allow the batter to become fine. Start with 1/4-1/2 cups of water and then add more if required.
Pour the batter into a deep vessel. Mix well if you ground the batter in batches.
Cover and keep in a warm place to ferment overnight.
When the batter has risen and become sour, it has fermented enough and can be used to make Dosa.
The batter keeps well in the fridge for almost a week. See "Points to keep in mind" above for more information on storage.

To make the Red Chilli Chutney:


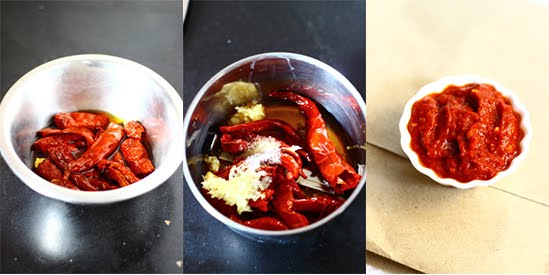
red chilli chutney garlic

Remove the seeds from the dry red chillies and soak them in warm water for 30 minutes.
Grind them into a fine paste along with the garlic, salt and a little water.
Store in an airtight box in the fridge. It keeps well for 2 weeks in the fridge.

To make the Potato Bhaji:


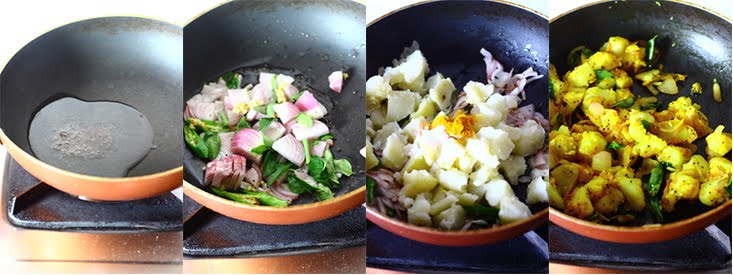
potato onion hash

Mash the potatoes into rough cubes.
Slice the onions and chop green chillies.
Heat oil in a pan and add the mustard seeds.
Once they splutter, add the curry leaves, onions and the green chillies.
Fry the onions until they are translucent.
Add the potato and mix well. 
Now add the salt and turmeric powder. Mix well.
Fry for 1-2 minutes.
Garnish with the chopped coriander leaves.

To make the Mysore Masala Dosa:


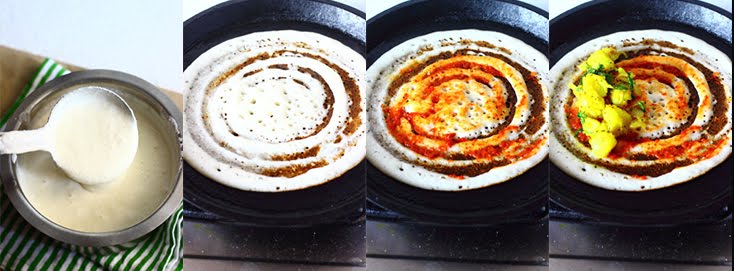
dosa mysore masala chutney pancake red chilli rice urad dal

Grease a cast iron or non stick griddle and heat it.
Once the griddle is hot (not smoking), pour one ladle full of batter on the griddle and spread it from the inside out into a thin circle.
Drizzle a spoonful of oil on it and allow it to cook on medium heat.
When the side touching the griddle turns golden brown and crisp and the side facing you is cooked and there is no raw batter there, spread 1/2-1 tsp of the red chilli chutney on the dosa.
Place a spoonful of potato bhaji on the dosa and fold the dosa into half.
Serve it hot with coconut chutney.

Read more ...

Khara Pongal


Khara Pongal Ven Ghee Khichdi moong dal rice

I spent 10 hours travelling by train yesterday. 10 long HOURS.
Can you imagine starting out at 5am, travelling by train for 5 hours and then spending a few hours at your destination and then travelling 5 hours in train coming back and then charging through the horrible HORRIBLE traffic home and having to cook your own dinner???

5am is close to mid night for me. I'm so not a morning person.


I was exhausted. I was more than exhausted, I don't even have a word for it. It was late to order food or parcel something from a restaurant. I was hungry and I had to eat. At times like this, come out the simplest recipes where I don't need to do a thing and magically delicious food appears on the table.

Khara Pongal is one of those magic recipes. Pongal is a South Indian version of Khichdi. To make khara pongal, all you need to do is dump rice, moong dal, water, ginger and a few other things into the rice cooker or pressure cooker and let it do its thing. And VOILA! 15-20 mins later, food on your table. It is just as simple as that.

Khara Pongal Ven Ghee Khichdi moong dal rice

So I washed and soaked my rice and moong dal as soon as I walked into the house. You can skip the soaking and directly cook it together but it may take you a little more time than what I took. Soaking for at least 30 minutes is recommended.

I'd never had Pongal until I moved to Bangalore. I'd never eaten rice for breakfast either until I moved to Bangalore. Then in the office cafeteria, I had khara pongal with masala vada for the first time for breakfast and it was love at first bite. Since then, I've been making it when ever I'm short of time.

Khara Pongal Ven Ghee Khichdi moong dal rice

Pongal is meant to be mushy, so don't worry about overcooking it. In fact, go ahead overcook it. This is why is generally fed to little kids as it needs no chewing. If serving it to kids, do not add the peppercorns and the chilli. 

Pongal is a vegan dish, but what takes it to a totally different level is the Ghee or clarified butter tempering that's poured over it. I say, the more the ghee, the better it tastes. If you are not vegan, don't forget this step. 


Khara Pongal


Khara Pongal Ven Ghee Khichdi moong dal riceKhara Pongal is a quick dish made by cooking together rice and moong dal with ginger and tempered with ghee.

Recipe Type:  Main
Cuisine:            South Indian
Prep Time:     30 minutes
Cook time:     30 minutes
Yield:                Serves 2

Ingredients:


1/2 cup Rice (uncooked)
1/2 cup Moong Dal (uncooked)
3 cups Water 1/2 tsp Black Peppercorns
3/4" Ginger
1/2 tsp of Turmeric Powder
Salt to taste
3-4 tsp Ghee
8-10 Curry Leaves
1 tsp Cumin seeds

Method:


Method:


Wash the rice and dal and keep aside for 30 minutes.
Add the washed rice and dal to a pressure cooker with the water, turmeric powder, black peppercorns, grated or sliced ginger and salt.
Pressure cook for 15 minutes or for 5-6 whistles. Pongal is meant to be mushy so don't worry about overcooking it.
Heat the ghee in a small pan and add cumin seeds to it.
Once they brown slightly, turn off the heat and add the curry leaves.
Pour this tempering over the khara pongal and mix well.
Serve hot with some raita

Read more ...

Coorg Pumpkin Curry


Coorg Pumpkin Curry kaddu sabzi coconut vegan kumbalkai palya


This Coorg style pumpkin curry is made with ripe pumpkin, coconut and spices. It is a spicy curry unlike most other pumpkin curries.

I don't usually crave pumpkins, at least not like I crave chocolate. But recently after eating a small bowl of pumpkin curry in office, I wanted more. And telepathically, my mother in law gave me a huge organic homegrown pumpkin. What's better than a pumpkin? A HOMEGROWN one.

The thing I hate most about pumpkins is actually peeling them. By the time I got through peeling this huge pumpkin, my palms were sore with the knife handle rubbing against them, my arms ached with all that effort. But the slightly sweet yet hot spicy coconut-ty curry made it totally worth it.

Coorg Pumpkin Curry kaddu sabzi coconut vegan kumbalkai palya

I usually make a simple dry pumpkin curry by boiling diced pumpkins with some fresh green chillies and garnishing it with freshly grated coconut. Simple and easy. It lets the sweetness of the pumpkin shine through. But this time I did not want a very sweet pumpkin curry. I wanted a change. I had something in mind but absolutely no idea how to make it.

Coorg is this beautiful place nestled among the Western Ghats of India. A bunch of friends went there several years ago and we stayed in this humble but beautiful homestay with a wonderfully warm family. The family cooked up all the traditional Coorgi delicacies and I remember one of them was this pumpkin curry with coconut, unlike I had ever eaten before. So I searched online for this curry and as usual Google spewed off many results, so I had to mix and match recipes to find the ONE. I tried this dish until I made something closer to the one in memory. 

Coorg Pumpkin Curry kaddu sabzi coconut vegan kumbalkai palya


Coorg Pumpkin Curry


Coorg Pumpkin Curry kaddu sabzi coconut vegan kumbalkai palya
Coorg style Pumpkin curry made with ripe pumpkin, coconut and spices.

Recipe Type:  Side
Cuisine:            Indian
Prep Time:     30 minutes
Cook time:     40 minutes
Yield:                Serves 3-4

Ingredients:


3 cups diced Pumpkin
3-4 tsp Oil
1 tsp Mustard seeds
6-8 Curry Leaves
1 Onion
2-3 Garlic cloves
2 tsp Coriander Powder
1 tsp Cumin Powder
1 tsp Turmeric Powder
1/2 cup grated Coconut or 1 cup of Coconut milk
1 tsp Tamarind pulp
3-4 dry red Chillies or 1-2 tsp of red chilli powder
1-2 tsp of Jaggery powder or Sugar
1 cup Water
Salt
Fresh Coriander leaves for garnish

Method:


Heat oil in a pan and add the mustard seeds.
Once they splutter, add the curry leaves, finely chopped onion and garlic. Fry until the onion is translucent.
Add the pumpkin.
Add the turmeric and water and cover and cook until the pumpkin is done.
If using grated coconut, grind together the coconut, tamarind, dry red chillies or chilli powder, cumin powder and the coriander powder with a little bit of water to make a fine masala paste.
Add it to the pumpkin in the pan and cook for 6-8 minutes.
If using coconut milk, then add the coconut milk along with the coriander powder, cumin powder, red chilli powder and the tamarind paste to the pumpkin and cook on low heat for 3-4 minutes.
Add salt and the jaggery powder or sugar and mix well.
Serve hot.
Read more ...