Showing posts with label Tomato. Show all posts

Tomato Gazpacho | Cold Tomato Soup


Soup and Cold - It is not an association we Indians generally make. We are proud of the fact that we serve and eat "Garma Garam Khana" or "Hot hot food". We can eat hot meals immaterial of the season or the temperature outside. When we want something cold, we make sherbets or have kulfis and ice creams. The thought of a filling cold soup rarely crosses our mind. So, now, I present to you *drum rolls* "A cold tomato  soup - Gazpacho". 

A couple of years ago if you had asked my hubby dearest what Gazpacho is, he would have asked you to repeat the question. But a couple of years of food channels and food shows can have such an effect on a person, even someone not interested in food. He can now not only tell you what it is, but probably take over this blog and tell you how to make it :D. Ah! Such is the power of the small squarish box at home. Where would we be without the TV?

I was watching an old episode of Planet Food on this mighty little box. Padma Lakshmi was in Spain. She was with a Spanish woman who told that unlike the common belief that tomatoes are a base for Gazpacho, it really is just bread. 

Tomatoes came from South America and until the Spanish conquered it, Spain did not have tomatoes, but they still did have the Gazpacho. She showed one recipe with tomatoes and one with almonds. I'm not sure how the almond soup tastes, but tomato soup is a favorite at home. Do you remember, last week I made bread rolls and asked you not to throw out the edges? Voila, those edges are the star of this ship.. oops, soup. 

The Spanish senorita asked us to use stale dense bread, but, let's face it, unless we are in really big cities that have gourmet bakeries, we aren't exposed to varieties of breads. We get our regular sandwich bread , milk bread or the now famous brown bread/whole wheat bread. Feel free to use any bread you can get your hands on. Or like me, use the unwanted edges of your bread.


I think the adjustment stops here :(. We need Olive Oil. Extra Virgin would be nice, but you can use what you have. I don't think this recipe would shine as much with any other oil. I haven't tried, but if you do try and it turns out amazing, let me know. 


If you don't want to have this as your meal, then just have this in between meals when you want to fill your tummy with something healthy and you don't want to waste too much time cooking, coz, seriously, this is just a 5 minute job and all you need to dirty is your blender jar. 

I simply love these lazy healthy recipes. Makes me wish all healthy food was fast food. There would be no excuse to eat junk :)


Like we garnish our hot soups with croutons, gazpachos are garnished too. But with fresh ingredients. The almond one is garnished with grapes, a particular variety I believe, but I don't remember which :( The tomato is garnished with chopped onions and tomatoes.  I suggest, get creative and add what you and your family will enjoy.

This recipe makes 2 hearty portions.


Tomato Gazpacho | Cold Tomato Soup


Cold Spanish inspired soup made with bread and tomatoes

Recipe Type:  Soup
Cuisine:          Spanish
Prep Time:     5 minutes
Cook time:     15 minutes
Yield:              2 big bowls

Ingredients:

3-4 Bread slices or Bread Edges of about 10-12 slices
2 Tomato
2-3 cloves Garlic
3-4 Tbsp Extra Virgin Olive Oil
1/2 tsp Red chilli powder/ Pepper (Optional)
Salt
Cold water
Chopped onion, tomato and coriander leaves for garnish (Optional)

Method:

  • Soak the bread in water. 
  • Remove and squeeze out the water. 
  • Blend together the bread, garlic and tomato. 
  • Add the salt, red chilli powder or pepper and olive oil Blend for 1 min or until creamy 
  • Add cold water and give it a whizz 
  • Garnish with chopped onion, tomato and coriander leaves and serve cold
Read more ...

Bombay Pav Bhaji

The reason I call this the Bombay Pav Bhaji is because I eat and make 2 kinds of Pav bhajis and it gets confusing about which one I'm talking about. The other one being the Goan Pav bhaji ( recipe will be posted soon). The Bombay pav bhaji is the red coloured pav bhaji most commonly eaten across India in restaurants or small chaat carts / gaadis . As a kid, eating out meant small snacks in the evenings, as restaurant culture had not yet caught on as it has today. We would go on my dad's Bajaj scooter to our favorite chaat cart/ gaadi in the market to eat Pav bhaji. With very low tolerance for spices, I was generally stuck eating just butter pav. But as I grew up, the spice tolerance also grew and I was able to enjoy this spicy red bhaji with the greasy yet amazingly tasty butter pav. I'm sure a lot of us have similar memories of the 1990s. Till date, whenever I go home, I make it a point to go to the same gaadi and eat the same pav bhaji. I don't know his secret recipe that makes it so yummy, but I do make it my way at home... The recipe that follows is the way I make it at home...


Bombay Pav Bhaji


A popular Bombay street food consisting of spicy mix vegetable mash and bread rolls/pav.

Recipe Type:  Snacks
Cuisine:          Indian
Prep Time:     30 minutes
Cook time:     30 minutes
Yield:              2-3 Servings

Ingredients:

3 medium Potato
1 cup chopped Tomato
3/4 cup chopped Onion
1/2 cup chopped Capsicum
1/4 cup chopped Carrot
1/2 cup Cauliflower (broken into small florets or chopped)
1/4 cup Green peas
3-4 cloves or 1 Tbsp paste of Garlic
1" piece or 1 Tbsp paste of Ginger
2 Tbsp Pav bhaji masala (In case you don't have this available, use Garam masala - 1/2 tsp, Coriander powder - 1 tsp, Amchur/ Dry mango powder - 1/4 tsp, Cumin powder - 1/2 tsp)
A pinch of Garam masala
2 Tbsp Butter
Red chilli powder - To taste
Salt - To taste
A handful of Coriander leaves
Lemon wedges

Method:

  • Boil and peel the potatoes
  • Boil the carrot, cauliflower, peas and capsicum.
  • Grind the ginger-garlic into a fine paste.
  • Heat 1 tbsp of butter in a kadhai or pan
  • Add the onions and fry until golden brown.
  • Add the ginger-garlic paste and fry until fragrant.
  • Add the tomatoes and fry until soft and cooked.
  • Add all the remaining vegetables and mash them.
  • Add all the spices and salt.
  • Add a little water to achieve the desired consistency
  • Boil for 5-6 mins
  • Add 1 tbsp of butter on top
  • Garnish with chopped coriander leaves
  • Serve hot with some lemon wedges, chopped onion and buttered Pav


Read more ...

Vegetable Biryani (2 ways)

After a short trip to Sri Lanka where we struggled to find veg food, our taste buds were craving for some spice and lots of vegetables. I wanted to make and eat something that celebrated our wonderful Indian cuisine. It had also been a long time since I had made biryani, I'd almost forgotten the recipe taught to me by my friend's mom. So I tried to recollect all I could and gave it a go. It definitely was the tastiest biryani I've ever eaten (may be cause I made it :P) Below is the recipe how I made it (1st one). There are a few things missing here that are present in an authentic biryani as I made it with things readily available. I have not added potato, black cardamom and saffron/kesar. You can add the potato along with the other vegetables. Black cardamom needs to be added to the rice as well as the masala (1 each). Few saffron strands are mixed with milk and added to the rice. I skipped all this and as I know it, it made no difference to the biryani tastewise. Also, I used regular rice and not Basmati. I highly recommend using Basmati as it adds to the fragrance. I am listing down 2 recipes below, 1st one is how I made it and the 2nd one is an easier method.


Vegetable Biryani


The masala before layering


Recipe 1 : How I made it:

Vegetable Biryani


Rice cooked with vegetables and a spicy masala

Recipe Type:  Main Course
Cuisine:          Indian
Prep Time:     30 minutes
Cook time:     60 minutes
Yield:              2-3 Servings

Ingredients:

1 cup / 10-12 florets Cauliflower
1 Carrot
1/2 cup Peas
12-15 Beans
2 medium Onions
2 medium Tomatoes
4-5 cloves Garlic
1 " piece Ginger
1/2 cup Curd/ Yoghurt
1/2 cup Mint
1 cup uncooked Rice
3.5 cups Water
4 Cloves
2 1" pieces Cinnamon
4 Green cardamom
2 Bayleaf
A few strands Mace
8-10 Peppercorns
1/2 tsp Cumin seeds
1/4 tsp Ajwain
6 tsp Oil
1 tsp Red Chilli powder
1 tsp Turmeric powder
1/2 tsp Garam masala
2 tsp Coriander powder
1/2 tsp Cumin powder
2 Tbsp Milk
Salt


Method:

  • Take 3 cups of water in a kadhai/pan. Add 2 cloves, 1 bayleaf, 1 piece of cinnamon, 2 Green cardamoms, few strands of mace and 1/2 tsp of salt.
  • Wash the rice and add to the water and boil until the rice is almost done.
  • Remove the spices from the rice and drain excess water if any.
  • Heat 4 tsp oil in another kadhai and add the cumin seeds.
  • Once they brown, add the 1 chopped onions, remaining cloves, cardamom, bayleaf, peppercorns, ajwain and cinnamon.
  • Cook until the onions are translucent.
  • Grind together the tomatoes, ginger and garlic.
  • Add it to the kadhai with the onions.
  • Add chilli powder, turmeric powder, cumin powder, coriander powder and the garam masala and cook for 1 min.
  • Add all the roughly chopped vegetables and 1/4 cup water and cover and cook on low flame until the vegetables are almost done.
  • Add more water if needed.
  • Grind the mint leaves with a little water and add it to the curd and whisk to remove any lumps.
  • Add this to the masala and cook for 1 min.
  • Add salt and remove from heat.
  • In another pan, add the remaining oil.
  • Once the oil is hot, add the remaining onion sliced lengthwise and fry until brown.
  • Add one layer of the masala over the onions
  • Add one layer of rice
  • Again add a layer of masala and then one layer of rice.
  • Sprinkle 2 tbsp of milk and cover the kadhai and cook on low flame for 10-15 mins.
  • Mix well and serve hot with raita.

Recipe 2: Easy way out


Ingredients:

Cauliflower - 1 cup / 10-12 florets
Carrot - 1
Peas - 1/2 cup
Beans - 12-15
Onion - 2 medium
Tomato - 2 medium
Garlic - 4-5 cloves
Ginger - 1 " piece
Curd - 1/2 cup
Mint - 1/2 cup
Rice - 1 cup
Water - 2 cups + 1/2 cup
Cloves - 2
Cinnamon - 1" piece
Green cardamom - 2
Bayleaf - 1
Mace - few strands
Cumin seeds - 1/2 tsp
Oil - 6 tsp
Chilli powder - 1 tsp
Turmeric powder - 1 tsp
Biryani masala - 1-2 tbsp
Salt

Method:

  • Cook rice along with cloves, cinnamon, green cardamom, bayleaf, mace and 1/2 tsp of salt. You can pressure cook the rice until it is done. Add a little less water than you regularly do so that the rice is not too mushy. We need the rice grains to be separate.
  • Remove the spices from the rice and keep aside.
  • Parboil the vegetables outside until they are half done. Especially carrot and beans that take a little longer to cook. You can microwave them on high for 3-4 mins.
  • Heat 4 tsp oil in another kadhai and add the cumin seeds.
  • Once they brown, add 1 chopped onion. Cook until the onions are translucent.
  • Grind together the tomatoes, ginger and garlic.
  • Add it to the kadhai with the onions.
  • Add chilli powder, turmeric powder and biryani masala and cook for 3-5 mins.
  • Add the vegetables cook on low flame until the vegetables are done.
  • Add more water if needed.
  • Grind the mint leaves with a little water and add it to the curd and whisk to remove any lumps.
  • Add this to the masala and cook for 1 min.
  • Add salt and remove from heat.
  • In another pan, add the remaining oil.
  • Once the oil  is hot, add the remaining onion sliced lengthwise and fry until brown.
  • Mix the fried onion, masala and rice. Heat once again if needed.
  • Serve hot with raita
Read more ...

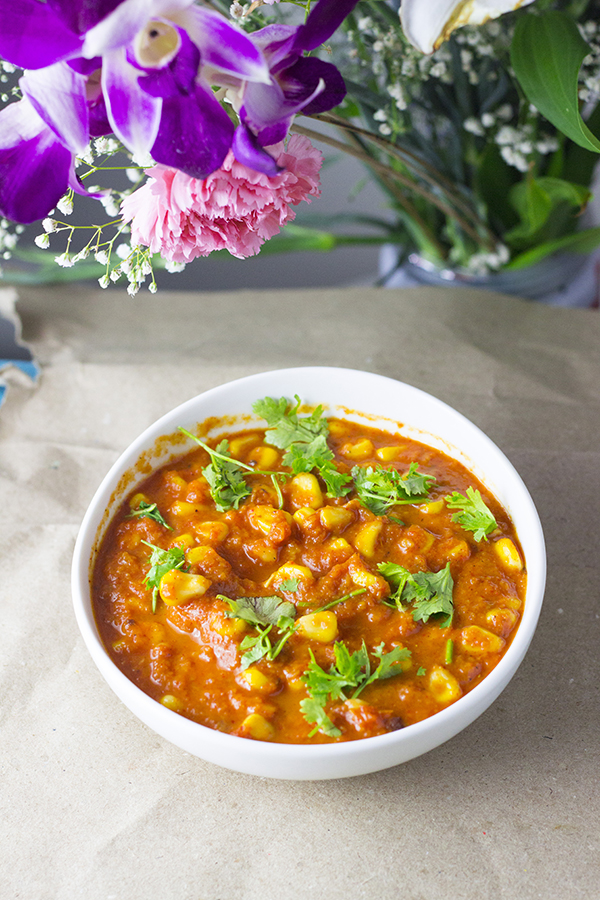
Corn Tomato Bharta Recipe | How to make tomato bharta [Video]


Corn Tomato Bharta recipe with video instructions. Corn Tomato Bharta is a vegan curry made with flame roasted tomatoes and sweet corn. This smoky curry is gluten free and vegan.

In a hurry? Jump to Video or Jump to Recipe

Corn Tomato Bharta


Grilled juicy Tomatoes. Boiled Sweet Corn. Fresh Spices. A marriage made in HEAVEN!

The sweetness of the corn marries well with the tanginess of the tomatoes and the sprinkling of spices, just make this Corn Tomato Bharta so delicious.


Corn Tomato Bharta

It was fate that make me sample this Corn Tomato Bharta. We planned to eat at a particular restaurant but the long winding queue of people waiting to be seated, made us change our mind and go to a new place. Since, we'd never heard of Corn Tomato Bharta, we decided to take a chance and try it. Try it, we did. Love it, we did.

How can I sample something new and not try to make it myself? I tried many versions and finally settled on this recipe. 


What is a Bharta?


Bharta is a curry or sabzi made by grilling a vegetable directly on open flame or coals. The most frequently grilled vegetable is eggplant or brinjal to make Baingan ka Bharta. 

Tomato Bharta is a village recipe in which the tomatoes and onions are grilled over coals until they are soft and then mashed to make the curry. Here, I have pureed the onions and tomatoes and cooked them further to make a spicy gravy. I have also added sweet corn for flavor and texture.

Tomato Bharta is very similar to the Bengali / Bangladeshi Tomato Vorta and the Trinidad Tomato Choka.

You can also grill the tomatoes in the oven or roast on a frying pan with little oil in it.


Corn Tomato Bharta


If you made this recipe, let me know! Leave a comment here or on Facebook tag your tweet with @oneteaspoonlife on Twitter and don't forget to tag your photo @oneteaspoonoflife on Instagram. You can also email me at onetspoflife@gmail.com I'd love to see what you are up to.

If you like this recipe, do not forget to share it with your friends and family! 


You can follow One Teaspoon Of Life on FacebookTwitterInstagramPinterest or you can subscribe to One Teaspoon Of Life and receive all the latest updated via Email


Video Recipe


------------------------------------------------------------------------------------------------------------------

Corn Tomato Bharta Recipe | How to make tomato bharta


Corn Tomato BhartaCorn Tomato Bharta is a vegan curry made of fire roasted tomatoes and sweet corn. Tomatoes and onions are roasted on an open flame, charring them and adding a smoky flavor. The onions and tomatoes are pureed and cooked along with spices to make the base of the curry. Boiled sweet corn is added for the slight sweetness and texture. Corn Tomato Bharta is vegan and gluten free.

Recipe Type:  Side
Cuisine:            Indian
Prep Time:     10 minutes
Cook time:     45 minutes
Total time:     55 minutes
Yield:                Serves 2-3

Ingredients:


3 Tomatoes
1 Onion
1 cup Sweet Corn
3-4 Garlic cloves
0.5" Ginger
2 Tbsp Oil
1 tsp Cumin seeds (Jeera)
0.5 tsp Turmeric Powder
1 tsp Coriander Powder
1 tsp Cumin Powder
1-2 tsp Red Chilli Powder
1 tsp Sugar
2 Tbsp Coriander leaves, chopped
Salt to taste
Water as required

Method:


1. Grill the whole tomatoes over an open gas flame until the skin is charred and the tomato softens or rrill the tomatoes in an oven for 20 mins. Turn them every 7-8 mins.
2. Allow the tomatoes to cool, then peel and puree them.
3. Grill an onion on the open flame until the skin is charred or it can also be grilled along with the tomatoes in the oven.
4. Once the onion is cool, peel it. Blend it along with garlic and ginger into a smooth puree. Add a little water to help the blending if required.
5. Boil the corn until done. Takes around 4-5 mins in the microwave.
6. Heat oil in a pan and add the cumin seeds
7. Once the cumin seeds brown slightly, add the onion-ginger-garlic paste and fry until it turns light brown
8. Add the tomato puree and add the red chilli powder, turmeric powder, cumin powder and coriander powder.
9. Cook until the oil separates or for 8-10 mins on low flame while stirring frequently
10. Add water to achieve the desired consistency and cook for another 2 mins
11. Add the salt and corn and simmer for 1 min
12. Serve hot with rotis


If you liked this, you may also like:

Vegan glutenfree creamy north indian punjabi dum aloo baby potatoes masala gravy
Punjabi Dum Aloo

double beans tomato masala gravy sabzi
Double Beans Masala
How to make Amritsari Chhole recipe at www.oneteaspoonoflife.com How to cook pindi chhole with tomato at One Teaspoon Of Life Vegan Chickpea Recipes
Amritsari Chhole
Read more ...

Heserkalu palya | Moong masala

Monsoons have almost stopped. The weather is awesome, but the vegetables are not. On most days I am disappointed looking at the dull looking veggies in Hopcoms or the local vendors. These are the days when the Beans/Kaalu/Dals come to the rescue. Heserkalu or Moong beans are easy to cook and make an awesome gravy dish to be mopped up with phulkas, chapatis or bread.


Heserkalu palya | Moong masala


spicy mung bean curryA spicy moong beans curry

Recipe Type:  Main Course
Cuisine:          South Indian
Prep Time:     15 minutes
Cook time:     30 minutes
Yield:              3-4 Servings


Ingredients:

1/2 cup Moong beans/ Heserkalu(dried)
1 large Tomato
1 medium Onion
2-3 cloves of Garlic
1 tsp Red Chilli Powder
1/2 tsp Turmeric powder
1/2 tsp Garam masala
3 tsp Oil
1/2 tsp Cumin seeds / Jeera
4-5 Curry leaves
1.5 cups Water
A handful of Coriander leaves


Method:

  • Wash the moong and cook it in the pressure cooker using 2 cups of water until cooked. It takes me around 10 mins in sim after one whistle.
  • Heat oil in a kadhai and add the cumin seeds
  • Once they brown add the curry leaves. chopped garlic and finely chopped onion
  • When the onion turns translucent, add finely chopped tomato and all the spices.
  • Fry until the tomatoes soften
  • Add the moon along with the water it is boiled it.
  • Add salt and cook until the water evaporates and you achieve the desired consistency.
  • Add more water if the moon has soaked up all the water while boiling itself.
  • Garnish with freshly chopped coriander leaves and serve with chapati or bread.
Read more ...

Rasam


How to make Tomato Saaru Tili Saaru Tomato Rasam at www.oneteaspoonoflife.com

September it is, monsoons are still here, its been raining all day. It's super cold. 

After this, come the cold winter days...

Rains + Cold + Spicy piping hot Soup = Winning Combo!!!

Rasam is perfect for all these cold rainy wintery nights.

Rasam or Tili Saaru or Tomato Saaru is a South Indian Soup that is a burst of flavor. It is spicy, it is tart, it is hot, it is hearty, it is cozy- everything you want in a soup. Generally, rasam is eaten as an accompaniment with rice across South India. But you can have it just like soup and you won't complain.

How to make Tomato Saaru Tili Saaru Tomato Rasam at www.oneteaspoonoflife.com

Rasam forms an essential part of tradition here in Karnataka. It is served at weddings and religious celebrations across Karnataka. In fact, a lot of times, a caterer is classified as good or bad based on the taste of the rasam he/she makes.

Rasam is made by boiling chopped tomatoes along with tamarind juice, then adding Rasam Powder and cooked lentils. Add a tempering of spluttered mustard seeds and crispy curry leaves. Garnish with chopped coriander, occasionally grated coconut is also added. And you have the hot spicy cozy Rasam. Rasam tastes awesome with rice with a side of crispy fried Papad.

Rasam is a regular when any of us has stuffed sinuses... it instantly clears them up. Also, when we are sick and food seems tasteless, we have to have rasam to wake up our taste buds.

But you don't need cold wintery nights or to be sick to have Rasam. Rasam and Rice is a part of daily meal for many of us here in South India. Try it out, and you will certainly love it.

How to make Tomato Saaru Tili Saaru Tomato Rasam at www.oneteaspoonoflife.com

If you liked this, you may also like:

  • Corn Tomato Bharta - Indian curry made with grilled or roasted tomatoes and sweet corn
  • Dal Fry - Dal or Pigeon Pea Lentils cooked in restaurant style.
  • Tomato Soup - Spiced tomato soup.
  • Lauki Soup - Soup made with bottle gourd and moong dal. Very nutritious and filling.

Rasam | Tili Saaru

How to make Tomato Saaru Tili Saaru Tomato Rasam at www.oneteaspoonoflife.com
Spicy tart South Indian lentil soup made with tomato and tamarind.

Recipe Type:  Main Course
Cuisine:          South Indian
Prep Time:     10 minutes
Cook time:     30 minutes
Yield:              3-4 Servings

Ingredients:

2 cup Toor dal(boiled)
1 large Tomato
1 lemon sized ball Tamarind
2 tsp Oil
1 tsp Mustard seeds
1/2 tsp Cumin seeds
5-6 Curry leaves
1 Tbsp Coriander leaves(Chopped)
0.25 tsp Hing / Asafoetida
2 Tbsp Rasam powder
0.5 tsp Turmeric powder
1-2 tsp Red chilli powder
3 cups Water
Salt

Method:


Soak the tamarind in half cup of water for 10 mins.
Squeeze the tamarind so that the half cup of water is now tamarind juice.
Add this tamarind juice to a pan on the stove.
Add the chopped tomato and another ½ cup of water and cover and cook until the tomato is very soft and mushy.
Add the rasam powder, red chilli powder and turmeric powder.
Add the toor dal and the remaining water.
Add hing and salt and boil until the desired consistency is achieved.
Generally rasam is of very thin consistency.
In another small pan, heat the oil.
Add the mustard seeds. After they splutter, add the cumin seeds. Let them brown slightly, then add the curry leaves and immediately pour this oil into the rasam.
Rasam can be enjoyed as a spicy soup on cold days or as a curry with rice.


How to make Tomato Saaru Tili Saaru Tomato Rasam at www.oneteaspoonoflife.com
Read more ...

Brinjal in Coconut Masala

Brinjal / Eggplant / Aubergines , call it what you want, is a favourite veggie across the world. Different names and cooked in myriad different ways. Wiki tells me that this was originally domesticated in India. So this was another gift to the world from us ;) Very easy to grow as well. I say this cause I have found success in growing brinjals :D. Brinjal is probably one the few vegetables cooked all across India, albeit in different ways. I myself make it in a couple of different styles. The recipe that follows is the twist on the traditional "Yennegai" or "Yenne badnekai" or the "Bharwan Baingan". The original recipe involves stuffing baby brinjals with the stuffing and frying in oil. I did not want to use too much oil and wanted it to cook sooner, so I cut the brinjal into smaller semicircles and fried them in very little oil initially and then added the masala. It was a perfect combination with the jowar roti or "Joladda rotti"

Brinjal in Coconut Masala


Brinjals cooked in a spicy coconut masala

Recipe Type:  Main Course
Cuisine:          South Indian
Prep Time:     20 minutes
Cook time:     40 minutes
Yield:              2-3 Servings

Ingredients:

500gms Brinjal
2 medium Onion
2 medium Tomato
1 cup grated fresh Coconut
2 tsp Sambar powder
1 tsp Garam masala
2 tsp Red chilli powder
1 tsp Turmeric powder
1 Tbsp Urad dal
½ tsp Fenugreek seeds / Methi seeds
2 tsp Cumin seeds / Jeera
1 Tbsp Tamarind
A pinch of Hing
3 Tbsp Oil

Method:

  • Lightly roast the urad dal and the methi seeds in a kadhai until the urad dal is slightly brown
  • Grind together coconut, tamarind, sambar powder, garam masala, urad dal, methi, red chilli powder and turmeric powder into a coarse paste. Use 1 tbsp of water to grind.
  • Heat 2 tbsp oil in a kadhai and fry onion until translucent in it.
  • Add finely chopped tomatoes, hing and the ground paste and cook until the tomato is cooked
  • Add 1 cup of water and cook on low flame for 8-10 mins or until the oil  separates
  • In a different kadhai, add the remaining oil and fry the sliced brinjals until done. The brinjal should be cooked but still be firm.
  • Add the fried brinjal to the masala and cook together for 2 mins
  • Add more water if you want a thinner gravy or less water if you want a dry sabzi.
  • Enjoy with hot hot phulkas or joladda rotti
Read more ...

Black Bean Soup

This has been on my list to post for a long time but I guess only laziness prevented me from posting it. Black beans are pretty much unknown out here. I first ate them at Panera Bread. The black bean soup which was a Thursday regular was the low fat vegetarian soup option. It’s nice to know something tasty is also low fat, isn’t it? I came back to Bangalore and black beans were nowhere to be found L Then one day while walking around a supermarket I found canned black beans. Since then it has become quite a regular soup at home. Filling and very Indian in spices and taste, this works well with everyone at home. Rajma looks a lot like black beans but tastes quite different, so don’t mistake the two. This soup so full of bean, is also very filling.


Black Bean Soup


Vegan soup made using spices and black beans

Recipe Type:  Soup
Cuisine:          Mexican
Prep Time:     10 minutes
Cook time:     20 minutes
Yield:              2 servings

Ingredients:

1 can Black Beans
1 Tomato
1 small Onion
2-3 cloves Garlic
1 tsp Cumin seeds / Jeera
1 tsp Cumin powder / Jeera powder
1 tsp Red chilli powder
2-3 tsp Oil
Salt
Water 2 Tbsp chopped Coriander leaves (Optional)


Method:

  • Wash and rinse the black beans as specified on the can.
  • Finely chop the garlic, onion and tomato
  • Heat oil in a large pan and add the cumin seeds
  • Once the cumin seeds brown, add the garlic and onion and fry until the onions are translucent
  • Add the tomato and cook until done
  • Add the cumin powder and rec chilli powder and fry for 1 min
  • Add the black beans, water and salt and boil for 4-5 mins.
  • Garnish with chopped coriander leaves (Optional)
  • Enjoy hot with crusty bread
Read more ...

Wholewheat Tomato & Basil bread

I often miss having the Mediterranean veggie sandwich at Panera bread for lunch. Since we don't have any Panera Bread's out here, I cannot enjoy their tomato and basil bread. Which is what set me on a path to create my own. I found several recipes on the net, but I modified them to suit me. I am not so keen on cooking with maida(flour) so I use atta (whole wheat flour) more often. I also had no parmesan cheese as the recipes asked for. Also, I added the oats and the fennel just as an experiment which worked successfully. This was a yummy breakfast today morning with oodles of butter....

Tomato & Basil bread


Before first rise

After first rise


After baking
Crust & crumb
Ingredients:
Whole wheat flour / Atta – 1.5 cups
Oats – ½ cup
Tomato – 1
Basil leaves – 10-12
Fennel seeds / Saunf – 1 tbsp
Olive oil – 1 tsp
Active dry yeast – 1 tsp
Red chilli flakes – 1 tbsp
Tomato ketchup – 1-2 tbsp
Water – ¼ cup
Salt – ½ tsp
Method:
Puree the tomato and mince the basil
Warm the water and dissolve the yeast in it
Add the tomato puree, basil, crushed fennel seeds, red chilli flakes, tomato ketchup, oats and salt and mix well
Add the flour and knead until the dough is smooth and elastic. I kneaded for around 15 mins.
Grease a vessel with olive oil and place the dough in it. Turn the dough so that it is covered in oil. Cover the vessel and allow it to proof for 2 hours or until doubled in size.
Knead again for 1 min and place in the loaf tin or the baking sheet and allow it to rise for another 1 hour.
Preheat the oven to 240 degree Celsius.
Bake for around 20-25 mins.
Read more ...

Jhunka

Jhunka Bhakri is a simple but thoroughly enjoyed meal in North Karnataka. Jhunka takes hardly 10 mins to prepare and is a welcome substitute to the regular sabzi once in a while. So on Friday night, tired of cooking ,once again, and bored of eating out. once again. This was the quickest fix for dinner.


Jhunka


curry made with chickpea flour and tomatoesQuick Maharastrian curry made from chickpea flour/ besan and tomatoes.

Recipe Type:  Side
Cuisine:          Indian / Maharastrian
Prep Time:     10 minutes
Cook time:     20 minutes
Yield:              2-3 servings

Ingredients:

1/2 cup Besan / Gram Flour
1 cup Water
1 Tomato
4-5 Curry Leaves
2 Green Chillies
1 tsp Cumin Seeds / Jeera
2 tsp Oil
1 tsp Turmeric Powder / Haldi
Salt

Method:

Heat oil in a kadhai and add the cumin seeds
Once they brown slightly, add the curry leaves, chopped tomatoes and chopped chillies and fry for 2 mins
Add 1/2 a cup of water and cook until the tomatoes are soft
Add the turmeric powder
Mix the besan in the remaining water until it is a smooth paste
Add this to the kadhai and add salt
Heat on low flame until the raw taste of the besan disappears. Keep stirring to prevent the jhunka from burning
Add more water if desired
Eat with jowar rotti or phulka


Read more ...

Tomato soup

In this cold Bangalore weather, a hot soup is soooo comforting. Everybody's favourite soup at home? Tomato, of course. It doesn't take too much time to make it either. The perfect weekday evening soup. Most store bought soup powders use cornflour or other flours to obtain the thickness, I generally add some other veggies or 2 tbsp of dal to do the same. Makes it healthy as well as thick. Potato is the general thickening agent people use at home, I avoid it and generally use cauliflower or sweet potato.


Ingredients:

Tomato - 3 medium
Carrots - 2
Sweet potato - 1/2 cup (peeled and cubed)
Onion - 1 small
Bay leaf / Tej patta - 1
Cinnamon / Dalchini - 1" piece
Black peppercorns / Kali mirch - 4-5
Clove/ Lawang - 1-2
Olive oil - 1 tbsp
Pepper powder / Red chilli powder - 1-2 tsp
Sugar - 1/2 tsp
Salt
Water

Method:

Heat the olive oil in a cooker pan
Roughly chop the onions and fry for 1-2 mins
Roughly chop the tomato, sweet potato and carrot and add to the cooker
Add all the whole spices
Add water just enough to cover the vegetables
Add salt and pressure cook for appx 2-3 whistles or 5-8 mins
Cool the vegetables a little and puree them in a mixer
Pour the puree back into the pan, add a cup of water, sugar, red chilli powder or pepper and allow it to boil
Add more water if the soup is too thick.
Boil on low flame for another 8-10 mins.
Serve hot. The above recipe makes enough for 3 people.

Read more ...

Dal Makhani

Friday nights call for something special. With the heavy rains, eating out was out of question. Who's ready to battle Bangalore traffic when it rains? So it was time to make something easy and special at home. So here comes Dal Makhani. Although the name suggests makhan aka butter, it really does not have too much. Infact, I made it without any butter. You can add a spoonful at the end.


Ingredients:

Whole black urad dal - 1/2 cup
Red kidney beans / Rajma - 2 tbsp
Tomato - 2 medium
Onion - 1 medium or 2 small
Ginger - 1" piece
Garlic - 1-2
Coriander powder / Dhania powder - 3-4 tsp
Cumin powder / Jeera powder - 1-2 tsp
Garam masala - 1 tsp
Turmeric powder - 1/2 tsp
Red chilli powder - 2 tsp
Cumin seeds / Jeera - 1 tsp
Oil - 3 tsp
Salt
Water

Method:

Soak the urad dal and the rajma for around 6-8 hours.
Pressure cook them in water until soft. Urad dal cooks very soon, around 3-4 whistles or 10 mins. Rajma, however, takes much longer. It took me around 45 mins on low
flame after 1 whistle to cook rajma.
Also, while cooking rajma, do not use the water that it was soaked in. Use fresh water.
Puree the onion along with the ginger and garlic
Puree the tomato
Heat oil in a kadhai and add the cumin seeds
Once they brown, add the onion paste and cook for 2-3 mins
Add the tomato puree and all the spices and cook on low flame for 10-12 mins. Add 1-2 tbsp water if it starts burning.
Add the urad dal and rajma.
Add salt and water.Adjust water according to the desired consistency.
Cook for another 5-7 mins.
Serve hot with rice or roti
Read more ...

Gobi Mussallam

Gobi mussallam is actually an entire head of cauliflower or gobi cooked in a tomato and cream based gravy. I searched the internet for this recipe but nothing looked similar to the one I eat at a restaurant near my house. So I decided to use the ingredients mentioned and just make it with instinct. Well, that worked, and I got a yummy gobi mussallam. I did not use an entire head of cauliflower as I was looking at making a smaller quantity, so I just cut it into florets and used.

Gobi mussallam
Steam and fry the gobi

Fry onion, ginger, garlic paste along with the whole spices


Add tomato and all the powder spices and cook for 15 mins

Add milk and cook until desired consistency is reached


Cauliflower cooked in a creamy tomato gravy
Serve hot with roti or rice


Gobi Mussallam


Cauliflower cooked in a tomato and cream based gravyHead of cauliflower cooked in a tomato and cream based gravy. Vegetarian cauliflower curry.
Recipe Type:  Main
Cuisine:            North Indian
Prep Time:     15 minutes
Cook time:     45 minutes
Yield:                Serves 2-3


Ingredients:

1/2 large or 1 small Cauliflower
3 Tomatoes
3 Onion
4 cloves Garlic
1" piece of Ginger
1/4 cup Cashew nuts (Optional)
4 tsp Coriander powder / Dhania powder
1-2 tsp Cumin powder / Jeera powder
1 tsp Garam masala
1/2 tsp Turmeric powder / Haldi
1 tsp Red chilli powder
1 Bay leaf /Tej patta
1-2 Clove / Lawang
1 Star anise
4-5 Peppercorns
1 small piece Cinnamon / Dalchini(about 1.5")
1 Cardamom / Elaichi
1 cup Milk
5-6 tsp Oil
Salt
4-5 Almonds (Optional)
A handful of Coriander leaves

Method:

Soak cashew nuts in warm water. If you don't have cashew nuts you can skip this.
Break cauliflower into large florets.
Soak cauliflower in hot water with 1 tsp of salt added to it for around 2 mins.
Steam or boil the cauliflower until almost done. It should not be completely cooked and it should still be crunchy. I steamed it for around 3-4 mins.
Remove the cauliflower and pat them dry using a kitchen towel
Heat 3 tsp of oil in a kadhai and fry the cauliflower until they slightly brown
Remove the cauliflower form heat and keep aside
Puree the onion, ginger and garlic in the mixer
Puree the soaked cashew nuts using a little water
Puree the tomatoes
Heat the remaining oil in a kadhai and add the onion paste
Add the bay leaf, clove, star anise, peppercorns, cinnamon and cardamom and fry until the onion turns slightly brown. Add more oil or a little water if the paste starts sticking to the bottom of the kadhai
Add tomato and cashew nut puree
Add turmeric powder, coriander powder, cumin powder, red chilli powder and garam masala and cook on low flame for 10-15 mins. Keep stirring to avoid the paste from burning or sticking to the bottom of the kadhai. I cooked for almost 15 mins.
Add the milk and salt and continue cooking on low flame until the gravy obtains the consistency needed. I cooked it for around 5-10 mins more.
Add the cauliflower and cook for 2 mins
Garnish with chopped almonds and finely chopped coriander leaves
Serve hot with roti or rice
Read more ...

Spinach Dal | Palak Dal

Howdy!! How did the weekend treat you? Are you in mood for some piping hot Palak Dal and Rice?

How to make palak dhal recipe at www.oneteaspoonoflife.com

The first time I had this Spinach or Palak Dal was when I was around 8 years old. My friend's mom, my next door neighbor made it. As we played in the kitchen, she cooked it right in front of us showing us how it is made. The moment she added the ginger-garlic and fried and the aroma wafted over to where we were playing, our mouths started watering and we did not leave the kitchen until the entire dal was made. I did not even go home for lunch that day, I ate at my friend's place.

Being from Mumbai, my friend's family was used to eating spicy and hot food. To my near bland palate, it was like an explosion in my mouth and I ate the dal while my eyes watered. But I loved every spoonful of it. I loved it so much, I ran back home and asked my mom to learn how to make Palak Dal.

How to make palak dhal recipe at www.oneteaspoonoflife.com

I've since, learnt how to make it and it is regular occurrence in my house. While I have grown up, my palate is still not accustomed to extremely hot food, so I never add as much green chilli or ginger my friend's mom added, I only add enough to tantalize my tongue. If you are fond of hot food, feel free to add in more or if you prefer your food to be lighter in taste, you can remove the seeds of the chilli before grinding it into a paste.

For added flavor, you can add half a cup of dill leaves or suva sabzi to this dal as well. I add it at times if I have it and it gives this Palak Dal a different dimension. Highly recommended addition, I say!

I personally love dal with roti or naan as much as I love my dal rice. If you plan on eating this with roti, reduce the amount of water you add, to get a thicker consistency. To eat with rice, a thinner consistency is preferred. 

I cook this dal entirely in the pressure cooker, partly because it is quicker and partly because I am lazy to wash many dishes. If you do not have a pressure cooker, you can use a kadhai or a sauce pan with a lid to make this Palak Dal. You will find that this does not alter the taste or texture of the Palak Dal, however, it does take longer to cook the dal. And that means you have to wait longer to eat this awesome curry!!!

How to make palak dhal recipe at www.oneteaspoonoflife.com

If you liked this, you may also like:


Spinach Dal | Palak Dal


How to make palak dhal recipe at www.oneteaspoonoflife.comSpinach Dal or Palak Dal is a spiced dal made from pigeon pea lentils (toor dal) and spinach. 

Recipe Type:  Main
Cuisine:            North Indian
Prep Time:     20 minutes
Cook time:     40 minutes
Yield:                Serves 3-4

Ingredients:


5-6 cups chopped Spinach (Palak)
1 cup Pigeon Pea Lentils (Toor Dal)
1 Onion
2 Tomato
3-4 pods Garlic
1" piece Ginger
1-2 Green Chilli
1 tsp Garam Masala
1/2 tsp Mustard Seeds
1 tsp Cumin Seeds (Jeera)
1/2 tsp Turmeric Powder (Haldi)
3 tsp Oil
Salt to taste
Water

Method:


Boil the toor dal with 2.5 cups of water in a pressure cooker. Remove the dal and clean the pressure cooker for re-use.
Wash and chop the palak leaves.
Chop the onion and tomato and keep aside.
Grind the ginger, garlic, and the green chillies into a paste.
Heat oil in the pressure cooker, add the mustard seeds and let them splutter.
Now add the cumin seeds and let them brown slightly.
Add the chopped onions.
Fry the onions until translucent.
Add the ginger-garlic-chilli paste and fry until fragrant.
Add the tomatoes and cook for 2 minutes, stirring occasionally.
Add garam masala and mix well.
Add chopped palak and stir for 1-2 minutes.
Add the boiled dal, turmeric powder, salt and 1 cup of water.
Close the pressure cooker and cook for 1-2 whistles or around 5 minutes after the pressure builds up.
If you want it to be thinner in consistency, then add more water.
Serve hot with rice.

Note:


If not using a pressure cooker, you can just use a regular deep sauce pan with a tight lid. There will be no difference in taste or texture, however, it will take longer to cook the Spinach Dal.


Read more ...