Showing posts with label Rice. Show all posts

Mixed Dal Handvo Recipe | Lauki Handva Recipe | How to make Gujarati Handvo


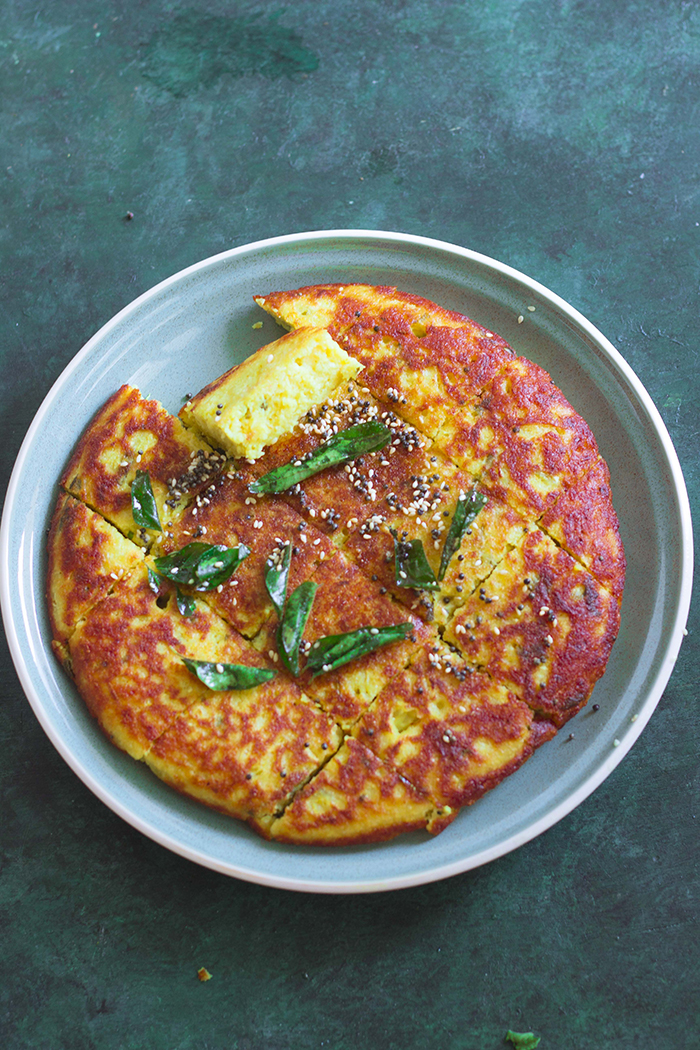
Mixed Dal Handvo or Lauki Handva is a popular gluten free Gujarati breakfast or snack, made from mixed lentils, rice and bottle gourd. Handvo is made with a rice-dal fermented batter and grated bottle gourd (lauki / ghiya). Handvo is steamed / pan fried in a frying pan or a kadhai. Handvo is suitable for a Jain diet.

In a hurry? Jump to Video or Jump to Recipe


mixed dal gujarati handvo


I had been waiting for this long weekend for ages and it has gone in a poof.. Somehow, all my long weekends seem busier than my regular 2 day weekends. Any of you out there with me on this one?

So, what did you do this Ganesh Chaturthi? I hope you all had a wonderful Chaturthi.

I spent my days cleaning the house before the festival and then just cooking, cooking and more cooking. Whew! Does life get busy around festivals!

mixed dal gujarati handvo

I made these super delicious Steamed Modaks. I love them sooo much more than the fried ones. I think I ate more than all others combined. 

To add to this Raj has a potluck in office and he wanted to take these Almond Chocolate Brownies. Thanks to my small oven, we had to keep baking it batches and it kept us in the house watching the oven for a long time.

But the festivities are done, the sweets have taken a toll on my weight for sure. It's now time to get back to something nutritious and healthy. These Protein Packed Mixed Dal Handvo or Handva as it is sometimes called, was just the thing I had in mind for Tuesday breakfast. 

mixed dal gujarati handvo

To tell you the truth, I wasn't convinced about Handvo when I watched it on TV. I wondered if it could taste so good as the show presenter was saying. Then, I tried it at home, following this recipe from Tarla Dalal and I must say, those guys on TV weren't lying, it is absolutely delicious. And healthy too... Now I can have my cake and eat it too!!

What is Handvo or Handva?


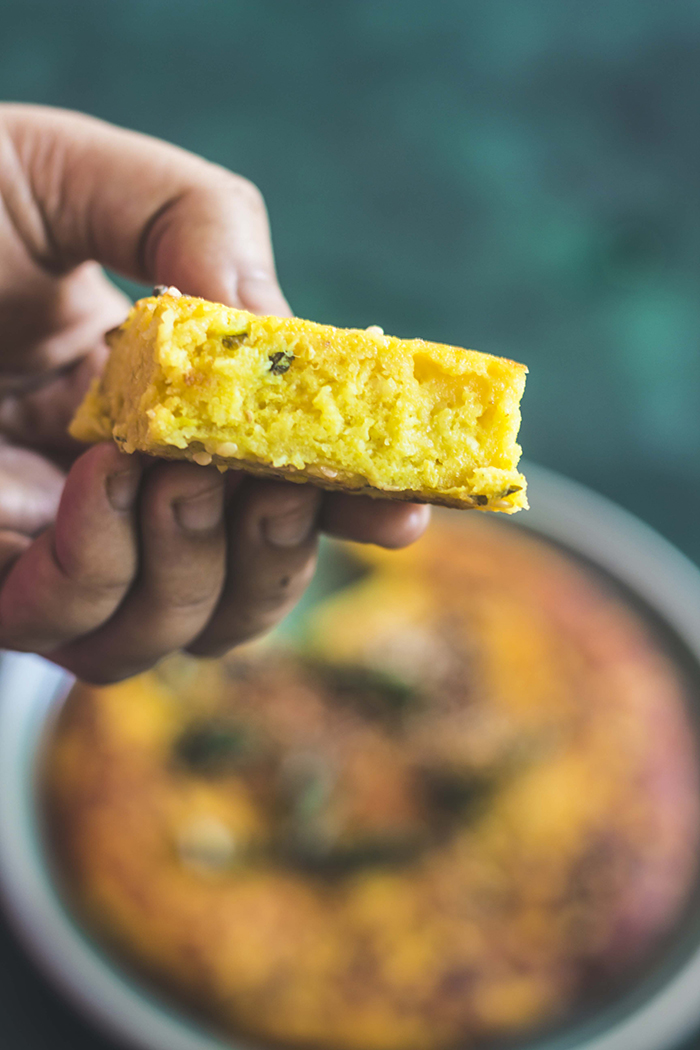
Handvo is a pan-fried or steamed savory cake made with a fermented batter of rice and mixed lentils. Rice and a variety of lentils or dals are soaked for 6-8 hours and then blended to form a thick coarse batter. To this batter, yogurt or curd is added to help it ferment better.

You can tell that the batter is fermented by looking at it, it should be light and fluffy and should have risen. If the temperatures in your region are high, this may take as less as 5-6 hours and if they are cold, it may take 10 hours or longer. 

Lauki or Bottle gourd or Ghiya is lightly fried in a tempering of mustard, curry leaves, asafoetida (hing) and turmeric powder before adding to the batter. If you cannot find bottle gourd, you can replace it with Zucchini or skip it too.

This batter is then steamed on a greased pan until cooked.

The side facing the pan first is crispy and the inside is soft. 

You may add a tempering before serving, it is highly recommended.

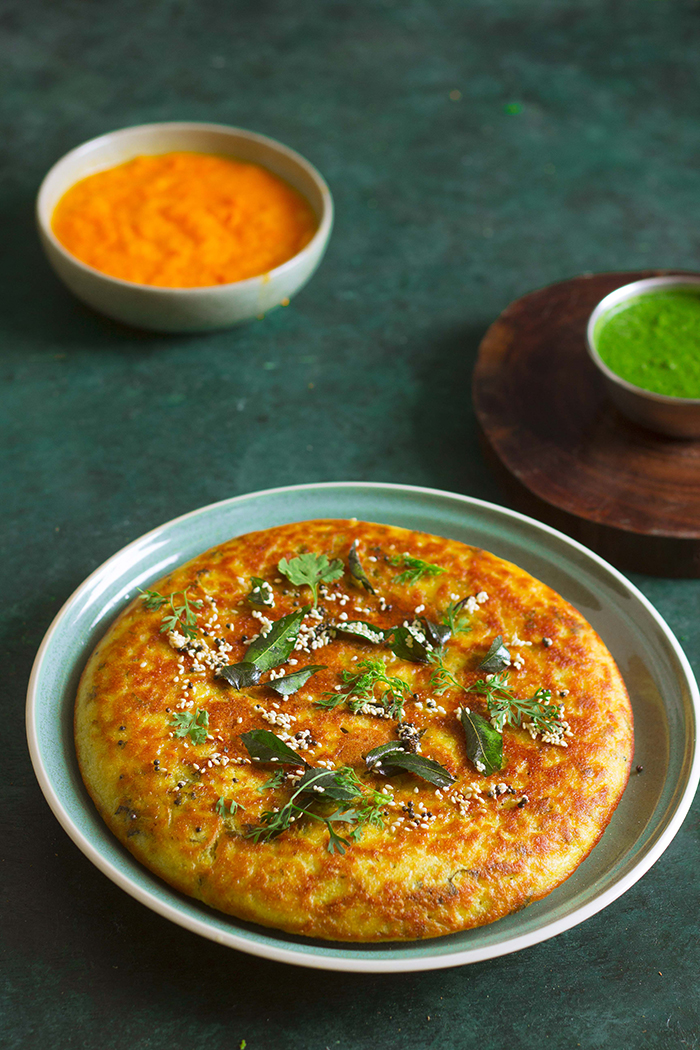
Handvo tastes best with pudina chutney, but you can also serve it with ketchup or just plain.


mixed dal gujarati handvo


If you made this recipe, let me know! Leave a comment here or on Facebook tag your tweet with @oneteaspoonlife on Twitter and don't forget to tag your photo @oneteaspoonoflife on Instagram. You can also email me at onetspoflife@gmail.com I'd love to see what you are up to.

If you like this recipe, do not forget to share it with your friends and family! 


You can follow One Teaspoon Of Life on FacebookTwitterInstagramPinterest or you can subscribe to One Teaspoon Of Life and receive all the latest updated via Email


Video Recipe


--------------------------------------------------------------------------------------------------------------------------

Mixed Dal Handvo Recipe | Lauki Handva Recipe | How to make Gujarati Handvo


mixed dal gujarati handvoMixed Dal Handvo or Lauki Handva is a popular gluten free Gujarati breakfast or snack, made from mixed lentils, rice and bottle gourd. Handvo is made with a rice-dal fermented batter and grated bottle gourd (lauki / ghiya). Handvo is steamed in a frying pan or a kadhai.

Recipe Type:  Snacks
Cuisine:            Gujarati
Prep Time:     16 hours
Cook time:     30 minutes
Total time:     6 minutes
Yield:                Serves 4 to 5


Ingredients:


1 cup Rice
0.5 cup Moong Dal
0.5 cup Toor Dal
2 Tbsp Urad Dal
2 Tbsp Chana Dal
0.5 cup thick Curd ( yogurt / dahi)
0.25 tsp Baking Soda (meetha soda)
2 cup Bottlegourd (Lauki / ghiya), grated, loosely packed
2 Tbsp Oil
1 tsp Mustard Seeds
1 Tbsp Curry leaves, chopped
0.25 tsp Asafoetida (Hing), gluten free
0.5 tsp Turmeric Powder
1 tsp Sesame seeds (til)
Oil to grease the pan
Salt to taste
Oil to grease the pan

For the tempering:


1 tsp Mustard Seeds
1 tsp Sesame seeds (til)
1 sprig Curry leaves

Method:


1. Mix the rice, moong dal, toor dal, chana dal and urad dal in a large bowl. Wash 2 to 3 times and soak in water for 6 hours.
2. After 6 hours, drain the water and blend to a thick coarse batter without adding any water. The dals would have soaked up water and that is sufficient to blend. If you still are struggling to blend, add very little and blend.
3. Remove the batter to a large bowl and add in the curd and baking soda. Mix well and cover and keep aside to ferment overnight or for 6-8 hours.
4. Next morning, heat oil in a pan and add mustard seeds.
5. Once the mustard seeds splutter, add the chopped curry leaves, hing, turmeric powder and grated bottle gourd. Mix well and cook on low heat for 5 minutes or until the bottlegourd softens a little.
6. Add this to the batter and add salt. Mix well.
7. In a shallow kadhai or in a frying pan add 1-2 Tbsp oil and spoon in the batter. Sprinkle sesame seeds. You will have to cook the handvo in batches. The size of your frying pan or kadhai will determine how many batches. I made 2 handvos in a 24 cm frying pan.
8. Cover and cook on low heat until the top is almost cooked. It should look somewhat set. This may take 8-10 minutes.
9. Carefully flip the handvo and cook on high heat until the second side is cooked and has brown spots.
10. Cool the handvo a little before slicing. Handvo will appear to be sticky when hot, it will set better as it cools.
11. Just before serving, make a tempering by heating oil and adding mustard seeds, curry leaves and sesame seeds and pour on the handvo.
12. Serve warm with pudina chutney.


If you liked this, you may also like:

Steamed Gujarati Green peas Snacks
Matar Dhokla

Kothimbir Vadi Coriander Chickpea Cake cilantro garbanzo steamed baked savory maharastrian vada wada pancake vegan
Kothimbir Vadi
How to make vegan sabudana vada sabakki vada recipe at www.oneteaspoonoflife.com
Sabudana Vada


Read more ...

Mysore Masala Dosa

Mysore Masala Dosa is a rice and lentil pancake that has a chilli and garlic chutney spread on the inside and stuffed with a potato bhaji and served with a simple coconut chutney.

How to make Mysore Masala Dosa recipe at www.oneteaspoonoflife.com


Weekends are meant to be slept in. Aren't they? But sometimes, waking up early on a weekend has it's own excitement - that slight chill in the air, the sky all grey and cloudy, birds chirping away from their hiding places and an occasional car or bus on the road. At times like this, all I need is a steaming hot cup of coffee and a blanket to wrap myself as I sit in the balcony watching the world go by. And you know what's better than that? Having a plate of absolutely delicious homemade Mysore Masala Dosa to eat.

There is absolutely nothing like a Mysore Masala Dosa for breakfast. The good thing about Bangalore is you can eat a Masala Dosa morning, evening or night and for as little as Rs.20 and for as much as Rs.200. But this homemade Masala Dosa is sooo much better than the restaurant ones. I swear you won't like those once you have tasted one that YOU made at home.

How to make Mysore Masala Dosa recipe at www.oneteaspoonoflife.com

A Mysore Masala Dosa is crisp and golden brown on the outside and soft and fluffy on the inside. It has a spicy red chilli and garlic chutney spread on the inside and is always stuffed with a potato bhaji. Served with a simple coconut chutney, it actually makes one of the most delicious breakfast. Sometimes, dinner too. Skip the red chilli chutney, to get a regular Masala Dosa.

In the age of fast food, a Dosa is a mix of both food movements - slow and fast. It needs to go through the slow process of fermentation but after that, it is a matter of minutes to cook it. 

How to make Mysore Masala Dosa recipe at www.oneteaspoonoflife.com

Points to keep in mind:

  • There are many recipes out there that replace the rice with rice flour or with all purpose flour, but a Dosa tastes authentic only when it is made with with rice grains as opposed to flour. 
  • I ALWAYS use an age old cast iron griddle or tava to make Dosa. It gives it that amazing color and crispness, but my sister swears by her non stick tava or griddle. Either way, a Dosa tava is meant to be absolutely flat, non stick or cast iron. You can also use a flat frying pan. 
  • In winters or if the day is cold, you may need more time to ferment the batter. Keeping it near a warm stove or oven helps. If you live in a hot region or it is summer, you may need only 6-8 hours for the batter to ferment. 
  • You will know that the batter is fermented when it has risen and tastes sour. 
  • If you do not plan to use the entire batter at one go, remove the excess and only add salt to the batter you plan to use immediately. 


How to make Mysore Masala Dosa recipe at www.oneteaspoonoflife.com


Mysore Masala Dosa


How to make Mysore Masala Dosa recipe at www.oneteaspoonoflife.comMysore Masala Dosa is a rice and lentil pancake that has a chilli and garlic chutney spread on the inside and stuffed with a potato bhaji.

Recipe Type:  Breakfast
Cuisine:            South Indian
Prep Time:     24 Hours (Including soaking and fermenting)
Cook time:     5 minutes per Masala Dosa
Yield:                Makes 12-15

Ingredients:


For the Dosa:


1.5 cups Dosa Rice (Use regular rice if you don't have dosa rice)
0.5 cup Urad Dal or Split Black Gram
1 tsp Fenugreek seeds or Methi seeds
Water to grind
1-2 tsp Salt
1.5-2 tsp Oil per Dosa

For the Red Chilli Chutney:


8-10 dry Red Chillies
1-2 Garlic cloves
1-2 Tbsp Water
1/2-1 tsp Salt

For the Potato Bhaji:


3-4 medium sized Potatoes (Boiled and Peeled)
1 large Onion
3-4 Green Chillies
1 sprig Curry Leaves
1 tsp Mustard Seeds
1 tsp Turmeric Powder
3-4 tsp Oil
Salt to taste
2 Tbsp finely chopped Coriander Leaves

Method:


To make the Dosa Batter:


Soak the rice, urad dal and methi seeds for 8-10 hours. To make Dosa for breakfast, soak the grains the previous morning. So you can grind the batter at night.
Drain the water and grind the soaked rice and dal into a fine batter. Use as little water as possible while grinding. Adding too much of water will not allow the batter to become fine. Start with 1/4-1/2 cups of water and then add more if required.
Pour the batter into a deep vessel. Mix well if you ground the batter in batches.
Cover and keep in a warm place to ferment overnight.
When the batter has risen and become sour, it has fermented enough and can be used to make Dosa.
The batter keeps well in the fridge for almost a week. See "Points to keep in mind" above for more information on storage.

To make the Red Chilli Chutney:


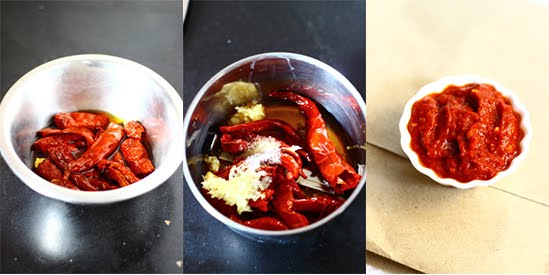
red chilli chutney garlic

Remove the seeds from the dry red chillies and soak them in warm water for 30 minutes.
Grind them into a fine paste along with the garlic, salt and a little water.
Store in an airtight box in the fridge. It keeps well for 2 weeks in the fridge.

To make the Potato Bhaji:


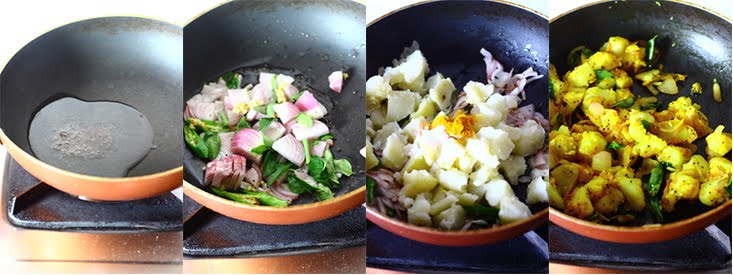
potato onion hash

Mash the potatoes into rough cubes.
Slice the onions and chop green chillies.
Heat oil in a pan and add the mustard seeds.
Once they splutter, add the curry leaves, onions and the green chillies.
Fry the onions until they are translucent.
Add the potato and mix well. 
Now add the salt and turmeric powder. Mix well.
Fry for 1-2 minutes.
Garnish with the chopped coriander leaves.

To make the Mysore Masala Dosa:


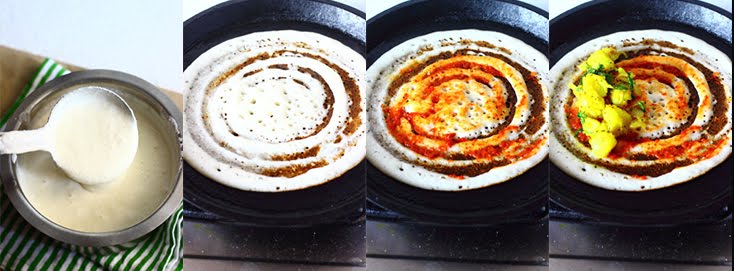
dosa mysore masala chutney pancake red chilli rice urad dal

Grease a cast iron or non stick griddle and heat it.
Once the griddle is hot (not smoking), pour one ladle full of batter on the griddle and spread it from the inside out into a thin circle.
Drizzle a spoonful of oil on it and allow it to cook on medium heat.
When the side touching the griddle turns golden brown and crisp and the side facing you is cooked and there is no raw batter there, spread 1/2-1 tsp of the red chilli chutney on the dosa.
Place a spoonful of potato bhaji on the dosa and fold the dosa into half.
Serve it hot with coconut chutney.

Read more ...

Khara Pongal


Khara Pongal Ven Ghee Khichdi moong dal rice

I spent 10 hours travelling by train yesterday. 10 long HOURS.
Can you imagine starting out at 5am, travelling by train for 5 hours and then spending a few hours at your destination and then travelling 5 hours in train coming back and then charging through the horrible HORRIBLE traffic home and having to cook your own dinner???

5am is close to mid night for me. I'm so not a morning person.


I was exhausted. I was more than exhausted, I don't even have a word for it. It was late to order food or parcel something from a restaurant. I was hungry and I had to eat. At times like this, come out the simplest recipes where I don't need to do a thing and magically delicious food appears on the table.

Khara Pongal is one of those magic recipes. Pongal is a South Indian version of Khichdi. To make khara pongal, all you need to do is dump rice, moong dal, water, ginger and a few other things into the rice cooker or pressure cooker and let it do its thing. And VOILA! 15-20 mins later, food on your table. It is just as simple as that.

Khara Pongal Ven Ghee Khichdi moong dal rice

So I washed and soaked my rice and moong dal as soon as I walked into the house. You can skip the soaking and directly cook it together but it may take you a little more time than what I took. Soaking for at least 30 minutes is recommended.

I'd never had Pongal until I moved to Bangalore. I'd never eaten rice for breakfast either until I moved to Bangalore. Then in the office cafeteria, I had khara pongal with masala vada for the first time for breakfast and it was love at first bite. Since then, I've been making it when ever I'm short of time.

Khara Pongal Ven Ghee Khichdi moong dal rice

Pongal is meant to be mushy, so don't worry about overcooking it. In fact, go ahead overcook it. This is why is generally fed to little kids as it needs no chewing. If serving it to kids, do not add the peppercorns and the chilli. 

Pongal is a vegan dish, but what takes it to a totally different level is the Ghee or clarified butter tempering that's poured over it. I say, the more the ghee, the better it tastes. If you are not vegan, don't forget this step. 


Khara Pongal


Khara Pongal Ven Ghee Khichdi moong dal riceKhara Pongal is a quick dish made by cooking together rice and moong dal with ginger and tempered with ghee.

Recipe Type:  Main
Cuisine:            South Indian
Prep Time:     30 minutes
Cook time:     30 minutes
Yield:                Serves 2

Ingredients:


1/2 cup Rice (uncooked)
1/2 cup Moong Dal (uncooked)
3 cups Water 1/2 tsp Black Peppercorns
3/4" Ginger
1/2 tsp of Turmeric Powder
Salt to taste
3-4 tsp Ghee
8-10 Curry Leaves
1 tsp Cumin seeds

Method:


Method:


Wash the rice and dal and keep aside for 30 minutes.
Add the washed rice and dal to a pressure cooker with the water, turmeric powder, black peppercorns, grated or sliced ginger and salt.
Pressure cook for 15 minutes or for 5-6 whistles. Pongal is meant to be mushy so don't worry about overcooking it.
Heat the ghee in a small pan and add cumin seeds to it.
Once they brown slightly, turn off the heat and add the curry leaves.
Pour this tempering over the khara pongal and mix well.
Serve hot with some raita

Read more ...

Rajma Chawal or Red Kidney Beans Masala with Rice

Rajma Chawal is red kidney beans cooked in a masala made from onion, tomato and some spices served over a bed of white rice.

red kidney beans masala gravy punjabi vegan rice sabzi

Haaapy Wednesday....

I'm not entirely sure about my feelings for Wednesday, the optimist in me says the week is half done and the cynic in me says there are still TWO days left to go... Either way, it calls for a treat, don't you think so?

I've had a hectic time going on. It was pretty much work work work until Sunday where I worked for a full day on the blog.Yes, an ENTIRE day. Raj just did his stuff and I did mine. Sis cooked up lunch and we just ate Masala Puri - a local street food for dinner. I redesigned a lot of stuff around on the blog on Sunday. Tried different templates, but finally decided HTML isn't my cup of tea. Too much effort, so reverted back to my old template and just updated the layout. The awesomely beautiful weather totally helped the non-working-yet-working Sunday I had. Such heavy lashing rains and melodious songs on YouTube. Have I mentioned, I absolutely LOVE rains.

red kidney beans masala gravy punjabi vegan rice sabzi

And then back to the work work work grind from Monday. So it is finally mid week and I deserved my treat I believe. Something delicious, yet quick to make. When I'm stressed out, I always make rice. On other days, I'm not usually a big fan of rice. I stick to rotis (wholewheat flatbread). But I think it is that starchy comfort I seek in rice when I'm all drained out. And what goes well with Rice - RAJMA...   Rajma Chawal in simple English words is Beans and Rice. Beans and Rice, now that's a world famous combo.

I highly recommend using Basmati rice here. The long grains and the fragrance of Basmati makes any simple dish also seem special. But I was out of Basmati. So I had to make do with regular short grain rice. But I highly highly recommend Basmati. Did I mention that already?

Have you ever fried onions and garlic in oil? Or at least been around when someone else was frying it? Doesn't it just smell AMAZING? That aroma always makes me hungry, even after I've just had a big meal. Well, this Rajma Chawal is a treat for the nose too with the frying-of-onion-and-garlic. It is the perfect appetite builder. So I am not responsible for munching on those banana chips while cooking, it was the onions.


red kidney beans masala gravy punjabi vegan rice sabzi


I've pretty much used the same recipe in the past to make black bean soup. Just replace the red kidney beans with the black ones and you are done. So if you want to skip the rice, although I suggest you try this famous marriage of flavors, you can have the Rajma just as a regular spiced soup with some crusty bread to mop it up.


Rajma Chawal or Red Kidney Beans Masala with Rice


red kidney beans masala gravy punjabi vegan rice sabziRed kidney beans cooked in a masala made from onion, tomato and some spices served over a bed of white rice.

Recipe Type:  Main
Cuisine:         North Indian
Prep Time:    20 minutes
Cook time:     45 minutes
Yield:             Serves 2


Ingredients:


Rajma:


2 cups cooked Red Kidney Beans or Rajma (see note if using dried beans)
2 Tomatoes
1 large Onion
1-2 cloves Garlic
1/2" piece of Ginger
2 tsp Cumin Powder or Jeera powder
1 tsp of Coriander Powder or Dhania Powder
1/2 tsp of Garam Masala
1 tsp of Cumin seeds or Jeera
1 tsp Sugar or Jaggery powder
1 tbsp of Kasuri Methi (Optional)
4 tsp of Oil
Salt to taste
Water
A handful of coriander leaves for garnish

Chawal:


1 cup of Rice (preferably Basmati)
2 cups of Water

Method:


Chawal:


Wash the rice twice with sufficient water.
In a deep pan, bring 2 cups of water to boil.
Once it comes to a rolling boil, add the washed rice and cover and cook until the rice is done.
Drain out any excess water.
Alternatively, pressure cook the rice for around 2-3 whistles or 8-10 minutes after the pressure builds up to cut the rice cooking time into half.

Rajma:


Heat the oil in a pan and add the cumin seeds.
Grind together the onion, ginger and garlic and add to the pan.
Fry the onion paste until it turns slightly brown or for about 3-4 minutes.
Grind the tomato into a puree.
Add the tomato puree to the pan and mix well. Fry for 2-3 minutes.
Now add all the spice powders and 1 cup water and allow it to simmer on low heat for 4-5 minutes. If you used dried beans and cooked it yourself, then instead of plain water, you can use the water in which the beans were cooked in.
Add the cooked beans, salt and sugar or jaggery and cook for another 2-3 minutes.
Add the kasuri methi and mix well. 
Garnish with fresh coriander leaves and serve with rice.

Note


If using dried red kidney beans or rajma like me, then soak 1 cup of dried beans for 8-10 hours.
Drain out the water.
In a pressure cooker or a deep pan, add the soaked beans and add enough water to cover the beans and a little more. 
Add salt and cover and cook until the beans are done but not mushy.
I cooked in the pressure cooker, so after the first whistle, I lowered the heat and allowed it to cook for 15 minutes.


Read more ...

Churmuri Soosla | Puffed Rice Breakfast

I LOVE ___ This is usually how I start my posts. You must think I love practically everything that I can eat (i.e. Vegetarian). I do hate some food. Well, hate may be a strong word. More like dislike. And I dislike something that more than half the world loves - Breakfast Cereals.

susla oggarne murmura kadle puri puffed rice breakfast vegan


I'll replay a usual breakfast discussion between me and my hubby dearest Raj.

Me (crestfallen, yet optimistically looking for answers) - "I don't know what to make for breakfast"

Raj - "Don't worry, lets eat cornflakes"

Me - "Nooooo... I'll make something, give me 10 minutes"

He loves it, I dislike it (at least the ones currently in the market). All those cereal lovers out there, please FORGIVE me for my next statement. I somehow feel Cereals are just loaded with sugar and offer nothing health wise. And I'm somehow not a big fan of sweet breakfast.

So this promise of 10 minutes isn't always upheld, but then, he's out there with the Newspaper and doesn't really keep track of time.

Isn't a girl allowed plus or minus 10 minutes? I'm sure she is. This wonderfully light breakfast of puffed rice (Churmuri or murmura or mandakki or kadle puri. Whew! that's a lot of "or"s) is done and on your plate in less than 20 minutes. And no - I'm not exaggerating at all.

susla oggarne murmura kadle puri puffed rice breakfast vegan


Puffed rice is exactly what the name says - it is puffed up rice. It is basically Rice Popcorn (more like popRICE). There are varieties in it - salted and unsalted. They both differ slightly texture wise. I've always used the salted variety.

This Churmuri Soosla as I call it, it my goto breakfast when I'm short of time. It's light, quick and it has the sweetness from the onions, tartness from the tomatoes and the lime, the heat from the green chillies and freshness from the coriander leaves. Basic spices like cumin seeds (jeera) and turmeric (haldi) just make it all the more delicious. You can skip the roasted gram, but I highly recommend it. If you cannot find it, I'd say try replacing it with powdered roasted peanuts and that should do.


Churmuri Soosla | Puffed Rice Breakfast


susla oggarne murmura kadle puri puffed rice breakfast veganA light South Indian breakfast made with puffed rice.

Recipe Type:  Breakfast
Cuisine:          South Indian
Prep Time:     10 minutes
Cook time:     15 minutes
Yield:              Serves 2-3

Ingredients:


150 gms of Puffed Rice / Churmuri
1 small Onion
1 medium sized Tomato
1-2 Green Chillies
1/2 tsp Turmeric Powder
1/2 Lemon / Lime
1/3 cup of Roasted Gram / Puthani
3 tsp of Oil
1 tsp of Cumin seeds
6-8 Curry leaves
1 Tbsp of finely chopped Coriander leaves
Salt to taste

Method:


Heat oil in a pan or kadhai.
Add the cumin seeds and allow them to brown slightly.
Add finely chopped onions, curry leaves and slit green chillies. Cook until the onions turn translucent.
Add chopped tomatoes and fry them for around 2 minutes until the tomatoes are soft.
Add the turmeric powder and mix well.
Wash the puffed rice and squeeze out the water.
Add to the pan and mix well.
Now add salt and lemon juice.
Grind the roasted gram into a fine powder and add to the pan. Mix well.
Garnish with coriander leaves and serve.
Read more ...

Curried Brown Rice and Zucchini Fritters


chawal tikki garam masala vegan pan fried snacks appetizer

Game Day? Movie Day? These Curried Brown Rice and Zucchini Fritters is are perfect for every occasion that DEMANDS you to to be glued to 2 things - your Sofa and your TV.

Called your friend over for Tea or Drinks? Curried Brown Rice and Zucchini Fritters - Perfect snack again.

chawal tikki garam masala vegan pan fried snacks appetizer

I can keep going and listing down all the occasions when you can make it. But frankly speaking, you don't need any occasion to enjoy good finger food. We just had this as an appetizer during dinner - no guests over or anything, just us two enjoying a quiet dinner.

It is also a great way to use up leftover rice if you have any.

Brown rice is healthy, even, fashionable these days. Not as fashionable as Quinoa, but fashionable enough. These fritters are loaded with the goodness of brown rice and zucchini - they are almost HEALTH FOOD! Almost!  Tasty health food - oxymoron isn't is?

chawal tikki garam masala vegan pan fried snacks appetizer

I've seasoned these fritters with Italian seasonings like oregano, basil etc, in the past, but I'm a CURRY GIRL at heart. I love my spices and my curry. The Garam Masala - the quintessential Indian blend of spices adds a wonderful Zing to the fritters. 

These Curried Brown Rice and Zucchini Fritters taste great when served piping hot with some good old ketchup.

Step by Step Instructions:


chawal tikki garam masala vegan pan fried snacks appetizer

1) Cook the rice as per instructions.
2) Allow the rice to cool and then mash it. You can use a food processor or mixer to mash it.
3) Grate the zucchini and add to the mashed rice.
4) Add all the ingredients except the oil and mix well.

chawal tikki garam masala vegan pan fried snacks appetizer


5) Shape the mixture into small patties and place in the hot pan and cook on medium heat.
6) Allow the first side to brown, and flip after 3-4 minutes. Allow the second side to brown and crisp up.
7) Serve hot with ketchup.


Curried Brown Rice and Zucchini Fritters


chawal tikki garam masala vegan pan fried snacks appetizerFritters or Tikkis made with mashed Brown Rice and grated Zucchini. Spiced with Garam Masala and pan fried. 

Recipe Type:  Snacks / Appetizer
Cuisine:          Indian
Prep Time:     15 minutes
Cook time:     20 minutes
Yield:              15 fritters

Ingredients:


1/2 cup Brown Rice
1 Zucchini
2 Tbsp finely chopped Coriander leaves
1 tsp Garlic Powder
1/2 tsp Garam Masala
1/2 tsp Turmeric Powder
1 tsp Red Chilli Powder
2-3 Tbsp Corn Flour
3-4 Tbsp Oil to fry
Salt to taste

Method:


Cook the rice as per instructions. I pressure cooked it in 1.25 cups of water for about 10 minutes or 3-4 whistles. The rice should be soft and well done.
Allow the rice to cool and then mash it. You can use a food processor or mixer to mash it.
Grate the zucchini and add to the mashed rice.
Add all the ingredients except the oil and mix well.
The corn flour is added as the mixture begins to leave water after the addition of salt. If your mixture becomes too wet, add more corn flour. Heat oil in a shallow pan.
Shape the mixture into small patties and place in the hot pan and cook on medium heat.
Allow the first side to brown, and flip after 3-4 minutes. Allow the second side to brown and crisp up.
Serve hot with ketchup.
Read more ...

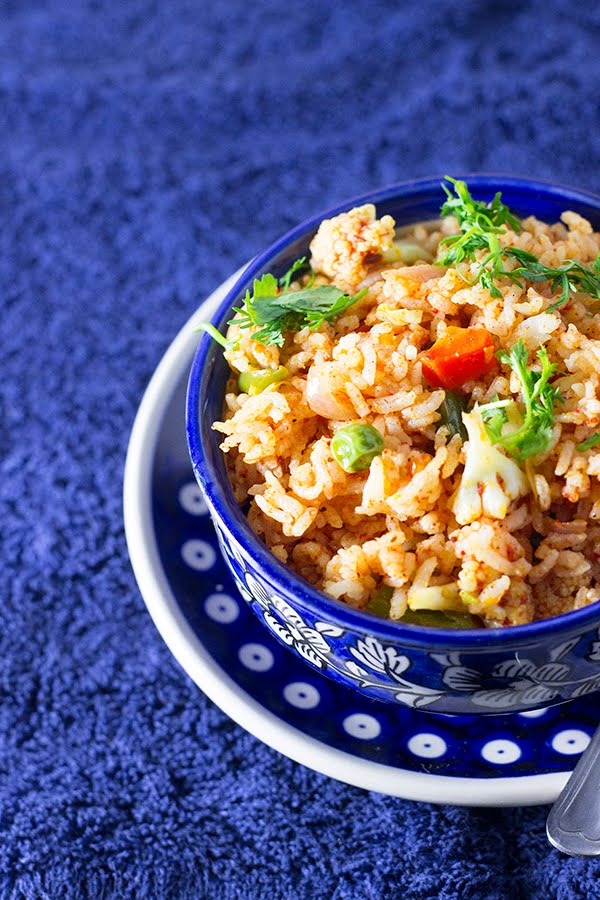
Tawa Pulao | How to make Tava Pulao Recipe with Step by Step Instructions

Tava pilaf pav bhaji mumbai street food masala rice tomato

Street food ROCKS!!!

Don't you just agree to that? Many markets across the world are centered around the street food. Streets of Bangkok... Streets of Mexico City... Streets of Mumbai...

I think the true essence of a city lies in its Street Food. You get local food, fusion food and some even carry international favorites. But one thing is a constant in every food street, there is so much variety. After all, variety is the spice of life, isn't it?
I've found these are one of the busiest places in a city, especially after sundown. We have our own little food street in Bangalore which is packed even on weeknights.

Every city has its favorite, and so does Mumbai.

Mumbai is famous for its Vada Pav and its Pav Bhaji. Lurking in their shadows is the Tawa Pulao. Tawa Pulao literally is rice and vegetables cooked on a flat griddle along with some spices and oodles of butter.

Everything tastes better with BUTTER!!! Spoon in as much butter as you desire, it only improves the taste.

Tawa Pulao can be easily made VEGAN by skipping on the butter, or adding some yummy Almond Butter.

Tava pilaf pav bhaji mumbai street food masala rice tomato

Tawa Pulao has now started to become a popular dish outside of Mumbai too. I've eaten it in so many places in Bangalore. It seems to be entering restaurants too. But the street version beats the restaurant version any day. On my list of favorite street food, Tawa Pulao ranks 3rd, right behind the Pani Puri and the Pav Bhaji.

I must credit this recipe to my friend at work. She got this for lunch one day and I simply had to have the recipe. I was pleasantly surprised when she told me the recipe. I couldn't believe it was so easy to make. My friend makes it with only green peas and she adds a chilli paste as well. I add any vegetables I find in my fridge. In the past I've added babycorn, sweet corn, zucchini, mushrooms, broccoli etc. I guess you get the picture.

Step-by-Step Instructions:

Tava pilaf pav bhaji mumbai street food masala rice tomato

1) If using uncooked rice, wash the rice and cook it in 2 cups of water until it is done but not mushy. Allow the rice to cool and then gently fork it.
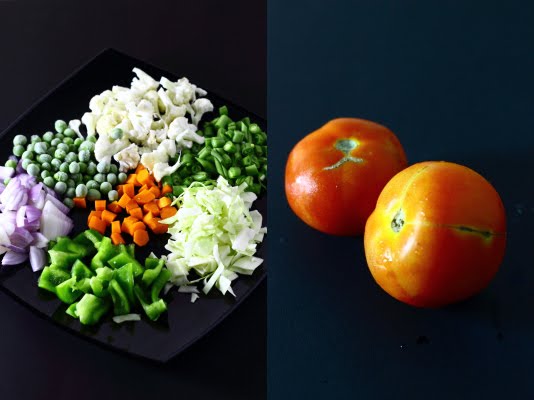
2) Dice the vegetables and keep aside. 
3) Puree the tomato in a blender.


Tava pilaf pav bhaji mumbai street food masala rice tomato

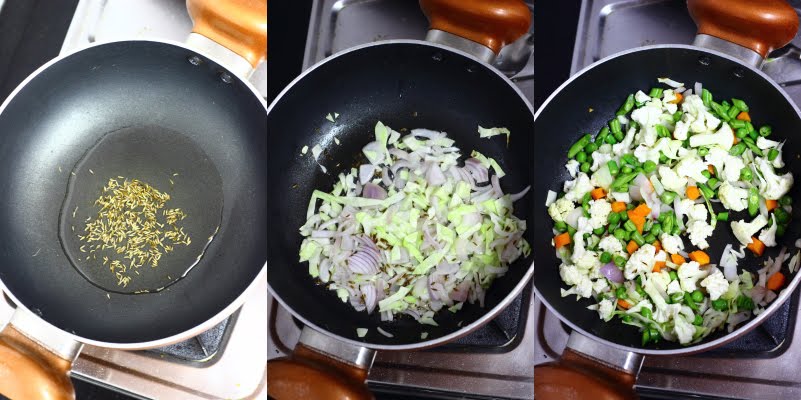
4) Heat the oil in a pan and add the cumin seeds.
5) Once they brown, add the onions and cabbage and fry until the onions are translucent.
6) Add all the remaining vegetables and 1/2 tsp of salt and cook until the vegetables are done but still have a bite to them. You can cover the pan to quicken the cooking.


Tava pilaf pav bhaji mumbai street food masala rice tomato

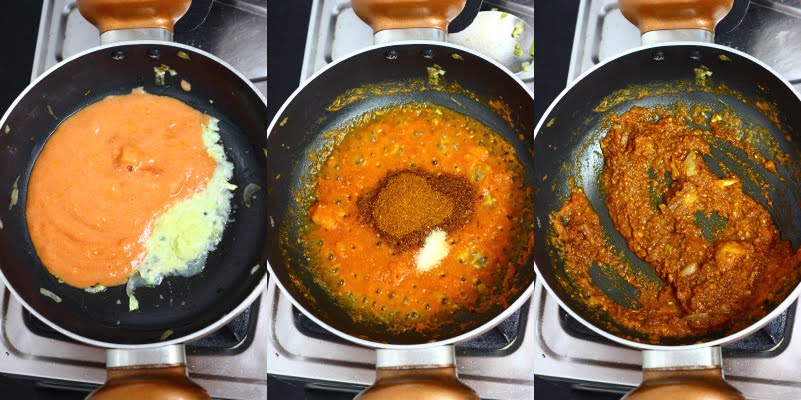
7) Remove the vegetables into a bowl, and place the pan back on heat. Add the ginger-garlic paste and the tomato puree and cook on low heat for 5-7 mins until the water from the puree evaporates and you get a thick tomato masala.
8) Add the pav bhaji masala and salt and mix well.


9) Add the fried vegetables and mix well.
10) Add the butter and mix well.
11) Add the rice and mix well.
12) Garnish with finely chopped coriander and serve.


Tawa Pulao | How to make Tava Pulao Recipe


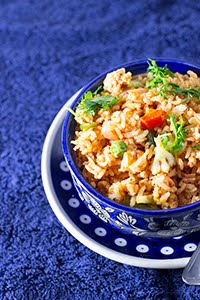
Tava pilaf pav bhaji mumbai street food masala rice tomato Tawa Pulao is rice cooked with tomatoes, vegetables and Pav bhaji masala. 

Recipe Type:  Main
Cuisine:          Indian
Prep Time:     15 minutes
Cook time:     30 minutes
Yield:              Serves 3-4

Ingredients:


1 cup uncooked Rice or 5 cups of cooked Rice
1 cup Tomato Puree or 2 Juicy Tomatoes
1.5 cups of assorted Vegetables (like Cabbage, Cauliflower, Carrots, Green Peas, Green Beans, Capsicum) (Optional)
1 Onion
1 Tbsp Ginger-Garlic Paste
2 Tbsp Pav Bhaji Masala (If you don't have this available, use Garam masala - 1/4 tsp, Coriander powder - 1 tsp, Amchur/ Dry mango powder - 1/4 tsp, Cumin powder - 1/2 tsp, Red chilli powder - 1/2 tsp)
1 Tbsp Butter
2-3 Tbsp Oil
1 tsp Cumin seeds / Jeera
Salt
Water
2 Tbsp chopped Coriander leaves for garnish

Method:


If using uncooked rice, wash the rice and cook it in 2 cups of water until it is done but not mushy. Allow the rice to cool and then gently fork it.
Dice the vegetables and keep aside.
Puree the tomato in a blender.
Heat the oil in a pan and add the cumin seeds.
Once they brown, add the onions and cabbage and fry until the onions are translucent.
Add all the remaining vegetables and 1/2 tsp of salt and cook until the vegetables are done but still have a bite to them. You can cover the pan to quicken the cooking.
Remove the vegetables into a bowl, and place the pan back on heat. Add the ginger-garlic paste and the tomato puree and cook on low heat for 5-7 mins until the water from the puree evaporates and you get a thick tomato masala.
Add the pav bhaji masala and salt and mix well.
Add the fried vegetables and mix well.
Add the butter and mix well.
Add the rice and mix well.
Garnish with finely chopped coriander and serve.
Read more ...

Vangi Bhaat | Eggplant Rice Pilaf with Raita with Step by Step Instructions

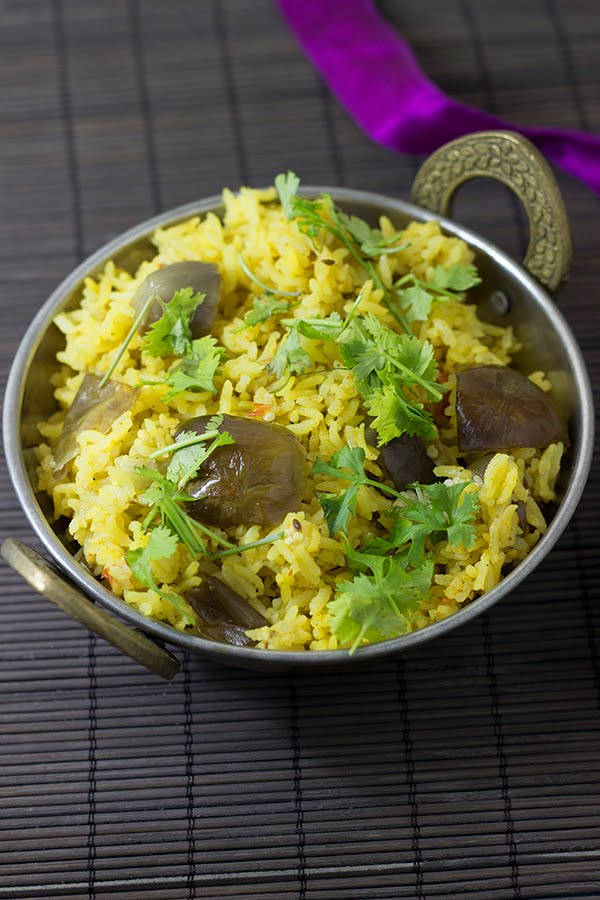
Vangi Bhaat or Eggplant Rice Pilaf is perfect for those weeknights when you are tilting towards ordering that pizza or planning to drive to the closest restaurant for that greasy take out but your head is making you feel guilty over that restaurant food.

brinjal aubergine eggplant yogurt curd rice pilaf pulao Indian

Isn't it true that we all get burned out sometime? All that going to work, doing the laundry, dusting the house, exercising and cooking.... seriously tires me out. Sometimes a little retail therapy aka shopping is what helps ease all that stress. Thank heavens for those little pleasures of life !!

Vangi Bhaat is always my GO TO dish when I'm not in the mood for too much of work and I want something home cooked, quick to make and as comforting as rice. It sometimes takes less time to come home and make Vangi Bhaat than wait for my take out at restaurants. And I know what goes in it and I can tweak it to my liking. And to add to it, it is a ONE POT recipe. Just one pot to wash, HURRAY!!!

brinjal aubergine eggplant yogurt curd rice pilaf pulao Indian

There are absolutely no more excuses to not make it anymore - Quick, Tasty, Healthy and less pots to wash. What more can one ask for, right?

Vangi Bhaat is rice cooked with brinjal or eggplant along with some basic spices. Toss in everything in a pot and cook until the rice is done. I use a pressure cooker and I recommend it as it cuts the cooking time by half. 

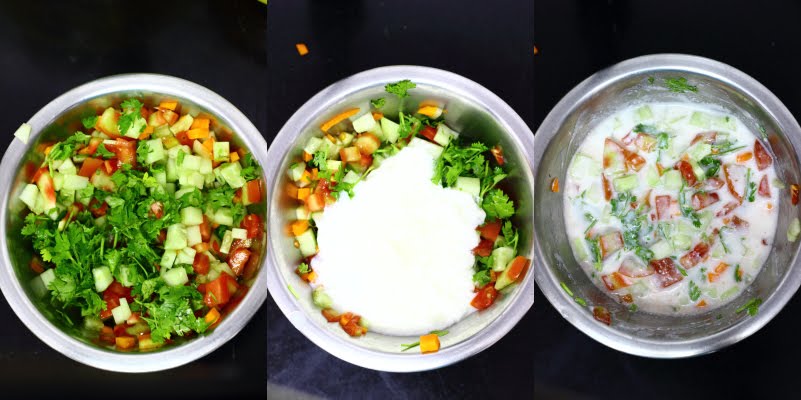
I usually pair it with some cooling mix vegetable raita. The raita can be made while the Vangi Bhaat is cooking away.

brinjal aubergine eggplant yogurt curd rice pilaf pulao Indian

Step-by-Step Recipe:

brinjal aubergine eggplant yogurt curd rice pilaf pulao Indian

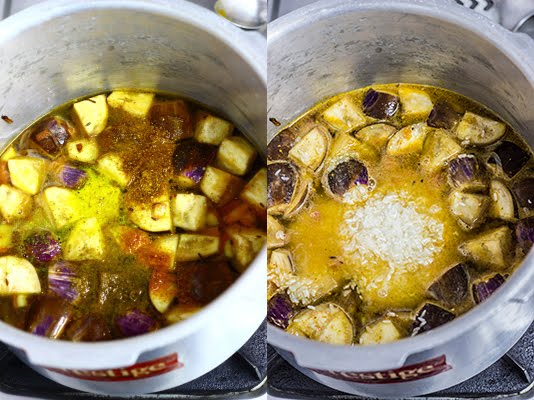
1) Wash the rice in sufficient water. Drain and set aside.
2) Roughly chop the onion, tomato and the brinjal.
3) Heat oil in a pressure cooker or a deep pan.
4) Add the cumin seeds.
5) Once they brown slightly, add the onions and fry until translucent.
6) Now add the tomatoes and brinjal and fry for 1 minute.

brinjal aubergine eggplant yogurt curd rice pilaf pulao Indian

7) Add water, all the spices and salt. If you are not using a pressure cooker, the quantity of water may vary. Adjust accordingly.
8) Add the rice and cover and cook until the rice is done. In a pressure cooker, that will take you around 3-4 whistles or approximately 10-12 minutes.
9) Garnish with finely chopped coriander leaves and serve with Raita

brinjal aubergine eggplant yogurt curd rice pilaf pulao Indian

10) To make the raita, just mix all the ingredients well.


Vangi Bhaat | Eggplant Rice Pilaf with Raita


Vangi bhaat is rice cooked with brinjal or eggplant and a few spices. It is vegan and gluten free.

brinjal aubergine eggplant yogurt curd rice pilaf pulao IndianRecipe Type:  Main
Cuisine:          Indian
Prep Time:     10 minutes
Cook time:     30 minutes
Yield:              Serves 4-5

Ingredients:


Vangi Bhaat:


200 gms of Brinjal or Eggplant
1.5 cups of Rice
1 Tomato
1 Onion
1/2 tsp of Turmeric Powder
1 tsp of Red Chilli Powder
1/2 tsp Garam Masala
1 tsp of Cumin Seeds / Jeera
1 Maggi Magic Cube (Optional)
4-5 tsp of Oil
3 cups of Water
Salt
A handful of fresh Coriander leaves

Raita:


1 cup of finely chopped mixed Vegetables (Tomato, Carrot, Cucumber, Onion)
1 Tbsp of finely chopped Coriander leaves
1.5 cups of Yogurt or Curd
Salt to taste

Method:


Wash the rice in sufficient water. Drain and set aside.
Roughly chop the onion, tomato and the brinjal.
Heat oil in a pressure cooker or a deep pan.
Add the cumin seeds.
Once they brown slightly, add the onions and fry until translucent.
Now add the tomatoes and brinjal and fry for 1 minute.
Add water, all the spices and salt. If you are not using a pressure cooker, the quantity of water may vary. Adjust accordingly.
Add the rice and cover and cook until the rice is done. In a pressure cooker, that will take you around 3-4 whistles or approximately 10-12 minutes.
Garnish with finely chopped coriander leaves and serve with Raita
To make the raita, just mix all the ingredients well.
Read more ...

Mexican Green Rice with Spicy Fried Potatoes

Work has been very stressful lately. All I want to do is get home and start blogging. But at the end of the day I have literally no energy left. In fact, hubby dearest has been cooking dinners too. It’s been raining outside, and I have no time to enjoy it :( . I’m missing watching MasterChef on TV :( . I am craving for my end of the month vacation. I hope for it to be my much needed relief. Until then, my blog will have to be my only source of relaxation. *End of ranting*


Now, back to my sane self. Forgive me, sometimes “Hyper-Stressed out-Worried Anu” makes an appearance here. This post is going to cater to those with lack of time – like me. One pot meal. The answer to a busy night. I know the name sounds simply Exotic. I’ll let you in on a secret *hush* it is only coriander rice *hush*. Yup, you heard it right. Coriander/Cilantro is abundantly available in India, albeit it’s gotten really costly off late. I pay Rs.40 for a bunch :( in Bangalore. I did try growing it. It grew too, though not enough to suffice and the heavy rains killed almost half of my saplings :( . Too many sad smileys. Isn’t that an oxymoron? Sad smiley. Or is there a more appropriate name for it?


For a lot of communities, rice is a side dish and the main is something else. But for us Indians, especially South Indians, rice is the star. Everything else is a side dish. I have seen a lot of friends for whom a meal isn’t complete if they don’t have a spoonful  of curd rice at the end. If you have never seen a paddy field, I suggest you do see one, especially in or after the monsoons. That is probably the brightest green nature can throw at you. It really relaxes the eyes and the mind.

The original Mexican rice obviously uses Mexican chillies, I had no time to find exotic chillies, so I just used the regular desi chillies. They are probably a little spicier than their Mexican counterparts, so use it carefully to match your taste buds.


I toyed with the idea of different accompaniments and finally settled on the spicy potato fry. I did seriously consider the raita, but gave it to my greediness of having some fried potatoes *feeling guilty*

So on a slightly free weeknight, we enjoyed a part Mexican and part Indian meal of Green rice with spicy fried potatoes watching another exciting episode of MasterChef. Hope you enjoy it as much as we did.


Mexican Green Rice with Spicy Fried Potatoes

Mexican green rice with spicy fried potatoes

Rice flavored with Coriander and Spinach served with spicy fried potatoes 

Recipe Type:  Main Course
Cuisine:          Mexican
Prep Time:     15 minutes
Cook time:     60 minutes
Yield:              2 servings

Ingredients:

Mexican Green Rice:

3/4 cup Basmati Rice
1/2 cup coriander leaves
1/2 cup spinach leaves
2-3 cloves of garlic
1-2 green chillies
4 tsp oil
1 Onion
1 tsp Lemon juice
1.5 cups Water
Salt

Spicy Fried Potatoes:

2 Potatoes
3 tsp oil
1 tsp Red Chilli Powder
1/2 tsp Turmeric Powder
1/2 tsp Mustard seeds
1/2 tsp Coriander powder
4-5 Curry leaves
Salt

Method:

Mexican Green Rice:

  • Wash and drain the rice.
  • Lay it out on a towel to dry.
  • Grind the spinach, coriander, garlic. onion and green chillies into a coarse paste
  • Heat oil in a pan/kadhai and add the rice
  • On a medium flame fry the rice until it is slightly golden appx. 5 mins
  • Add the green paste, water and salt
  • Cover and cook on low flame until the rice is cooked
  • Add lime juice and garnish with chopped coriander leaves and serve hot

Spicy Fried Potatoes:

  • Peel and chop the potatoes
  • Heat oil in a pan, add the mustard seeds
  • Once they splutter, add the curry leaves and the potatoes
  • Add the spices and salt and mix well
  • Cover and cook until the potatoes are done
  • You can have this with roti/chapati also
Read more ...