Showing posts with label Spicy. Show all posts

Pancharangi Dal | Panchmel Dal


Cozy Comfort Food. Three words to describe the dish of the day - Dal. When you want to feel that cozy under a blanket feeling not outside but inside you, I say make dal. It is warm, hearty and healthy. No guilt trips to the gym either.

How to make vegan Panchmel Dal or mixed lentil soup at www.oneteaspoonoflife.com

Dal is such an essential part of Indian cooking. From north to south, east to west, every region has their version of dal. I have so many dal recipes with me that I rotate frequently, some have made it to the blog and some may never make it here. Try out this Spinach Dal or this Restaurant Style Dal Fry sometime.

For those who have never attempted to make dal, I encourage you to do so. It is such a forgiving dish. You can add anything or absolutely nothing to dal, and it will still taste good. The simplest dal we make is something called "Tove" where all you add is a simple tempering of mustard seeds, curry leaves and green chilli to already cooked pigeon pea lentils or toor dal. Salt is added after it is served. Dal can be that basic. Or it can be cooked with ginger-garlic, tomatoes and spices. Or with vegetables like this Heerekai Tove / Ridgegourd Dal.

How to make vegan Panchmel Dal or mixed lentil soup at www.oneteaspoonoflife.com

Panchrangi Dal or Panchmel Dal is a mixed lentil dal that uses 5 different types of lentils - Toor Dal or Split Pigeon Peas, Chana Dal or Split Bengal Gram, Sabut Urad Dal or Black lentils, Moong Dal or split Mung Beans and the last is not really a dal - Moong or Mung beans. I learnt this recipe from my Aunt who lives in Gujarat. Pancharangi Dal or Panchmel Dal is a famous recipe across Gujarat and Rajasthan in Western India. These places are arid and hence, home to a lot of delicious spicy lentil recipes.

The dals are soaked for 30 minutes to 1 hour and then cooked until done. Dal is meant to be mushy in general. So cook until all the dals are well cooked. Then mush them up with a spoon. Fry finely chopped onions until translucent, then add the ginger-garlic paste and fry till fragrant. Toss in the chopped tomatoes and spices and cook well. Add the lentils and little water along with salt and simmer until you have the consistency you desire. 

How to make vegan Panchmel Dal or mixed lentil soup at www.oneteaspoonoflife.com


If you liked this, you may also like:


Pancharangi Dal | Panchmel Dal


How to make vegan Panchmel Dal or mixed lentil soup at www.oneteaspoonoflife.comPancharangi Dal | Panchmel Dal is a Gujarati Dal made from 5 different types of dals and beans. It is a spicy mixed lentil soup.

Recipe Type:  Main
Cuisine:            Indian
Prep Time:     30 minutes
Cook time:     45 minutes
Yield:                Serves 3-4

Ingredients:


0.5 cup Toor Dal (Pigeon Pea Lentils)
0.5 cup Moong Dal
0.5 cup Moong Beans
0.5 cup Chana Dal (Split Bengal Gram)
4 Tbsp Sabut Urad Dal (Whole black lentils)
1 Onion
2 Tomatoes
1 tsp Ginger Garlic Paste
1 tsp Turmeric Powder
1 tsp Red Chilli Powder
3 tsp Coriander Powder
2 tsp Cumin Powder
1/2 tsp Mustard Seeds
1/2 tsp Cumin Seeds
3-4 tsp Oil
Salt to taste
Water as required

Method:


Soak all the dals in water for at least 30 mins.
Cook in a pressure cooked until cooked.
Heat oil in a kadhai and add the mustard seeds.
Once the mustard seeds splutter, add the cumin seeds and allow them to brown slightly.
Add the chopped onions and fry until translucent.
Add the ginger-garlic paste and stir fry until for 2-3 minutes until fragrant.
Add the chopped tomato and cook for 1-2 minutes.
Add all the spices to the tomato and cook until the tomato is a paste
Add the cooked dal, salt and water. Simmer for 5-6 minutes or until you get the consistency you desire.
Garnish with chopped coriander leaves.
Serve hot with rice or roti.


How to make vegan Panchmel Dal or mixed lentil soup at www.oneteaspoonoflife.com

Read more ...

Garlic Stuffed Karela (with Step by Step Photos)

Happy Holidays!!!

The last week of the year is HERE! As the new year inches closer. and with it the new year's resolutions, I'm giving in to all my indulgences one last time. After all there are just 7 days left for 2016 to end.

How to make bharwan karela stuffed bittergourd recipe at www.oneteaspoonoflife.com


While I'm filling up on all those chocolate cakes and french fries, I'm also bringing out the family favorite indulgences. One of them is my Mother-in-law's Garlic Stuffed Karela - Baby bitter gourds stuffed with a spicy masala of garlic and red chilli powder and fried in lots of oil. This is a tried, tested and loved recipe. It is what I call a flavor bomb, well they look like little bombs, don't they?

This Garlic Stuffed Karela is sure an explosion of flavors. It is S-P-I-C-Y, well you can reduce the spiciness by reducing the red chilli powder, but we love it spicy. It is heaven for garlic lovers (like me, of course), you can never kiss after this recipe, unless of course, the other person is filling up on it too. And if I haven't mentioned it enough times on this blog, I am a big bitter gourd or karela fan. Check these out if you have any doubts.

How to make bharwan karela stuffed bittergourd recipe at www.oneteaspoonoflife.com

There is one thing that mellows down the sharp flavors of karela, chilli and garlic, and is also marries them all together, and that is Oil. This curry uses more oil than any other curry I've ever posted here. But it is an essential ingredient. Now you know why I call this an indulgence! You can decide to use less oil int he beginning and then add more as you go, or start out with a fair amount in the beginning. This Garlic Stuffed Karela is meant to be eaten with rice, either as a side with rice and dal or just mix it along with rice. If you are having it with just plain rice, add more oil.

This is a slow cooking recipe, perfect for holidays. This one cannot be rushed. The karela needs to be slowly coaxed into submission to bring out the best flavors. There is on silver lining though, once you have the karela frying, it requires minimal monitoring. Just check once in 10-15 minutes and flip 
them to ensure the all sides cook evenly.

How to make bharwan karela stuffed bittergourd recipe at www.oneteaspoonoflife.com


Step-by-Step Instructions:


How to make bharwan karela stuffed bittergourd recipe at www.oneteaspoonoflife.com

  • Slit each bitter gourd lengthwise. Be careful that the knife does not pierce all the way through.
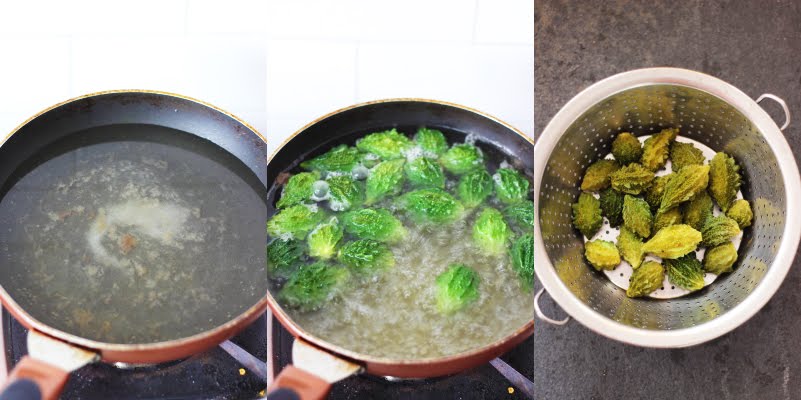
  • Heat water in a shallow pan and add 1 tsp of salt and the tamarind juice to it. Allow the water to come to a rolling boil.
  • Now add the slit bitter gourds and allow them to cook on medium flame for around 8-10 minutes until they change color. Do not cover the pan.
  • Drain and keep aside.
How to make bharwan karela stuffed bittergourd recipe at www.oneteaspoonoflife.com
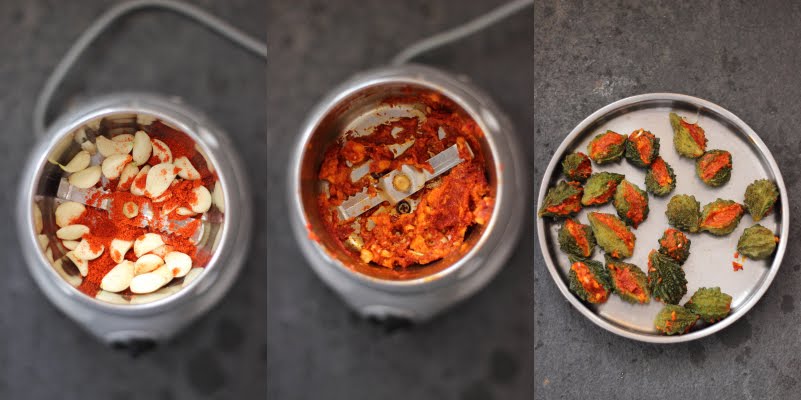
  • Make a paste out of the garlic, red chilli powder, salt and 2-3 tsp Oil.
  • Stuff the bitter gourds with the spice paste.
How to make bharwan karela stuffed bittergourd recipe at www.oneteaspoonoflife.com
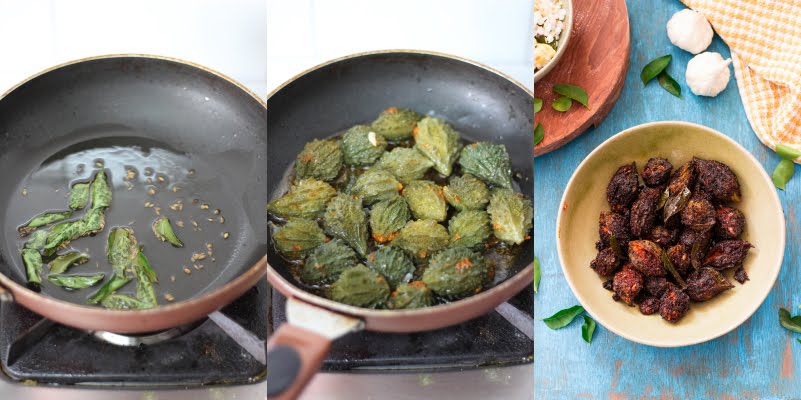
  • Heat the remaining oil in a frying pan and add cumin seeds. Once the seeds splutter, add the curry leaves.
  • Add the stuffed bitter gourds to the frying pan and cook on low flame for an hour. I prefer using a flat based pan, you can use a kadhai.
  • Keep turning them frequently so all sides are cooked well.
  • Sprinkle salt on top to coat all the bitter gourds. Mix well and cook for 1-2 minutes.
  • The dish is done when the bitter gourds are soft.


Garlic Stuffed Karela


How to make bharwan karela stuffed bittergourd recipe at www.oneteaspoonoflife.comGarlic Stuffed Karela is vegan semi dry curry made with baby bitter gourds stuffed with a masala of garlic and red chilli powder and then fried.

Recipe Type:  Side
Cuisine:            South Indian
Prep Time:     20 minutes
Cook time:     1.25 hour
Yield:                Serves 2-3

Ingredients:


20 Bitter Gourd, small (Karela)
4 Garlic Pods
4-5 tsp Red Chilli Powder
0.5 tsp Cumin Seeds (Jeera)
5-6 Tbsp Oil
2 tsp Tamarind juice
1 sprig Curry leaves
Salt to taste
Water as required

Method:


Slit each bitter gourd lengthwise. Be careful that the knife does not pierce all the way through.
Heat water in a shallow pan and add 1 tsp of salt and the tamarind juice to it. Allow the water to come to a rolling boil.
Now add the slit bitter gourds and allow them to cook on medium flame for around 8-10 minutes until they change color. Do not cover the pan.
Drain and keep aside.
Make a paste out of the garlic, red chilli powder, salt and 2-3 tsp Oil.
Stuff the bitter gourds with the spice paste.
Heat the remaining oil in a frying pan and add cumin seeds. Once the seeds splutter, add the curry leaves.
Add the stuffed bitter gourds to the frying pan and cook on low flame for an hour. I prefer using a flat based pan, you can use a kadhai.
Keep turning them frequently so all sides are cooked well.
Sprinkle salt on top to coat all the bitter gourds. Mix well and cook for 1-2 minutes.
The dish is done when the bitter gourds are soft.


How to make bharwan karela stuffed bittergourd recipe at www.oneteaspoonoflife.com


Read more ...

Pathrode Dosa | Uppu Menasu Dosa | Uppu Khara Dosa


Happy Weekend Guys!!

 How to make uppu khara dosa / uppu menasu dosa / Pathrode Dosa recipe at www.oneteaspoonoflife.com


Isn't it a wonderful feeling that you get to wake up when you want and for once your life is not ruled by technology. No alarms to snooze, no water heaters to be turned on, no bus / train to miss. So Saturday breakfast is usually something relaxed, that does not need too much effort, but definitely not something like a zero effort cereal. I love cooking traditional recipes on weekends when we get to sit down and enjoy a meal while it is still hot.

Pathrode Dosa also sometimes called Uppu Khara Dosa or Uppu Menasu Dosa is a dish from Mangalore and its surroundings. Rice grows abundantly there and almost every meal out there has rice as their hero.

Pathrode Dosa is a very similar to the Menthe Pathrode recipe, the only difference being there the entire batter is steamed and then fried, while here it is spread on a tava or a griddle and cooked.

 How to make uppu khara dosa / uppu menasu dosa / Pathrode Dosa recipe at www.oneteaspoonoflife.com


To make Pathrode dosa, you need to soak rice for 2-3 hours and then grind it as fine as you can. Let that rest for 30 mins to an hour. For the masala, you can either use fresh coconut or onion depending on what you have available with you. Grind the onion or coconut with tamarind pulp, red chillies and coriander powder to make a coarse thick masala. Add the masala to the rice batter along with some salt and chopped up fenugreek or methi leaves to make Pathrode Dosa batter. Add water to adjust the consistency. You can replace the methi leaves with spinach or any peppery leaf, or just leave it out. Spoon out the batter and spread it a little on a hot greased tava or griddle. Flip when one side is cooked and cook until the other side is browned.

If you don't want to wait 3 hours for your breakfast, I don't, just soak the rice the previous night for 2-3 hours or you can soak it the previous morning. Grind it at night and leave it covered on the counter overnight at room temperature. Make the masala fresh in the morning and add it to batter just 10-15 minutes before making. Don't add any salt to the batter if leaving it overnight and don't add the masala overnight either.

You have to serve this dosa hot like all other dosas. You can serve this dosa with chutney or butter, or even just plain. It has enough flavour to stand up on its own.

Try out this Tondekayee Chutney to go with the Pathrode Dosa.

 How to make uppu khara dosa / uppu menasu dosa / Pathrode Dosa recipe at www.oneteaspoonoflife.com


If you liked this, you may also like:
  • Mysore Masala Dosa - A rice and lentil pancake that has a chilli and garlic chutney spread on the inside and stuffed with a potato bhaji.
  • Instant Ragi Dosa - Instant dosa or crepe  made with rava or semolina and ragi flour (finger millet flour).
  • Instant Wheat Dosa - Instant savory dosa or pancake made with whole wheat flour.


Pathrode Dosa | Uppu Menasu Dosa | Uppu Khara Dosa

How to make uppu khara dosa / uppu menasu dosa / Pathrode Dosa recipe at www.oneteaspoonoflife.com
Pathrode Dosa is a pancake made with rice, spices and fenugreek or methi leaves. It is vegan and gluten free. 

Recipe Type:  Breakfast
Cuisine:            South Indian
Prep Time:     3 hours
Cook time:     30 minutes
Yield:                8 to 10


Ingredients:


1.5 cups Dosa Rice or any Regular Rice
1/2 cup grated fresh Coconut or 1 Onion
2 tsp Coriander Powder
3-4 dry Red Chillies or 3/4 tsp Red Chilli Powder
1/2 tsp Tamarind pulp
A handful of Fenugreek leaves or Methi leaves
1 cup Water
Salt to taste
Oil for frying

Method:


Soak the rice for 2 hours.
Drain out the water from the rice and grind it with very little water to get a smooth batter. Let it rest for 30 mins to 1 hour.
Grind together the coconut or onion along with the coriander powder, tamarind and the dry red chillies into a fine masala paste. Use 1/4 cup of water to help the grinding.
Wash the methi leaves thoroughly and chop it finely.
Add the masala paste and the chopped methi leaves to the rice batter.
Add salt and the remaining water and mix well.
Heat a griddle and grease it.
Once the griddle is hot, pour a ladle of the batter on to the griddle and gently spread it.
Cover and cook for 45-60 seconds on medium heat.
Spoon a little oil on the top and flip the dosa.
Cook for another 45-60 seconds or until the dosa is cooked through.
Serve hot.

How to make uppu khara dosa / uppu menasu dosa / Pathrode Dosa recipe at www.oneteaspoonoflife.com


Read more ...

Mushroom Biryani

It's good to be back... especially with flavorful dish like Mushroom Biryani.

How to make mushroom biryani recipe at www.oneteaspoonoflife.com

I've had a family filled weekend since my last post and days and days of writer's block.

I attended the first family wedding in over 2 years and what fun it was! I got to meet my cousins, aunts and uncles, eat good South Indian food and the best part was I got to dress up. Out came all those heavy Silk Sarees that I had tucked to the back of the cupboard. LOVED wearing every one of them.

Before the wedding, my palate had somehow mellowed down and I was more for eating less spicy and blander food. No known reasons for the change, but it was definitely not welcome. But the spicy South Indian Rasam-Rice managed to wake up the taste buds and then they craved more spice.

When I think of spicy food, I always think of Biryani. Biryani is usually meat cooked along with lots of spices and rice. But in India, we vegetarians are super lucky, cause there is always a vegetarian version of a non vegetarian dish, so we never miss out on the flavors. I've made vegetable biryani many times before, but this was my first time making Mushroom Biryani and with all my love for Mushrooms, there was really no way I could not LOVE this biryani.

How to make mushroom biryani recipe at www.oneteaspoonoflife.com

Unlike the biryanis I've made before, I did not half cook anything and layer anything. This is a simple biryani - cook the rice until done, cook the mushroom masala until done and then just mix the two well to get a flavorful Mushroom Biryani.

To make the perfect Mushroom Biryani, you need 3 things:
  1. Rice:  Biryani is as much about the rice as it is about the meat or the vegetables. Different regions use different varieties of rice, with Basmati being the most popular rice. Long grained fragrant Basmati Rice is perfect for Biryanis, and that is exactly what I used. Rice is washed and allowed to soak for 30 minutes, until it is cooked along with whole spices to enhance its taste.

  2. Mushrooms: The hero of the dish is definitely the mushrooms. Either keep the mushrooms whole or half them. Anything smaller than that and the mushrooms will be lost in the Biryani. Mushrooms are cooked along with onions, ginger-garlic, tomato puree, yogurt, spices and herbs. In traditional style, a paste of browned onions is also added to the mushroom masala. Use any large mushrooms you can find. 

  3. Spices: Any biryani is incomplete without an array of whole spices. A mix of cinnamon, clove, pepper, green cardamom, black cardamom, cumin seeds, bay leaf and nutmeg is added to the rice as well as to the mushroom masala. Whole spices have a long shelf life and it's good to have your pantry stocked with them. However, if you have run out of spices or don't use them much, you can replace the spices in the mushroom masala with store bought Biryani Masala ( spice powder).
Always serve your Mushroom Biryani piping hot. Raita or Salan make for great accompaniments with the Biryani.

How to make mushroom biryani recipe at www.oneteaspoonoflife.com


If you liked this, you may also like:


Mushroom Biryani


How to make mushroom biryani recipe at www.oneteaspoonoflife.com Mushroom Biryani is Basmati rice cooked along with whole spices and mushrooms.

Recipe Type:  Main
Cuisine:            Indian
Prep Time:     10 minutes
Cook time:     45 minutes
Yield:                Serves 2-3

Ingredients:


For the Biryani Rice:


1.25 cups Basmati Rice
1 Bay leaf
2 Cloves 
1 Green Cardamom
0.5" piece Cinnamon
1 tsp Salt
2.5 cups Water

For the Mushroom Masala:


15-20 Button Mushrooms
2 Onions, large
1 Tomato, medium
0.5 cup Yogurt
1" piece Ginger
5-7 Garlic cloves
0.5 tsp Turmeric
1 tsp Red Chilli Powder
0.5" piece Cinnamon
1-2 Cloves
1 Bay leaf
5-6 Black Peppercorns
0.5 tsp Cumin seeds
0.25 tsp grated Nutmeg
1 Green Cardamom
1 Black Cardamom
0.5 tsp Garam Masala
Handful of fresh Mint leaves
Handful of fresh Coriander leaves
5-6 Tbsp Oil
Salt to taste

Method:


Wash the rice twice and keep is aside.
Halve the mushrooms and keep aside.
Slice the onions.
Chop the tomatoes finely or puree the tomato.
Crush the garlic and ginger to form a paste.
In a pan, heat 3 Tbsp of Oil. Once the oil is hot, add 3/4 the onion and fry on low heat until the onions brown. Stir frequently, taking care not to burn the onions.
In a large kadhai or saucepan, add water, salt and spices and allow it to come to a rolling boil.
Add the washed rice and cook on medium heat until the rice is almost done. Drain out the excess water and spread the rice out in a large plate to cool. This will prevent the rice from becoming sticky.
Heat the remaining oil in a clean pan or kadhai.
Add the remaining onions and the whole spices and cook until the onions are cooked.
Add the ginger garlic paste and fry it for 2 minutes, stirring frequently.
Add the chopped tomatoes and fry for 4-5 minutes or until the tomatoes are soft.
Add the halved mushrooms and salt as required. Cook for 5 minutes on low heat.
Keep aside 1 Tbsp of browned onions, and puree the rest.
Add the onion puree to the mushrooms and fry for 1 minute.
Whisk the yogurt and add it to the mushrooms. Add the turmeric powder, red chilli powder and garam masala and simmer on low heat for 5 minutes.
Add chopped mint and coriander leaves and cook for 2-3 minutes.
Pick out the whole spices from the rice and fluff up the rice with a fork to separate the rice grains.
Add the rice to the mushroom masala and mix well. 
Add salt as required and mix well.
Cook for 2-3 minutes.
Garnish with the remaining browned onions and serve hot.


How to make mushroom biryani recipe at www.oneteaspoonoflife.com


Read more ...

Banana Blossom Cutlets


Finger Food Fridays !!!

And this time with a Healthy Pan fried Banana Blossom and white peas spicy cutlet.

How to make banana flower cutlets recipe at www.oneteaspoonoflife.com


Speaking of Friday, guess where we are off to today??? 

SIEM REAP, CAMBODIA.... Really!!! (I'm still pinching myself)

I'm super excited. I was in a state of disbelief until I had to pack. I hate packing. May be a little less than unpacking though. But YESSS... the tickets are booked, hotel's spoken for, the bags are packed and the Passports are out and ready to be stamped. It's been so long that we took a vacation, and we've been all working so hard in office, that this is such a welcome break.

I'd never heard of Cambodia, while Raj went on and on that we should go there once in our life. This was waaay back some 5 yrs ago. I ignored him then and we went to Phuket (which I loved loved loved). But then I saw photos of these magnificent temples online and I wanted to see them NOW. So here we are, a few hours away from actually seeing those beautiful temples, but before that we have miles to go and lots of airport wait time.

Has anyone of you out there been to Cambodia and can give me tips on what to see and where to eat and where to shop? I'm all ears. 

How to make banana flower cutlets recipe at www.oneteaspoonoflife.com


What this means next Tuesday, I won't be blogging live, it will be a scheduled post. Watch out for it though, it is on the lines of Caramelized Onion Mushroom Tart, only minus the mushrooms and plus some colorful ingredients, but just as delicious. But I will (hopefully) be active on Twitter tweeting our latest photos of sites we saw, food we ate (I'm excited to try out the Khmer curries, I've heard wonderful things about them) and knick-knacks we shopped for (dying to see what Siem Reap has to offer in the night market) - don't miss it out, follow @oneteaspoonlife on Twitter.

Back to Friday's finger food - Banana Blossom Cutlets. Banana Blossom or Banana Flower as it is sometimes called is a popular in South East Asian cusine (so perfect for today's post). Banana flower is very much like an artichoke in structure and in flavour. Usually, a typical Banana Blossom Cutlet uses potato along with the banana blossom to bind it. But here, I've used mushy white peas and a little bit of besan or chickpea flour to bind them. The banana flower in itself has no taste, (but it is loaded with texture), so generously use spices. 

How to make banana flower cutlets recipe at www.oneteaspoonoflife.com


Preparing a banana blossom needs patience, but the reward at the end is worth it. Did you know it acts as an anti-depressant? So by the time you are done eating, you WILL be happy! So back to preparing, 
  • The maroon outer layer is to be discarded, the tiny flowers attached to the stem are for keeps. 
  • Continue peeling away the layers until you reach a white heart where distinguishing the layers becomes difficult. 
  • Chop this heart finely and immediately soak it in water with added lime juice to prevent browning. 
  • For each of the tiny flowers, remove the inner filaments and chop the flowers finely and add to the water. 
  • These need to be soaked for 4-5 hrs or overnight to remove any bitterness it may contain. 
The white peas need soaking too, until they can be cooked. So this would be the right time to soak them too.

After 5 hrs, cook the peas until mushy and cook the banana blossom until done. Drain both and mix. Add in besan or chickpea flour, spices, salt and mash well. Shape into patties and pan fry while spooning oil on each of the cutlets.

How to make banana flower cutlets recipe at www.oneteaspoonoflife.com


If you liked this, you may also like:

  • Goan Banana Blossom Curry - Semi dry curry made with banana blossom and white peas in Goan style
  • Sabudana Vada - Shallow fried vadas or poppers made with Sabudana/Sago, Peanuts and mashed potatoes.
  • Raw Banana Fry - Dry spicy curry made with raw banana or plantains in South Indian style.
  • 10 minute Plantain Chips - Goan style chips made by pan frying finely sliced plantain dipped in spices and fine semolina.


Banana Blossom Cutlets


How to make banana flower cutlets recipe at www.oneteaspoonoflife.comBanana Blossom Cutlets are vegan pan fried snacks made from cooked banana blossom, mushy white peas and spices.

Recipe Type:  Snacks
Cuisine:            South Indian
Prep Time:     8 Hours (includes soaking time)
Cook time:     1 Hour
Yield:                10-12 cutlets

Ingredients:


1 cup Banana Blossom, chopped (Refer to the post on top to see how to prepare banana blossom)
0.25 cup dried White Peas
2-3 Tbsp Chickpea Flour or Besan
1/2 tsp Red Chilli Powder
1/2 tsp Turmeric Powder
1/2 tsp Garam Masala
Oil to fry
Salt to taste

Method:


Soak the chopped banana blossom in water overnight or for 4-5 hours. 
Soak the dried white peas in water overnight or for 8-10 hours.
Drain out the water and pressure cook for 1 whistle or cook in a sauce pan until done.
Separately pressure cook the white peas with 1/2 tsp salt for 2-3 whistles or until done.
Drain out the water from the banana blossom and the peas.
Combine the banana blossom and peas and mash them slightly.
Add in the turmeric powder, garam masala, red chilli powder, besan and salt and mix well.
Shape into cutlets.
Heat a frying pan and grease it.
Place the cutlets on the pan and spoon 1 tsp of oil on each of them. Cook on medium heat.
Flip them when the first side browns. Cook until the second side browns.
Serve hot with ketchup or chutney.

How to make banana flower cutlets recipe at www.oneteaspoonoflife.com


Read more ...

Baby Corn Masala (Vegan)

Baby Corn Masala is a semi dry curry made by tossing stir fried Baby Corn in a North Indian style tomato masala gravy.

baby corn masala tomato gravy north indian curry

I’m all into Baby Vegetables this week. First came the baby potatoes simmers in a delicate creamy gravy a.k.a Punjabi Dum Aloo. In case you missed it, check it out here.

Now it is the time for Baby Corn to shine in this super simple Vegan Baby Corn Masala.

I go through phases in my cooking. One week it is the all down to earth pure South Indian meals with simple vegetables cooked in their own juices with just a simple tempering of mustard, green chilli and curry leaves and finished off with a generous helping of grated coconut. Ah! I just LOVE love love fresh Coconut. I even made Raj get me some fresh Coconut oil from Karkala and it tastes amazing.

baby corn masala tomato gravy north indian curry

Anyway, my next week is all full blown Masala curries or other cuisines I love – Italian, Chinese or Thai. This last week was full on North Indian week. I’ve been busy making grilled Paneer, Punjabi Dum Aloo and now Baby Corn Masala.

Now this recipe is very similar to most North Indian curries you have made and very similar to the Vegatable Jalfrezi that I made earlier (which was super AWESOME, btw). 

It is made by sautéing onions, ginger-garlic paste and tomato puree until the oil separates. But don’t be upset if this never happens for you. It rarely happens when I cook too. For oil to separate, there needs to be sufficient quantity of oil in the pan before you add the ingredients, and I usually skimp on the oil. As far as you fry it sufficient enough, the oil-no oil should not be any problem. 

Then add the tomatoes and cook them until oil “separates”, but seriously, don’t worry about it separating, just as long as the tomatoes are cooked and the flavor has intensified, you should be good to go.

baby corn masala tomato gravy north indian curry

I stir fried the baby corn separately and added it. I’ve found that baby corn never softens, no matter how much I cook it. I like that in a way, since I don’t need to worry about over cooking it, but sometimes I wonder if I’m doing it wrong. But I’m still okay with it since it tastes great with that crunch.

This Baby Corn Masala tastes really good with Naan bread or Roti. 

baby corn masala tomato gravy north indian curry


If you liked this, you may also like:


Baby Corn Masala


baby corn masala tomato gravy north indian currySemi-dry North Indian style curry made with Baby Corn tossed in a tomato based masala gravy.

Recipe Type:  Main
Cuisine:            North Indian
Prep Time:     15 minutes
Cook time:     45 minutes
Yield:                Serves 2

Ingredients:


18-20 Baby corn cobs
1 large Onion
1 large Tomato
1 tsp Ginger Paste
1 tsp Garlic Paste
1/2 tsp Turmeric Powder
1 tsp Red Chilli Powder
1/2 tsp Coriander Powder
1/2 tsp Kitchen King Masala or Garam Masala
1/2 tsp Cumin Seeds or Jeera
4-5 tsp Oil
1/4 cup Water
Coriander leaves for garnish

Method:


Cut the baby corn cobs into chunks.
Heat 1-2 tsp of oil in a pan. Once it is hot, add the baby corn and stir fry for 3-4 minutes.
Remove from heat and keep aside.
Chop the onion finely and puree the tomato.
Heat the remaining oil and add the cumin seeds.
Once the cumin seeds brown slightly, add the onions and fry until translucent.
Add the ginger and garlic paste and fry for 1-2 minutes until fragrant.
Add the tomato puree and cook on low heat for 5-6 minutes. Stir occasionally.
Add all the spices and salt. Mix well. Cook on low heat for another 3-4 minutes. Stir occasionally.
Add the fried baby corn and the water. Cook on medium heat for 4-5 minutes.
Garnish with chopped coriander leaves and serve hot with Rotis.


Read more ...

Gobi Manchurian Pizza


You heard that right! Gobi Manchurian Pizza!!!

Your favorite starter "Gobi Manchurian" as a Pizza topping. Dinner does not get better than this!!!

cauliflower gobi manchurian pizza whole wheat italian indian chinese fusion

I try to cook healthy an eat healthy most of the times. My regular lunch or dinner is chapati with some vegetables. But then, there are some days (or nights) that all I want to do is indulge. Friday night was just that - Indulgence Night. 

This Pizza was a product of circumstances. Seriously, I had no choice. Na ah. 
I had (still have) lots of cauliflower. I had Mozzarella left over from my UBER-ly delicious Stuffed Potato Skins. Remember those? And I had a small little Capsicum growing in my pot. TA-DA - Gobi Manchurian Pizza.

I love LOVE Gobi Manchurian. The chef that invented it was pure Genius. What a perfect starter to any meal! At any given time, in a restaurant, I believe at least 50% of the people order Gobi Manchurian as a starter. Except in those fancy fine-dines. I wonder what people order there.


cauliflower gobi manchurian pizza whole wheat italian indian chinese fusion

I've been told this dish - the Gobi Manchurian Pizza is not my invention (Darn those eye-opener friends!!). To my credit, this Gobi Manchurian Pizza recipe is totally mine. I made Gobi Manchurian the way I always make it, the only difference being I did not simmer the cauliflower with the sauce, instead I just layered them on the Pizza base.

The Pizza was a super hit. This Gobi Manchurian Pizza brings together the best of 2 cuisines (or is it 3) - Indo-Chinese and Italian.

I'm sure everyone knows about Italian Cuisine and Pizzas. No intro needed there. 

Now, the Gobi Manchurian is a purely Indian take on Chinese cuisine. It consists of batter coated cauliflower florets that are deep fried until they are crispy golden brown (I suggest you make extra, they taste awesome just like that). If that wasn't enough of BANG, there is the sauce. The sauce is soy-based and is full of flavors of soy sauce, chilli, ginger and garlic. Getting an idea?


To make the Gobi Manchurian Pizza, I made a whole wheat and honey pizza base. That is 100% whole wheat, nothing else. I have not followed the traditional way of making a pizza base - 2 rises, then either rolling or stretching. I have done it more like - rise, roll, rise. This gave me a nice thick base. If you plan on making a thin crust, then you may need to adjust the dough quantities to match that and your pan size. My directions below are for a 10" thick base Pizza. You can also freeze part of the dough for a later day.

After making the base, I then layered with that delicious spicy sauce and dropped the cauliflower all around. Grated some cheese and VOILA! the Gobi Manchurian Pizza is already ready to be devoured.

I know this does not sound like a weekday kinda meal, when you come back from office battling all that traffic and the rains. The number of ingredients and the number of steps sound daunting. When you start making it you will see that the number of unique ingredients isn't really much. And I've written a very detailed recipe to make your cooking easier. I assure you, there is a time and a place to make this Pizza. I actually made it in like 2 hrs on a Friday night. And the 2 hrs was all rising of the base. The actual cooking took way less.


This Gobi Manchurian Pizza is perfect for you:

If you like quirky fusion food that is delicious.

If you love Asian or Indo-Chinese flavors

If you love Pizza


Gobi Manchurian Pizza


cauliflower gobi manchurian pizza whole wheat italian indian chinese fusionFusion pizza topped with fried cauliflower and Manchurian sauce. 

Recipe Type:  Main
Cuisine:            Fusion
Prep Time:     2 Hours
Cook time:     50 minutes
Yield:                Serves 2

Ingredients:


For the Pizza Base:


2 cups Whole wheat flour or Atta
1 tsp Active Dry Yeast
1 Tbsp Honey
1 Tbsp + 2 tsp Olive Oil
2-3 cups warm Water
1 tsp Salt

For the Gobi / Cauliflower:


2.5 cups Cauliflower florets
4-5 Tbsp Cornflour
1.5 tsp Soy Sauce
1 tsp Ginger Garlic Paste
1 tsp Chilli Sauce
1/2 tsp Tomato Ketchup
1/2-1 cup Water
Salt to taste
Oil to fry

For the Manchurian Sauce:


Leftover batter from the Gobi / Cauliflower
1 Onion
1/2 Capsicum
1 Tbsp finely chopped Garlic
1 tsp Ginger Garlic Paste
1 tsp Soy sauce
1 tsp Chilli sauce
2 tsp Oil
1 cup Water
Salt to taste

For assembling:


Pizza Base
Fried Gobi / Cauliflower
Manchurian Sauce
2 Tbsp Olive Oil
1 Tbsp chopped Coriander
Mozzarella or Pizza cheese

Method:


To make the Pizza Base:


Add the active dry yeast to 1 cup of warm water along with the honey. Allow it to rest for 5-10 minutes.
Once it is foamy, add it to the whole wheat flour along with 1 Tbsp olive oil and salt and knead into a smooth dough. Knead for around 5-10 minutes.
Now coat the dough with the remaining olive oil and place in a clean bowl. Cover the bowl loosely with a plate of a towel and keep in a warm place to rise. It should double up in size. Mine took around 1 hour.
Once it is doubled in size, punch it down, and roll it into a pizza base. Roll according to if you want a thick base or a thin base. I made a thick 10" base.
Oil the pan in which you will cook the base, and place the rolled out base, prick it with a fork. Cover and keep it in a warm place for its 2nd rise for 30 minutes.
Preheat the oven to 200 degree Celsius and bake the base for 12-15 minutes.

To make the fried Gobi / Cauliflower:


This can be made when the base is kept for rising.
In a large bowl, mix together the cornflour, ginger garlic paste, soy sauce, chilli sauce, tomato ketchup, salt and add water by the spoonfuls. We need a medium consistency batter that can coat the cauliflower. I did not need the full cup of Water.
Heat oil in a frying pan. I shallow fried the florets, you can deep fry them.
Once the oil is hot, dip the cauliflower in the batter and drop them in the oil.
Fry until golden brown and crispy on the outside and the cauliflower is cooked on the inside.

To make the Manchurian Sauce:


Heat oil in a pan and add sliced onions and chopped garlic. Fry until the onions are translucent.
Add the sliced capsicum and fry for another 1-2 minutes.
Add the leftover batter from the cauliflower. If there is none leftover, mix together 1 Tbsp cornflour in 1/4 cup of water and add it. You may need to increase the quantity of the sauces accordingly.
Add the ginger garlic paste, soy sauce, tomato ketchup, chilli sauce, salt and 1/4 cup of water and mix well. Add more sauce if required.
Allow it to cook 3-4 minutes. You may need to add more water in as cornflour thickens on cooking.

To make the Pizza:


Spread the sauce on the base.
Place the fried cauliflower all on top of the sauce.
Sprinkle the chopped coriander leaves.
Grate cheese to cover the pizza.
Drizzle over the Olive Oil.
Bake in a 200 degree Celsius preheated oven for 5-8 minutes until the cheese melts.
Serve hot.


Read more ...

Kashmiri Green Apple and Brinjal Curry | Bom Chount Wangan


This Green Apple and Brinjal Curry also called Bom Chount Wangan is a specialty of the Himalayan state of Kashmir.

Kashmiri Apple Granny Smith Brinjal Eggplant aubergine curry bom chount wangan

If you’d told me last month that I would be cooking a Green Apple and Brinjal Curry, I would have laughed it off. “NEVER!!!” would have been my reaction. Apples? In a savory curry? No way, right? I had the same thought process, until NOW.

Over a cup of tea when we were discussing recipes and blogs (this is the direction most of my conversations take, not surprisingly!), my cousin mentioned her Kashmiri friend makes this awesome Green Apple and Brinjal Curry. I was intrigued. I would have never tried it out had I just found this recipe somewhere, but when someone you know recommends something, you feel like at least giving it a try.

Kashmiri Apple Granny Smith Brinjal Eggplant aubergine curry bom chount wangan

Since I did not have the recipe, just the idea of the dish, I did what I do like a 100 times a day – I googled for it. I found this great site for Kashmiri Food by Anjali Pandita. I followed her recipe for the Green Apple and Brinjal Curry, all I did was alter the quantities as I was making a much smaller quantity. You can find her recipe here.

This recipe is interesting. Interesting because I never imagined it would taste the way it did. Spicy and Tangy with a lot of different textures.

Kashmiri Apple Granny Smith Brinjal Eggplant aubergine curry bom chount wangan

Granny Smith or Green Apples are used in this curry. When I tasted them before cooking, they seemed sweet yet slightly tart. But after cooking, they began tasting like raw mango. Most of the apple’s sweetness seeped into the slight gravy it has while the apple pieces retained their tartness.

The recipe originally only calls for Amchur or dried Mango powder to enhance the tartness of the dish if the apples are too sweet. However, due to the transformation of the apples, I added in Jaggery to add sweetness. I've made it an semi-dry curry, that goes well with Roti or Naan. Adjust the consistency if you plan on having it with rice.

Kashmiri Apple Granny Smith Brinjal Eggplant aubergine curry bom chount wangan


Kashmiri Green Apple and Brinjal Curry | Bom Chount Wangan


Kashmiri Apple Granny Smith Brinjal Eggplant aubergine curry bom chount wanganA spicy semi-dry curry made from Green Apples and Brinjals in Kashmiri style. 

Recipe Type:  Main
Cuisine:            Kashmiri
Prep Time:     15 mins
Cook time:     40 minutes
Yield:                Serves 2-3

Ingredients:


1 Green Apple
4-5 small Brinjals
4-5 Tbsp Oil
1 tsp Fennel seeds
1 tsp Cumin seeds
1/2 tsp of Ginger paste
2-3 tsp Red Chilli Powder
1/2-1 tsp Garam Masala
1/2 tsp Jaggery or Sugar (Optional)
1/2 tsp Amchur or dried Mango powder (Optional)
3/4 cup Water
Salt to taste
Coriander leaves for Garnish

Method:


Dice the apple and the brinjals into equal sized pieces.
Heat oil in a deep pan and fry the brinjals and apple until they are cooked and keep aside. Insert a knife to check if they are done. If it slides smoothly, they are. I did not cook the apple for long as I like the crunch of the apples. I fried them in batches. If you plan to fry all together, you may need more oil.
Remove the excess oil, leaving only about 1-2 tsp in there.
Add the cumin seeds and crushed fennel seeds.
Once they brown slightly, add the chilli powder and 1/4 cup of water and cook until the water evaporates and the oil separates.
Now add the fried apple and brinjal.
Add the remaining water, garam masala, ginger paste, and salt and simmer on low heat for 5-8 minutes.
Add amchur if the apple is too sweet and the jaggery if the apple is too sour.
Garnish with chopped coriander leaves and serve hot with rice or roti.


Read more ...

Maggi Pakoda | Instant Noodle Fritters with Step by Step Photo Instructions


Maggi Pakoda recipe with step by step video instructions. Maggi Pakodas are deep fried fritters made using Maggi instant noodles, chickpea flour (besan) and a few spices. Maggi Pakoda are instant noodles fritters and any instant noodles can be used. Maggi Pakoda are perfect for snacking on a rainy evening. They go famously with a hot cup of chai.


In a hurry? Jump to Video or Jump to Recipe


maggi instant noodles fritters fried pakoda chickpeas besan

Every time it rains, I want something hot and spicy (and mostly fried). What I crave when it rains, I crave more when we are out on a long drive during rains. For all those health food eaters out there, this post is most definitely not for you, unless of course you occasionally binge on some DELICIOUS fried food. This is one of those one-time INDULGENCE recipes that just makes you wish it rains every day.

On a different note, has an idea gotten stuck in your head and grown into a tree until you can no longer resist it? Something like “Inception”? On one of these long-drive-in-rain, I imagined what would a “Maggi Pakoda” taste like. And after that, nothing tasted good enough on that drive. I wanted MAGGI PAKODA, that’s it! And I thought I was being very inventive and all with my idea of Maggi pakoda until I heard it has already been around in Delhi for a long time. Those Delhi-ites definitely know their fried food.

maggi instant noodles fritters fried pakoda chickpeas besan

Maggi is an instant noodle brand from Nestle. And since it was the first instant noodle brand in the Indian market and remained the sole one for many many years, instant noodles are synonymous with Maggi for most of us. So when I say Maggi, you can think of ANY instant noodles. Any noodles you like.

The first time I went to Rohtang Pass in the Himalayas to see snow, I was pleasantly surprised to find little shacks selling Maggi at that altitude. Absolutely loved eating Maggi while our teeth chattered with the chill in the air. The next time I went to Rohtang, I was actually looking forward to eating Maggi up there. Maggi, Chai, and the mountains felt like heaven.

maggi instant noodles fritters fried pakoda chickpeas besan

How many of you out there have had hot hot Maggi when you’ve gone to a cold cold place? Let me know your story.

These pakodas have that warmth of noodles and the crispiness of the pakodas all combined in one. Perfect for rainy evenings. You can use any instant noodles, Chinese flavored, Thai flavored, Chicken flavored, as I said anything. Just cook the noodles as usual, add the chickpea flour or besan, mix and deep fry.

maggi instant noodles fritters fried pakoda chickpeas besan


If you made this recipe, let me know! Leave a comment here or on Facebook tag your tweet with @oneteaspoonlife on Twitter and don't forget to tag your photo @oneteaspoonoflife on Instagram. You can also email me at onetspoflife@gmail.com I'd love to see what you are up to.

If you like this recipe, do not forget to share it with your friends and family! 


You can follow One Teaspoon Of Life on FacebookTwitterInstagramPinterest or you can subscribe to One Teaspoon Of Life and receive all the latest updated via Email


Video Recipe


--------------------------------------------------------------------------------------------------------------------------

Maggi Pakoda or Instant Noodle Fritters

maggi instant noodles fritters fried pakoda chickpeas besan
Maggi Pakodas are deep fried fritters made using Maggi instant noodles, chickpea flour (besan) and a few spices. Maggi Pakoda are instant noodles fritters and any instant noodles can be used. Maggi Pakoda are perfect for snacking on a rainy evening.

Recipe Type:  Snacks
Cuisine:            Indian
Prep Time:     10 mins
Cook time:     30 mins
Yield:                12 pakodas

Ingredients:


1 packets Maggi Instant Noodles
3 Tbsp Chickpea Flour or Besan
1 tsp Red Chilli Powder
1 tsp Garam MAsala (if not using the tastemaker)
2 Tbsp Coriander Leaves, finely chopped
1-2 tsp Chaat Masala (Optional)
Water as required
Salt to taste
Oil  to deep fry

Method:


1. Boil 2 cups of water in a sauce pan and add 1 tsp of Oil to it.
2. Add the instant noodles to the water and cook until the noodles are done. Do not add the taste maker to it.
3. Once the noodles are cooked, drain the water and rinse them with cold water to stop the cooking.
4. Mix in the taste maker or 1 tsp Garam Masala, red chilli pwoder, salt and coriander leaves.
5. Add the chickpea flour or besan and mix until combined.
6. Add more salt and chilli powder if required.
7. Heat Oil in a deep pan for frying.
8. Divide the noodles into small portions.
9. Once the oil is hot, carefully dump the portions in the oil.
10. Fry on medium to high heat. Flip the pakodas once the lower side is partially set. Keep stirring the pakodas until all sides are browned and cooked. Remove from heat once the pakodas are crisp and golden brown.
11. Sprinkle chaat masala (optional).
12. Serve hot with ketchup.


If you liked this, you may also like:

Cucumber pakoda fritter sautekayee bonda khira khire kakdi
Cucumber Pakoda

how to make vegetable cutlets recipe, aloo tikki recipe, vegan cutlet recipe, beetroot cutlet recipe at www.oneteaspoonoflife.com
Veg Cutlet
masala vada, ambode, chana dal vada recipe
Masala Vada
Read more ...