Instant Milk Peda Recipe | Milk Peda Recipe with Condensed Milk | Quick doodh peda recipe [Video]


Instant Milk Peda Recipe | Milk Peda Recipe with Condensed Milk | Quick doodh peda recipe with step by step video instructions. Instant Milk Peda or Doodh Peda is made by combining sweetened condensed milk like mithai mate or milkmaid and milk powder and cooking them on low heat to make instant khova. Pedas are flavored with cardamom, shaped and topped with nuts. Instant milk peda is perfect for festivals like diwali or when you want a quick dessert. This recipe is gluten free and suits a Jain diet.

In a hurry? Jump to Video or Jump to Recipe

milk peda made from milk powder and condensed milk

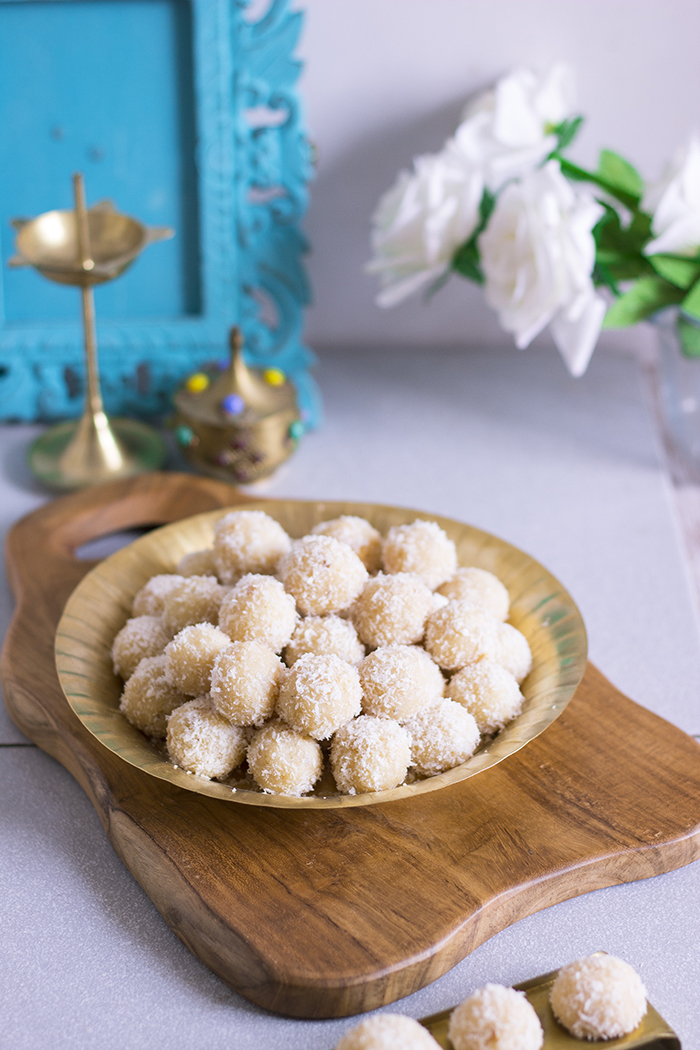
Milk Pedas are one of the easiest of Indian sweets, especially with THIS recipe.

You know that time, when you had a nice spicy dinner, and then get this sudden sweet craving, but it's already late and you are so cozily dressed up in your pajamas. And you are torn between changing and driving to the nearest sweet mart or trying to suppress that craving. You don't need to anymore, not with this recipe. 

The scene I just described above, is something I experience almost every couple of weeks. And most of the times laziness wins, I hate changing and going out after 10pm. So I mostly settle for maybe a biscuit or when I am in a good healthy-diet sort of mind, a couple of dates or raisins. But mostly, I'm still thinking of delicious desserts in my head. 

So when you aren't freezing brownies for such nights, give this peda recipe a try and I assure you it won't disappoint. In fact, it is so easy, a 12-year-old can make it, so feel free to delegate this to the little chefs at home. My sister actually won a cooking contest in school making this on an old kerosene stove, so you can guess how simple and tasty it really is. 

Instant Milk Peda is made from just a handful of ingredients - ghee, condensed milk, milk powder, cardamom powder and nuts.

milk peda made from milk powder and condensed milk

Notes to make the perfect Pedas

Not that you need too many pointers, but I did somehow manage to mess up this recipe once, so I thought I'd rather share the experience.

  • When I say 5-6 minutes of cooking, I mean it. Unfortunately, the first time I made the pedas, I went by look and feel rather than timing. I ended up with very chewy pedas, almost like a 5-star or caramel candy if you know. Not a pleasant experience for my jaws. So although the mixture looks runny and sticky after 6 minutes, don't cook it too long. At the maximum, based on the heat, you may need 1-2 minutes more. The pedas will harden and set as they cool, so don't worry.
  • What if my advice above failed and you actually undercooked it. Don't worry, put the mix back on the stove and maybe cook for an additional 2-3 minutes.
  • What if you totally missed my advice and overcooked it. Well, at least now you know how strong your jaws are. But don't worry, I actually managed to get this working too. Keep the pedas in the fridge overnight. In the morning, remove them and keep them on the counter and allow them to come to room temperature. Somehow this magically fixed the texture in my case. So it is worth a try, don't you agree?
Also, you can top the pedas with any nuts or no nuts at all. I like almonds and pista, so that is what I used.

Flavoring too is your choice. The traditional flavoring for most Indian sweets is cardamom and I stuck with it. You can use saffron, rose, or kewra too. I've tried the rose and it rocks.

Oh and also, since I'm posting this so close to Diwali, have a happy and safe one. 

I have a Diwali playlist on YouTube, that may interest you too, check it out here.

milk peda made from milk powder and condensed milk

If you made this recipe, let me know! Leave a comment here or on Facebook tag your tweet with @oneteaspoonlife on Twitter and don't forget to tag your photo @oneteaspoonoflife on Instagram. You can also email me at onetspoflife@gmail.com I'd love to see what you are up to.


If you like this recipe, do not forget to share it with your friends and family! 


You can follow One Teaspoon Of Life on FacebookTwitterInstagramPinterest or you can subscribe to One Teaspoon Of Life and receive all the latest updated via Email


Video Recipe


--------------------------------------------------------------------------------------------------------------------------

Instant Milk Peda Recipe | Quick Doodh Peda | Milk Peda with Condensed Milk


milk peda made from milk powder and condensed milk Instant Milk Peda or Doodh Peda an Indian fudge type of dessert / sweet that is made by combining sweetened condensed milk like mithai mate or milkmaid and milk powder and cooking them on low heat. Pedas are flavored with cardamom, shaped and topped with nuts. Instant milk peda is perfect for festivals like diwali or when you want a quick dessert. This recipe is gluten free and suits a Jain diet.

Recipe Type:  Dessert
Cuisine:            Indian
Prep Time:     10 hours
Cook time:     10 minutes
Total time:     20 minutes
Yield:                25


Ingredients:


400gms Sweetened Condensed Milk
1.5 cup Milk Powder or Dairy Whitener
8-10 Green Cardamom
1 Tbsp Ghee
3 Tbsp chopped nuts like Almonds and Pistachios

Method:


1. Peel the cardamom and crush the seeds into a powder. Add 1 tsp sugar to help you pound it into a powder.
2. In a non stick pan, add the ghee, condensed milk and the milk powder.
3. Mix well.
4. Cook the mixture on low heat while stirring constantly to prevent the mix from burning.
5. Continue to cook for 5-6 minutes or until the mix comes together as one mass.
6. Add cardamom powder and mix well.
7. Remove from heat and transfer to a bowl or a plate. The mix will look sticky, but don’t be tempted to cook it more. The pedas will become chewy if overcooked.
8. As the mix cools, it will begin to harden and set.
9. Grease your hands with ghee and take a spoonful of the mix while still warm and shape into pedas.
10. Top with chopped nuts and gently press so that they stick to the peda.
11. Cool completely before serving.
12. Pedas can be stored at room temperature for 1-2 days, after which they are best stored in the fridge. Do not store them for over 5-7 days.


If you liked this, you may also like:

kaju barfi recipe, Indian cashew fudge
Kaju Katli

Coconut Laddoo
Bele holige, obbattu, puran poli, sweet lentil stuffed flatbread
Holige | Puran Poli


Read more ...

Matar Kachori Recipe | Green Peas Kachori Recipe


Matar Kachori is a deep fried green peas stuffed savory snack. Matar Kachori is a popular North Indian tea time snack. The green peas are spiced and then stuffed in a flour based dough, shaped into parcels and deep fried. Matar Kachori is vegan and can be modified to suit a Jain diet.

In a hurry? Jump to Video or Jump to Recipe

matar kachori, green peas stuffed kachori

It may seem strange, but I had never been very fond of kachoris. We probably knew of each other's existence and chose to live separate lives. But Samosa and me, were like best pals. And then BAM! I get married to kachori lover and our lives weren't too separate anymore. When I bought samosas for myself, I bought kachori for him. And slowly, I started enjoying it too. The crispy exterior, the sweet imli ki chutney, the theeki hair chutney, the chopped onions and sometimes, the sev. It made a delicious mouthful, that I couldn't resist. 

Then last year, I tried the stuffed kachori and it was just another level. The plain barely held up to it after that. I had a standard Rajasthani shop in the neighbourhood where I bought kachoris before. Sadly, due to the pandemic, they have now closed. And I had to learn to make these at home to fulfill our cravings.

We have been having all sorts of cravings during the lockdown, that previously, weren't there. Are you going through the same thing?

Over the past few months, I have made these Matar Kachoris, 4-5 times and we have loved it at home. It took me some time to learn the art of deep frying kachoris. This is the most important step as it gives you a crispy exterior shell. Well, even if you do mess up here when you try it for the first time, please know that the stuffing is so delish, that you will barely get any complaints. 

matar kachori, green peas stuffed kachori

What is a Kachori?


Kachori is a deep fried savory snack very popular in the Indian subcontinent, it is a slightly flattened disk made of all purpose flour (maida) that is usually stuffed with spiced lentils (dal) or onions. There are different varieties of kachoris available across North India. In some regions, a soft stuffed puri is also called a kachori and served for breakfast along with curry. 

Matar Kachori is a crispy deep fried kachori that is stuffed with a spiced green pea mash. Since the stuffing of the kachori is a wet filling, a matar kachori will never be as crispy as a plain kachori.

matar kachori, green peas stuffed kachori

How to fry a kachori?


The most important step in achieving the perfect kachori is the frying of the kachori. Fear not, I will share the tips and tricks that I learned over the course of several retries.

To fry kachori, take sufficient oil in a kadhai or a deep pot. Don't skimp on the amount of oil being used.

The temperature of the oil is very important. The oil should not be very hot not too cold. If the oil is very hot, the kachoris will puff up immediately, but they will become soft as soon as they are removed from the oil and cool a little. These will still taste very good, but will just not have the crispy shell that you may be expecting. If the oil is too cold, the kachori will absorb a lot of oil, will not puff up and will end up becoming hard rather than crispy. The perfect temperature to fry a kachori is medium to low. When a kachori is dropped in the oil, oil should bubble around it, but it should rise to the surface slowly. Always test the temperature of the oil with a small ball of dough - if it rises too fast, turn off the heat and allow the oil to cool, if it doesn't bubble, wait for a while. If the oil bubbles, but the dough ball doesn't rise to the surface, you are good to fry the kachori. Maintain the temperature of the oil throughout the cooking process.

The kachoris will puff up slowly as they rise to the surface. If they don't all puff up, don't worry, they will still taste amazing. This could be because the dough has gotten a little dry. Keep the dough covered with a moist cloth throughout.

Serve the kachoris warm-hot with sweet tamarind chutney and spicy mint chutney. However, I'd like to add that these kachoris taste delicious on their own too.

matar kachori, green peas stuffed kachori

If you made this recipe, let me know! Leave a comment here or on Facebook tag your tweet with @oneteaspoonlife on Twitter and don't forget to tag your photo @oneteaspoonoflife on Instagram. You can also email me at onetspoflife@gmail.com I'd love to see what you are up to.

If you like this recipe, do not forget to share it with your friends and family! 


You can follow One Teaspoon Of Life on FacebookTwitterInstagramPinterest or you can subscribe to One Teaspoon Of Life and receive all the latest updated via Email


Video Recipe


--------------------------------------------------------------------------------------------------------------------------


Matar Kachori Recipe


matar kachori, green peas stuffed kachoriMatar Kachori is a deep fried green peas stuffed savory snack. Matar Kachori is a popular North Indian tea time snack. Matar Kachori is vegan.

Recipe Type:  Snacks
Cuisine:            North Indian
Prep Time:     1 hour
Cook time:     45 minutes
Total time:     1 hour 45 minutes
Yield:                12

Ingredients:


For the dough


2 cups Flour (Maida)
2 Tbsp Semolina (Fine Rava/Sooji)
6 Tbsp Oil
Salt to taste
Water as required

For the stuffing


1 cup boiled Green Peas
1 Tbsp Oil
1 tsp Fennel Seeds (lightly crushed)
0.25 tsp Asafoetida (Hing)
1 tsp Ginger Green Chilli Paste
1 tsp Cumin Powder
1 tsp Coriander Powder
0.5 tsp Chaat Masala
0.5 tsp Amchur
0.25 tsp Turmeric Powder
0.5 tsp Red Chilli Powder
Salt to taste

Others


Oil to fry

Method:


1. To make the dough, take the flour in a large bowl and add in the semolina, salt and oil.
2. Mix in the oil until the flour has a sandy texture.
3. Add water little by little and knead into a smooth dough.
4. When the dough is smooth and soft, cover it with a moist cloth and allow it to rest for 30 mins to 1 hour.
5. While the dough rests, make the stuffing. To make the stuffing, coarsely mash the boiled green peas.
6. Heat oil in a pan and add in the crushed fennel seeds.
7. Add the asafoetida and the ginger-green chilli paste and saute until fragrant. For a Jain version, just add chilli paste.
8. Add in the mashed green peas and all the spice powders and salt and mix well. Keep aside until cooled.
9. After 1 hour, divide the rested dough into 10 or 12 equal pieces.
10. Flatten a dough ball with either your fingers or with a rolling pin to a small disk.
11. Spoon in the stuffing. Do not overstuff.
12. Seal the kachori and place it on a floured surface with the seam side up.
13. Roll out the kachori with either a rolling pin or the heel of your hand.
14. Heat oil for deep frying in a kadhai.
15. The oil should neither be too hot nor too cold. When you drop the kachori in, it should bubble but should slowly rise to the top. Refer to notes above for frying.
16. The kachori will puff as it rises to the top.
17. Fry until the kachoris are browned on both sides.
18. Serve the kachoris hot with sweet tamarind chutney and spicy mint chutney.


If you liked this, you may also like:

batata vada recipe, alugadde bonda recipe, aloo chop recipe
Batata Vada

medu vada medhu vada with chutney
Medu Vada
masala vada, ambode, chana dal vada recipe
Masala Vada


Read more ...

Baked Falafel Recipe | How to make baked falafels | Easy falafels recipe [Video]


Easy Baked Chickpea Falafel Recipe. Falafels are usually deep fried patties made of chickpeas or other beans and are a popular snack in the region around Middle East. These vegan and gluten free falafels are made from chickpeas and are baked. They are healthier than the deep fried ones. Baked falafels are a perfect addition to buddha bowls, wraps and pita pockets.

In a hurry? Jump to Video or Jump to Recipe

baked chickpea falafel wraps

We love falafels and hummus. If we could swim in a tub of hummus, we would. The silky-smooth, nutty savory goodness is meant for slathering and swimming in, it really is. Hummus is something I make quite often, it is so easy to make and tastes great with so many things. My favorite meal is really just taking some roti or chapati and slathering the hummus and adding a few julienned veggies like carrots, cucumber, tomato and colored peppers and rolling it up to make a delicious wrap. Lunch, done!!
But the thing I love and don't make enough of is Falafels. These crispy balls/patties of chickpeas are so delicious, yet I've generally avoided making them because deep-frying is not something I like to do too often. But all that has changed since I started baking them.

Baked falafels are really easy to make, healthy and freeze well. These baked falafels are made from soaked dried chickpeas, giving them the perfect texture on the inside. The recipe was the batter is the same as the fried ones, just this is baked, so you are not losing out on taste or texture. 

Making these falafels requires a little planning, just enough time to soak the dried chickpeas. They need a good 8-10 hours soak to become soft and achieve the right texture. If you have this planning done, then you really don't need to do much. The soaked chickpeas are drained, and blended with coriander leaves, onion, cumin, red chilli powder or paprika, salt and oil to get a stiff batter that can be shaped. The falafels are shaped into a patty as they bake better that way instead of a ball.

These baked falafels are the perfect addition to buddha bowls, curries, pita pockets and wraps.

baked chickpea falafel wraps


How to freeze baked falafels?

Once the falafels are baked, allow them to cool completely. Once cooled, you can either place them in a ziploc bag in a layer and freeze them horizontally or place in a freezer friendly plastic box and freeze. These will easily stay good for 1-2 weeks. 

To use frozen falafels, microwave on high until they are warm on the inside. I like to leave them out on the kitchen counter for 1-2 hours before I microwave. You can also pan fry them until they are warm on the inside.

My Falafel Wrap

 The pictures I have posted is of the falafel wrap I built with the baked falafels. 

The wrap has the following:
- Homemade pita bread
- Hummus
- Pickled onions
- Shredded red cabbage
- Cherry tomatoes
- Coriander leaves
- Crumbled feta cheese

The options are limitless, you can add different sauces like tzatziki or tahini or even mayo. Pickled radish or carrots will taste great too. Roasted veggies is another way to go. Mint, parsley or your favorite herbs. Pita bread can be replaced with a regular wholewheat roti or even a leftover restaurant garlic naan. Cheese is optional, use your favorite vegan or non vegan soft cheese if you desire. 

baked chickpea falafel wraps

If you made this recipe, let me know! Leave a comment here or on Facebook tag your tweet with @oneteaspoonlife on Twitter and don't forget to tag your photo @oneteaspoonoflife on Instagram. You can also email me at onetspoflife@gmail.com I'd love to see what you are up to.


If you like this recipe, do not forget to share it with your friends and family! 


You can follow One Teaspoon Of Life on FacebookTwitterInstagramPinterest or you can subscribe to One Teaspoon Of Life and receive all the latest updated via Email


Video Recipe


--------------------------------------------------------------------------------------------------------------------------

Baked Falafel Recipe | How to make baked falafels | Easy falafels recipe

baked chickpea falafel wrapsBaked Falafels are baked patties made of chickpeas, coriander, spices and aromatics. Falafels are popular snack in the region around Middle East. These vegan and gluten free. They are healthier than the deep fried ones. Baked falafels are a perfect addition to buddha bowls, wraps and pita pockets.

Recipe Type:  Appetizer
Cuisine:            Middle Eastern
Prep Time:     8 hours
Cook time:     30 minutes
Total time:     8 Hours 30 Minutes
Yield:                14-15 Falafels

Ingredients:


1.5 cups dried Chickpeas (Kabuli Chana | Chhole)
1 large Onion
5-6 Garlic cloves
1 cup Coriander leaves
1 Tbsp Cumin Powder
1 Tbsp Coriander Powder
1 tsp Red Chilli Powder
0.25 tsp Baking Soda
6 Tbsp Olive Oil
Salt to taste

Method:


1. Soak the dried chickpeas in water for 8 hours or overnight.
2. In the morning, drain the water completely and add to a blender.
3. Add chopped onions, garlic, coriander leaves, baking soda, cumin powder, coriander powder, red chilli powder, salt and 2-3 Tbsp olive oil. Blend to a coarse batter, you should be able to shape the falafels.
4. If the batter feels wet, add in 1-2 Tbsp Corn starch or corn flour to help it bind.
5. Shape the falafels and place in a single layer on a greased baking sheet.
6. Bake for 25-30 minutes at 180 degree celsius or until done.
7. Serve hot with hummus or use in buddha bowl, wrap or pita pocket.
8. Look at notes above if you are planning to freeze the falafels.


If you liked this, you may also like:

Vegan lentil meatballs

vegan pan fried turnip chops
Vegan Turnip Chops
roasted sweet potato, chickpea, quinoa salad with walnuts, pomegranate, broccoli and beans in a mustard date dressing
Roasted Sweetpotato Salad


Read more ...

Batata Vada Recipe | Alugadde Bonda Recipe [Video]


Batata Vada Recipe with step by step video instructions. Batata Vada or Alugadde Bonda are a popular deep fried snack from India. Spiced mashed potato is dipped in a batter of besan or chickpea flour and deep fried. Batata Vada is stuffed inside a pav bread to make the famous street food Vada Pav. Batata Vada is vegan and gluten free.

In a hurry? Jump to Video or Jump to Recipe

batata vada recipe, alugadde bonda recipe, aloo chop recipe

I had batata vada almost every day for a long time until the pandemic hit. Literally every day!!

It was my usual evening snack. I had a routine - get down from my cab, buy a mix of pakodas/bondas (usually, batata vada, masala vada and may be a mirchi vada) and enjoy those with tea while watching something on YouTube. It was my "me" time. Those 15-20 minutes were what relaxed me enough to take on the evening.

Now with no access to the bonda cart and the cravings rising, I had to make them at home. And boy, am I glad to be reunited with one of my favorites. And the day I made these, it rained, it poured.

Happy Days!!

I mean everyone knows, when it rains, you are obligated to have something fried along with your hot cuppa caffeine. And this time, we enjoyed it with these delicious batata vadas.

batata vada recipe, alugadde bonda recipe, aloo chop recipe


The details...


Batata Vada, is thought to have originated in the state of Maharashtra, but is now equally popular all over the country. The Batata Vada forms the "Vada" of Mumbai's favorite street snack - the Vada Pav. If you'd like to make amazingly pillowy soft pav, you can follow our recipe for pav here.

The good thing about batata vada is that you can prep it in advance, so much in advance. And even on the day you are making it, it is very less effort. There are essentially just 5 steps

  • Boil potatoes
  • Make the stuffing
  • Make the batter
  • Dip the stuffing in the batter
  • Deep fry
You can make the stuffing and store it in the fridge until you are ready to fry. The batter is a simple matter of mixing besan (gram flour / chickpea flour) with a handful of readily available pantry spices like turmeric powder and red chilli powder and salt. A pinch of baking soda makes the coating thick. If you are not fond of the thick coating, don't add the baking soda and make the batter a little thin. 

And don't worry if you mess up the batter, it is SO easy to fix it. If the batter is too thick - add a little water to thin it down. If you added too much water in the batter, add in more flour and adjust the spices as required. If you made too much batter, you can either dip other vegetables and fry to make mixed pakodas or you can also use it to make Vegan Omelet, or Tomato Omelet.

Deep fry in hot oil so that the vadas soak up less oil.

Always serve the vadas hot. Always!!

batata vada recipe, alugadde bonda recipe, aloo chop recipe

If you made this recipe, let me know! Leave a comment here or on Facebook tag your tweet with @oneteaspoonlife on Twitter and don't forget to tag your photo @oneteaspoonoflife on Instagram. You can also email me at onetspoflife@gmail.com I'd love to see what you are up to.

If you like this recipe, do not forget to share it with your friends and family! 


You can follow One Teaspoon Of Life on FacebookTwitterInstagramPinterest or you can subscribe to One Teaspoon Of Life and receive all the latest updated via Email


Video Recipe


--------------------------------------------------------------------------------------------------------------------------

Batata Vada Recipe | Alugadde Bonda Recipe


batata vada recipe, alugadde bonda recipe, aloo chop recipeBatata Vada or Alugadde Bonda are a popular deep fried snack from India. Spiced mashed potato is dipped in a batter of besan or chickpea flour and deep fried. Batata Vada is stuffed inside a pav bread to make the famous street food Vada Pav. Batata Vada is vegan and gluten free.

Recipe Type:  Snacks
Cuisine:            Indian
Prep Time:     15 minutes
Cook time:     20 minutes
Total time:     35 minutes
Yield:                12 to 14


Ingredients:


For the potato stuffing:


8-10 boiled Potatoes (750 gms)
2-3 Tbsp Oil
1 tsp Mustard Seeds
2 Green chillies, finely chopped
1 Tbsp crushed Ginger Garlic or Ginger Garlic Paste
1 tsp Turmeric Powder
2 Tbsp chopped Coriander leaves
0.25 tsp Asafoetida or Hing (Optional)
Curry leaves
Salt to taste

For the besan batter for coating:


1 cup Besan (Chickpea flour)
1 tsp Turmeric Powder
1 tsp Red Chilli Powder
0.25 tsp Baking Soda
Salt to taste
0.5 to 0.75 cups of Water

Method:


1. To make the besan batter for coating, add all the ingredients except water to a large bowl. Slowly add the water while whisking with a fork or a whisk until smooth. The amount of water you add determines the thickness of the coating, so for a thick coating, add less water. For a thinner coating add more water. 
2. To make the stuffing, peel the boiled potatoes and roughly mash them. There should still be chunks in it. Don't mash it until smooth.
3. Heat oil in a kadhai and add the mustard seeds.
4. Once they splutter, add the hing (if using) and the curry leaves.
5. Then add the crushed ginger garlic or ginger-garlic paste and green chillies. Saute until fragrant.
6. Add the turmeric powder (haldi) and mix well. 
7. Add the mashed potatoes and salt and mix well until the potatoes are coated with the turmeric powder.
9. Turn off the heat and add chopped coriander leaves. Mix well and remove to a large bowl. Set aside until it is cool enough to handle.
10. Once the stuffing is cool, make balls out of it. The size can vary from that of lime to a tomato. 
11. Heat oil for deep frying in a kadhai or deep pan.
12. To check if the oil is hot, add a small piece of potato to it, if it rises immediately, the oil is hot.
13. Dip the stuffing potato ball into the besan batter and add to the oil carefully. Do not crowd the kadhai. 
14. Once the lower side is cooked and set, gently flip the vadas in the oil.
15. Fry until the vada is completely cooked. Stir the vadas occasionally to cook them evenly.
16. Once golden brown, remove the vadas to an absorbant paper.
17. Serve the batata vadas while hot with ketchup or chutney.


If you liked this, you may also like:

masala vada, ambode, chana dal vada recipe
Masala Vada

maggi instant noodles fritters fried pakoda chickpeas besan
Maggi Pakoda
how to make vegetable cutlets recipe, aloo tikki recipe, vegan cutlet recipe, beetroot cutlet recipe at www.oneteaspoonoflife.com
Vegetable Cutlets


Read more ...

Pav Recipe | Goan Pao Recipe and an Ode to the humble Pao [Video]


Pav or Pao Recipe with step by step video instructions. Pav or Pao are leavened bread rolls from India. Pao is a soft, fluffy and chewy white bread roll. Pao is usually served with a bhaji or curry on the side. This recipe of pav is vegan.


In a hurry? Jump to Video or Jump to Recipe

goan pao, vegan pav, ladi pav

Pav or Pao.. to the tiny state on the Konkan coast where I am from, it is not just bread, it is almost a way of life.

Every time I post a photo of Pao on Instagram, I always write about how special the Goan Pao is. It is a sentiment that my fellow Goans agree to.

The Portuguese brought the leavened bread, the Pao to Goa. During the Portuguese rule, the pao was leavened using toddy, the local coconut alcohol.  But since independence, the toddy has been replaced with yeast which is now easily available all across the country.

When you are in Goa, you are bound to see the Poder, the guy who delivers the pao to your door step. He is usually riding the cycle with a blue tarpaulin covered cane basket behind him on the cycle and honking away to let the people know that he is present. Just holler at him to stop him and buy your fresh from the bakery pao.

goan pao, vegan pav, ladi pav


My earliest memory is my grandma giving me Rs.0.5, yes, 50 paise, and sending me off to buy pao at 4pm, when the poder made his second round of the day. Today the humble pao costa a little more, but is still subsidized by the government so that it is affordable to all.

The Goan pao is like no other and although I attempt to recreate it in my kitchen with this recipe, I will never accept it can reach the texture of the Goan pao. The Goan pao has the chewiest and lightest crumb that can soak up any curry and still hold its shape. The crust can be soft or "kadak", buy the variety you like, it is always a nice even brown with so much texture. The pav is so aptly salted that it can still be enjoyed just plain and it won't taste bland and use it to mop up a curry, it won't taste too salty. Perfect, just like Goldilocks liked it. And yes, it isn't even a tad bit sweet and the crust doesn't crumble, like it does for store bough pao in Bangalore.

I have spent several years trying to find the perfect pao in Bangalore and almost given up. There are a few ones that come close to the Goan pao, but aren't always available. So in the meantime I have been attempting to make it at home. And after several several tries, I can say that this Pao recipe satisfies me.

The pao is soft and has a decent crumb that does not rip apart and crumble when dipped into a gravy. The crust is nice and soft with a gentle resistance of the gluten. It isn't always an even texture, but I attribute it to my shaping skills. While I attempt to keep most of my recipes vegan friendly, this is one place where I tend to replace the sugar with honey just because it gives me an amazing rise and color. The recipe below calls for sugar, but feel free to replace it with honey, maple syrup or any other sweetner. The addition of steam helps the pao rise and also gives it better texture as in the case of a sourdough or other artisanal breads.

goan pao, vegan pav, ladi pav


If you made this recipe, let me know! Leave a comment here or on Facebook tag your tweet with @oneteaspoonlife on Twitter and don't forget to tag your photo @oneteaspoonoflife on Instagram. You can also email me at onetspoflife@gmail.com I'd love to see what you are up to.

If you like this recipe, do not forget to share it with your friends and family! 


You can follow One Teaspoon Of Life on FacebookTwitterInstagramPinterest or you can subscribe to One Teaspoon Of Life and receive all the latest updated via Email


Video Recipe


--------------------------------------------------------------------------------------------------------------------------

Pav Recipe | Goan Pao Recipe


goan pao, vegan pav, ladi pavPav or Pao are leavened bread rolls from India. Pao is a soft, fluffy and chewy white bread roll. Pao is usually served with a bhaji or curry on the side. This recipe of pav is vegan.

Recipe Type:  Bread
Cuisine:            Goan / Indian
Prep Time:     2.5 minutes
Cook time:     20 minutes
Total time:     3 minutes
Yield:                Makes 9 small pavs

Ingredients:


3 cups all-purpose flour or maida
3 tsp instant yeast or 2 tsp active dry yeast
1 Tbsp Honey or Sugar
2 Tbsp Oil
Salt to taste
Water as required
Oil for greasing
Flour for dusting

Method:


1. Add the sugar or honey to 0.5 cups of warm water and mix well.
2. Add in the yeast and mix well. If using active dry yeast, allow it to sit for 5-10 minutes until the yeast blooms.
3. Pour the yeast to a large bowl and add in the 2 Tbsp of oil and salt.
4. Add the flour and knead to a smooth dough. Use water as required while kneading.
5. Once you have a smooth dough, rub some oil on it to prevent it from drying and cover and keep the dough in a warm place for 1 hour or until it doubles.
6. Once the dough has doubled, punch it down and move it to a floured surface.
7. Gently knead the dough again and form a log.
8. Divide it into equal pieces. I divided into 9 pieces because I was using an 8 inch square pan.
9. Take each piece of dough and roll it into a ball. Fold the sides in and place it on a greased baking pan.
10. Keep 1-2 cm gap between the dough balls. The dough will rise and the pav rolls are meant to stick together on the sides to give you the classic shape and feel of pav.
11. Cover loosely with a cloth and allow the pav to rise for a second time in a warm place. The second rise may be shorter than the first as the yeast is already activated.
12. Preheat the oven to 220 degree Celsius and boil water in a kettle until it reaches a rolling boil.
13. Place the pav in the oven and in a tray below the pav add the boiled water to create steam in the oven.
14. Bake for 20 minutes or until the pav bread is cooked. Timing may vary according to the oven.
15. Remove from the pan and cool on a wire rack.
16. Allow to cool before serving.

Notes:

  1. Using honey instead of sugar gave me a better rise and color. Feel free to substitute the sweetner to your liking. Don't eliminate the sweetner, it is required for the color and rise.
  2. You can brush the top of the pav with milk before baking, it helps in getting a browner color on the top.
  3. You can replace water with milk in the recipe, it will give you softer and less chewy pav.
  4. Steam helps the pav get a better rise and texture. You can skip this, although it is recommended.


If you liked this, you may also like:

Spicy Maharashtrian Misal Pav
Misal Pav

How to make goan bhaji pao, pav bhaji,  alsanyache tondak at One Teaspoon Of Life www.oneteaspoonoflife.com
Alsane Tonak
jain pav bhaji made without onion, garlic and potatoes
Jain Pav Bhaji
Masala Pav, Indian street food
Masala Pav

How to make dill bread recipe, dill and onion bread recipe, eggless dill and onion bread recipe, how to bake bread rolls recipe, how to bake bread at www.OneTeaspoonOfLife.com
Dill Onion Rolls
Indian street food, chaat, made with bread, yogurt, chutneys and spices
Dahi Bread Chaat

Read more ...