Showing posts with label bread. Show all posts

Mumbai Masala Toast Recipe | Bombay Sandwich Recipe [Video]


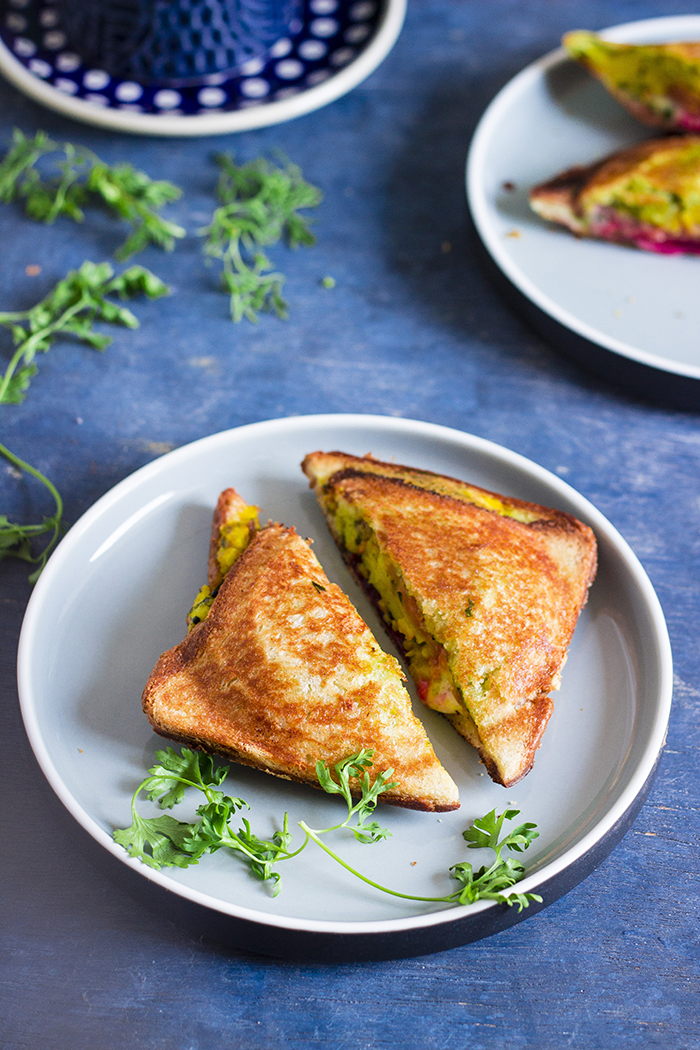
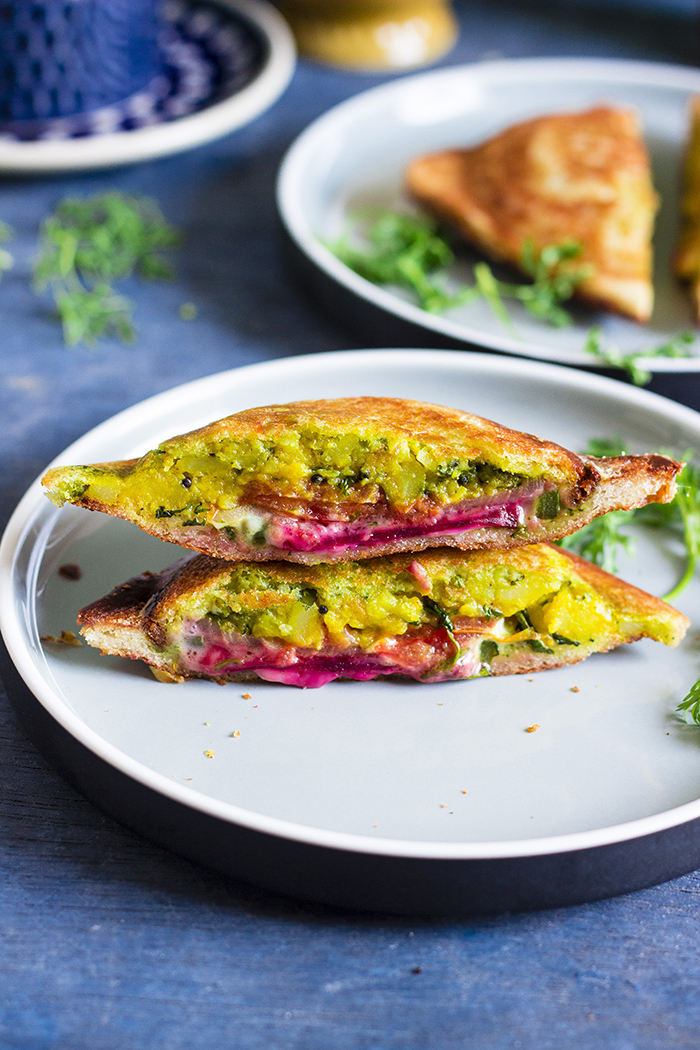
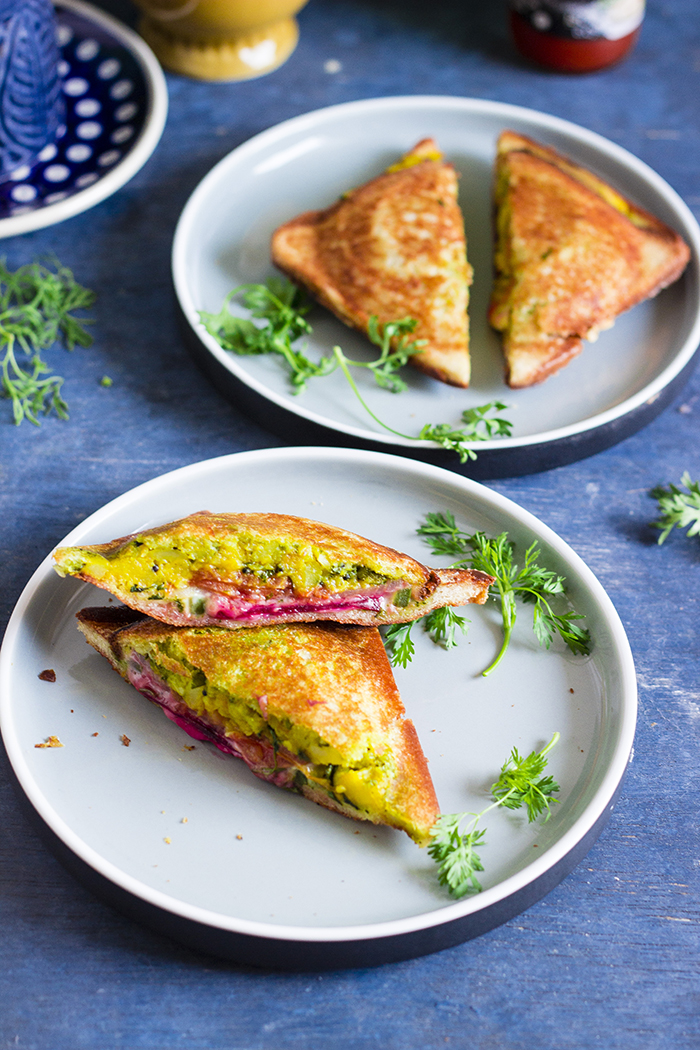
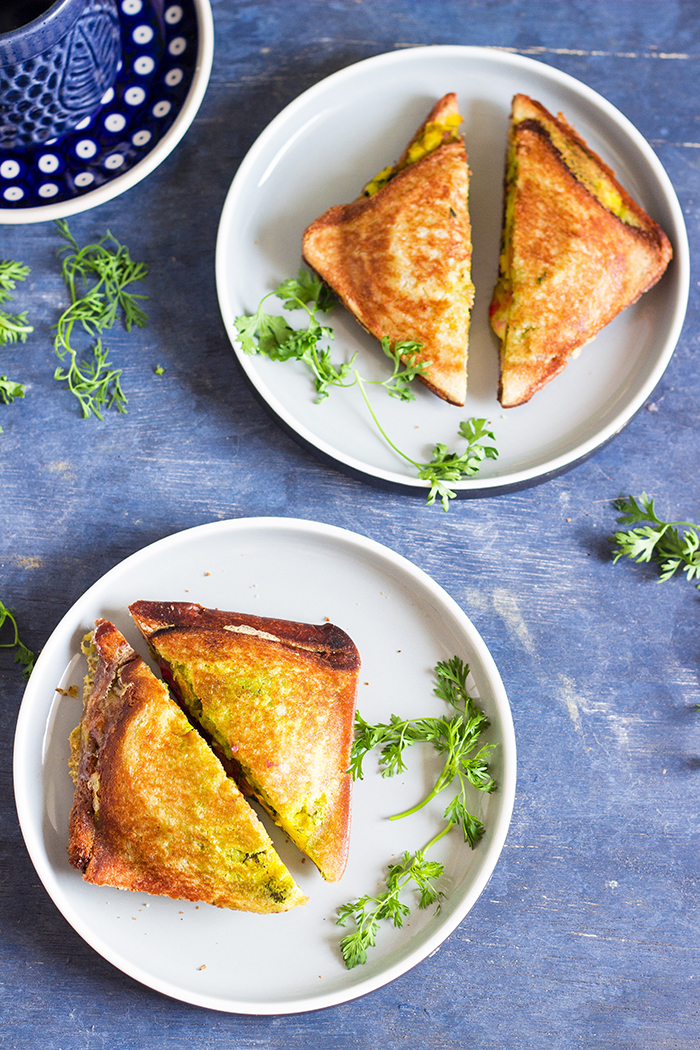
Mumbai Masla Toast or Bombay Sandwich is a popular street side sandwich from Mumbai (Bombay). The sandwich is a stove top toasted sandwich that is stuffed with spiced potato mash, sliced vegetables and grated cheese. 

In a hurry? Jump to Video or Jump to Recipe


Bombay sandwich, Bombay masala toast, Mumbai sandwich, Spiced potato sandwich

Bombay sandwich, Bombay masala toast, Mumbai sandwich, Spiced potato sandwich

7 Years!!! I can't believe that's how long I have been meeting you guys at this very space!!

On 9th February 2012, I posted by very first recipe Sweet Potato Chips, and started this journey. I was such an amateur in this space of blogging. I was horrible at taking photos, I owned a point and shoot and clicked all my photos under tube lights at home. I didn't know how to edit them or even the right angle to take photos. While I won't claim I am an expert today, I think I have grown leaps and bounds since then in my photography. I was an absolute zero in social media promotion. This is still something, I feel I'm poor at, but I hope to improve this year. Likewise, there is so much I believe I have overcome and improved, and it was you guys who made it all possible.

I love you guys for encouraging me to keep doing this, the comments and feedbacks, that I received have just kept me going. A very big Thank You!!

I struggled for a while on deciding which recipe should mark this momentous occasion. Gee suggested this one as this is one of her favorites and I liked the idea. It ticked all the check boxes - Easy (check), Delicious (check), Indulgent (check), Snacks (check), Kid friendly (check), Family favorite (check). What more could I ask for?

Bombay sandwich, Bombay masala toast, Mumbai sandwich, Spiced potato sandwich


So, today, apart from all the applause and thanks, I bring to you a very delicious street food dish - Mumbai Masala Toast, from the streets of, ehmmm..... Mumbai!! The coastal city of Mumbai (formerly Bombay) is home to some of the best street food. Vada Pav, Masala Pav, Pani Puri, Tava Pulao and so much more. And this Masala Toast or Bombay Sandwich is one of those many more street favorites. It is actually such a simple dish, but once you eat it you totally understand why thousands of people love it.

There are several variations of the dish, I am sharing one that I have eaten.

Mumbai Masala Toast is a vegetarian sandwich that is stuffed with so many flavorful things and then toasted. To build the perfect Mumbai Masala Toast, you will need:

  • Butter. Butter is your friend, your very best friend, while making this sandwich, The street food cooks, do not shy away from it, and neither should you. So be generous, street food was never meant to be healthy. 
  • After butter, embrace those potatoes. The spiced mash can be as simple as I have shared or full of spicy masalas like some folks make. Feel free to adjust the taste to your liking. 
  • Then come in all the veggies - now that's the healthy part. Tomatoes, Onions, Beets and Capsicum. Add in cucumber if you are in the mood.
  • Green chutney is added for more flavor. 
  • Then add cheese, the more cheese, the better. 
  • Once the tall sandwich is ready, it is toasted in a unique type of toaster. If you don't have that toaster, you can either grill the sandwich in a sandwich maker or you can toast it in a pan.

Serve these sandwiches while still hot, along with some piping hot adrak wali chai or ginger tea.

Happy Weekend to all you lovelies.

Bombay sandwich, Bombay masala toast, Mumbai sandwich, Spiced potato sandwich


If you made this recipe, let me know! Leave a comment here or on Facebook tag your tweet with @oneteaspoonlife on Twitter and don't forget to tag your photo #oneteaspoonoflife on Instagram. You can also email me at onetspoflife@gmail.com I'd love to see what you are upto.


If you like this recipe, do not forget to share it with your friends and family! 


You can follow One Teaspoon Of Life on FacebookTwitterInstagramPinterest and Google+ or you can subscribe to One Teaspoon Of Life and receive all the latest updated via Email


Video Recipe


--------------------------------------------------------------------------------------------------------------------------

Mumbai Masala Toast Recipe


Bombay sandwich, Bombay masala toast, Mumbai sandwich, Spiced potato sandwichMumbai Masala Toast or Bombay Sandwich is a popular street side sandwich from Mumbai (Bombay). The sandwich is a stove top toasted sandwich that is stuffed with spiced potato mash, sliced vegetables and grated cheese.

Recipe Type:  Snacks, Breakfast
Cuisine:            Indian
Prep Time:     10 minutes
Cook time:     15 minutes
Total time:     25 minutes
Yield:                6

Ingredients:


12 Bread slices
1.5 cups mashed boiled Potatoes
5-6 Curry leaves, finely chopped
1 Green Chilli, finely chopped
1 tsp Mustard Seeds
2 Tbsp Oil
1 tsp Turmeric Powder
2 Tbsp chopped Coriander leaves
1 tsp Chat Masala (optional)
Salt to taste
Sliced Tomatoes
Sliced Onions
Sliced Capsicum
Sliced Beetroot
0.5 cup Green Chutney
1 cup grated Cheese
Butter as required

Method:


1. Heat oil in a pan and add in the mustard seeds.
2. Once the mustard seeds splutter, add in the chopped curry leaves and green chilli.
3. Add the turmeric powder and the mashed potatoes and mix well.
4. Add salt to taste.
5. Add chat masala now, if adding. Mix well.
6. Remove from heat and add in chopped coriander leaves and keep aside.
7. Apply butter on 2 slices of bread and then spread 1 tsp of green chutney on each of them.
8. Add the spiced potato mash on one slice of bread, over the chutney.
9. Place sliced tomato, onion, capsicum and beetroot over the potato mash.
10. Add in grated cheese and place the other bread slice with the chutney side down.
11. Grease the stove top toast maker with butter. If using a pan, grease the pan.
12. Apply butter on the outside of the sandwich and place in toaster or on pan.
13. Toast until both sides are golden brown and crisp.
14. Remove from heat and cut the sandwich into half with a sharp knife.
15. Serve hot with chutney or ketchup.


If you liked this, you may also like:

Bangalore Iyengar Bakery Style bread toast topped with an onion-carrot masala
Masala Bread Toast

vegan grilled summer vegetable open sandwich
Grilled Vegetable Sandwich
Mediterranean Veg Sandwich


Read more ...

Roasted Butternut Squash and Artichoke Bruschetta [Video]


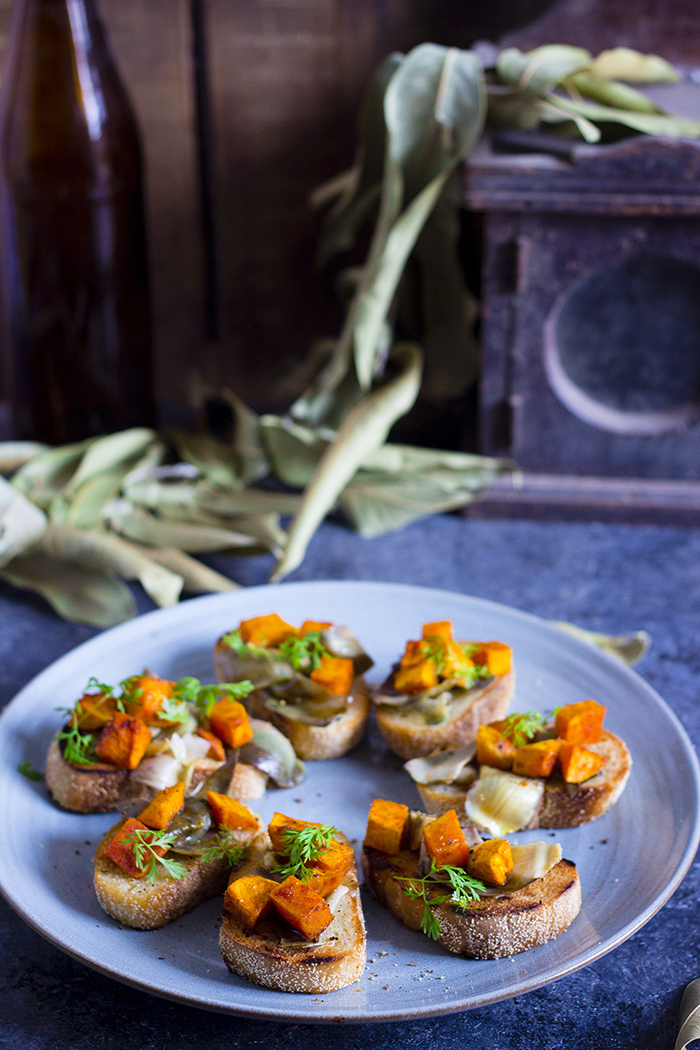
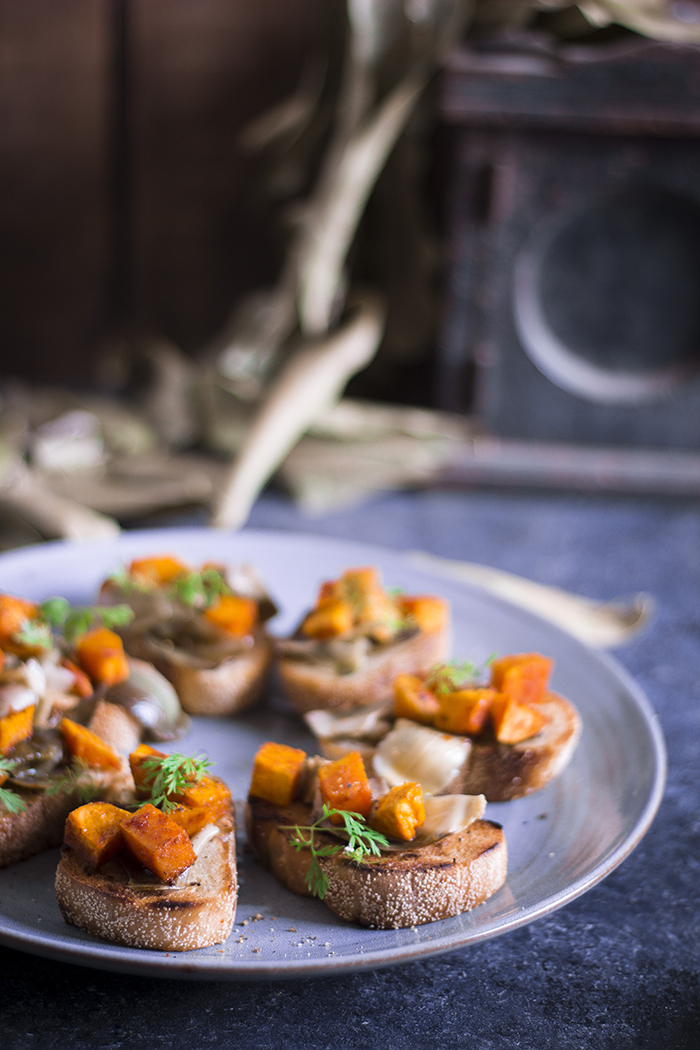
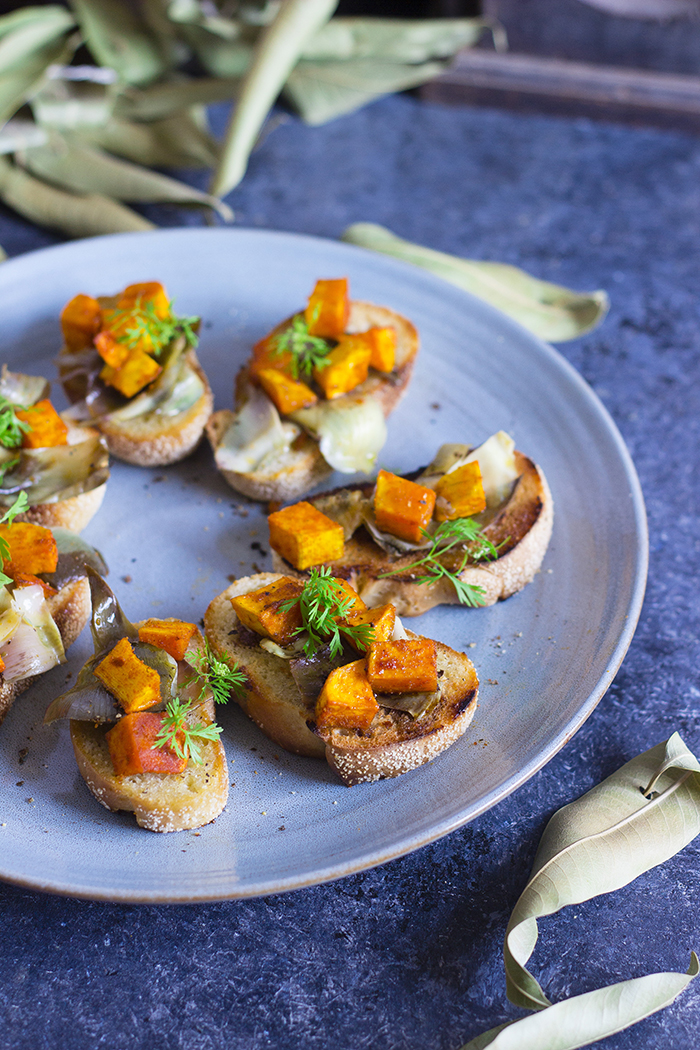
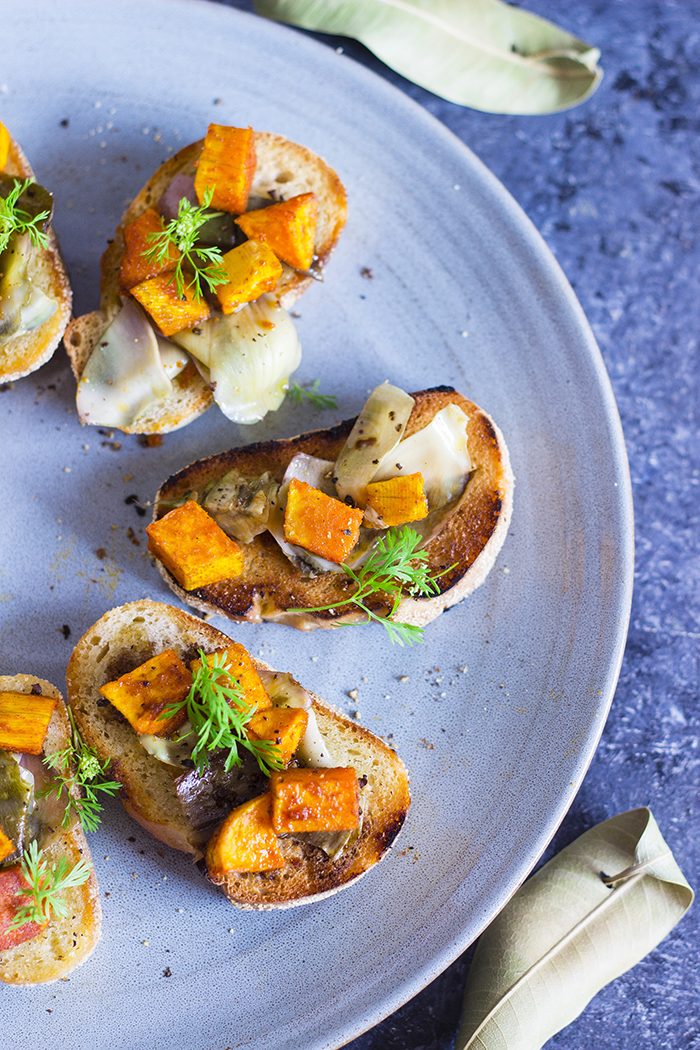
Roasted Butternut Squash and Artichoke Bruschetta. Crusty grilled bread topped with sweet cumin roasted butternut squash, artichokes cooked in the oven until soft, olive oil, and balsamic vinegar. This vegan appetizer is perfect for soirees and parties. Included is a video that shows how to roast butternut squash and how to cut and prepare artichokes to cook in the oven.

In a hurry? Jump to Video or Jump to Recipe

Crusty bread topped with roasted butternut squash and artichokes


Hey, we are mid week already!!

If you are an optimist (which I am sure you are), you are thinking you are halfway through to the weekend. So true!! Shouldn't we celebrate? I  say we should with this Roasted Butternut Squash and Artichoke Bruschetta.

Crusty bread topped with roasted butternut squash and artichokes

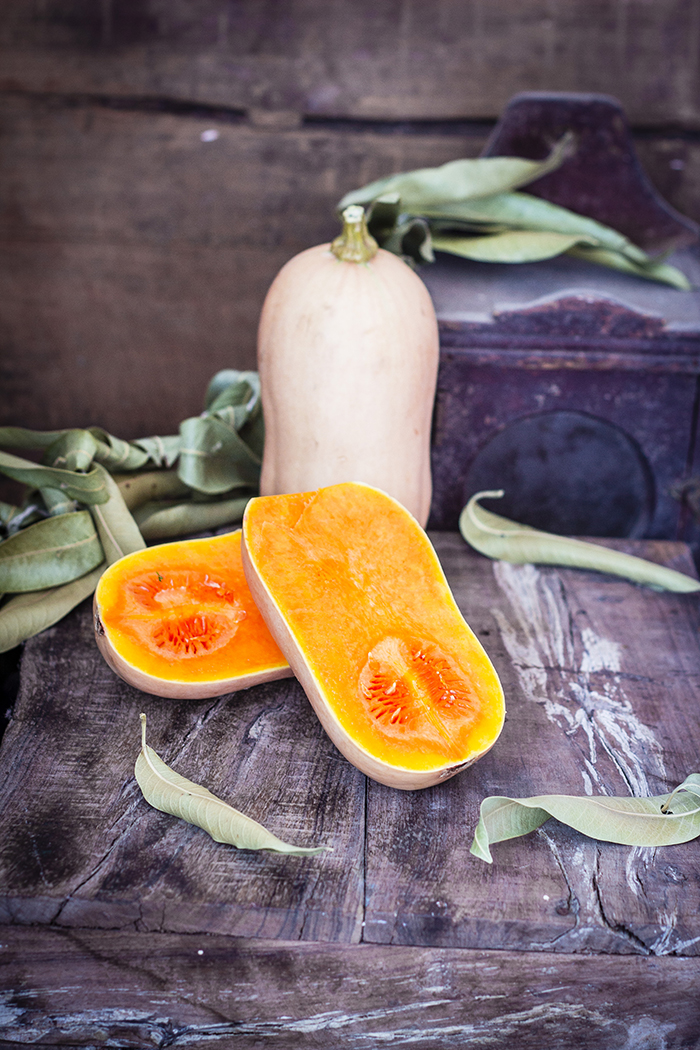
butternut squash

Crusty bread topped with roasted butternut squash and artichokes


I simply LOVE Butternut Squash. It's a beautiful vegetable. For those who haven't had one, it is the closest in taste to red or orange pumpkin, but slightly firmer in texture. You can replace butternut squash with pumpkin too. But I love the texture of a butternut squash. And roasting it brings out the sweetness of the squash. I kept the flavor profile very simple, just red chilli and cumin. The red chilli brought a nice heat to the otherwise sweet squash and the cumin added a little earthy flavor that worked wonderfully with the sweet squash. The little cubes are so tasty, you won't stop eating them while cooking, so make a little more than you would like to serve. Your own secret stash.


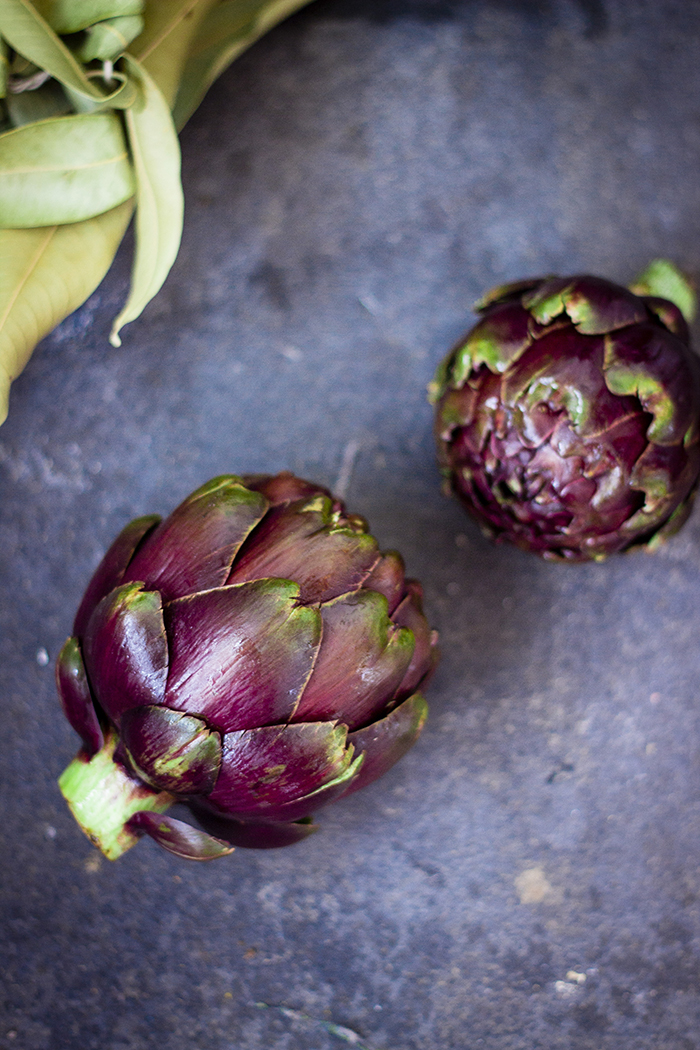
Next in, the Artichokes. This is not something very regularly available in India. I happened to find it stocked in the supermarket near my house and I couldn't resist buying it. Good decision, though. The last time I had cooked artichokes, Raj was totally unimpressed. He almost forbade me to buy them this time. But after this time, I may have at least converted him to tolerating them. I almost steamed the artichokes in the oven and they turned out all soft and melt in your mouth texture, that was really appetizing. I absolutely loved them with just salt and olive oil. Gee preferred adding in some Italian seasoning. Season the artichokes according to your taste.

Good quality crusty bread works best for a Bruschetta, but you can use what you have. You can even use crackers.

This Roasted Butternut Squash and Artichoke Bruschetta is a perfect snack or appetizer that you can serve for a Sunday Brunch, or Friday night Cocktails, or a just a soiree with friends. It is also something that you can prepare in advance, so you can leave your hair loose and enjoy with your family and friends and just accept the compliments that will come your way. Happy celebrating!


Crusty bread topped with roasted butternut squash and artichokes

Crusty bread topped with roasted butternut squash and artichokes

If you made this recipe, let me know! Leave a comment here or on Facebook tag your tweet with @oneteaspoonlife on Twitter and don't forget to tag your photo #oneteaspoonoflife on Instagram. You can also email me at onetspoflife@gmail.com I'd love to see what you are upto.


If you like this recipe, do not forget to share it with your friends and family! 


You can follow One Teaspoon Of Life on FacebookTwitterInstagramPinterest and Google+ or you can subscribe to One Teaspoon Of Life and receive all the latest updated via Email


Video Recipe


--------------------------------------------------------------------------------------------------------------------------

Butternut Squash and Artichoke Bruschetta


Crusty bread topped with roasted butternut squash and artichokesBruschetta is an Italian appetizer in which crusty grilled bread is topped with sweet cumin roasted butternut squash, artichokes cooked in the oven until soft, olive oil, and balsamic vinegar. This vegan appetizer is perfect for soirees and parties

Recipe Type:  Snacks
Cuisine:            Italian
Prep Time:     15 hours
Cook time:     60 minutes
Total time:     75 minutes
Yield:                Serves 4-5

Ingredients:


2 Baguettes
1 Butternut Squash
2 Artichokes
0.5 cup Extra Virgin Olive Oil
1 tsp Cumin Powder
1 tsp Red Chilli Powder
2-3 Tbsp Balsamic Vinegar
Salt to taste
Water as required
1 Lime or Lemon
2 Tbsp freshly cracked Pepper

Method:


1. Peel the butternut squash and remove the seeds. Dice it into bite sized pieces of about 1 cm.
2. Add salt, red chilli powder, cumin powder and 2-3 Tbsp of olive oil and mix well.
3. Layer them on a baking sheet and bake for 20 minutes at 220 degree Celsius or until soft.
4. In the meanwhile, prepare the artichokes. In a large bowl, take water and add lime juice to it and keep close by. Acidulated water prevents artichokes from browning.
5. Cut the top of the artichoke and remove the tough outer leaves. Keep dipping the artichoke in lime water to avoid browning.
6. Trim the stem and cut the artichoke into half and soak it in the lime water.
7. Once all the artichokes are prepped, place them in a baking pan and drizzle olive oil and salt over them. Use your fingers to rub the salt and oil into the artichokes.
8. Add water to the pan and cover with aluminium foil.
9. Bake for 35-40 minutes or until soft in an oven at 220 degree Celsius.
10. Allow the artichokes to cool a little and either chop them or separate the individual leaves.
11. Slice the baguettes and grill them or toast them until crisp.
12. Top with the artichokes and butternut squash.
13. Drizzle with olive oil and balsamic vinegar. Top with freshly cracked pepper for taste.
14. Serve warm or at room temperature.

If you liked this, you may also like:
vegan grilled summer vegetable open sandwich
Grilled Veg Sandwich

Vegan Tomato Onion Avocado Olive Mint Coriander Italian Sourdough Baguette Bread Sandwich
Breakfast Bruschetta Duo
Bangalore Iyengar Bakery Style bread toast topped with an onion-carrot masala
Masala Bread Toast
artichokes


Read more ...

North Karnataka Jolada Rotti Oota - Part 1 - How to make Jolada Rotti | Jowar Bhakri Recipe [Video]


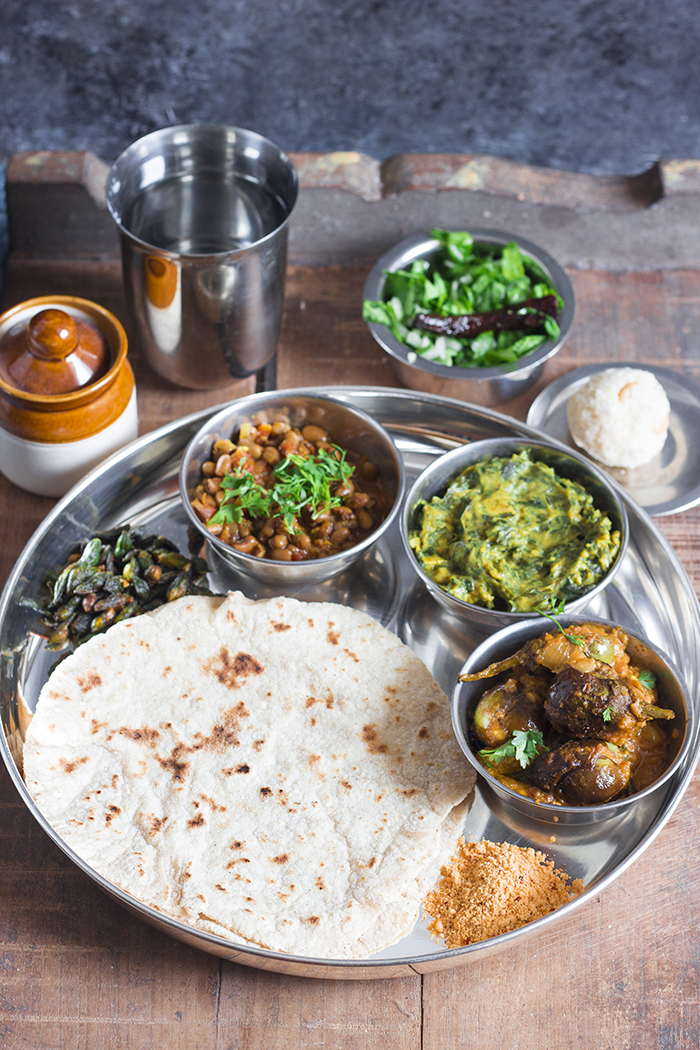
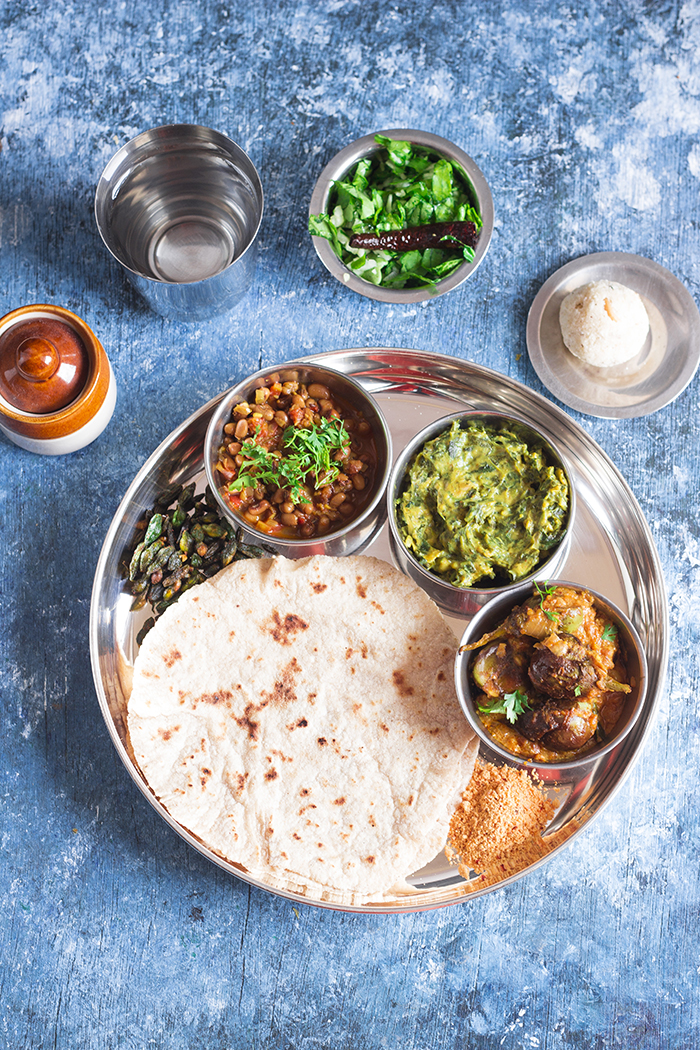
Jolada Rotti Oota is a North Karnataka Thali that has jowar roti, spicy curries and condiments along with salads and sweets. Jolada rotti or Jowar Roti is an oil less, vegan, healthy, gluten free flatbread made from jowar millet or sorghum.

jowar roti with curries or jolada rotti oota


If you have never been to North Karnataka or never eaten the food, you are in the right place, because I'm taking you there!!

Karnataka is a state with various cultures, dialect and cuisines all mixed into one. While the coastal belt is huge on growing and eating rice, the drier northern regions eat more of flatbread or rottis made from wholewheat or millet like jowar. And today, I'm taking you through the cuisine of North Karnataka in the first post of a four part series.

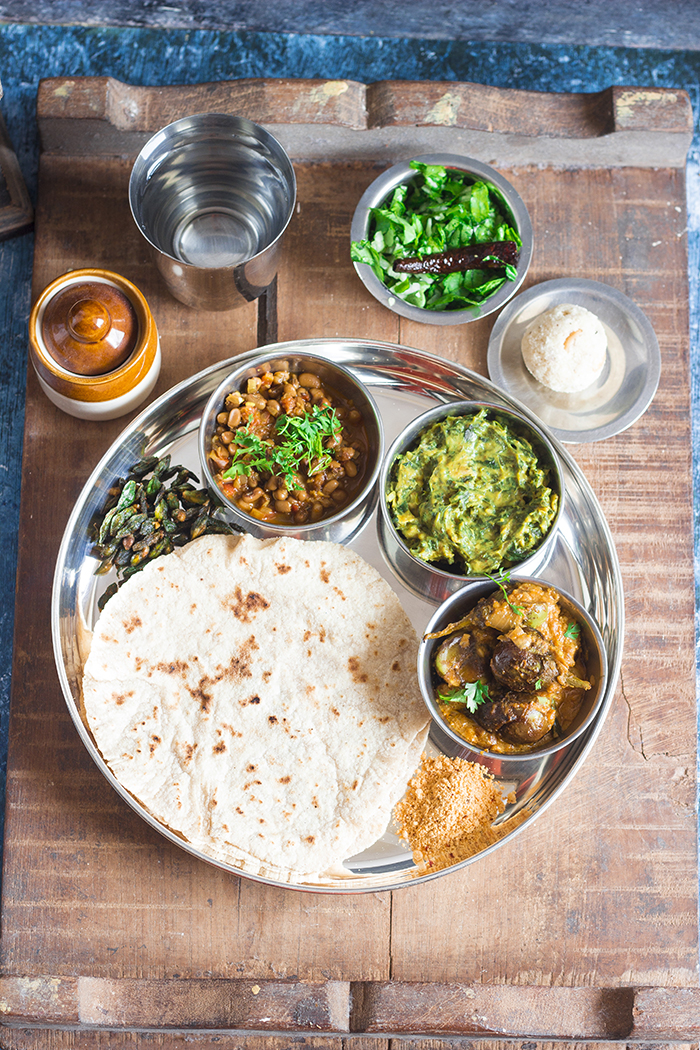
A typical vegetarian meal or Jolada Rotti Oota in the region is centered around the Jolada Rotti or the Jowar Roti (flatbread). Jolada Rotti is accompanied by spicy curries, jhunka, spiced peanut and fried gram powder (chutney pudi), sliced onions, fresh fenugreek leaves (methi), buttermilk and fried pakodas.

Going clockwise from the Jolada Rotti, I have the following on my plate - Karachi Kai fry - a baby bitter gourd type of vegetable native to the region, lightly fried in oil with red chilli powder and garlic,  Kaalu Palya (Lobia) or Cowpeas curry, Soppina Palya or a curry made with leafy greens, Yennegai or baby eggplants cooked in a peanut sauce, Chutney Pudi or spicy powder made with peanuts and fried gram. Outside my plate I have pickle, water, a tempered radish salad or kochhidu moolangi salad and rava ladoo or semolina fudge ball.

jowar roti with curries or jolada rotti oota

The Jowar flatbread is made of only 3 ingredients - jowar flour, salt and water. It is cooked without oil or any type of fat, making it a very healthy type of bread. A well made jolada rotti is soft and just melts in your mouth. Jolada Rotti is vegan, gluten-free and plant based and easily fits into various diets.

The recipe of Jolada Rotti that I have here is slightly different from the traditional one, but it produces the same results - a soft, heavenly rotti. Traditionally, the flour is made by adding hot water to the flour and kneading it until you have a pliable dough. In my recipe, I add the flour to hot water, this tends to increase the elasticity of the dough making it easier for you to roll it out. Also, traditionally, a jolada rotti is patted out thin using your fingers or palm. It requires a lot of practice and expertise to be able to pat out a thin rotti. Here, I'm demonstrating the easier option of rolling out the rotti using a rolling pin.

Since jowar is a gluten free millet, making the rotti is a little trickier than making chapatis, naan or rotis that are typically made from gluten rich wheat flour and hence the deviations from the traditional recipes. Additionally, I am giving you a few tips so that you don't fail, however, only practice can make you perfect in the art of making jolada rotti.

  • Firstly, the flour - Buy the best quality jowar flour you can, preferably, organic and unadulterated. I usually buy jowar and get it powdered at a local mill and I found this works best for me over pre-packaged flours. If you have the option, try it out, you won't regret it.
  • As Jowar is gluten free, you cannot make the dough in advance and the rottis later. You have to roll out the rottis when the dough is warm for best results. So make the dough only when you plan to make the rottis. You can store the rottis for later though. So make all the rottis and keep aside. 
  • Roll the rottis on your kitchen counter or slab. I've tried to roll it out on a wooden board like I do for wheat rotis, but jowar seems to get stuck to the wood, so preferably roll it out on your granite kitchen slab or use marble slab.
  • Roast the rottis on an oil free tava or griddle. 

There is a crisper version of the rotti called "kataka rotti" that you will find for sale in a lot of North Karnataka shops. Kataka rotti is jowar rotti cooked on very low heat until it becomes dry and crisp like a papad. It is usually made for travel or if one wants to store the rotti for weeks.

Come back for my next post - Yennegai or Baby eggplant curry - a perfect accompaniment to the Jolada Rotti.

jowar roti with curries or jolada rotti oota


If you made this recipe, let me know! Leave a comment here or on Facebook tag your tweet with @oneteaspoonlife on Twitter and don't forget to tag your photo #oneteaspoonoflife on Instagram. You can also email me at onetspoflife@gmail.com I'd love to see what you are upto.


If you like this recipe, do not forget to share it with your friends and family! 


You can follow One Teaspoon Of Life on FacebookTwitterInstagramPinterest and Google+ or you can subscribe to One Teaspoon Of Life and receive all the latest updated via Email


Video Recipe


--------------------------------------------------------------------------------------------------------------------------

Joladda Rotti Recipe | How to make Jowar Bhakri


jowar roti with curries or jolada rotti ootaJoladda Rotti or Jowar Bhakri is an oil-free, vegan and gluten free Indian flatbread made from jowar millet or sorghum.

Recipe Type:  Bread
Cuisine:            South Indian
Prep Time:     15 minutes
Cook time:     30 minutes
Total time:     45 minutes
Yield:                16

Ingredients:


3.25 cups Jowar Flour
3 cups Water
1 tsp Salt
Jowar flour to dust
Water to cook the rottis

Method:


1. Add the water to a kadhai or a deep pot and allow it to come to a boil.
2. Add salt to the water.
3. Reduce the heat, and add 3 cups of jowar flour to the water and mix well with a wooden spoon.
4. Once the flour is well mixed, cover and cook on low heat for 4-5 minutes.
5. Turn off the heat and keep covered for 2 more minutes.
6. Remove the dough from heat and transfer to a clean plate. Spread it out a little and allow to cool slightly.
7. While the dough is still warm, knead it until smooth. If it is wet, add a little dry flour. If it is dry, then add a little water to help you knead.
8. Take out a lemon sized piece of dough and roll it into a ball and flatten it. Keep the rest of the dough covered with a kitchen towel.
9. Dust your kitchen counter with dry flour and dip the ball of dough in it.
10. Using a rolling pin, roll it into a thin rotti or flatbread. Make it as thin as you can.
11. Dust with dry flour while rolling to prevent the dough from sticking to the rolling pin and the counter.
12. Heat a clean ungreased tava or griddle on medium heat and put the rotti counter side up on the tava.
13. Wipe the rotti with a wet cloth.
14. Flip the rotti when one side has brown spots. Cook until the rotti puffs up a little.
15. All rottis may not puff up completely, but do not worry, they are still cooked.
16. Serve the rottis hot/warm with curry.


If you liked this, you may also like:
curry made with chickpea flour and tomatoes
Jhunka

fresh red chilli chutney
Ranjaka
Akki Rotti

Read more ...

Grilled Vegetable Open Sandwich Recipe


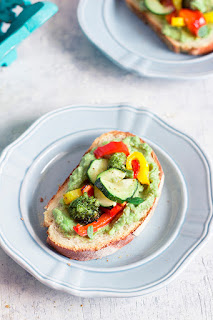
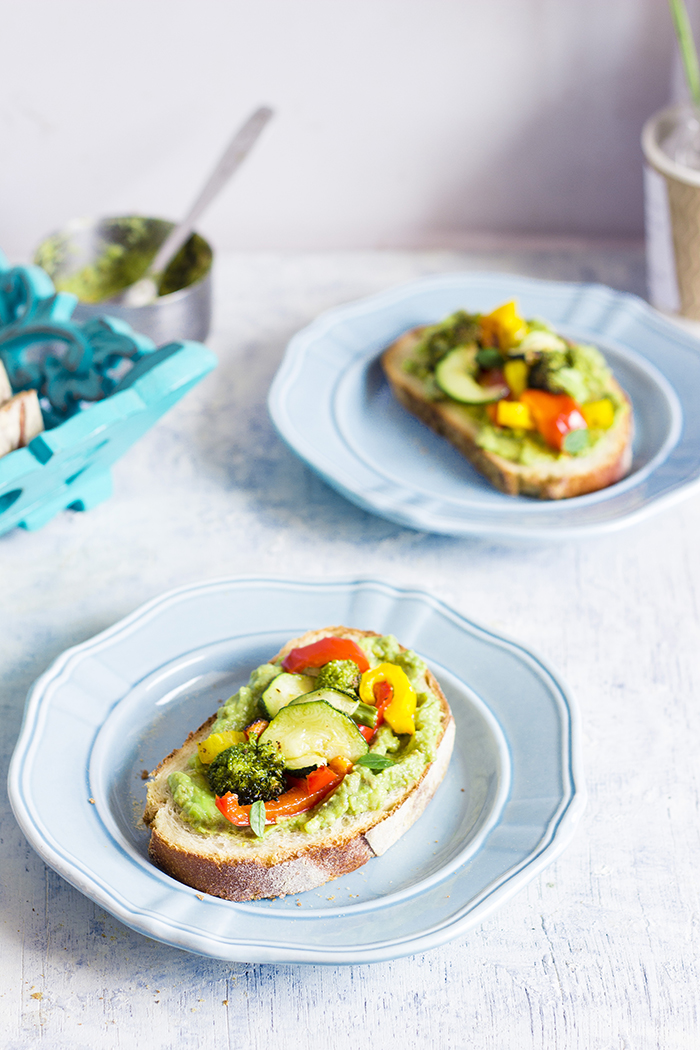
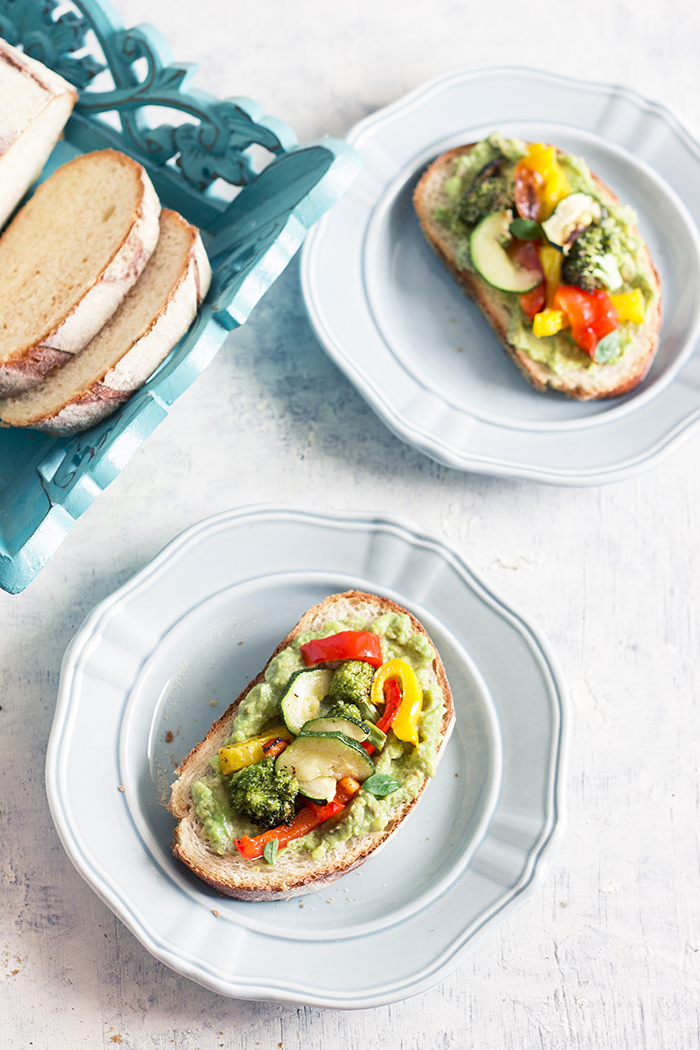
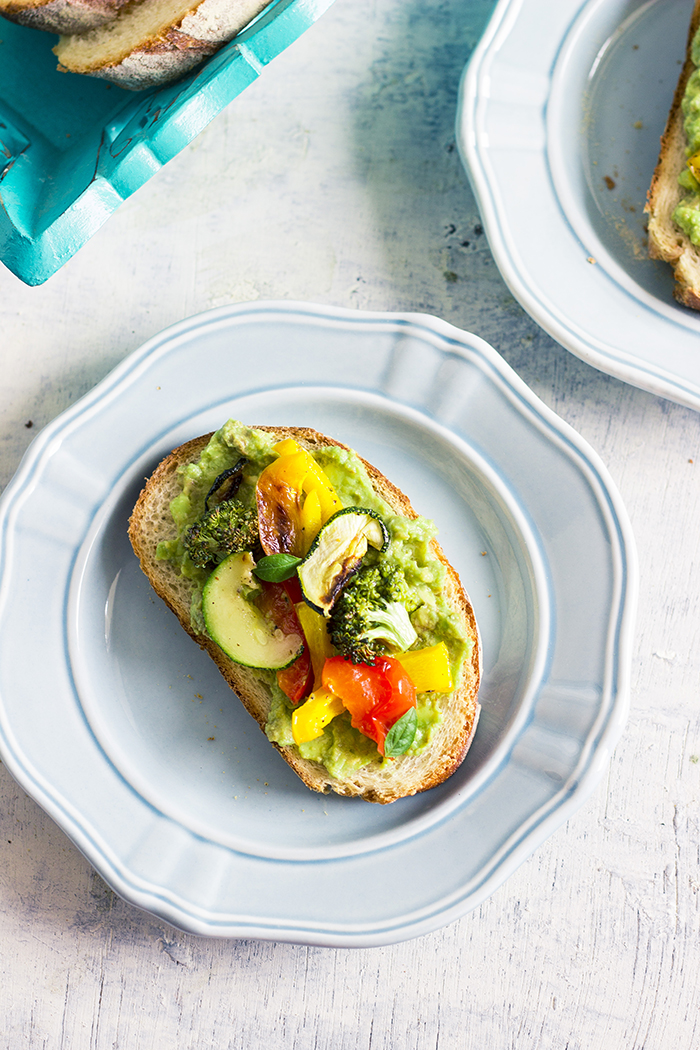
Grilled Summer vegetables over a bed of mashed ripe avocado on a slice of crusty sourdough bread. Vegan and healthy open Sandwich!

vegan grilled summer vegetable open sandwich

This post is neither inspired by some past incident, my childhood or the weather. This Grilled Vegetable Open Sandwich came into being solely because of 2 things - the awesome Sourdough bread and the soft ripe Avocado. 

I get super excited when I find a ripe avocado. I never miss a chance to pick it up. I buy it first and then think of where I can use it. The sourdough is a different story. I was in training for 2 days last week ( hence, I missed posting on Friday) at a hotel. And the hotel's bakery had this amazing looking selection of breads. That is where I picked up this extremely crusty loaf. Crusty bread and ripe avocado, in my head it had to be an open sandwich.

vegan grilled summer vegetable open sandwich


There isn't much to hide from in this Sandwich, so it is important you use the best ingredients you can. You can select the veggies you want to grill based on what's available and what you love to eat. I grilled yellow capsicum, red capsicum, broccoli and zucchini. It made my sandwich look vibrant and inviting. The peppers added a nice sweetness to the otherwise savory sandwich. And broccoli, aah, I love grilled broccoli to eat just like that with some salt sprinkled. So I made some extra. The grilled veggies can be used in tacos, burritos and rolls too, so if you have leftovers, it takes care of another meal. 

vegan grilled summer vegetable open sandwich


vegan grilled summer vegetable open sandwich


To grill the veggies, I sliced them long and drizzled a little extra virgin olive oil, the good kind, and coated the veggies. Sprinkled salt and pepper, and grilled them in the oven for 20 minutes or until my peppers blistered and browned slightly. If the day is fine, go ahead and use your outdoor grill. This Sandwich is also perfect to assemble at picnics or campfires as far as you have the veggies grilled or a place to grill them on site.

The bread was so good, I really did nothing to it. Just sliced it. To add flavor to the bread, you can toast it with butter or rub it with smashed garlic. I kept the avocado simple too, just a squeeze of line, a pinch of salt and pepper. Sometimes, simple is good.  

vegan grilled summer vegetable open sandwich


If you made this recipe, let me know! Leave a comment here or on Facebook, tag your tweet with @oneteaspoonlife on Twitter and don't forget to tag your photo #oneteaspoonoflife on Instagram. You can also email me at onetspoflife@gmail.com. I'd love to see what you are upto. 

If you like this recipe, do not forget to share it with your friends and family! 


You can follow One Teaspoon Of Life on Facebook, Twitter, Instagram, Pinterest and Google+ or you can subscribe to One Teaspoon Of Life and receive all the latest updated via Email


---------------------------------------------------------------------------------------------------------------------------


Grilled Vegetable Open Sandwich Recipe


vegan grilled summer vegetable open sandwichGrilled summer vegetables and mashed ripe avocado layered on crusty sourdough bread slice. Vegan open sandwich recipe.

Recipe Type:  Sandwich
Cuisine:            International
Prep Time:     15 minutes
Cook time:     20 minutes
Total time:     35 minutes
Yield:                Serves 2

Ingredients:


6 slices Sourdough Bread
1 ripe Avocado
1 cup Broccoli florets
0.5 Yellow Capsicum
0.5 Red Capsicum
1 small Zucchini
1 Tbsp Extra Virgin Olive Oil
1 tsp Lime Juice
Salt to taste
Pepper to taste

Method:


1. Slice the capcisum and zucchini into bite sized pieces.
2. Place them in a bowl and add the olive oil, salt and pepper. Mix well.
3. Lay on a baking sheet and grill in the oven on high for 15-20 minutes until the veggies are slightly charred.
4. Mash the avocado with the lime juice and a pinch of salt.
5. Spread the avocado the sourdough slice and top with grilled veggies. Serve immediately.


If you liked this, you may also like:
How to make grilled cauliflower recipe, spicy grilled cauliflower recipe, roasted cauliflower recipe, how to make black rice recipe, summer recipes, one bowl recipes at www.oneteaspoonoflife.com
Grilled Cauliflower Bowl

How to make vegetable souvlaki recipe, souvlaki gyros, vegetarian souvlaki recipe, vegan souvlaki recipe at www.oneteaspoonoflife.com
Vegetable Souvlaki Rolls
Vegan Tomato Onion Avocado Olive Mint Coriander Italian Sourdough Baguette Bread Sandwich
Bruschetta Duo


Read more ...

Bread Pizza Cups [Video]

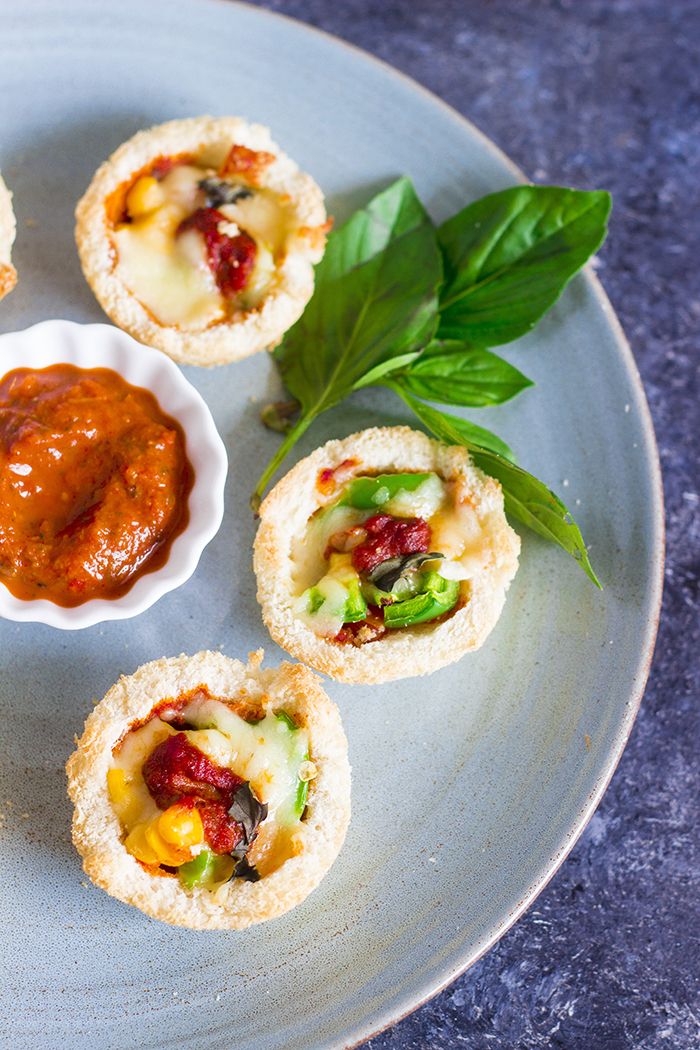
Pizza in a cup - cups made with bread, filled with your favorite pizza toppings and sauce, topped with cheese and baked until the bread is crisp and cheese is oozy.

cups made with bread, filled with pizza toppings,sauce and cheese and baked

Tell me, do you love Pizza? Did you just say yes??? Then you will LOVE this recipe.

So, since you asked for more snacks, I've been sharing recipes for snacks here. Just early this week, I shared the recipe for Masala Bread Toast - a popular bakery item in Bangalore. And today, I bring to you Pizza in a cup. Cute, right?

These Pizza cups are straight out easy to make and they are highly customizable. All you need are fresh bread slices, your favorite pizza sauce, toppings - again just use what you love or you have leftover in the fridge, and cheese. Yes, lots of cheese. I say the cheese is never enough. 

Okay, so there is a reason I mentioned fresh bread slices up there. The fresher the bread, the softer and easier to work with. The bread won't crumble when you try to shape them. I had a few slices that just crumbled on touch, so bad for the pizza cups. Use wholewheat bread to make it healthier.

cups made with bread, filled with pizza toppings,sauce and cheese and baked

Next, the Pizza Sauce. I made my own sauce following an older recipe of Eggplant Pizza, and I think this Basil Almond Pesto will also go famously. You can get creative and use this Manchurian Sauce instead or you can just buy the Pizza Sauce. If you don't want to go through all the fuss, just use Ketchup and add some Italian seasoning or Oregano to it.

The best part of any Pizza is the toppings. I kept mine super simple - chopped tomatoes, capsicum and sweet corn. It tasted delicious. But this is where you want to get creative and add what you love or as I suggested before, just use up leftovers. Also, a brilliant way to sneak in those healthy veggies your family won't eat.

I topped my Pizza Cups with Mozzarella cause I love the way the cheese melts and gets all stringy. Use any cheese you love, but remember, for cheese, less is never more!! Add more cheese, always!

So where all can you show these Pizza Cups off, let see:

  • High Tea - These Pizza cups will perfectly complement those cute little pastries you have for high tea
  • Kid's birthday parties - What's more fun is you can make the kid's add their own toppings. 
  • Cocktail Parties - let's just agree, these are perfect for any party, really!
  • Snack boxes?? I wouldn't highly recommend this, cause the bread may get soggy, but if you have non-fussy family, I say go ahead. I actually kept aside a few for 2-3 hours and ate them later and they still held and were just as tasty.

cups made with bread, filled with pizza toppings,sauce and cheese and baked

If you made this recipe, let me know! Leave a comment here or on Facebook, tag your tweet with @oneteaspoonlife on Twitter and don't forget to tag your photo #oneteaspoonoflife on Instagram. You can also email me at onetspoflife@gmail.com. I'd love to see what you are upto. 

If you like this recipe, do not forget to share it with your friends and family! 

You can follow One Teaspoon Of Life on FacebookTwitterInstagramPinterest and Google+ or you can subscribe to One Teaspoon Of Life and receive all the latest updated via Email


Video Recipe


--------------------------------------------------------------------------------------------------------------------------


Bread Pizza Cups


cups made with bread, filled with pizza toppings,sauce and cheese and bakedCups made with bread, filled with your favorite pizza toppings and sauce, topped with cheese and baked until the bread is crisp and cheese is oozy.


Recipe Type:  Snack
Cuisine:            International
Prep Time:     15 minutes
Cook time:     15 minutes
Total time:     30 minutes
Yield:                Makes 6 Pizza cups

Ingredients:


6 slices Bread
6 tsp Pizza Sauce
2 Tbsp diced Tomato
2 Tbsp diced Capsicum
2 Tbsp Sweet Corn, boiled
6 Tbsp shredded Mozzarella Cheese
2 tsp Olive Oil
1-2 tsp Italian seasoning / Oregano (Optional)
1-2 fresh Basil leaves(Optional)
Water as required

Method:


1. Lightly sprinkle the bread slices with water and tap to wet the bread slightly.
2. Flatten the bread using a rolling pin.
3. Cut the bread into a circle using a bowl or a box cover.
4. Grease the muffin tray generously with olive oil.
5. Carefully place the bread into the muffin tray in the shape of a cup. See video above for reference.
6. Spoon in the pizza sauce.
7. Add the chopped tomatoes, capsicum and boiled sweet corn.
8. Sprinkle Italian seasoning or oregano if using.
9. Top each cup with 1 Tbsp of shredded cheese.
10. Top with a little bit of sauce and chopped basil leaves.
11. Bake in a preheated oven for 10 minutes at 200 degree Celsius.
12. Serve hot/warm.


If you liked this, you may also like:
Bangalore Iyengar Bakery Style bread toast topped with an onion-carrot masala
Masala Bread Toast

Indian street food, chaat, made with bread, yogurt, chutneys and spices
Dahi Bread Chaat
How to make chutney sandwich recipe, coriander chutney recipe, vegan sandwich, easy sandwich recipe
Coriander Chutney Sandwich


Read more ...

Iyengar Bakery Style Masala Bread Toast [Video]

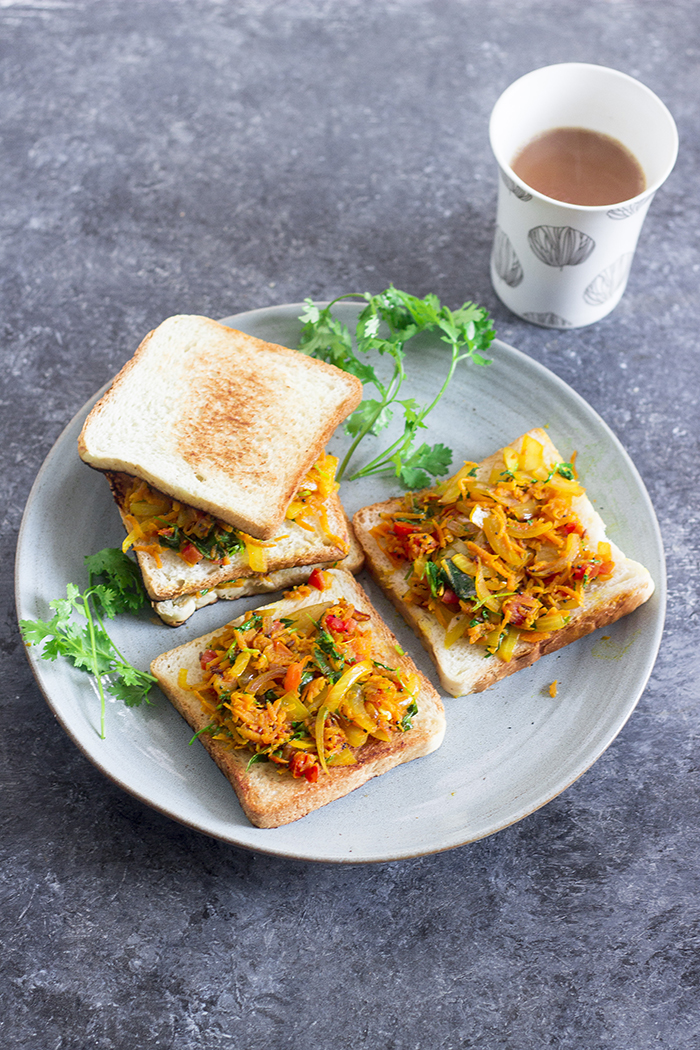
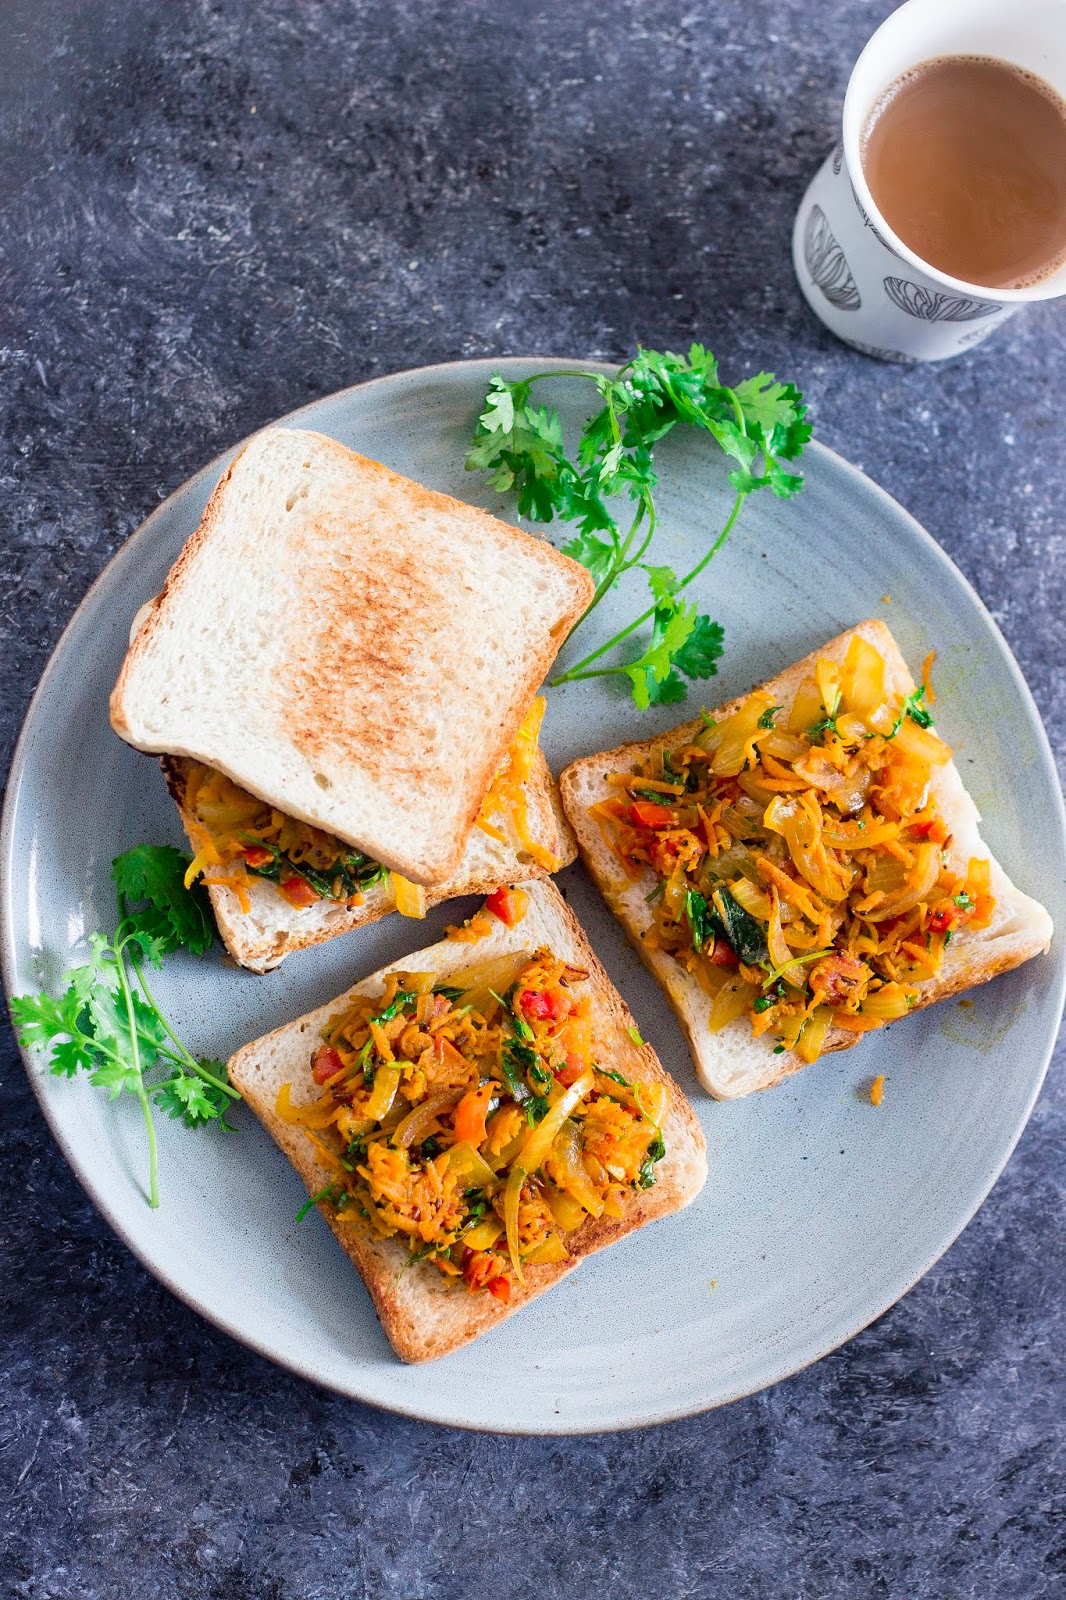
Simple delicious masala bread toast made by topping bread with fried onions, carrots and spices in Bangalore Iyengar Bakery style!

Bangalore Iyengar Bakery Style bread toast topped with an onion-carrot masala

You asked for snacks, so here goes - Masala Bread Toast made in full Banglore's Iyengar Bakery style!!

So I recently posted a poll on my Facebook Page. Have you liked it yet? Go on, like it so you never miss out on what's cooking on One Teaspoon Of Life!! Anyway, so while not many of you voted, the choice was waaay too clear. All you ever want to eat is snacks. There is no satisfying you folks out there, is there? But you are my kinda people. I would have voted snacks too! To say I love snacks would be an understatement. I am forever hungry for snacks, just like you.

Today I'm sharing an extremely simple recipe. This Masala Bread Toast is an extremely popular product in Banglore's famous Iyengar Bakeries. And something I buy regularly. Every evening as I travel home from work, I have just one thought on my mind - "What do I eat for evening snacks today?". Sometimes, it is just leftover breakfast (I always make extra), or a dosa or pakoras, but a lot of times, it is this Masala Bread Toast from the bakery right behind my apartment complex. 

So when you guys asked for snack, I thought this recipe was perfect. It is quick, it is filling, it is healthy if you use the right bread, and it is vegan too. But above all, it is delicious and your family will love it. It is also an excellent way to add veggies to your snacks. Although I have used some spice mixes like garam masala and chaat masala, you can skip them if making for kids or if you don't have access to them. The masala tasted perfectly tasty without any spices too. 

Bangalore Iyengar Bakery Style bread toast topped with an onion-carrot masala

Bangalore Iyengar Bakery Style bread toast topped with an onion-carrot masala


If you made this recipe, let me know! Leave a comment here or on Facebook, tag your tweet with @oneteaspoonlife on Twitter and don't forget to tag your photo #oneteaspoonoflife on Instagram. You can also email me at onetspoflife@gmail.com. I'd love to see what you are upto. 

If you like this recipe, do not forget to share it with your friends and family! 

You can follow One Teaspoon Of Life on FacebookTwitterInstagramPinterest and Google+ or you can subscribe to One Teaspoon Of Life and receive all the latest updated via Email


--------------------------------------------------------------------------------------------------------------------------


Iyengar Bakery Style Masala Bread Toast

Bangalore Iyengar Bakery Style bread toast topped with an onion-carrot masala

Simple delicious masala bread toast made by topping bread with fried onions, carrots and spices in Bangalore Iyengar Bakery style.


Recipe Type:  Snack
Cuisine:            South Indian
Prep Time:     10 minutes
Cook time:     15 minutes
Total time:     30 minutes
Yield:                Makes 5 toasts

Ingredients:


5 slices Bread
1 large Onion, roughly sliced
1 medium Carrot, grated
1 small Tomato, diced
2 Tbsp chopped Coriander
8-10 Curry leaves
1 Green Chilli, finely chopped
0.5 tsp Sugar
0.5 tsp Mustard Seeds
0.5 tsp Cumin seeds
0.25 tsp Garam Masala
0.25 tsp Chaat Masala
2 Tbsp Oil
Salt to taste

Method:


1. Heat oil in a pan and add mustard seeds
2. Once the mustard splutters, add in the cumin seeds.
3. Once the cumin browns slightly, add the curry leaves and allow them to crisp up.
4. Now add the onions and saute them until they are lightly browned.
5. Toss in the grated carrot and mix well.
6. Add the diced tomatoes and mix.
7. Add the salt, chaat masala, garam masala and sugar. Mix well. Adjust the seasoning to suit your taste.
8. Cook for 2-3 minutes and remove from heat.
9. Add the chopped coriander leaves and mix well.
10. Dry toast the bread. You can add butter or oil while toasting if you like.
11. Spread the masala on the toast and serve it immediately like an open sandwich.
12. You can make the masala before and store it in the fridge, just heat it up before serving and top on the freshly toasted bread. 


If you liked this, you may also like:
how to make honey cake recipe,how to make bangalore honey cake recipe, how to make iyengar bakery honey cake recipe, eggless cake recipe, eggless baking at www.oneteaspoonoflife.com
Honey Cake

Indian street food, chaat, made with bread, yogurt, chutneys and spices
Dahi Bread Chaat
How to make chutney sandwich recipe, coriander chutney recipe, vegan sandwich, easy sandwich recipe
Coriander Chutney Sandwich


Read more ...