Showing posts with label Dairy. Show all posts

Dill and Caramelized Onion Bread Rolls [Video]


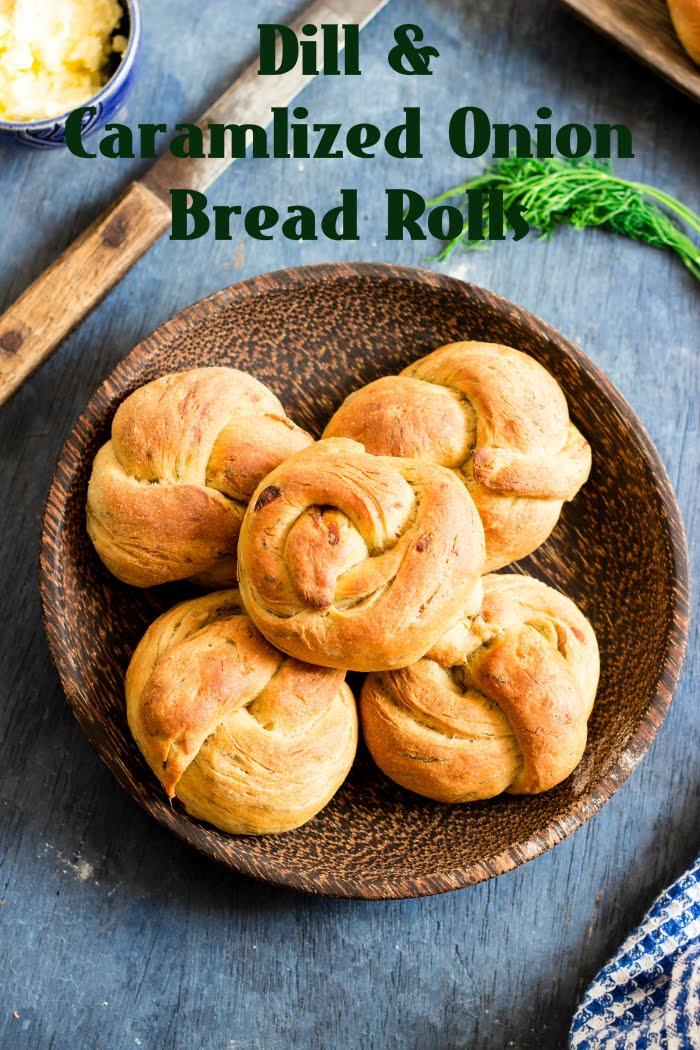
These Dill and Caramelized Onion Bread Rolls are sooo good, this is the ONLY recipe you will ever need for flavored bread rolls

How to make dill bread recipe, dill and onion bread recipe, eggless dill and onion bread recipe, how to bake bread rolls recipe, how to bake bread at www.OneTeaspoonOfLife.com


How to make dill bread recipe, dill and onion bread recipe, eggless dill and onion bread recipe, how to bake bread rolls recipe, how to bake bread at www.OneTeaspoonOfLife.com

Happy Sunday Guys!!

These Bread Rolls... YUMMMMMM....

If you take it from me, these Dill and Caramelized Onion Bread Rolls are the ONLY flavored bread rolls recipe you will ever need. I made this twice in one week. TWICE!!

I first made them on Sunday, last Sunday, and it was more of a trial batch. And then again on Wednesday. Never done that before. I'm more of a buy-bread-from-store types than bake bread from scratch person. I surprised myself by making it twice in a week. See, the thing was, Raj did not get to eat any on Sunday as he wasn't around. I had nice fresh warm bread from the oven and I had just made butter at home. Yes, I make butter at home almost every week, I just love fresh homemade butter so much. And among Gee and I, we wiped off the entire lot of 7 bread rolls. It was soooo GOOD!! Then I just felt bad that he did not get to even taste one, so I made it again in the week.

How to make dill bread recipe, dill and onion bread recipe, eggless dill and onion bread recipe, how to bake bread rolls recipe, how to bake bread at www.OneTeaspoonOfLife.com

I'd first seen a Dill and Onion bread roll recipe in an airline magazine. It used dill seeds and raw onions. Fresh Dill is so much easier to find than dill seeds here in Bangalore, so I swapped that. I love caramelized onions. They are soft, and brown and sweet. Yum! I never miss a chance to use them in a recipe and I always make extra to eat along in the week. This week, I stuffed some flatbread rolls with them. But if you are short of time, just saute the onions for 2-3 minutes and add them in the bread. I don't want you to miss out on eating this bread just because caramelizing onions takes time.
Or like me, you can make them in advance and keep them in the fridge, they stay good for one week in there.

There is one more cheat to save time here - Buy Paneer or Cottage cheese from the store. If buying frozen, let it thaw completely before using. Making Paneer at home can seem daunting, but it is the easiest cheese you can make at home. This recipe does not require you to make paneer completely, just the curds. Drain the curds and blend them into a smooth puree for this recipe. You can also replace with cream cheese.

How to make dill bread recipe, dill and onion bread recipe, eggless dill and onion bread recipe, how to bake bread rolls recipe, how to bake bread at www.OneTeaspoonOfLife.com

You know what's the best thing about these rolls? Taste, of course, but the aroma that fills your house when a fragrant herb like Dill is cooking is so heavenly. I just love Dill, and its sharp earthiness, it is my favorite green, right from childhood. 

Now that I've made these twice is such quick succession, I'm confident that this is my go to recipe for dinner rolls. They taste great with any gravy, but they taste BEST just by themselves. Slather on some butter and that's IT!! Soft, buttery, fragrant, salty rolls with that little hint of sweetness when you bite into a caramelized onion slice. What more do you really need?

How to make dill bread recipe, dill and onion bread recipe, eggless dill and onion bread recipe, how to bake bread rolls recipe, how to bake bread at www.OneTeaspoonOfLife.com

P.S - I have a bonus for you, a VIDEO recipe!!

Video Recipe


If you made this recipe, let me know! Leave a comment here or on Facebook, tag your tweet with @oneteaspoonlife on Twitter and don't forget to tag your photo #oneteaspoonoflife on Instagram. You can also email me at onetspoflife@gmail.com. I'd love to see what you are upto. 

If you like this recipe, do not forget to share it with your friends and family! 

You can follow One Teaspoon Of Life is there on Facebook, Twitter, Instagram, Pinterest and Google+ or you can subscribe to One Teaspoon Of Life and receive all the latest updated via Email (How convenient!!)


If you liked this, you may also like:


Dill and Caramelized Onion Bread Rolls


How to make dill bread recipe, dill and onion bread recipe, eggless dill and onion bread recipe, how to bake bread rolls recipe, how to bake bread at www.OneTeaspoonOfLife.comDill and Caramelized Onion Bread Rolls are fragrant flavorful bread rolls made with fresh cottage cheese, dill leaves and sweet caramelized onions.

Recipe Type:  Bread
Cuisine:            International
Prep Time:     3 Hours
Cook time:     1 Hour
Yield:                Makes 14 rolls

Ingredients:


For Caramelized Onions:


3 Onions
2 Tbsp Olive Oil
1 tsp Sugar or Jaggery
1-2 tsp Balsamic Vinegar
1 Tbsp Water
Pinch of salt

For Cottage Cheese / Paneer:


1 litre Milk
2 Tbsp Lime Juie
3-4 Tbsp Water

For the Dill and Caramelized Onion Bread Rolls:


2 cups Wholewheat flour (Atta)
1 cup All purpose flour (Maida)
1.25 cups Water
3-4 Tbsp chopped Dill leaves
2 tsp Active Dry Yeast
2 Tbsp Oil
Salt to taste

Method:


To make Caramelized Onions:


Heat oil in a pan and add sliced onions.
Sprinkle a pinch of salt and mix well.
Allow the onions to cook on medium to low heat until they are slightly brown.
Add sugar or jaggery and balsamic vinegar.
Add little water to prevent the onions from sticking to the pan.
Remove from heat once the onions are dark brown and sweet. This takes around 30-40 minutes.

To make Cottage Cheese / Paneer:


Boil the milk until it comes to a rolling boil.
Turn off the heat and immediately add the lime juice and mix well.
Once the milk curdles, strain it and keep aside for 15 minutes allowing the water to drain from the cheese curds.
Once the cheese cools, blend it along with a little water to a smooth puree.

To make the Dill and Caramelized Onion Bread Rolls:


Heat 1.5 Tbsp Oil in a pan and add 1/4 cup water.
Add the cheese puree, chopped dill and caramelized onions. Mix well.
Simmer on low heat for 3-4 minutes. Remove from heat and keep aside to cool.
Heat 3/4 cup of water until lukewarm. Add the active dry yeast to it and allow the yeast to bloom.
Once the cheese mixture is cool, pour it into a clean bowl and add the yeast.
Add salt, 1.5 cups whole wheat flour and the all purpose flour.
Knead until combined. Add more whole wheat flour if the dough is very sticky.
Take another large clean bowl and grease it slightly. Move the dough to it. Rub the dough with oil. Cover and allow it to rise for 1-2 hours until doubled.
Once the dough has risen, divide the dough into 14 equal balls.
Grease a baking tray. Shape the rolls and place on the baking tray leaving at least 1" gap between rolls.
Cover and allow it to rise a second time for around 45 mins to 1 hour.
Preheat the oven to 250 degree C.
Bake the rolls for 12-15 minutes until browned.

How to make dill bread recipe, dill and onion bread recipe, eggless dill and onion bread recipe, how to bake bread rolls recipe, how to bake bread at www.OneTeaspoonOfLife.com
Read more ...

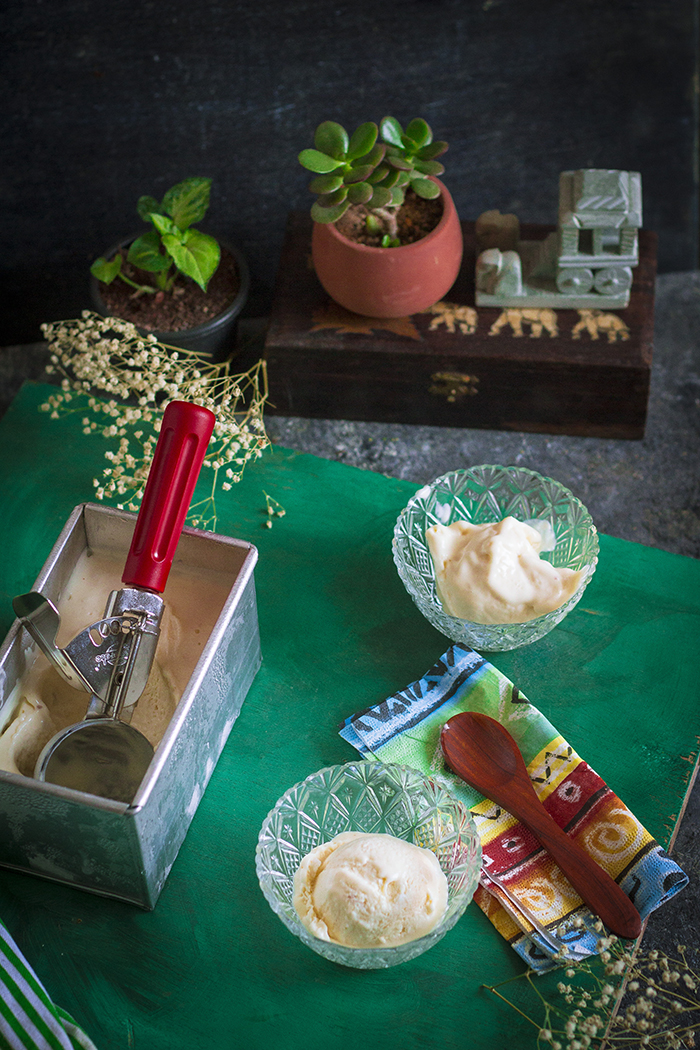
Natural's style Tender Coconut Ice Cream (without ice cream maker)


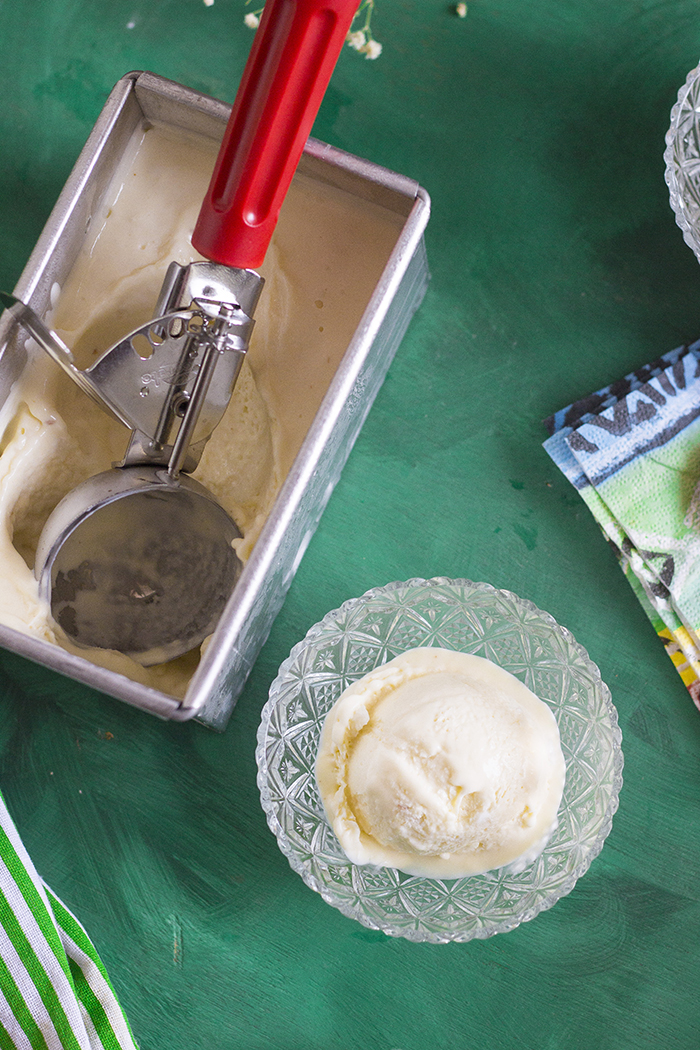
Tender Coconut Ice Cream recipe with step by step video instructions. This Naturals style Tender Coconut Ice Cream is made with only 4 ingredients and WITHOUT an ice cream maker!!! Tender Coconut Ice Cream is glutenfree and fits a Jain diet.

In a hurry? Jump to Video or Jump to Recipe


How to make coconut ice cream, coconut ice cream recipe, how to make ice cream without eggs, how to make ice cream without ice cream maker, naturals tender coconut ice cream recipe at www,oneteaspoonoflife.com

Heat Wave ALERT!! Bangalore is reeling under a heat wave right now and temperatures are soaring to mid thirty degrees C. Time to wallow in ice cream!

I have half the mind to move on to a chilled liquid diet until the heat wears off. But you know me, I wouldn't last a day without any food. So I'm doing the next best thing, well... not the next, but the BEST best thing, and that is loading up on ice cream. Chilled sweet perfection.

Tender coconut icecream

Everyone who's anyone in a town which has a Natural's Ice Cream Parlour has definitely tried their signature flavor - Tender Coconut. It's even in their logo. My family's favorite flavor. I personally die for their Custard Apple flavor but Gee and Raj love the Tender Coconut. You have to cook what the family will eat. Well, there is no cooking involved here, just like my last recipe of Bircher Muesli (Overnight Oats), which was also chilled, keeping in the spirit of Summer. 

Cut to last Saturday, while we were walking back home from one of our ridiculously long weekend walks, we picked up 4 tender coconuts from a local seller. Tender Coconut water is supposed to cool the body, and this heat definitely necessitates cooling. So the plan was to keep the coconut water in the fridge and drink it over the next few days so that we do not reach for any sugary sodas or drinks. 

I was then left with the meat or flesh of 4 coconuts. I don't mind eating it just like that or with a little jaggery, but 4 is a little too much for us to eat in a day. Light bulb moment!! Why don't I try making Tender Coconut Ice Cream! and the idea was born. I've made pop-sickles before, but never an ice cream. We usually just drive down to Natural's and buy a scoop of our favorite flavor. But Sunday was a first in my recipe book. I made Tender Coconut Ice Cream.... 

How to make coconut ice cream, coconut ice cream recipe, how to make ice cream without eggs, how to make ice cream without ice cream maker, naturals tender coconut ice cream recipe at www,oneteaspoonoflife.com

How to make coconut ice cream, coconut ice cream recipe, how to make ice cream without eggs, how to make ice cream without ice cream maker, naturals tender coconut ice cream recipe at www,oneteaspoonoflife.com

I don't own an ice cream maker and I don't know anyone who does, so this ice cream is something anyone can whip up. All you need is a whisk or a spatula. If you have a hand mixer, then you have all the power you need. This ice cream needs only 4 ingredients. Yup, that's it - FOUR!! Cream, Sugar, Coconut Meat and Coconut Water. Since there are only 4 ingredients, make sure you use fresh and the best quality you can find. 

I used fresh medium fat cream. Low fat cream may not work well. The cream needs to be chilled before use, else you may end up with butter instead of whipped cream.Whip the chilled cream until you have soft peaks. Blend a part of the coconut meat with 1/2 cup of coconut water. Fold in with the cream along with powdered sugar and chopped coconut meat. Pour in a freezer safe container and cover loosely with aluminium foil. Every 45-60 minutes for the first 3 hours, remove the ice cream from the freezer and whisk once completely and refreeze. This will prevent it from getting icy in places.
Tender coconut icecream

If you made this recipe, let me know! Leave a comment here or on Facebook, tag your tweet with @oneteaspoonlife on Twitter and don't forget to tag your photo #oneteaspoonoflife on Instagram. You can also email me at onetspoflife@gmail.com. I'd love to see what you are upto. 

If you like this recipe, do not forget to share it with your friends and family! 

You can follow One Teaspoon Of Life is there on Facebook, Twitter, Instagram, Pinterest and Google+ or you can subscribe to One Teaspoon Of Life and receive all the latest updated via Email (How convenient!!)


Video Recipe


--------------------------------------------------------------------------------------------------------------------------

Tender Coconut Ice Cream


How to make coconut ice cream, coconut ice cream recipe, how to make ice cream without eggs, how to make ice cream without ice cream maker, naturals tender coconut ice cream recipe at www,oneteaspoonoflife.comNaturals inspired Tender Coconut Ice Cream made with only 4 ingredients without an ice cream maker.

Recipe Type:  Dessert
Cuisine:            Indian
Prep Time:     30 minutes
Cook time:     0 minutes
Total time:     6 Hours 30 Minutes
Yield:                Serves 7-8


Ingredients:


400ml medium-fat Cream (chilled)
4 Tender Coconuts Meat
0.5 cup Tender Coconut Water
400gms sweetened Condensed Milk or 6-7 Tbsp Powdered Sugar

Method:


1. Blend the meat of 3 tender coconuts along with the tender coconut water to a smooth paste.
2. Chop the remaining tender coconut meat finely.
3. Whisk the chilled cream until you have soft peaks. Be careful not to over whisk, the cream will curdle into butter. If you feel the cream is getting warm, chill it for 10 minutes in the fridge and restart whisking.
4. Fold in the coconut paste, condensed milk or powdered sugar and the coconut pieces until combined.
5. Pour into a freezer safe box or baking pan. Cover with aluminium foil and place in the freezer.
6. After every hour for the first 3 hours, remove the ice cream from the freezer and whisk it again with the handheld mixer or with a spatula to prevent formation of ice crystals.
7. Leave it in the freezer until completely frozen.
8. Scoop and serve.


How to make coconut ice cream, coconut ice cream recipe, how to make ice cream without eggs, how to make ice cream without ice cream maker, naturals tender coconut ice cream recipe at www,oneteaspoonoflife.com


If you liked this, you may also like:

Meetha paan kulfi
Paan Kulfi

Coconut Laddoo
Blueberry Litchi Coconut Mocktail

Read more ...

Bircher Muesli | Overnight Oats


When temperature soars, a cold breakfast is welcome. This Bircher Muesli or Overnight Oats made with rolled oats, apple juice and yogurt is exactly what a cold breakfast should taste like...

How to make overnight oats, overnight oats recipe, bircher muesli with apple juice recipe, how to make bircher muesli with apple juice, rolled oats recipe, how to make rolled oats, cold breakfast recipe at www.oneateaspoonoflife.com


How to make overnight oats, overnight oats recipe, bircher muesli with apple juice recipe, how to make bircher muesli with apple juice, rolled oats recipe, how to make rolled oats, cold breakfast recipe at www.oneateaspoonoflife.com


I'll be completely honest, I was never one for a cold breakfast. Hot hot breakfast is what I am used to, and sometimes, I'll satisfy myself with food that is at room temperature. But chilled, just out of the fridge was something that never tempted me. Those rare times I eat cereal, I eat it with warm milk. But a couple of years ago when I went for a training to Hyderabad and was served cold Muesli in the buffet breakfast, I may have just converted a little bit. I still cannot eat cold breakfast every single day but when temperatures soar the way they have begun soaring, a cold breakfast is a relief!!

The first weekend I was back from the training, all I wanted to try was this Bircher Muesli... I couldn't wait to go out and buy rolled oats. I did go out, only to realize that the market is flooded with quick cooking oatmeal but there was no rolled oats anywhere. Gourmet super markets carried imported brands but they were super expensive. Finally, I tried making the muesli with oatmeal. While the taste was spot on, the texture really wasn't. Soaking oatmeal overnight gives it this pasty soft texture that is a total turn off. So if you really do make it with oatmeal, I highly recommend a shorted soaking time, maybe 2-3 hours.

How to make overnight oats, overnight oats recipe, bircher muesli with apple juice recipe, how to make bircher muesli with apple juice, rolled oats recipe, how to make rolled oats, cold breakfast recipe at www.oneateaspoonoflife.com


How to make overnight oats, overnight oats recipe, bircher muesli with apple juice recipe, how to make bircher muesli with apple juice, rolled oats recipe, how to make rolled oats, cold breakfast recipe at www.oneateaspoonoflife.com

Then I found this super affordable brand of Rolled Oats here. And luckily for me, just last week I found it stocked in an Organic store in Bangalore. Bircher Muesli it had to be.

This Bircher Muesli is till date the ONLY cold breakfast I eat. This muesli is all apple-y and yogurt-y, a flavor combination that tastes fresh and warm while being cold, um huh, you understand? If you are not a yogurt person, just replace it with milk and if you are looking for a vegan option, Almond milk goes great, but for me, it has to be fresh slightly sour yogurt.

This is a simple, no-cook recipe. But then, simple food always tastes the best, doesn't it?

To make this Bircher Muesli, soak the oats overnight in apple juice. In the morning add yogurt, lots of chopped nuts and lots and lots of chopped fruits. Sugar or honey for sweetness. Now this is something you can add or skip and it won't change the taste one bit - Basil Seeds. Basil seeds are the same family as Chia but are much more economical to purchase. They swell up when soaked in water just like chia seeds. You may know them as Falooda Seeds or Sabze ka beej. I soaked a few tablespoons of it in a cup of water and allowed it to swell while I cut fruits and chopped nuts. Once they had swelled up, I added them to the muesli. 

Use this recipe as a guide to make your perfect Bircher Muesli or Overnight Oats. I added fruits that my family loves and what are in season here - Apples, Pears, Bananas and Pomegranate (of course, pomegranate). You can use whatever you have. I'm a total "nut" case too, so I always have a variety of nuts and dry fruit stocked up to snack on. Use what is locally available to you.

How to make overnight oats, overnight oats recipe, bircher muesli with apple juice recipe, how to make bircher muesli with apple juice, rolled oats recipe, how to make rolled oats, cold breakfast recipe at www.oneateaspoonoflife.com

How to make overnight oats, overnight oats recipe, bircher muesli with apple juice recipe, how to make bircher muesli with apple juice, rolled oats recipe, how to make rolled oats, cold breakfast recipe at www.oneateaspoonoflife.com
If you made this recipe, let me know! Leave a comment here or on Facebook, tag your tweet with @oneteaspoonlife on Twitter and don't forget to tag your photo #oneteaspoonoflife on Instagram. You can also email me at onetspoflife@gmail.com. I'd love to see what you are upto. 

If you like this recipe, do not forget to share it with your friends and family! 

You can follow One Teaspoon Of Life is there on Facebook, Twitter, Instagram, Pinterest and Google+ or you can subscribe to One Teaspoon Of Life and receive all the latest updated via Email (How convenient!!)


Bircher Muesli | Overnight Oats


How to make overnight oats, overnight oats recipe, bircher muesli with apple juice recipe, how to make bircher muesli with apple juice, rolled oats recipe, how to make rolled oats, cold breakfast recipe at www.oneateaspoonoflife.comBircher Muesli or Overnight Oats is a cold breakfast made by soaking rolled oats in apple juice overnight and adding yogurt, nuts and fruits in the morning.

Recipe Type:  Breakfast
Cuisine:            International
Total Time:     20 minutes (excludes soaking time)
Yield:                Serves 5-6


Ingredients:


2 cups Rolled Oats
2 Tbsp Basil Seeds 
400 ml Apple Juice
3-4 Tbsp chopped Nuts (Almonds, Pistachios, Walnuts)
4 cups whisked Yogurt
3 Apples
2 Bananas
1 Pear
1/2 cup Pomegranate seeds
1 cup Water
Powdered sugar to taste

Method:


Soak the rolled oats in apple juice overnight.
In the morning, peel and grate 2 apples and add to the oats.
Add whisked yogurt and powdered sugar to taste.
Soak the basil seeds in 1 cup of water and allow them to swell up and then add to the muesli.
Top with chopped fruits and nuts and serve.


How to make overnight oats, overnight oats recipe, bircher muesli with apple juice recipe, how to make bircher muesli with apple juice, rolled oats recipe, how to make rolled oats, cold breakfast recipe at www.oneateaspoonoflife.com
Read more ...

Sunday Lunch Special - Kathal Biryani | Jackfruit Biryani (with Photo Instructions)


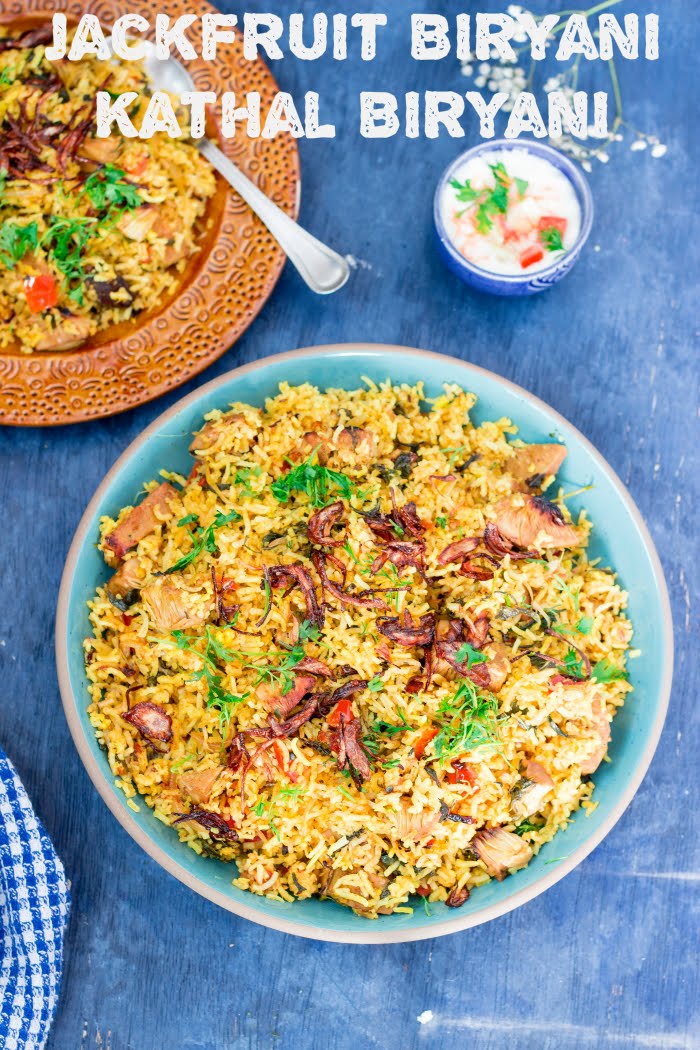
Sunday Lunches are meant to be special, and this slow cooked Jackfruit Biryani or Kathal Biryani made with raw jackfruit, long grained Basmati Rice and lots of spices is definitely my definition of SPECIAL (Vegan option available)!!

How to make jackfruit biryani, jackfruit biryani recipe, vegan jackfruit recipe, raw jackfruit recipe, young jackfruit recipe, how to make kathal biryani, kathal biryani recipe, kathal recipes at www.oneteaspoonoflife.com

When I think of Sunday lunch, I always think of something that is slow cooked and delicious. A dish into which I put my heart and time into. It may be because of my mom. Being children of a full time career woman meant that weekday food was simple and quick. It was still delicious and healthy. My mom made sure we ate home cooked healthy food literally every meal every day. Eating out was a rarity. Working 6 days a week, left out just one Sunday and she made sure that Sunday was special. It was the day she got to cook something special for the large family. A Sunday fare that everyone in the family loved and awaited.

A couple of years ago, I realized I'm turning into my Mom!! Good for me, she is the woman I admire the most, but not so good for my lazy hubby. He gets picked on for not keeping his tea cup in the kitchen sink almost as soon as he finishes the tea, a most definite hand-me-down trait from my mom. I instantly NEED (yes, it is a need) cups and plates and bowls to be kept in the sink as soon as they are empty of food. It may be a really annoying good habit or just OCD, but whatever that is, came from my mom to me.

There is one thing different though, she hated spicy food. Infact, all her siblings do. They cannot stomach anything spicy, they prefer a more bland affair. Luckily for me I can eat spicy a couple of times a week, and then I crave my simple daily home cooked rice-dal type of food.

How to make jackfruit biryani, jackfruit biryani recipe, vegan jackfruit recipe, raw jackfruit recipe, young jackfruit recipe, how to make kathal biryani, kathal biryani recipe, kathal recipes at www.oneteaspoonoflife.com

So while my Sunday lunch is a lengthy affair, it is definitely spicier than my mom's. This Sunday it was a recipe that I'd been wanting to make for a very very long time - Jackfruit Biryani or Kathal Biryani. Can I just tell you something? It was DELICIOUS!!! It was the best biryani I made till date. The aroma wafting through the house from the very first step had us drooling before we even got to eat the biryani. I am actually sorry that you cannot smell this through the photos. You can make this Biryani on anyday, but I'm just being honest in saying it is a time consuming dish and is best made on days when you have the time and do not have to rush through the steps. This is definitely not a quick weeknight recipe.

Biryani is predominantly a non-vegetarian dish in which rice is cooked along with meat and spices. Jackfruit is a perfect replacement for the meat due to is chewy moist texture. And this Jackfruit Biryani can convert anyone to a vegetarian!!

The most boring and tedious job while making this biryani is actually cutting the jackfruit. The sticky milky wax is kinda annoying. Rajeshwari of Rak's Kitchen has provided a beautiful visual tutorial on how to cut a jackfruit. You can follow that until step 2. I used coconut oil instead of sesame oil, use any cooking oil. Once the jackfruit is cut and ready, half your job is done. Salt the pieces and deep fry them. You can also steam them or just use it directly in the biryani and allow it to cook along with the rice and spices.

How to make jackfruit biryani, jackfruit biryani recipe, vegan jackfruit recipe, raw jackfruit recipe, young jackfruit recipe, how to make kathal biryani, kathal biryani recipe, kathal recipes at www.oneteaspoonoflife.com

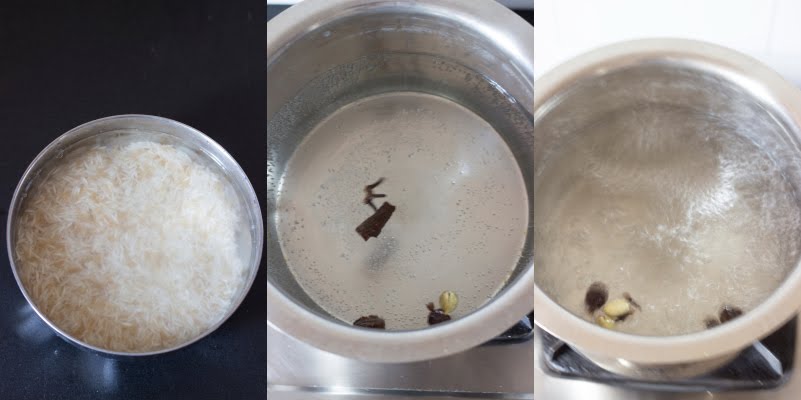
A major part of the biryani is the rice. Use the best long grained rice you can. Fragrant basmati works the best with this type of biryani. Since the rice is layered along with the masala and cooked again later, in the initial stages, we only parboil the rice. The rice is cooked along with whole spices until it is half done. Then it is drained and washed and kept aside.

The masala, this smells DIVINE. I'm not kidding. This is gonna bring neighbors home, that's how fragrant it is. Traditionally the masala is not vegan, but you can make it vegan. Just replace the Ghee with more Oil and the yoghurt with extra tomatoes. The spices are fried in ghee+oil and then the onion is added. Then come in the ginger-garlic, and this is when the aroma just explodes into your face. Then come tomatoes. If you are replacing the yogurt with tomatoes, just add them now. Add all your spice powders. Once everything is cooked, add in the jackfruit, yogurt, and coriander leaves. Your masala is practically ready.

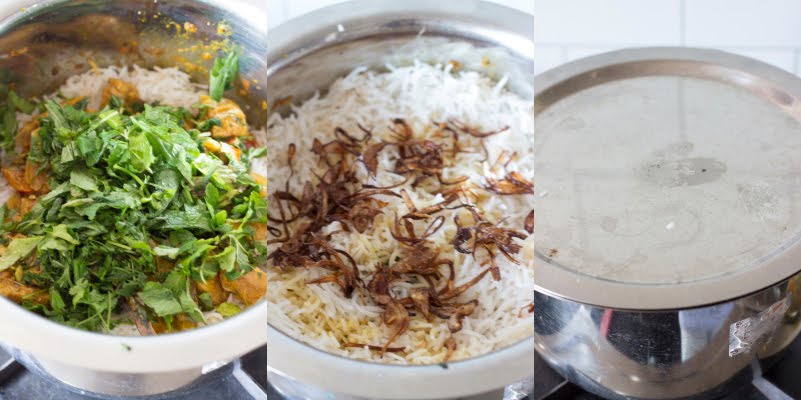
Then begin by layering the masala, fresh mint leaves, rice. Usually 2 layers are made. Then on the top layer add saffron or turmeric powder mixed with either milk or water and pour. Sprinkle crispy brown onions. Cover and cook on low heat for 20-25 mins or until the rice is done.

You can bake this too. Preheat your oven to around 200 degree C and bake the layered biryani for 20-25 minutes or until the rice is done.

How to make jackfruit biryani, jackfruit biryani recipe, vegan jackfruit recipe, raw jackfruit recipe, young jackfruit recipe, how to make kathal biryani, kathal biryani recipe, kathal recipes at www.oneteaspoonoflife.com

If you made this recipe, let me know! Leave a comment here or on Facebook, tag your tweet with @oneteaspoonlife on Twitter and don't forget to tag your photo #oneteaspoonoflife on Instagram. You can also email me at onetspoflife@gmail.com. I'd love to see what you are upto. 

If you like this recipe, do not forget to share it with your friends and family! 

You can follow One Teaspoon Of Life is there on Facebook, Twitter, Instagram, Pinterest and Google+ or you can subscribe to One Teaspoon Of Life and receive all the latest updated via Email (How convenient!!)

If you liked this, you may also like:


Jackfruit Biryani | Kathal Biryani (Vegan Option Available)


How to make jackfruit biryani, jackfruit biryani recipe, vegan jackfruit recipe, raw jackfruit recipe, young jackfruit recipe, how to make kathal biryani, kathal biryani recipe, kathal recipes at www.oneteaspoonoflife.com Jackfruit Biryani or Kathal Biryani is an Indian layered rice dish wherein raw jackfruit is cooked with rice and spices.  

Recipe Type:  Rice
Cuisine:            North Indian
Prep Time:     30 minutes
Cook time:     60 minutes
Yield:                Serves 4


Ingredients:


Fresh Ingredients:


1 small raw Jackfruit / Kathal (600-700gms)
4 Onions
4 Tomatoes
2 handfuls Coriander leaves
2 handfuls Mint leaves
1 Tbsp Garlic Paste
1 Tbsp Ginger Paste

Grains:


2 cups Basmati Rice

Whole Spices:


4 Green Cardamom (Elaichi)
3 Black Cardamom (Badi Elaichi)
1 tsp Fennel Seeds (Saunf)
1/2 tsp Caraway Seeds (Shah Jeera)
5 Cloves (Lawang)
2" Cinnamon (Dalchini)
1 Bay Leaf (Tej Patta)
1 tsp Stone Flower (Pathar ke Phool / Dagad Phool)

Spice Powders:


3 tsp Coriander Powder
1 tsp Garam Masala Powder
1.5 tsp Turmeric Powder
1-2 tsp Red Chilli Powder
1 tsp Cumin Powder

Dairy:


1 cup Yogurt / Dahi (Replace with 1 large tomato for a vegan option)
3 Tbsp Ghee (Replace with Oil for a vegan option)
2 Tbsp Milk (Replace with water for a vegan option)

Others:


3 Tbsp Oil
Oil for frying
Salt to taste
8 cups Water

Method:


Cooking the Jackfruit:


Oil your hands and the knife with any edible oil, preferably coconut.
Cut the jackfruit into quarters.
Peel the thorny skin of the jackfruit. Remove the center stalk.
Dice the jackfruit into 1" sized pieces.
Sprinkle 1/2 to 1 tsp of salt on the jackfruit pieces.
Heat oil in a deep kadhai or pan.
Deep fry the jackfruit until golden.
Keep aside until later.

Making the Crispy Brown Onions:


Slice 2 onions finely.
Deep fry the onions on medium heat until dark brown and crispy. Be careful not to burn the onions.
Remove from oil and keep aside until later.

Cooking the Biryani Rice:


Wash the basmati rice for 5-6 times until the water runs clean.
Soak it in water and keep aside for 20-30 minutes.
Heat 8 cups of water in a large deep bottomed pan. Add 1/2 tsp of salt, 2 green cardamom, 2 black cardamom, 1" piece of cinnamon and 3 cloves.
Once the water comes to a rolling boil, drain the rice and add the rice to the boiling water.
Cover and cook on medium heat until rice is half done.
Drain the water and wash the rice in cold water. Drain and keep the rice aside.

Making the Masala:


I make the masala in the same utensil in which I will be finally assembling the biryani. Use a deep bottomed pan or pot or pressure cooker for this if doing the same.
Finely slice the onions and chop the tomatoes. If you are making a vegan biryani, add one more large tomato.
Heat oil+ghee in a kadhai or pan. Replace ghee with oil for a vegan option.
Gently bruise the fennel seeds, stone flower, 1" cinnamon, 2 cloves, 1 black cardamom and  2 green cardamoms using a mortar and pestle. Do not crush it into a powder, just bruise it to allow it to release it's fragrance in the oil.
Once it heats up, add the caraway seeds (shah jeera) and bruised spices along with the bay leaf.
Saute for 1 minute until fragrant.
Add the sliced onion and cook them until translucent.
Add the ginger and garlic paste and saute for 1-2 minutes until fragrant.
Now add the tomatoes. 1 tsp turmeric powder, red chilli powder, coriander powder, cumin powder and garam masala.
Continue to cook while stirring frequently until the tomatoes are cooked or for 5-6 minutes.
Add the deep fried jackfruit, whipped yogurt, salt and 1 handful of coriander leaves (chopped) and mix well.Skip the yogurt for a vegan option.
Cook on low heat for 1-2 minutes.
Remove from heat.

Making the Jackfruit Biryani:


If you are going to cook the biryani in the same pan in which the masala was cooked, remove half the masala into a bowl.
If you are using a fresh pan to make the biryani, spread half the masala in the new pan.
Chop the coriander and mint leaves.
Sprinkle half the coriander and mint leaves over the masala.
Layer half the parboiled rice over the mint leaves.
Spread the remaining masala on the rice.
Sprinkle the remaining coriander and mint leaves.
Spread the remaining rice on the mint leaves.
Take half the crispy brown onions and spread over the rice. Dissolve 1/2 tsp turmeric in 2 Tbsp milk or water and pour over the rice.
Cover and cook on low heat for 20-25 minutes or until the rice is cooked.
Mix the layers while serving.
Garnish with the remaining crispy brown onions while serving.


Photo Instructions:


How to make jackfruit biryani, jackfruit biryani recipe, vegan jackfruit recipe, raw jackfruit recipe, young jackfruit recipe, how to make kathal biryani, kathal biryani recipe, kathal recipes at www.oneteaspoonoflife.com

  • Dice the jackfruit into 1" pieces. Salt them and deep fry until golden.

How to make jackfruit biryani, jackfruit biryani recipe, vegan jackfruit recipe, raw jackfruit recipe, young jackfruit recipe, how to make kathal biryani, kathal biryani recipe, kathal recipes at www.oneteaspoonoflife.com

  • Wash the basmati rice for 5-6 times until the water runs clean.
  • Soak it in water and keep aside for 20-30 minutes.
  • Heat 8 cups of water in a large deep bottomed pan. Add 1/2 tsp of salt, 2 green cardamom, 2 black cardamom, 1" piece of cinnamon and 3 cloves.
  • Once the water comes to a rolling boil, drain the rice and add the rice to the boiling water.
  • Cover and cook on medium heat until rice is half done.
  • Drain the water and wash the rice in cold water. Drain and keep the rice aside. take just 20 mins to make.


How to make jackfruit biryani, jackfruit biryani recipe, vegan jackfruit recipe, raw jackfruit recipe, young jackfruit recipe, how to make kathal biryani, kathal biryani recipe, kathal recipes at www.oneteaspoonoflife.com

  • Deep fry finely sliced onions on medium heat until brown and crispy.
  • Heat oil+ghee in a kadhai or pan. 
  • Gently bruise the fennel seeds, stone flower, 1" cinnamon, 2 cloves, 1 black cardamom and  2 green cardamoms using a mortar and pestle. 
  • Once it heats up, add the caraway seeds (shah jeera) and bruised spices along with the bay leaf.
  • Saute for 1 minute until fragrant.
  • Add the sliced onion and cook them until translucent.
  • Add the ginger and garlic paste and saute for 1-2 minutes until fragrant.
  • Now add the tomatoes. 1 tsp turmeric powder, red chilli powder, coriander powder, cumin powder and garam masala.
  • Continue to cook while stirring frequently until the tomatoes are cooked or for 5-6 minutes.
How to make jackfruit biryani, jackfruit biryani recipe, vegan jackfruit recipe, raw jackfruit recipe, young jackfruit recipe, how to make kathal biryani, kathal biryani recipe, kathal recipes at www.oneteaspoonoflife.com

  • Add the deep fried jackfruit, whipped yogurt, salt and 1 handful of coriander leaves (chopped) and mix well.
  • Cook on low heat for 1-2 minutes.
  • Remove from heat.
  • Take a deep pan, and spread half the masala.
  • Sprinkle half the chopped coriander and mint leaves over the masala.
  • Layer half the parboiled rice onto the mint leaves.

How to make jackfruit biryani, jackfruit biryani recipe, vegan jackfruit recipe, raw jackfruit recipe, young jackfruit recipe, how to make kathal biryani, kathal biryani recipe, kathal recipes at www.oneteaspoonoflife.com

  • Spread the remaining masala on the rice.
  • Sprinkle the remaining coriander and mint leaves.
  • Spread the remaining rice on the mint leaves.
  • Take half the crispy brown onions and spread over the rice. Dissolve 1/2 tsp turmeric in 2 Tbsp milk or water and pour over the rice.
  • Cover and cook on low heat for 20-25 minutes or until the rice is cooked.
  • Mix the layers while serving.
  • Garnish with the remaining crispy brown onions while serving.
How to make jackfruit biryani, jackfruit biryani recipe, vegan jackfruit recipe, raw jackfruit recipe, young jackfruit recipe, how to make kathal biryani, kathal biryani recipe, kathal recipes at www.oneteaspoonoflife.com
Read more ...

No-Bake Strawberry Cheesecake (Egg and Gelatin free)


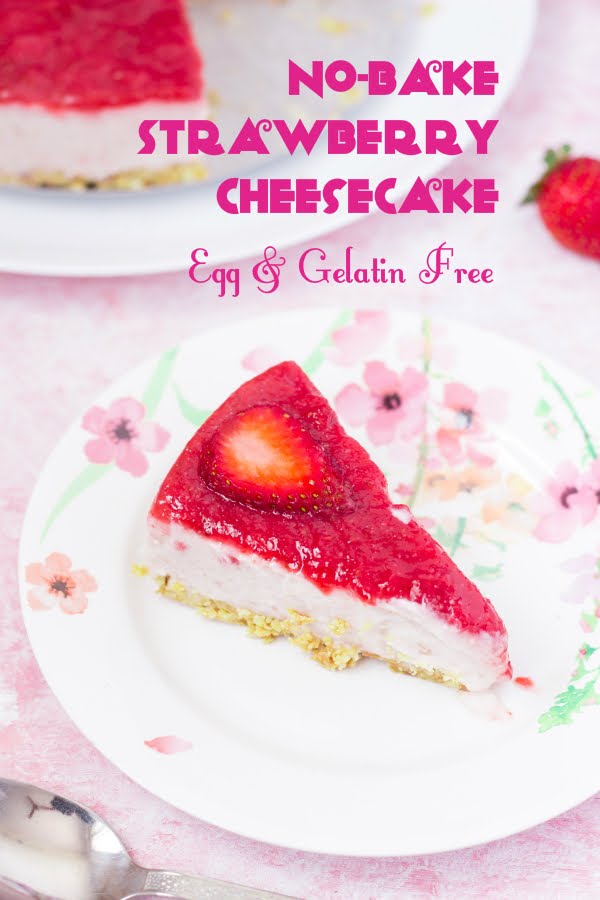
Vegetarian Cheesecake Time!!! This no-bake Strawberry Cheesecake is Egg and Gelatin free, it is made with easily available and fresh ingredients.

vegetarian cheesecake recipe, How to make no-bake cheesecake recipe, How to make strawberry cheesecake recipe, How to make cheesecake without gelatin recipe, Eggless strawberry cheesecake recipe at www.oneteaspoonoflife.com


We are a cheesecake loving family, well almost, except Gee, her poison is a dark gooey chocolate cake. But the rest of us are ready with our forks out at the mention of a cheesecake. Blueberry, Mango, Strawberry, bring them ON!
Initially we would love to go a gourmet bakery just to eat it. But then someone mentioned that cheesecakes have gelatin in them. Gelatin is what holds it together and it does a wonderful job at it, but it is not vegetarian. So then onwards there was a non-cheesecake existence, we could see it staring at us at malls, cakeshops and bakeries but never had the heart to go buy it. Then I found this recipe for a Mango Cheesecake by Anushruti. There was hope again for us!!!


vegetarian cheesecake recipe, How to make no-bake cheesecake recipe, How to make strawberry cheesecake recipe, How to make cheesecake without gelatin recipe, Eggless strawberry cheesecake recipe at www.oneteaspoonoflife.com


vegetarian cheesecake recipe, How to make no-bake cheesecake recipe, How to make strawberry cheesecake recipe, How to make cheesecake without gelatin recipe, Eggless strawberry cheesecake recipe at www.oneteaspoonoflife.com


vegetarian cheesecake recipe, How to make no-bake cheesecake recipe, How to make strawberry cheesecake recipe, How to make cheesecake without gelatin recipe, Eggless strawberry cheesecake recipe at www.oneteaspoonoflife.com
I will be honest - making a cheesecake at home is not a simple task. It really isn't. But the rewards are BIG and TASTY and VEGETARIAN!! I had to work with this recipe multiple times to get it right, the family definitely did not mind getting to eat Strawberry Cheesecake every weekend. I wondered how long their love would last, but I got the recipe right before they got bored, so hey, that's a win for me.  

Strawberries are currently plenty in the market and pretty cheap too. So this is the right time for the cheesecake. I took Anushruti's recipe as a base and changed it to suit my ingredients along the way.
A cheesecake is made of 2 major components - Biscuit Base and the Cheese Filling.

Biscuit Base 

I used different commonly available biscuits to make the biscuit base. I experimented with Goodday, Marie, Digestive Biscuits etc, sometimes it was a combination of different varieties. My pick at the end of the day - Marie. Marie biscuit is naturally very crispy and works beautifully here. It doesn't have too much of a flavor of its own, so it doesn't interfere with the taste of the filling and just ends up adding a very buttery crunch to the whole cheesecake. You may have a different favorite, just go with it. 
I used a mix of salted and unsalted butters, I liked the mild saltiness. I wouldn't recommend using only salted butter, however, you can use only unsalted butter and may be add a pinch of salt to it if you like the saltiness or avoid the salt all together.

vegetarian cheesecake recipe, How to make no-bake cheesecake recipe, How to make strawberry cheesecake recipe, How to make cheesecake without gelatin recipe, Eggless strawberry cheesecake recipe at www.oneteaspoonoflife.com

vegetarian cheesecake recipe, How to make no-bake cheesecake recipe, How to make strawberry cheesecake recipe, How to make cheesecake without gelatin recipe, Eggless strawberry cheesecake recipe at www.oneteaspoonoflife.com

Cheese Filling 

While the biscuit base is super simple to make, getting the cheese filling right was my mount Everest. The taste was spot on from day one, but it just would not set. The cheesecake would melt right before my eyes and break my heart. Hence, multiple retries and I'm happy to tell you the below recipe worked perfectly for us. I would have probably liked it a little firmer, but I'm a little worried if adding more china grass will leave an unpleasant aftertaste. 

Making the filling takes over a day. The first step is hanging the yogurt or curd in a muslin cloth to drain all the water from it. Use a thick set curd or preferably, buy Greek Yogurt. At the end of the draining, you should have a really thick creamy yogurt. The next ingredient is Paneer, blend it in a mixer to get a creamy paneer paste. Refrain from adding water during the blending. Strain to remove lumps. Add it to the yogurt and mix well. Add the powdered sugar and mix well. P

uree the strawberries and gently heat the puree on the stove. Don't let it boil, but it needs to be hot when you add the china grass to it, else the china grass will seize and become a lump. China Grass is the trickiest ingredient of the lot. Soak it for at least 10 minutes in water before heating it up. Do not heat the china grass directly on the stove top. Use a double boiler - take a pan and add water to it. Allow the water to come to a boil, then place the bowl containing the soaked china grass and allow it to melt, stirring occasionally. Once the china grass has completely dissolved in the water, add it to the hot strawberry puree and mix well. Immediately add this to the yogurt-paneer mix. Fold in.

vegetarian cheesecake recipe, How to make no-bake cheesecake recipe, How to make strawberry cheesecake recipe, How to make cheesecake without gelatin recipe, Eggless strawberry cheesecake recipe at www.oneteaspoonoflife.com

vegetarian cheesecake recipe, How to make no-bake cheesecake recipe, How to make strawberry cheesecake recipe, How to make cheesecake without gelatin recipe, Eggless strawberry cheesecake recipe at www.oneteaspoonoflife.com


Your cheesecake filling is ready. Pour it over the chilled biscuit base and refrigerate it for 5-6 hours until it sets.

The glaze can be either poured over the cheesecake while serving, or while it is setting. Making the glaze requires you to heat the strawberry puree with sugar for a few minutes. Allow it to cool and then pour over the cheesecake. If you'd like it to set along with the cake, pour it over the cheesecake after it has been refrigerated for 1-2 hours, else, pour it while serving.

To make individual sized portions, set the cheesecake in bowls or in glasses. These are perfect if you are hosting a party.


If you made this recipe, let me know! Leave a comment here or on Facebook, tag your tweet with @oneteaspoonlife on Twitter and don't forget to tag your photo #oneteaspoonoflife on Instagram. You can also email me at onetspoflife@gmail.com. I'd love to see what you are upto. 

If you like this recipe, do not forget to share it with your friends and family! 

You can follow One Teaspoon Of Life is there on Facebook, Twitter, Instagram, Pinterest and Google+ or you can subscribe to One Teaspoon Of Life and receive all the latest updated via Email (How convenient!!)

vegetarian cheesecake recipe, How to make no-bake cheesecake recipe, How to make strawberry cheesecake recipe, How to make cheesecake without gelatin recipe, Eggless strawberry cheesecake recipe at www.oneteaspoonoflife.com

If you liked this, you may also like these other desserts:


No-Bake Strawberry Cheesecake (Egg and Gelatin Free)


vegetarian cheesecake recipe, How to make no-bake cheesecake recipe, How to make strawberry cheesecake recipe, How to make cheesecake without gelatin recipe, Eggless strawberry cheesecake recipe at www.oneteaspoonoflife.comNo-Bake Strawberry Cheesecake is an eggless and gelatin free frozen dessert made with fresh strawberries,yogurt and paneer. It is set using china grass or agar agar instead of gelatin or egg.

Recipe Type:  Dessert
Cuisine:            International
Prep Time:     45 minutes (Does not include setting time)
Cook time:     45 minutes
Yield:                Serves 6-8


Ingredients:


200gms fresh Strawberries (20-25)
400gms Greek Yogurt or Thick Full Fat Curd
200gms Paneer
10gms China Grass (Agar Agar)
1.25 cups Sugar
10-12 Digestive Biscuits
3 Tbsp unsalted Butter
1 Tbsp salted butter

Method:


To make the Biscuit Base:


Crush the biscuits until they are a coarse powder.
Add the butter to the biscuit powder and mix well.
Put the biscuit crumbs into the cake pan. You will need to use a springform cake pan or a cake pan with a detachable bottom plate. Alternately, you can also make individual sized portions in glasses.
Gently press the biscuit crumb until the bottom of the entire pan is coated evenly with it with a slight rise along the edges. Make sure there are no holes in the layer.
Keep the cake pan in the fridge for 2-3 hours. This can be done simultaneously with hanging the yogurt

To make the Strawberry Cheesecake Filling:


Tie the yogurt or curd in a muslin cloth and leave it hanging for 3-4 hours until all the water is drained from it. I left it overnight in the fridge.
Blend the paneer in a mixer/blender until smooth. Strain if required to remove lumps.
Add the creamed paneer to the hung yogurt and mix well.
Powder the sugar.
Add 1.5 cups of the powdered sugar to the yogurt-paneer mix and whisk well until combined.
Soak china grass in 3/4 cup of water for 10-15 minutes.
Heat water in a pan, once the water boils, place the bowl containing the china grass into the pan.
Do not allow the china grass to come to a boil. Stir occasionally. Continue to heat the china grass until it dissolves completely in the water. This may take 15-20 minutes.
In the meanwhile, puree 12-15 strawberries until smooth.
Add the puree to a small pan and heat it on low heat. The puree should not come to a boil but should be hot when we add the china grass.
Once the china grass has completely dissolved, add it to the hot strawberry puree and mix well.
Taste to see if you need more sugar, you can stir in more powdered sugar at this point.
Immediately pour this into the yogurt-paneer mix and fold in until combined.
Refrigerate the cheesecake for 6-7 hours until set.

To make the Strawberry Glaze:


Puree the remaining strawberries until smooth.
Heat the puree in a small pan.
Add the remaining powdered sugar by the spoonful. You may need more if the strawberries are very tart.
Simmer on low heat for 4-5 minutes.
Allow it to cool completely.
Then pour over the cheesecake evenly. Allow it to set for at least 1 hour before serving. Alternately, you can pour the glaze just before serving as well.


vegetarian cheesecake recipe, How to make no-bake cheesecake recipe, How to make strawberry cheesecake recipe, How to make cheesecake without gelatin recipe, Eggless strawberry cheesecake recipe at www.oneteaspoonoflife.com


Read more ...

Karachi Bakery Inspired Fruit Biscuits


Have you ever tried Hyderabad's famous Karachi Bakery Fruit Biscuits?

No? I suggest you go get yourself one packet right now, girl.

Yes? Aren't they super delicious? I absolutely love them... So I made them at home... Really!! Read on!

How to make vegetarian eggless Karachi Bakery Fruit Biscuit rose cookies cranberry cookie recipe at One Teaspoon Of Life www.oneteaspoonoflife.com


I had no idea I liked Rose flavored cookies until I tried the Karachi Bakery Fruit Biscuits. A colleague once got them from Hyderabad and I missed the first batch. Just to make up to all those late comers like me, he got more the next day. And I was converted!! Until then I thought I was a lover of all things chocolate, but rose suddenly rose to the top (hee hee... see my little pun there? okay, ignore it).

I absolutely love roses, not generally as a flower, I find them "meh" and over rated. But I love rose flavor! I'm all for Rose Faluda, Rose Lassi, Rose Ice cream and of course anything with Gulkand in it (Indian Rose Jam). And now Rose Cookies are added to the list.

How to make vegetarian eggless Karachi Bakery Fruit Biscuit rose cookies cranberry cookie recipe at One Teaspoon Of Life www.oneteaspoonoflife.com

How to make vegetarian eggless Karachi Bakery Fruit Biscuit rose cookies cranberry cookie recipe at One Teaspoon Of Life www.oneteaspoonoflife.com
I'm sorry that although the title says Fruit Biscuit, all I'm talking about is roses. While the biscuits or cookies have little bits of fruit in them, rose is the predominant fragrance and flavor in them. The fruit component of the biscuit is Tutti Fruiti. Tutti Fruiti are colored sweetened bits of dried papaya. Very popular in Indian desserts. If you cannot find it anywhere, you can add any dried berry like cranberries. Actually, this recipe is very similar to the Cranberry Cookie recipe with the addition of few very Indian ingredients.

One of those ingredients is the Vanilla Custard Powder. Traditionally custard is made with egg yolks, but ask any Indian how to make custard (well, almost any) and he/she will show you a little carton of Custard Powder that is completely eggless and allows any vegetarian to enjoy the flavors of a custard. There are several brands and flavors available, and while you can use any brand, I strongly recommend sticking to the vanilla flavor. If you cannot find custard powder, replace it with either milk powder or corn starch /flour. If using sweetened milk powder, remember to reduce the amount of powdered sugar used, else you may end up with a super sweet biscuit.

My recipe of fruit biscuit is a very simple recipe that any baking newbie can make. You start by creaming together butter and powdered sugar. I cannot emphasize the importance of room temperature butter enough. To get the right consistency of the dough and eventually the biscuit, you have to have butter at room temperature. Salted vs unsalted is a whole other argument. I've always used unsalted butter in baking so I cannot comment on how salted will work in this case. I assume they have the same texture, but using salted will just add a little saltiness to your biscuits. Whisk the butter and sugar until the butter is white, soft and fluffy. Then just add all the flours, tutti fruiti, cashew nuts, milk and rose essence and knead until combined. Shape into logs or into a large rectangular block like I did. Wrap it in cling wrap and store in fridge to harden a little. This just makes it easier to cut and get even shaped biscuits.

How to make vegetarian eggless Karachi Bakery Fruit Biscuit rose cookies cranberry cookie recipe at One Teaspoon Of Life www.oneteaspoonoflife.com

Bake at 180 degree C until the sides are slightly brown. Cool completely before storing in an air tight box. They will last you easily for 1-2 weeks. I really did not get any time to test the shelf life as these were over by day 4.

I can assure you the flavor of these biscuits is spot on with the Karachi Bakery Fruit Biscuits. The texture is slightly different. Mine were not as flaky and crumbly as the bakery ones, mine were more dense and crunchy. This could be because I have not used any leavening agent like baking powder or baking soda. My family loves crunchy biscuits that stay intact when dipped in tea over the crumbly ones, so we loved the texture. If you want softer ones, I suggest adding a little baking powder to a small batch of dough and seeing how it goes.

How to make vegetarian eggless Karachi Bakery Fruit Biscuit rose cookies cranberry cookie recipe at One Teaspoon Of Life www.oneteaspoonoflife.com

If you like this, you may also like:


Karachi Bakery Inspired Fruit Biscuit


Karachi Bakery inspired Fruit Biscuits are rose flavored biscuits or cookies made with dried papaya pieces called tutti fruiti.

How to make vegetarian eggless Karachi Bakery Fruit Biscuit rose cookies cranberry cookie recipe at One Teaspoon Of Life www.oneteaspoonoflife.com
Recipe Type:  Dessert
Cuisine:            Indian
Prep Time:     2.5 Hours
Cook time:     20-25 minutes
Yield:                30 biscuits


Ingredients:


100gms unsalted Butter
1 cup All Purpose Flour / Maida
1 cup + 1 Tbsp Powdered Sugar
1/2 cup Vanilla Custard Powder
3 Tbsp Tutti Fruiti
8-10 Cashew nuts
2 Tbsp Milk
1 tsp Rose Essence

Method:


Cream together butter and powdered sugar in a large bowl until soft and fluffy. Around 5-10 minutes with a electric hand mixer.
Sift in the all purpose flour and custard powder.
Add tutti fruiti, chopped cashew nuts, rose essence and milk.
Knead until combined.
Gently roll into logs using your hands and wrap in plastic cling wrap. Refridgerate for 2-3 hours until stiff.
Preheat the oven to 180 degree C.
Slice the dough into biscuits, about 5-6mm thickness.
Line the baking sheet with butter paper or parchment paper.
Place the biscuits on the sheet leaving enough space between the biscuits.
Bake for 20-25 minutes until the sides are slightly browned.
Cool on a wire rack.
Store in an air tight box.


How to make vegetarian eggless Karachi Bakery Fruit Biscuit rose cookies cranberry cookie recipe at One Teaspoon Of Life www.oneteaspoonoflife.com


Read more ...