Showing posts with label South Indian. Show all posts

Methi Rice Recipe


How to make methi rice recipe at www.oneteaspoonoflife.com How to make Fenugreek Pilaf recipe How to make Methi Pulao recipe at One Teaspoon Of Life

So how is Monday treating you? 

I've always suffered from Monday Blues... more so these days as weekends seem to go off in a blur.

Come Sunday night, and I find myself wondering what I did in the past two days. Usually, it is just a lot of cooking, photography and cleaning. This weekend I added in an extra trip to a place called Pottery Town, hoping to buy some earthen pots to cook in. I've heard that the earthen pots enhance the flavor of the food cooked in them and I'm always in the forefront to try out anything that takes my food to the next level. And while the entire trip was futile, as we reached late and probably skipped the very section of the street we should have driven on, I've not yet given up hope. So if you stay in Bangalore and have visited Pottery Town/Lane/Road and know the best shops there to pick up pots for cooking, please leave me a comment, I highly appreciate any help I get to locate the place.

How to make methi rice recipe at www.oneteaspoonoflife.com How to make Fenugreek Pilaf recipe How to make Methi Pulao recipe at One Teaspoon Of Life

So this Sunday night when I did a little introspect, I realized I'm getting so involved in all this that I'm running out of time to do the thing I love next to cooking - Blogging!! I'm now consciously making a resolution to start managing my time better so I get enough time to blog. 

While I spend most of my weekend cooking for the week ahead and making dishes that are slow cooked or have too many steps, my weeknight mantra is "Quick and Simple" with a very strong emphasis on the quick part. My work has a way of interfering with my evenings and a lot of it is unplanned so I'm usually scrambling for time on weeknights. So quick it has to be.

How to make methi rice recipe at www.oneteaspoonoflife.com How to make Fenugreek Pilaf recipe How to make Methi Pulao recipe at One Teaspoon Of Life

When I think quick cooking recipes, I always turn to Rice. One of my quick rice recipes is this Methi Rice. Methi, Menthe or Fenugreek is a small leaved green that is native to India. Usually slightly bitter in taste, it goes amazingly well with rice. I've been eating Methi Sabzi all my life like this Aloo Methi, but the first time I tried Methi Rice was at my aunt's place a few years ago. I loved it instantly. Spicy, fragrant, with the slight salty bitterness of Methi leaves, what's not to love in it?

There are 2 ways to make Methi Rice. You can cook it entirely in the pressure cooker or a single pot or you can make rice separately and the methi masala separately and mix the two together. For those weeknights when I need a quick fix, I make the pressure cooker version and on weeknights like today, when I have a little more time, I use the latter method. The recipe below is for the second method, but if you plan to make it in a single pot, just skip the steps to cook the rice. Make the masala as described below, and then add the rice and water and cook the rice with the masala until it is done.

How to make methi rice recipe at www.oneteaspoonoflife.com How to make Fenugreek Pilaf recipe How to make Methi Pulao recipe at One Teaspoon Of Life

If you liked this, you may also like:
  • Mint Rice - Mint Rice is a one pot dish of rice cooked along with a mint puree, vegetables and spices.
  • Mushroom Biryani - Mushroom Biryani is Basmati rice cooked along with whole spices and mushrooms.
  • Ghee Rice - Ghee Rice is a simple Indian rice dish where Basmati rice is cooked in ghee or clarified butter.


Methi Rice


How to make methi rice recipe at www.oneteaspoonoflife.com How to make Fenugreek Pilaf recipe How to make Methi Pulao recipe at One Teaspoon Of Life
Methi Rice is made by cooking rice along with methi or fenugreek leaves and a fragrant masala.

Recipe Type:  Rice
Cuisine:            Indian
Prep Time:     20 minutes
Cook time:     60 minutes
Yield:                Serves 2


Ingredients:


2 cups Fenugreek / Methi leaves
1 cup Basmati Rice
1 medium Potato
1 large Onion
1 large Tomato
1 tsp Red Chilli Powder
1/2 tsp Turmeric Powder
1/2 tsp Garam Masala
1/2 tsp Sugar
1 tsp Ginger Garlic Paste
1/2 tsp Cumin seeds
1/2 a Lime
4-5 Tbsp Oil
2 cups + 2 Tbsp Water
Salt to taste

Method:


Wash the basmati rice until the water runs clear. Drain and keep aside.
Boil 2 cups of water in a large pot. Add 1 tsp oil and 1/2 tsp salt to it.
Add the washed rice. Cover and cook until the rice is done.
Allow to cool, then fluff rice with a spoon or fork
Heat the remaining oil in a large kadhai or pan.
Add diced potato to the oil and stir fry until the potatoes are cooked. Remove from oil and keep aside. Alternately, you can boil the potato and then dice into cubes.
Add the cumin seeds the oil.
After the cumin seeds are slightly browned, add sliced onions.
Fry until onions turn golden brown.
Add the ginger garlic paste and saute for 1 minute until fragrant.
Add chopped tomatoes and cook until the tomatoes are soft.
Add the turmeric powder, red chilli powder and garam masala. Mix well and cook for 1-2 minutes.
Add washed and chopped methi leaves and 1-2 Tbsp water.
Cook until the methi leaves are completely cooked. Add sugar, salt and lime juice. Mix well. Fry for another 1 minute.
Add the cooked rice and mix until the masala coats every grain.
Cook on low heat for 3-4 minutes until the rice is at least warm.
Serve with raita.

How to make methi rice recipe at www.oneteaspoonoflife.com How to make Fenugreek Pilaf recipe How to make Methi Pulao recipe at One Teaspoon Of Life


Read more ...

Shavige Payasa | Semiyan Kheer | Vermicelli Pudding

Happy New Year!!!

I hope you had a great New Year's Eve!!

How to make shavige payasa semiyan kheer vermicelli pudding recipe at www.oneteaspoonoflife.com

I ended 2016 with a sweet note. Read about it here.

In our culture, we start everything new with something sweet. I'm starting the new year with this sweet treat - Vermicelli Pudding or Semiyan Kheer or Shavige Payasa. Not that I need excuses to eat desserts, but then it is January, and I have resolutions made that I don't want to break in the very first week.

So, I just had one little bowl. But what a bowl it was, rich, sweet, fragrant, everything a kheer is meant to be.

How to make shavige payasa semiyan kheer vermicelli pudding recipe at www.oneteaspoonoflife.com

Shavige Payasa is very commonly made for all festivals and is what we begin the meal with. It is one of the easiest desserts I know to make.

To make Shavige Payasa, we first need to roast the shavige or semiyan or vermicelli in ghee until golden brown. This is an important step as it prevents the vermicelli from clumping up when added to the milk. Also it imparts that rich taste of ghee to the entire kheer. You need to do this step carefully, stirring frequently and ensuring that the vermicelli does not burn. I always use wheat vermicelli that is not pre-roasted and is already broken into small pieces. I buy brands like MTR or Bambino

The second step is the dry fruits. I am a total "nut-case", I love nuts and dry fruits. I am extra generous with nuts and dry fruits when it comes to desserts and I also like to add a variety of them. This time I've used almonds, cashews, raisins and pistachios. The nuts and dry fruits need to be chopped and fried in ghee as well. Again, you need to be careful while frying in ghee. Ghee heats up quickly and you can end up with burnt nuts. So keep a watch on them. Stir frequently and keep the heat low. Fry the raisins separately as they burn quickly.

How to make shavige payasa semiyan kheer vermicelli pudding recipe at www.oneteaspoonoflife.com

After this you are pretty much done with the "work". Just boil milk, add sugar and the roasted vermicelli. Give it a good stir to separate the strands of vermicelli and then allow it to simmer on low heat until the vermicelli is cooked completely but still retains it's shape. The vermicelli will give way when squeezed. About the sugar, I'd say start with less and add more if required later. Add around 3/4th the quantity in the beginning and you can add more after the vermicelli is cooked. Somehow, a lot of people think Indian Desserts are way too sweet and avoid them. But when you make it at home, you can adjust how much sugar you add depending on your taste. So Indian desserts don't have to be sickly sweet. Once the vermicelli is cooked and the sugar adjusted, add the cardamom powder and the fried nuts and dry fruits and mix well. If you have over reduced the milk and the kheer begins to look thick, add more milk and adjust the sugar.

Shavige Payasa is usually served hot to warm, but I like it at room temperature. I enjoy it even when it is cold.

How to make shavige payasa semiyan kheer vermicelli pudding recipe at www.oneteaspoonoflife.com


If you liked this, you may also like:

  • Chana Dal Payasa - Kheer made from chana dal and coconut milk.
  • Gajar ka Halwa -  North Indian carrot pudding made with grated carrots, milk, sugar, ghee and dry fruits.


Shavige Payasa | Semiyan Kheer | Vermicelli Pudding


How to make shavige payasa semiyan kheer vermicelli pudding recipe at www.oneteaspoonoflife.comShavige Payasa | Semiyan Kheer | Vermicelli Pudding is a simple Indian dessert made by cooking ghee roasted vermicelli in milk.

Recipe Type:  Dessert
Cuisine:            Indian
Prep Time:     5 minutes
Cook time:     60 minutes
Yield:                Serves 4-5

Ingredients:


0.5 cup Vermicelli or Semiyan or Shavige
4-5 cups Milk
3-4 Tbsp Sugar
1.5 Tbsp Ghee
3 Cardamoms
5-6 Cashew Nuts
5-6 Almonds
8-10 Raisins
4-5 Pistachios

Method:


Chop the almonds, cashew nuts and pistachios.
Heat ghee in a kadhai and add the chopped nuts. Fry them until they are a gentle brown. Do not allow them to burn. Keep stirring.
Remove the nuts and keep aside.
Add the raisins and stir fry them until they puff up. Remove and keep along with the nuts.
Add the vermicelli to the kadhai and on low heat roast the vermicelli until it is golden brown. Keep stirring frequently. Remove from heat and keep aside.
In the same kadhai, add 4 cups milk and bring it to a rolling boil.
Lower the heat and add sugar and simmer for 1 minute until the sugar dissolves.
Add the vermicelli to the milk and on low heat allow it to simmer until the vermicelli is cooked. Stir occasionally so that the vermicelli does not form lumps.
The kheer is done when the vermicelli is cooked. At this point if the kheer looks very thick, add the remaining milk and you can add more sugar and cook it until the sugar dissolves.
Crush the cardamom into a powder and add to the kheer. Simmer for 1 minute after mixing well.
Add the nuts and raisins and mix well. Remove from heat.
Kheer is usually served hot, but you can serve it at room temperature or even cold. As the kheer cools it ends up thickening. You can add a little milk to loosen the kheer while serving. You can add powdered sugar to adjust the sweetness as well.


How to make shavige payasa semiyan kheer vermicelli pudding recipe at www.oneteaspoonoflife.com
Read more ...

Garlic Stuffed Karela (with Step by Step Photos)

Happy Holidays!!!

The last week of the year is HERE! As the new year inches closer. and with it the new year's resolutions, I'm giving in to all my indulgences one last time. After all there are just 7 days left for 2016 to end.

How to make bharwan karela stuffed bittergourd recipe at www.oneteaspoonoflife.com


While I'm filling up on all those chocolate cakes and french fries, I'm also bringing out the family favorite indulgences. One of them is my Mother-in-law's Garlic Stuffed Karela - Baby bitter gourds stuffed with a spicy masala of garlic and red chilli powder and fried in lots of oil. This is a tried, tested and loved recipe. It is what I call a flavor bomb, well they look like little bombs, don't they?

This Garlic Stuffed Karela is sure an explosion of flavors. It is S-P-I-C-Y, well you can reduce the spiciness by reducing the red chilli powder, but we love it spicy. It is heaven for garlic lovers (like me, of course), you can never kiss after this recipe, unless of course, the other person is filling up on it too. And if I haven't mentioned it enough times on this blog, I am a big bitter gourd or karela fan. Check these out if you have any doubts.

How to make bharwan karela stuffed bittergourd recipe at www.oneteaspoonoflife.com

There is one thing that mellows down the sharp flavors of karela, chilli and garlic, and is also marries them all together, and that is Oil. This curry uses more oil than any other curry I've ever posted here. But it is an essential ingredient. Now you know why I call this an indulgence! You can decide to use less oil int he beginning and then add more as you go, or start out with a fair amount in the beginning. This Garlic Stuffed Karela is meant to be eaten with rice, either as a side with rice and dal or just mix it along with rice. If you are having it with just plain rice, add more oil.

This is a slow cooking recipe, perfect for holidays. This one cannot be rushed. The karela needs to be slowly coaxed into submission to bring out the best flavors. There is on silver lining though, once you have the karela frying, it requires minimal monitoring. Just check once in 10-15 minutes and flip 
them to ensure the all sides cook evenly.

How to make bharwan karela stuffed bittergourd recipe at www.oneteaspoonoflife.com


Step-by-Step Instructions:


How to make bharwan karela stuffed bittergourd recipe at www.oneteaspoonoflife.com

  • Slit each bitter gourd lengthwise. Be careful that the knife does not pierce all the way through.
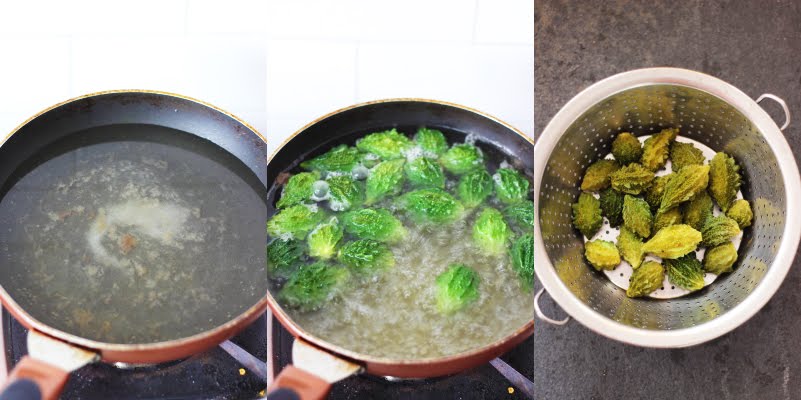
  • Heat water in a shallow pan and add 1 tsp of salt and the tamarind juice to it. Allow the water to come to a rolling boil.
  • Now add the slit bitter gourds and allow them to cook on medium flame for around 8-10 minutes until they change color. Do not cover the pan.
  • Drain and keep aside.
How to make bharwan karela stuffed bittergourd recipe at www.oneteaspoonoflife.com
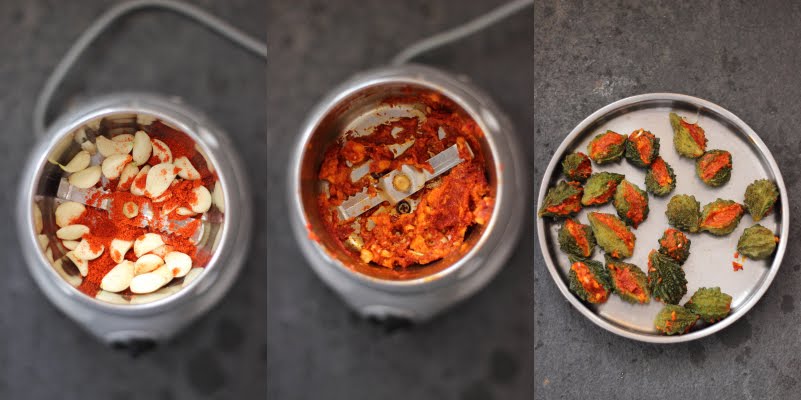
  • Make a paste out of the garlic, red chilli powder, salt and 2-3 tsp Oil.
  • Stuff the bitter gourds with the spice paste.
How to make bharwan karela stuffed bittergourd recipe at www.oneteaspoonoflife.com
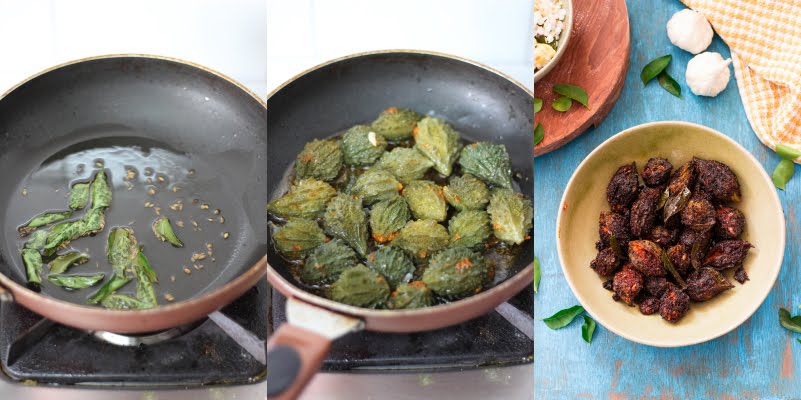
  • Heat the remaining oil in a frying pan and add cumin seeds. Once the seeds splutter, add the curry leaves.
  • Add the stuffed bitter gourds to the frying pan and cook on low flame for an hour. I prefer using a flat based pan, you can use a kadhai.
  • Keep turning them frequently so all sides are cooked well.
  • Sprinkle salt on top to coat all the bitter gourds. Mix well and cook for 1-2 minutes.
  • The dish is done when the bitter gourds are soft.


Garlic Stuffed Karela


How to make bharwan karela stuffed bittergourd recipe at www.oneteaspoonoflife.comGarlic Stuffed Karela is vegan semi dry curry made with baby bitter gourds stuffed with a masala of garlic and red chilli powder and then fried.

Recipe Type:  Side
Cuisine:            South Indian
Prep Time:     20 minutes
Cook time:     1.25 hour
Yield:                Serves 2-3

Ingredients:


20 Bitter Gourd, small (Karela)
4 Garlic Pods
4-5 tsp Red Chilli Powder
0.5 tsp Cumin Seeds (Jeera)
5-6 Tbsp Oil
2 tsp Tamarind juice
1 sprig Curry leaves
Salt to taste
Water as required

Method:


Slit each bitter gourd lengthwise. Be careful that the knife does not pierce all the way through.
Heat water in a shallow pan and add 1 tsp of salt and the tamarind juice to it. Allow the water to come to a rolling boil.
Now add the slit bitter gourds and allow them to cook on medium flame for around 8-10 minutes until they change color. Do not cover the pan.
Drain and keep aside.
Make a paste out of the garlic, red chilli powder, salt and 2-3 tsp Oil.
Stuff the bitter gourds with the spice paste.
Heat the remaining oil in a frying pan and add cumin seeds. Once the seeds splutter, add the curry leaves.
Add the stuffed bitter gourds to the frying pan and cook on low flame for an hour. I prefer using a flat based pan, you can use a kadhai.
Keep turning them frequently so all sides are cooked well.
Sprinkle salt on top to coat all the bitter gourds. Mix well and cook for 1-2 minutes.
The dish is done when the bitter gourds are soft.


How to make bharwan karela stuffed bittergourd recipe at www.oneteaspoonoflife.com


Read more ...

Pathrode Dosa | Uppu Menasu Dosa | Uppu Khara Dosa


Happy Weekend Guys!!

 How to make uppu khara dosa / uppu menasu dosa / Pathrode Dosa recipe at www.oneteaspoonoflife.com


Isn't it a wonderful feeling that you get to wake up when you want and for once your life is not ruled by technology. No alarms to snooze, no water heaters to be turned on, no bus / train to miss. So Saturday breakfast is usually something relaxed, that does not need too much effort, but definitely not something like a zero effort cereal. I love cooking traditional recipes on weekends when we get to sit down and enjoy a meal while it is still hot.

Pathrode Dosa also sometimes called Uppu Khara Dosa or Uppu Menasu Dosa is a dish from Mangalore and its surroundings. Rice grows abundantly there and almost every meal out there has rice as their hero.

Pathrode Dosa is a very similar to the Menthe Pathrode recipe, the only difference being there the entire batter is steamed and then fried, while here it is spread on a tava or a griddle and cooked.

 How to make uppu khara dosa / uppu menasu dosa / Pathrode Dosa recipe at www.oneteaspoonoflife.com


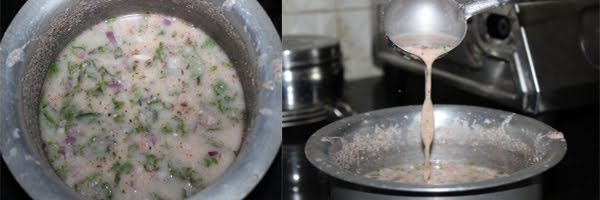
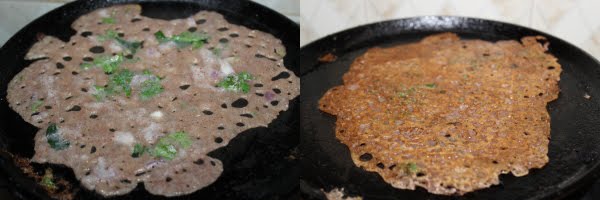
To make Pathrode dosa, you need to soak rice for 2-3 hours and then grind it as fine as you can. Let that rest for 30 mins to an hour. For the masala, you can either use fresh coconut or onion depending on what you have available with you. Grind the onion or coconut with tamarind pulp, red chillies and coriander powder to make a coarse thick masala. Add the masala to the rice batter along with some salt and chopped up fenugreek or methi leaves to make Pathrode Dosa batter. Add water to adjust the consistency. You can replace the methi leaves with spinach or any peppery leaf, or just leave it out. Spoon out the batter and spread it a little on a hot greased tava or griddle. Flip when one side is cooked and cook until the other side is browned.

If you don't want to wait 3 hours for your breakfast, I don't, just soak the rice the previous night for 2-3 hours or you can soak it the previous morning. Grind it at night and leave it covered on the counter overnight at room temperature. Make the masala fresh in the morning and add it to batter just 10-15 minutes before making. Don't add any salt to the batter if leaving it overnight and don't add the masala overnight either.

You have to serve this dosa hot like all other dosas. You can serve this dosa with chutney or butter, or even just plain. It has enough flavour to stand up on its own.

Try out this Tondekayee Chutney to go with the Pathrode Dosa.

 How to make uppu khara dosa / uppu menasu dosa / Pathrode Dosa recipe at www.oneteaspoonoflife.com


If you liked this, you may also like:
  • Mysore Masala Dosa - A rice and lentil pancake that has a chilli and garlic chutney spread on the inside and stuffed with a potato bhaji.
  • Instant Ragi Dosa - Instant dosa or crepe  made with rava or semolina and ragi flour (finger millet flour).
  • Instant Wheat Dosa - Instant savory dosa or pancake made with whole wheat flour.


Pathrode Dosa | Uppu Menasu Dosa | Uppu Khara Dosa

How to make uppu khara dosa / uppu menasu dosa / Pathrode Dosa recipe at www.oneteaspoonoflife.com
Pathrode Dosa is a pancake made with rice, spices and fenugreek or methi leaves. It is vegan and gluten free. 

Recipe Type:  Breakfast
Cuisine:            South Indian
Prep Time:     3 hours
Cook time:     30 minutes
Yield:                8 to 10


Ingredients:


1.5 cups Dosa Rice or any Regular Rice
1/2 cup grated fresh Coconut or 1 Onion
2 tsp Coriander Powder
3-4 dry Red Chillies or 3/4 tsp Red Chilli Powder
1/2 tsp Tamarind pulp
A handful of Fenugreek leaves or Methi leaves
1 cup Water
Salt to taste
Oil for frying

Method:


Soak the rice for 2 hours.
Drain out the water from the rice and grind it with very little water to get a smooth batter. Let it rest for 30 mins to 1 hour.
Grind together the coconut or onion along with the coriander powder, tamarind and the dry red chillies into a fine masala paste. Use 1/4 cup of water to help the grinding.
Wash the methi leaves thoroughly and chop it finely.
Add the masala paste and the chopped methi leaves to the rice batter.
Add salt and the remaining water and mix well.
Heat a griddle and grease it.
Once the griddle is hot, pour a ladle of the batter on to the griddle and gently spread it.
Cover and cook for 45-60 seconds on medium heat.
Spoon a little oil on the top and flip the dosa.
Cook for another 45-60 seconds or until the dosa is cooked through.
Serve hot.

How to make uppu khara dosa / uppu menasu dosa / Pathrode Dosa recipe at www.oneteaspoonoflife.com


Read more ...

Tondekayee Chutney | Tendli Chutney | Tindora Chutney


Today was Potluck at office. I took Dahi Kebab and Pathrode. My other friends got some really amazing dishes that I not only ate but packed in a box and got it home for dinner to share with my family.

How to make tondekai or tindora or tendli or ivy gourd chutney recipe at www.oneteaspoonoflife.com

Lunch was definitely my only extravagant meal of the week. I've been eating super simple food all week. More because the weather is just awesome and I cannot be coaxed out of bed to cook. It's been drizzling all through the week and it is cold outside. Perfect weather for snoozing, don't you think?

So what food does a lazy me cook or eat? Dosa and Chutney! I can eat that all week long and not get bored - true blue South Indian at heart and stomach. 

Let's get real, 50% of the taste of the dosa comes from its accompaniment, whether it is chutney or sambar. But I'm totally a chutney girl. So throughout this blog, you'll find me talking chutney many a times. And this Tondekayee Chutney is just one among my favorites. 

How to make tondekai or tindora or tendli or ivy gourd chutney recipe at www.oneteaspoonoflife.com


There is this little cart or gaadi near my house that makes awesome pillowy soft dosa and idli. It is a simple affair and very economical. The dosa is always served with 2 chutneys, a green coriander-coconut chutney and a red chutney. For a long time I believed the red chutney was made from tomatoes, so every time I made the chutney, I was always left wondering why my chutney tasted so different from his. I found out from Raj that the red chutney is actually made from ripe tondekayee (tendli | tindora | ivy gourd). The non foodie in the house knew more about chutneys than I did, what a shocker for me.

To make this chutney you need ripe tondekayee, the ones you usually throw away as they are squishy and mushy. Quarter the tondekayee and fry them up along with red chillies, garlic, chana dal (split bengal gram) and urad dal (split black gram). Grind it along with tamarind, salt, jaggery or sugar and a little water to a smooth chutney once the mixture has cooled. Add a tempering of mustard seeds and curry leaves, and enjoy your crispy hot dosa with this red chutney.

How to make tondekai or tindora or tendli or ivy gourd chutney recipe at www.oneteaspoonoflife.com

If you liked this, you may also like:


Tondekayee Chutney | Tendli Chutney | Tindora Chutney


How to make tondekai or tindora or tendli or ivy gourd chutney recipe at www.oneteaspoonoflife.com
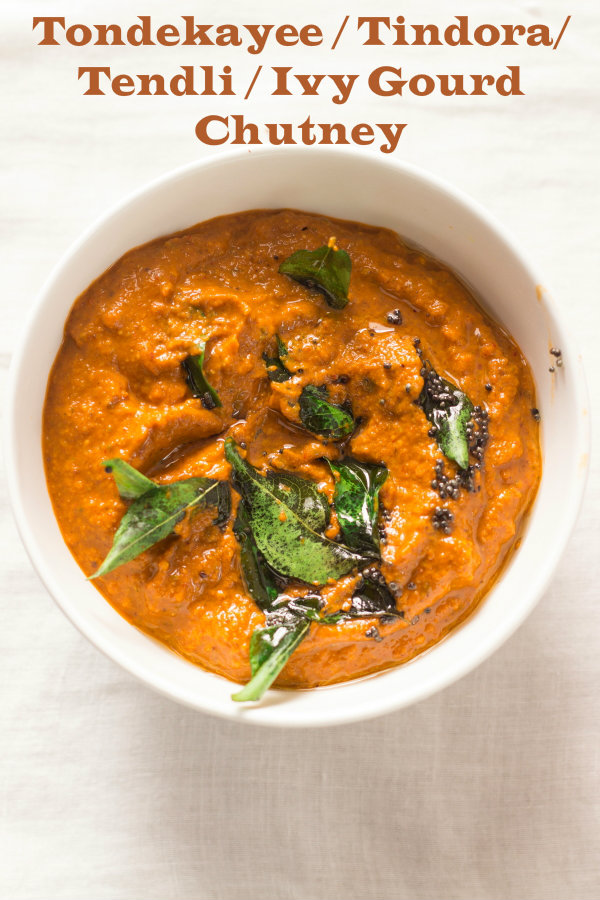
Tondekayee Chutney | Tendli Chutney | Tindora Chutney is a South Indian chutney made from ripe ivy gourd and mixed dals. 

Recipe Type:  Side
Cuisine:            South Indian
Prep Time:     10 minutes
Cook time:     20 minutes
Yield:                1 bowl


Ingredients:


18-20 ripe Tondekayee (Tendli or Tindora or Ivy Gourd)
2 dry Red Chillies
2-3 Garlic cloves, peeled and crushed
1.5 Tbsp Chana Dal
0.5 Tbsp Urad Dal
1 tsp Tamarind Pulp
1/2 tsp Jaggery powder or Sugar (Optional)
4-5 tsp Oil
1/2 tsp Mustard Seeds
1 sprig Curry Leaves
Salt to taste
Water as required

Method:


Wash and chop the tondekayee into quarters.
Heat oil in a pan.
Add the chana dal, urad dal and red chilli and fry for 2-3 minutes on low heat until the dals are slightly browned.
Add the garlic and chopped tondekayee and mix well.
Cover and cook for 8-10 minutes on low heat.
Remove from heat and allow to cool.
Grind the fried mixture along with tamarind, jaggery, salt and 2-3 Tbsp of water into a coarse paste.
Remove to a serving bowl.
Heat the remaining oil in a small pan and add the mustard seeds. Once they splutter, add the curry leaves and immediately pour this tempering onto the chutney.
Serve the chutney with rice or dosa.
It stays fresh for around 7 days in the fridge.


How to make tondekai or tindora or tendli or ivy gourd chutney recipe at www.oneteaspoonoflife.com

Read more ...

Savory Puffed Rice | Murmura Chiwda | Churmuri Chiwda | Khara Kadle Puri | Bhadang

It was such an awesome day to sleep in and do absolutely nothing...

How to make vegan murmura chiwda or churmuri chiwda or bhadang or khara kadle pure recipe at www.oneteaspoonoflife.com

Unfortunately, it was a Tuesday!! Working day, guys. 

There is nothing worse than having to work on a day as cold, humid and lazy as today. Well, may be getting stuck on an island with no chocolate is worse, but hey, let's stick to reality. 

There is also something about cold rainy days that gets my appetite worked up. I'm always HUNGRY... Well, I'm "always" hungry most other times as well, but this rainy day hunger is different. It is just not my stomach, but my heart and my head as well that craves all sorts of deep fried goodness and endless cups of piping hot tea.

How to make vegan murmura chiwda or churmuri chiwda or bhadang or khara kadle pure recipe at www.oneteaspoonoflife.com

I know deep fried food is bad especially when I've missed 4 days of my workout. The first was justified, I was super tired and my back ached. But the other 3 days were just plain laziness and excuses. So no matter how much the heart or the head craves, I let my guilty conscience take over and snacked on this Savory Puffed Rice (Murmura Chiwda | Churmuri Chiwda | Bhadang | Khara Kadle Puri) the whole day with at least 3 cups of tea. 

I've always loved Savory Puffed Rice,what's not ot love in it? It's crispy, it's light, it is spicy without being overpowering, and the best part - Peanuts, I make sure every handful has a minimum of 2 peanuts in it.

Savory Puffed Rice | Murmura Chiwda | Churmuri Chiwda | Bhadang | Khara Kadle Puri is plain salted puffed rice that has been mixed with a tempering of mustard seeds, curry leaves, peanuts, fried gram, dry red chillies, turmeric powder, salt and a little bit of sugar. See how easy that is? The list of ingredients may seem long, but the best part of making something from scratch is infact that you can omit what you don't want. Skip what you don't have. Just make sure you have turmeric and salt. A lot of people I know add a lot more ingredients like dried coconut slices or cashewnuts or fried garlic to their chiwda, but I prefer the basic one with just fried Peanuts.

The instructions to make this Savory Puffed Rice must be the shortest ever on One Teaspoon Of Life... All you need to do is, heat oil, and then add mustard seeds. Once they splutter, chuck in the peanuts and fried gram. Fry them until the peanuts are slightly browned, then add everything else and mix and pour onto the Puffed Rice or Murmura or Churmuri or Kadle Puri. Carefully (cause the oil is hot), mix everything until every grain of puffed rice is bright yellow. Initally use a spoon to mix, but later, just get your hands dirty and mix it. If you feel anything is lacking, like turmeric or you feel you need more peanuts ( I always feel I need more), just heat a little oil, add whatever is missing and pour that oil to the puffed rice and mix again.

This is just the basic snack, there is so much more you can do with it. You can use it as a base for Bhel Puri instead of plain murmura or chop up some onions, tomato and coriander, mix well and enjoy a quick fresh snack. It also makes a great travel snack - a lot of vegetarians travelling abroad usually carry it or like me, you can just snack on it when stuck in traffic on your way back from work (and you don't have to even feel guilty about it)

How to make vegan murmura chiwda or churmuri chiwda or bhadang or khara kadle pure recipe at www.oneteaspoonoflife.com

Store it at room temperature in an air tight box and it will easily last you 3-4 weeks. 

Savory Puffed Rice is easily available at local stores, but I've found that many a times, the store bought one smells like old oil. Also, they skimp on the peanuts and load it up with dried coconut or sugar, both of which I don't enjoy. I assure you, what you make at home is definitely better than the one at the store.

There is just one thing you need to remember, use the crispiest puffed rice (murmura | churmuri | kadle puri) you can find. And preferably one that does not have sand in it. If you are based out of Bangalore, I highly recommend the one from Nilgiris, it's the best I've found till date - clean and crisp and it stays crisp longer.

How to make vegan murmura chiwda or churmuri chiwda or bhadang or khara kadle pure recipe at www.oneteaspoonoflife.com

If you liked this, you may also like:


Savory Puffed Rice | Murmura Chiwda | Churmuri Chiwda | Khara Kadle Puri | Bhadang


How to make vegan murmura chiwda or churmuri chiwda or bhadang or khara kadle pure recipe at www.oneteaspoonoflife.comSavory Puffed Rice | Murmura Chiwda | Churmuri Chiwda | Khara Kadle Puri | Bhadang is a simple crispy snack made by mixing plain puffed rice with peanuts and spices.

Recipe Type:  Snacks
Cuisine:            South Indian
Prep Time:     5 minutes
Cook time:     20 minutes
Yield:                200 gms

Ingredients:


200gms salted Puffed Rice (Churmuri / Kadle Puri/ Murmura)
1/3 cup Oil
4-5 Tbsp Peanuts
1 Tbsp Fried Gram
1 sprig Curry leaves
1/2 tsp Mustard Seeds
1 tsp Turmeric Powder
4-5 dried Red Chillies
1/4 tsp Red Chilli Powder
1/2 tsp Sugar
Salt to taste

Method:


Pour the puffed rice to a large bowl or onto newspapers and keep aside.
Heat oil in a small pan and add the mustard seeds.
Once the seeds splutter, add the dry red chillies, peanuts and the fried gram and fry until the peanuts are slightly browned.
Add the curry leaves, turmeric powder and salt.
Allow it to cool for 1-2 minutes and then pour onto the puffed rice. Add sugar and red chilli powder.
Using a spoon mix the oil with the puffed rice until the mixture is cool enough to handle with your hands.
Now using your hands, mix well until every grain of puffed rice is bright yellow.
Adjust the salt and sugar as required.
If you feel the need to add anything else like turmeric powder or peanuts or curry leaves, heat a little more oil and add the ingredient to it and then add it to the puffed rice. Mix well.
Store at room temperature in an air tight container after it cools.


How to make vegan murmura chiwda or churmuri chiwda or bhadang or khara kadle pure recipe at www.oneteaspoonoflife.com

Read more ...

Avarekalu Uppit | How to make Hyacinth Beans Upma


Avarekalu Uppit or Upma is a basic South Indian breakfast made by cooking toasted semolina in a vegetable broth containing boiled Avarekalu or Hyacinth beans.

avarekalu avarekaalu uppit upma hyacinth beans semolina rava suji sooji


I had a nice chat with one of my friend's in the bus yesterday. We were chatting away about food, we are both obsessed foodies and were super hungry by the time we reached halfway, thanks to our little chitter chatter. During our extremely animated food talk, we realized some universal truths:

  •  "What to cook?" is a more exhausting question than actually cooking that "What" on a daily basis
  •  Every Indian mother thinks their children should stop cooking "Special" dishes and learn to make the basic mundane daily food.
Do you agree with me? Or have some more universal truths? Leave me a comment and we can discuss it in length.

avarekalu avarekaalu uppit upma hyacinth beans semolina rava suji sooji

"What to cook next week?" is a regular question I ask myself and the people around me every weekend so I can stock up on the raw material. And pretty much every woman I ask, asks me back the same question. Sigh

And the second point takes me back almost 15 years in time when I was still living with my parents and had recently discovered I love to cook. I'd flip through the magazines at the library and find some new recipe and rush home to try it. And my mom had just the same response my friend's mom had - Learn to cook basic everyday food and then learn the "Specials". 

The wisdom in those words dawned on me much later in life when I moved to Bangalore for a job and had to eat out everyday. I craved for simple home cooked meals like my mom made. So now I balance my simple meals with my special meals. And sometimes, I mix the two.

avarekalu avarekaalu uppit upma hyacinth beans semolina rava suji sooji

This Avarekalu Uppit is my version of special and simple, all combined together. Avarekalu or Hyacinth beans are extremely seasonal and make their appearance for a short time in the winter. Imagine my surprise when I found street vendors selling it at this time of the year. I had to pick them up. Addition of avarekalu made my simple uppit, special for me. 

Avarekalu is a local name for Hyacinth beans. They have a very subtle delicate flavor. In winter, there is a fest dedicated just for Avarekalu in Bangalore where the creativity of the chefs is displayed as they make anything and everything using avarekalu. Ah! Simple special moments in life!!!

Uppit or Upma is a dish usually had for breakfast in South India. It is made my cooking toasted semolina or rava in a vegetable broth. You can make uppit with just onions and tomatoes or load it up with veggies like carrots, peas, green beans, cabbage, capsicum or like in this recipe - Avarekalu. To make a simple Avarekalu Uppit, you can skip all the other vegetables except the avarekalu, onion and the tomato.

avarekalu avarekaalu uppit upma hyacinth beans semolina rava suji sooji

You may also like to check out the recipes for Uppit/Upma or Avarekalu Saaru.


Avarekalu Uppit or Hyacinth Beans Upma


avarekalu avarekaalu uppit upma hyacinth beans semolina rava suji soojiAvarekalu Uppit or Upma is a basic South Indian breakfast made by cooking toasted semolina in a vegetable broth containing boiled Avarekalu or Hyacinth beans.

Recipe Type:  Breakfast
Cuisine:            South Indian
Prep Time:     20 minutes
Cook time:     30 minutes
Yield:                Serves 2

Ingredients:


1 cup Semolina or Rava or Sooji
1/2 cup Avarekalu
1 small Carrot
6-8 Green Beans
1 small Potato
1 Onion
1 small Tomato
1 sprig Curry leaves
1-2 Green Chilli
1/2 tsp Mustard seeds
2.5 cups Water
4-5 tsp Oil
Salt to taste
1 tsp Lemon juice
2 Tbsp finely chopped Coriander leaves for garnish
1 Tbsp grated fresh Coconut for garnish

Method:


In a kadhai or pan, toast the rava for 4-5 minutes on low heat until fragrant.
Chop the onion, beans, carrot, potato, tomato and the chillies.
Heat oil in a kadhai and add the mustard seeds. Once they splutter, add the curry leaves.
Immediately add the onions and green chillies and fry until the onions are translucent.
Add the other vegetables along with the avarekalu to the kadhai and stir for 1-2 minutes.
Add the water and cover and cook until the avarekalu and the beans are cooked.
Add salt.
Add the rava while stirring continuously to avoid forming lumps.
Cover and cook on low heat for 3-4 minutes.
Turn off the heat and allow the uppit to rest for another 5 minutes.
Now add the lemon juice and garnish with coriander and coconut and mix well.
Serve hot.


Read more ...

Instant Ragi Dosa

Continuing with my Instant recipes with this Instant Ragi Dosa. It is an instant dosa or crepe  made with rava or semolina and ragi flour (finger millet flour).

How to make instant ragi dosa or finger millet crepe at www.oneteaspoonoflife.com

As much as I love Bangalore, I also love getting out of Bangalore once in a while. There are but only a few roads that lead out. One of them is the Mysore road. I'm not too fond of the Bangalore-Mysore highway. Too many speed breakers and way too many vehicles. Barely feels like you have left Bangalore. But it has some silver lining, in the form of the various eating joints all along the way. There is this Kamat restaurant on the way where I first ate the Ragi Dosa. And it was love at first bite. Crispy dosa served with some coconut chutney. I'd never imagined Ragi could taste sooo good.

I'd had ragi in the form of Ragi Rotti or the Ragi Mudde, but never the Ragi Dosa. I simply loved it and when we came back, I was off to buy Ragi Flour to make it. Ragi Dosa is made exactly like the Rava Dosa, only the rice flour is replaced with ragi flour.

How to make instant ragi dosa or finger millet crepe at www.oneteaspoonoflife.com

Ragi Dosa is perfect for those mornings when you haven't planned ahead for breakfast. All you do is mix stuff together and throw them on a hot griddle or tava. Yup no spreading it with love like the regular Dosa or pancake, you have to throw it on and let it take the shape it likes. No obsessing over the round shape. 

It is also perfect for that 5pm hunger of mine. A great alternative to all that fried stuff around. 

Making awesomely crispy Ragi Dosa requires patience, something I lack, so sometimes I'm just okay with soft ones. But I have the following tips to making a great Ragi Dosa. The same work for Rava Dosa as well.

  • Mix and make the dosa immediately. Do not leave it to soak. Soaking allows the rava or semolina to soak up all the water and it won't get crisp.
  • The batter needs to be thin. Make a few and try, you will know if you need to add more water. The consistency should be similar to that of buttermilk.
  • Pour the batter when the tava or the griddle is really hot and then lower the heat and leave it to crisp up.
  • Don't skimp on the oil. The dosa needs oil to crisp up, at least 1-2 tsp per Dosa. Oil-less Ragi Dosa is just not as tasty. 
  • I add onions, curry leaves, cumin seeds, coriander leaves and chilli. A well seasoned Ragi Dosa does not even need any accompaniments, it tastes delicious on its own. All these are optional and you can leave them out to make a plain Ragi Dosa

How to make instant ragi dosa or finger millet crepe at www.oneteaspoonoflife.com


How to make instant ragi dosa or finger millet crepe at www.oneteaspoonoflife.com
Buttermilk consistency Batter
How to make instant ragi dosa or finger millet crepe at www.oneteaspoonoflife.com
Spoon the mixture on a hot tava. Flip when browned.


Instant Ragi Dosa


Instant dosa made with Ragi flour and Semolina

Recipe Type:  Breakfast
Cuisine:            South Indian
Prep Time:     10 minutes
Cook time:     30 minutes
Yield:                5-6 Dosas

Ingredients:


1/2 cup Semolina (Rava)
1/4 cup Ragi flour
1 Tbsp All purpose flour (Maida)
1 Tbsp Yogurt (Curd)
1 small Onion (finely chopped)
5-6 Curry leaves
2 Tbsp Coriander leaves (chopped)
1 tsp Red chilli powder
1 tsp Cumin seeds
1.5 cups Water
Salt
Oil for frying

Method:


Mix together all the ingredients except oil and whisk until free of lumps
Heat a tava and grease it
Pour spoonfuls of the batter on the tava
Allow it to cook on low flame
Spoon oil on the dosa
Once the dosa is cooked, it will leave the sides of the tava, else use a spatula to loosen the dosa from the tava
Flip and cook for 1 minute
Serve hot with chutney


Read more ...

Instant Rava Idli


I had an INDULGENT weekend. I-N-D-U-L-G-E-N-T!!!

I'm spelling out stuff, so I guess you get the picture.

Spicy Biryani lunch, Cheesy Pasta for dinner, Deep fried Bread Rolls for snacks and a heavenly TRIPLE Chocolate Milkshake, I’ve had it all. And I cooked none of it. Nada. 
I’m sure it will take me a month to work it off. Sigh!!

How to make MTR style instant rava idli at www.oneteaspoonoflife.com


All those guilty pleasures made me want to eat a healthier breakfast this Monday morning. I’d never been a Rava Idli fan, regular Idli, give it to me anyday and I’ll eat it. But I wondered why would one eat that hard lump of rava (semolina) for any meal? This was until I made my own.

Eye opener – Rava Idli does not have to be a hard lump. It can be soft like the regular rice Idlis. It can actually be delicious.

All credit goes to Gee, my sis. Someday she got the MTR instant rava idli packet and made it and repeatedly kept telling me how good they had become. MTR is a legendary restaurant in Bangalore that actually invented the Rava Idli when there was food shortage during a war. A place you should visit for some rich South Indian food.

The restaurant rocks, but I won’t accept defeat from a packet. Na-ah.

How to make MTR style instant rava idli at www.oneteaspoonoflife.com

So I made just to show her that she can make equally good Rava Idlis with just the ingredients she has at home. I had no plans of liking them at all. It was just a competition with the packet, that’s IT. (I'm competitive that way). At least that’s what I thought, until I ate them. I mean if I make them, I have to taste it, right? And what a pleasant surprise it was. Soft smooth Rava Idli. And so easy to make as well. No overnight soaking, no overnight fermenting. Just mix and steam.

I'm always on a lookout for breakfast recipes. And they obviously have to be HEALTHY and EASY to make. These Rava Idlis satisfy all my criteria. So they have been back on the menu time and again since that day. 

How to make MTR style instant rava idli at www.oneteaspoonoflife.com

Some additional steps that you may have to do if making your own healthy Rava Idlis, and it is totally worth it:

  • Toast the Rava / Semolina - You can either toast it when you decide to make the Rava Idlis or you can toast the rava whenever you have time and store it. Toasting helps increase the shelf life of rava. You can then use it instantly while making Upma too.
  • Grate a carrot, Chop a chilli - Yup, you will need to grate a carrot and chop some chilli and coriander. 
  • Tempering - Heat a little oil, throw in some lentils (dals), mustard seeds, curry leaves and chilli. This is seriously a 10 seconds job.
  • Mix once - Mix tempering with the rava.
The rest is exactly like the packet. Mix in the ingredients. Allow it to rest for some time. Then steam them as usual. Ta-da - Instant soft smooth Rava Idli.


Instant Rava Idli


How to make MTR style instant rava idli at www.oneteaspoonoflife.comPopular South Indian instant steamed breakfast cakes made from semolina or rava and yogurt.

Recipe Type:  Breakfast
Cuisine:            South Indian
Prep Time:     30 minutes
Cook time:     30 minutes
Yield:                8 Idlis

Ingredients:


1.25 cups Semolina or Upma Rava
1 cup Yogurt (Curd)
1 small Carrot
1/4 tsp Baking Soda
2-3 tsp Oil
1/2 tsp Mustard seeds
1 tsp Urad Dal
1 tsp Chana Dal
8-10 Curry leaves
1 Tbsp chopped Coriander leaves
1 chopped Green Chilli
1/2 cup Water
Salt to taste 
Oil to grease

Method:


Toast the rava in a kadhai on low flame for 8-10 minutes. Stir frequently to avoid burning. Remove it into a large bowl once done.
Heat oil in the kadhai and add mustard seeds to it.
Once the mustard seeds splutter, add the urad dal and the chana dal.
Once the dals brown slightly, add the curry leaves and chilli. Pour this tempering to the toasted rava.
Mix well and allow to cool.
Once the rava has cooled, add grated carrot, yogurt, chopped coriander, baking soda and salt and mix well.
Add water by the spoonful. The consistency of the batter should be similar to the regular idli batter.
Leave aside for 10-15 minutes.
In the meanwhile, prepare the idli steamer. The water in the steamer should be boiling when we put in the idli, else the idli will become hard.
Now grease the idli mould, and pour in the batter.
Steam for 10-15 minutes.
Serve hot with chutney or sagu.


Read more ...