Travel to North East India - Meghalaya


Itinerary, tips, what to shop for, where to eat and things to know before you go for a 10 day trip to North East India including the states of Meghalaya, West Bengal and Sikkim.


After many debates, discussions and online searches later, we finalized our 2019 vacation destination as North East India. It was a vacation I had done ten years ago with my parents and chose to repeat the same with Raj.

The North East has been blessed with natural beauty - the towering Himalayas, the clear rivers, white waterfalls, varied wildlife, diverse fauna, clear blue skies, fresh hilly air, and clouds. Ever since my first visit in 2009, I had been craving to take Raj there. And finally, we made it this year. And we have some more trips planned based on our current experience.

This travel post (like all my travel posts) is divided into 3 parts so that I can detail out our itinerary, the sights to see, places to eat perhaps, our plans and misses, and how I would replan it for the future.

Our overall itinerary:


Day 1 - Travel from Bangalore to Guwahati by flight. Then drive down to Shillong.
Day 2 - Sohra (Cherrapunji) sightseeing
Day 3 - Mawlyngong and Dawki
Day 4 - Drive back to Guwahati. Fly to Bagdogra. Hire a cab to Darjeeling.
Day 5 - Kalimpong sightseeing
Day 6 - Darjeeling sightseeing
Day 7 - Take a cab to Gangtok.
Day 8 - Nathu La Pass
Day 9 - Gangtok sightseeing
Day 10 - Take a cab to Bagdogra. Fly back to Bangalore.


This post details our travel and stay in the state of Meghalaya.

Meghalaya


Meghalaya means the abode of clouds. And true to its name, that is exactly what it was. You can love it or hate it, but you just cannot ignore the clouds. Sometimes we were mesmerized by them, sometimes we wished they would all go away, just for a day. It has often been referred to as the Scotland of the East.

The state of Meghalaya was carved out of Assam in the year 1972. Shillong is the capital of Meghalaya. Meghalaya is flanked by Bangladesh on its west and south. It is also home to the wettest places on Earth - Sohra (Cherrapunji) and Mawsynram.


Our Journey: Day 1: Shillong


We took an early morning direct flight to Guwahati, Assam from Bangalore. Shillong has an airport too, however, it doesn't have a direct flight from Bangalore and we would need to hop flight at Kolkata. Guwahati worked in our favour as we were able to rent a self-drive vehicle from there, something that is still not available in Shillong.

Our original plan was to reach Guwahati early, pick up our Zoomcar (self-drive), visit the famous shakti peetha - Kamakhya in Guwahati and then proceed to Shillong, which is a 2.5 hour drive. And if there was still daylight, we planned to see a few places in Shillong. But things went wrong from the moment we landed in Guwahati. The location provided by the Zoomcar app took us to a drain 27kms away from the airport. We had booked a car from a location closest to the airport (4.5kms) as we did not get an airport pickup. Their customer service center kept telling us they had technical issues so they could not help us. We finally managed to get a vehicle from them even further away from the Airport (30kms) and that too 3 hours later. This meant we had to forego visiting Kamakhya as that had already closed for the afternoon and also, we had no daylight when we reached Shillong.

Zoomcar 

We had a very harrowing experience that I have not detailed here. To avoid something similar, I suggest booking a car well in advance and to only take an airport pickup in an unknown city. Otherwise, you may be better off just hiring a cab instead of taking unnecessary stress like we did. Also, it isn't as easy as it sounds. There is a lot of process to gain access to the car that they have for security reasons, but sometimes that plays out negatively. The car we got couldn't be locked/unlocked by the app and we had to call up their call center, who in turn had to get the owner of the car to unlock it for us. The only positive was, the car was decent and Zoomcar reimbursed all our uber receipts for the inconvenience. Unfortunately, we lost a lot of time and also missed out on visiting places that we had planned.

If everything had gone right, this is what we would have accomplished on day 1:
  • Pickup car at 11am.
  • Reach Kamakhya temple by 12pm. The temple is closed between 1pm to 2.30pm.
  • Have lunch and start for Shillong by 2pm.
  • Reach Shillong by 5pm. See Umiam lake on the way.
  • Explore the local markets and cuisine.
We managed to see the Umiam lake but skipped the temple. Umiam Lake or Barapani Lake is a huge man-made lake on the outskirts of Shillong. Since it is almost 15kms away from the city, it makes sense to cover it on the way in or out of the city, unless one plans on enjoying the water sports available there. There are several viewpoints near the lake which offer picturesque views, make sure to stop at one. There are small shops near these viewpoints that sell you tea, pakodas, aloo chops, maggi and cane knick-knacks. We tried the aloo chops at one of these and they were heavenly. We also picked up some cane vases and cups as souvenirs. 

We had booked Hotel M Crown, bang in the middle of Police Bazaar. I could play devil's advocate for the location of the hotel - it was right next to the market, but that made it a nightmare to reach it. Read my review of the hotel on TripAdvisor. We reached Shillong by 6pm and it was already pretty dark, but Police Bazaar was alive with its hawkers and shops. We managed to battle our way through the crowd and take a glimpse of the market. We also managed to eat momos on the street and rich Bengali sweets from Delhi Mistan Bhandar. We also finished our souvenir shopping of cane goods and fridge magnets. 

Sights to see in Shillong:

  1. Umiam Lake -  We visited this on our way to Shillong on Day 1.
  2. Elephant Falls - Elephant falls is on the way to Sohra/Cherrapunji. It is a 3 level water fall. We visited this on Day 2
  3. Shillong Peak - Highest point in Shillong from where one can view the entire city. We planned for it but it was closed by the time we reached there. It is open from 9am to 3.30pm.
  4. Ward's Lake - A large lake in the middle of the city with a small garden on the side. You can do boating here. We visited this on Day 2
  5. Lady Hydari Park with a small zoo
  6. Museums - There are a few museums in the city related to air force, military and local culture. 
  7. Churches, Temples and Mosques 
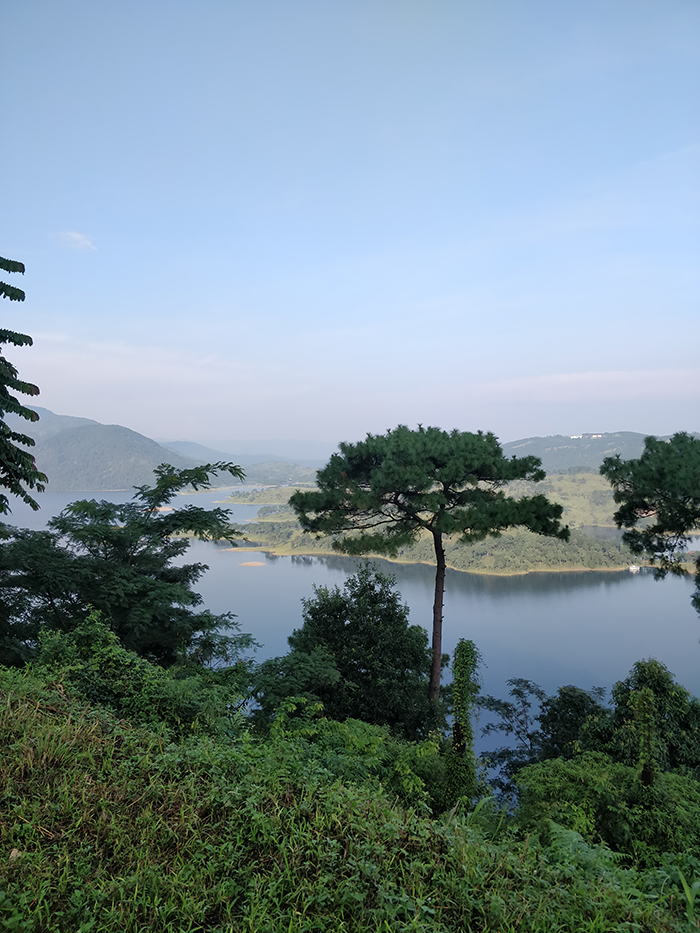


Umiam Lake

Elephant Falls
Ward's Lake

Day 2: Sohra/Cherrapunji


We started early for Sohra or Cherrapunji. Sohra is the local name and Cherrapunji is a British corruption of it. Locals prefer it being called Sohra, so Sohra it is. We started at 6.30am from the hotel towards Sohra. Sunrise happens early here, around 5am, so it was bright daylight when we started. If breakfast is included in your hotel stay, ask for a boxed breakfast the night before, most hotels will keep it ready for you. If you eat eggs, then head to police bazaar for a quick egg and roti breakfast. Else, you can eat at Nongkhlaw Cafeteria on the way. We got some aloo paratha and puri bhaji there along with some really good ginger tea.

We then continued our sightseeing in the following order:

  1. Duwan Sing Syiem View Point - Dress up in local Khasi clothes here for Rs.100 per person and take photographs. View the lush green valleys from the viewpoint.
  2. NohKaLiKai Waterfall - This is the part where we hated clouds. Fog like clouds covered the falls and we barely got a glimpse after a good 30-minute wait. We bought some cinnamon here and a local snack of sweet almonds - tasted like some sweet flour coated peanuts. 
  3. Seven Sisters Waterfalls - Again, clouds covered these and it was a test of patience as we waited in the hope that it would clear. They finally did clear and the sight was breathtaking.
  4. Ecopark - This park is located at the origin of the Seven Sisters Waterfalls. Worth the visit.
  5. Wah-Kaba Falls - You can stand near a waterfall here, hence, we loved it. 
  6. We also returned to Shillong by 4pm so we covered Elephant falls and Ward's Lake in Shillong too. 
  7. Shillong Peak closes at 3.30. If you are not hampered by clouds in Sohra, you can manage to cover this on the same day as well.

Other sights to see in Sohra:

  1. Mawsmai Caves - Dimly lit limestone caves. I visited this in 2009 and didn't personally find it special, hence skipped it. There are sections in the caves that are narrow and you may need to squeeze through. Also, be aware that the caves have a strong odor due to the natural mineral deposits.
  2. Double Decker Root Bridges - Definitely a must-go if you are physically fit. The trek to go here involves going down 3500 stairs to see the bridges and climbing back up the same stairs to get back to your car. If you plan to visit these, it is better to halt at Sohra for the night and go here early as this may take a good 2-3 hours to visit.
  3. Rainbow falls - A short trek from the double decker route bridges. If you visit the bridge, then plan for this too.
  4. Wei Sawdong Waterfalls - View 3 levels of waterfalls if you have the courage to bear the bad roads. We planned it and skipped it after traveling a few kilometers off the main highway. The bumpy ride wasn't for us.
Duwan Sing Syiem View Point 
Khasi Dress
NohKaLiKai Waterfall

Seven Sisters Waterfalls


Ecopark
Wah Kaba Falls


Day 3 - Living Root Bridge, Mawlynngong and Dawki:


We had a scrumptious breakfast at the hotel and started day 3 around 8am. Personally, I'd say start earlier as the roads are not good and they slow you down. We wanted to cover three places on our trip in the following order:

  1. Living Root Bridge - If you skipped the double decker root bridge like us, you can visit this one. This is a short 15-minute walk from the parking. It does involve stairs, but much fewer than 3500. The point where the road deviates from the highway is narrow, surrounded by thick foliage, has no cell reception in most places and is full of pot holes. It is a bumpy ride of 13kms that easily took us upwards of 45 minutes. But the sound of the river is calming and the feat of engineering is humbling. 
  2. Mawlynngong - Declared the cleanest village in Asia in 2003, it is only 2kms from the Living Root Bridge. The villagers are extremely conscious about cleanliness and the tourists are also expected to be so. There is a nice bamboo tree top viewpoint, which was under maintenance when we went, but appears to be nice if functional. We ate lunch at the village square and it was a simple yet good meal.
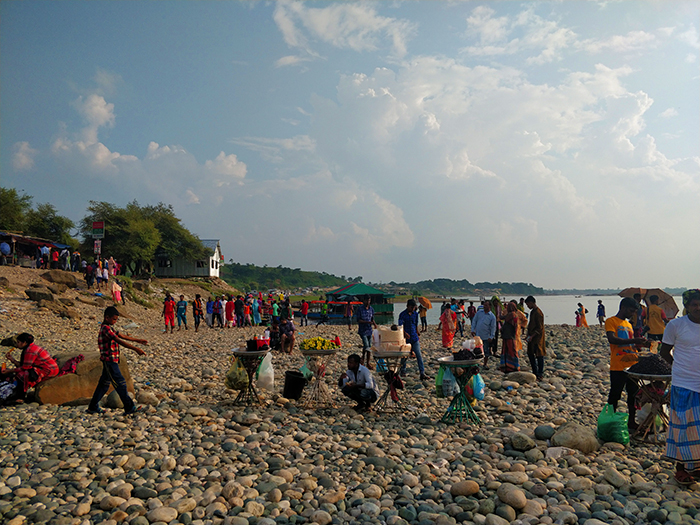
  3. Dawki - If the time is right, the waters are clear. Dawki is located on the India - Bangladesh border and is famous for the illusion of boats floating in the air when the water is clear. The time to witness this is from November to April. The water was green when we went and we didn't mind it at all. The water turns muddy brown during monsoons and is not recommended at that time. There are several boating locations as you near and you will find agents pouncing on your car asking if you want to go boating. We went to the absolute end near the border and chose to go boating from there. It cost us Rs.700 for one boat. Life jackets are provided. The rowboat is taken until a small island where the water is clear and you are given time to take photographs and to soak your feet in the clear and cold water. As per Raj, this was the highlight of the entire trip for him, so I guess something went right here. You can also see the plains of Bangladesh from here.
The drive back was slightly scary as night had fallen by the time we were negotiating the hills and it turned all foggy and cloudy. The visibility was near zero and the rain didn't help much either.
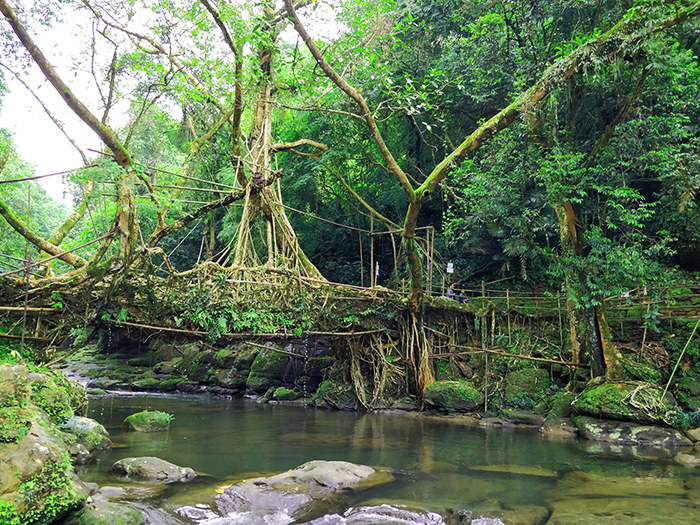
Living Root Bridge


Mawlynngong
Mawlynngong
Dawki

Dawki

Zero Point - India Bangladesh Border at Dawki

If we were to replan:

  • Number of days - 2 days is definitely not enough to absorb the beauty of Meghalaya. If we were to replan, we'd add in at least 3 more days to the trip and include a visit to Kaziranga National Park in Assam. It is 4 hours from Guwahati. Kaziranga is closed for the general public from May to October every year.
  • Time of travel - We definitely want to see the clear waters of Dawki, and would hence plan this during November or December. I would not recommend closer to the summer as the waterfalls may dry up. 
  • We would stay at Sohra for the night and cover the double decker root bridges for sure.

What to buy:

  • Chillies - North East India is famous for its extremely spicy chillies. Buy them at the market at Police Bazaar. This may be seasonal.
  • Apples - We got some amazing crisp apples here. It may be seasonal though.
  • Pickles - Loads of local pickles on sale here in various quantities - chillies, local fruit, bamboo and fish. Take your pick.
  • Cane products - Bamboo grows in abundance here and hence, they have a lot of cane ware for sale - bowls, vases, baskets. 
  • Long lemons and other local vegetables - I loved the lemons and bought home a few. They are served in all restaurants and they tasted different to me. I also saw a lot of different vegetables that I would buy if I were heading home straight from Shillong.
  • Spices - The shops in Sohra sell spices, I picked up some fragrant cinnamon.
  • Shawls and Jackets 
Chillies for sale at Police Bazaar
Shop for pickles and spices at Nohkalikai Falls

Where to eat:

  • Red Rice Restaurant - If you want to try local Khasi cuisine, head here. We tried our luck on two days and managed to get a vegetarian thali on day 2. It was a simple fare, but delicious.
  • Delhi Mistan Bhandaar - If you love sweets, you have to go here!! I loved their sweets. It may be one of the best sweet shops I've ever visited. Try their special sweet, you won't regret it. Skip the nimkis (too salty for my liking).
  • Trattoria - A small hole in the wall in the market that serves local food and is frequented by locals too. It closes at 8pm and I'm not sure it serves veg food. Ask before settling it. Vouched for by most people online for non-vegetarian food. 
  • We also tried Lamee and the restaurant in M Crown Hotel, and preferred the latter. The service in Lamee was slow and the food was average.
  • Momos on the street were average, you can try it once though. 
  • Police Bazaar circle offers a lot of variety in non-vegetarian food - there is biryani, jadoh, momo, kebabs, chops, fried goodies etc. Judging by the looks of it, these are extremely popular with locals, so it must taste good. Try if you are adventurous and non-vegetarian.
  • The same circle offers roti and masala boiled eggs in the morning. You can give that a try too.
  • Wahrisaw restaurant- We ate a simple thali lunch here when at Sohra and it was good.
  • Dapbiang Restaurant - Again, we ate a thali here when were at Mawlyngong. The salsa that accompanied our meal was spicy and full of flavor.
  • Tea near the boating counter at Dawki - This has to be the best tea I've had in a restaurant. Absolutely loved it.
  • Berries from Bangladesh - Give it a try at Dawki if you are feeling adventurous. I did not really like them, but you may.
  • Ja and Cha shops - There are several Ja cha shops all along the highway. Ja means rice and Cha means tea. A simple ja meal is rice, dal, one vegetable (usually okra/bhindi) and one boiled egg if you want. If you want to eat like locals, pop into one of them.
Clockwise from L-R - 1) Sweets at Delhi Mistan Bhandar, Meal at Mawlynngong, Meal at Sohra, Manchow soup at Lamee, Aloo Paratha at Nongkhlaw Cafeteria

 1) Tea at Dawki 2) Khasi meal at Red Rice, 3) Long lemon 4) Sweets at Delhi Mistan Bhandar 5) Sweet almonds

Things to know before you go:

  • Sunset happens very early in Meghalaya. Expect it around 4-5pm in the winter months.
  • Restaurants close early - 8pm to 10pm. Head for an early dinner.
  • Language is not a problem at all. English is the official language of the state and almost everyone speaks Hindi.
  • Street food is mostly non-vegetarian. Ask before you eat.
  • Shillong has a lot of one-ways and Google maps isn't accurate. Ask the locals for directions. Do NOT rely on Google maps.
  • Be aware that Shillong has a lot of traffic jams. It may easily take you 1 hour to cover 4kms in the evenings. 
  • The highway is prone to landslides during monsoons. Be cautious.
  • The city has extremely narrow roads, drive carefully.
  • The state is proud of its cleanliness, there are a lot of dustbins all over the tourist places as well as restrooms (they are well maintained mostly). Use them and do not litter on the streets.
  • All major festivals are celebrated in Meghalaya, so it is better to avoid visiting during Durga Puja, Diwali and Christmas unless you love crowds.
  • Most of the sights in Shillong are closed on Sundays. Ward's lake is closed on Tuesdays. Plan accordingly. 

Useful links:

Meghalaya Tourism Official Website - http://megtourism.gov.in/
Kaziranga National Park Official Website - https://www.kaziranga-national-park.com/
Our favorite website to compare flights - https://www.cleartrip.com/
Our favorite website to book hotel - https://www.agoda.com/
For details on Kamakhya temple - https://www.maakamakhya.org/
Read more ...

Kaju Katli Recipe | How to make Kaju Katli | Vegan Cashew Fudge Recipe [Video]


Kaju katli or kaju barfi is a diamond shaped soft fudge made from cashew nuts. It is a popular Indian sweet. Perfect to gift family and friends.

In a hurry? Jump to Video or Jump to Recipe

kaju barfi recipe, Indian cashew fudge

Deepavali is here!!

Deepavali or Diwali always brings with it the air of festivity. Deepas or lamps everywhere, akash kandils in the balconies, colorful rangolis near the threshold, brand new clothes and delicious sweets and savories. With such fervor in the air, it is hard not to celebrate.

The best part of Diwali for me has always been the sweets and savories. People painstakingly spend hours making an array of snacks to fill up boxes and on the day of diwali these are distributed between friends and family. While I always saw my mom do this when we were kids, I had never done so, until last year.

Last year for deepavali, I went to my childhood home and did just that. I made crispy Chakli and this delicious Kaju Katli. Kaju Katli is a sweet that everyone loves. It is generally mildly sweet and has a delicate flavor of cashew nuts. Kaju Katli is gluten free and can be vegan too. The version I make is always vegan, but some recipes I know call for the addition of milk or milk powder.

While the recipe looks simple, it really isn't. So don't fret if it doesn't work out for you the very first time you try. The first time I made it, the sugar syrup was not the right consistency and we ended up eating kaju halwa for a few days. That was delicious too.

kaju barfi recipe, Indian cashew fudge

What is Kaju Katli


Kaju Katli is cashew nut fudge, in simple words. It is a very popular Indian sweet that is sold worldwide and it can made from just three ingredients - Cashew nuts, Sugar and water. Some recipes call for milk, milk powder or condensed milk, but if you want a vegan recipe, you are in the right place.

Kaju Katli is a sweet that is commonly distributed for all celebrations from birthdays to promotions to festivals. Also, since it is a dry sweet that has a greater shelf life than most milk based sweets, it also makes for a good gifting option.

Kaju Barfi is a sweet similar to Kaju Katli but is made slightly differently and uses milk and milk solids. The names are used synonymously several times, so don't get confused. Kaju katli is usually thin - somewhere about 3-5mm in thickness while a kaju barfi is thicker.

kaju barfi recipe, Indian cashew fudge


Tips for making the best Kaju Katlis:


Some important notes and learnings from my mistakes, just to help you a little:

  1. Use everything at room temperature. Refrigerated cashew nuts will mess up the recipe, so keep them out overnight if you store cashew nuts in the fridge. 
  2. Pulse the grinder to powder the cashew nuts. Grinding them for too long will lead to cashew nuts leaving their oil and making them unusable.
  3. Sieve if you want to, or just skip it. Small bits of cashews just give the kaju katli a rustic feel and they are really not very noticeable in the end product.
  4. If you have some large chunks of cashew nuts that just won't grind fine enough, add as little water as possible and blend them to a puree.
  5. You need the sugar syrup at the right consistency. Use the water bowl trick mentioned in the video and the recipe to check for the right consistency.
  6. If the sugar syrup has gone beyond the required consistency and the dough looks brittle and forms hard lumps after removing from heat, allow it to cool a little, and then pulse it in the mixer until all lumps are broken and you get a fine powder. Knead this powder along with milk or water to get a smooth dough.
  7. You have to knead the dough while it is still hot. Use gloves if required.
  8. Do not knead the dough too much, it will release its oil and while it is still edible, the kaju katli will not have the same mouthfeel as the store bought ones.

kaju barfi recipe, Indian cashew fudge

If you made this recipe, let me know! Leave a comment here or on Facebook tag your tweet with @oneteaspoonlife on Twitter and don't forget to tag your photo @oneteaspoonoflife on Instagram. You can also email me at onetspoflife@gmail.com I'd love to see what you are up to.

If you like this recipe, do not forget to share it with your friends and family! 


You can follow One Teaspoon Of Life on FacebookTwitterInstagramPinterest or you can subscribe to One Teaspoon Of Life and receive all the latest updated via Email


Video Recipe


--------------------------------------------------------------------------------------------------------------------------

Kaju Barfi Recipe | How to make Kaju Katli

kaju barfi recipe, Indian cashew fudge

Kaju katli or kaju barfi is a diamond shaped soft fudge made from cashew nuts. It is a popular Indian sweet. It can be made vegan.

Recipe Type:  Dessert
Cuisine:            Indian
Prep Time:     15 minutes
Cook time:     45 minutes
Total time:     55 minutes
Yield:                12-15

Ingredients:


1 cup Cashew nuts
0.5 cup Sugar
0.25 cup Water
Oil or Ghee for greasing

Method:


1. Powder the cashew nuts until fine. Use cashew nuts at room temperature, cashew nuts used directly from the fridge will not give you a fine powder.
2. If the cashews are not finely powdered, you can use a sieve and remove the big unground pieces. Use a medium sized sieve. Sieve and keep aside.
3. To make the sugar syrup, in a pan (preferably nonstick), add the sugar and water and cook on medium heat. The sugar syrup needs to reach one string consistency.
4. To check if the consistency of the sugar syrup, add a small drop of the syrup into a bowl of water. If the syrup dissolves in the water, then the syrup needs more cooking. If the syrup doesn't dissolve but forms a flexible string, then it is ready.
5. Add in the ground cashew nuts and mix until combined.
6. Continue to cook on low heat until the cashew dough becomes one mass.
7. Remove from heat and move the dough to a large plate. Allow it to cool for 2-3 minutes.
8. While the cashew dough is still hot, gently knead it for 2-3 minutes until it is smooth. Do not over-knead, else the cashew will leave its oil.
9. Grease the back of a plate and place the dough on it. Roll it out until the dough is around 5mm thick.
10. Cut the kaju katli into diamond shaped pieces. Allow to cool completely.
11. Using a butter knife, gently remove the kaju katli from the plate and store it in a cool place.
12. Serve Kaju Katli at room temperature.


If you liked this, you may also like:

How to make shakkarpara recipe, shankarpole recipe at www.oneteaspoonoflife.com
Shankarpole

Coconut Laddoo
Bele holige, obbattu, puran poli, sweet lentil stuffed flatbread
Holige | Puran Poli


Read more ...

Lahsun Shev Recipe | Garlic Sev Recipe [Video]


Garlic Sev or Lahsun Shev is deep fried savory strings made of chickpea flour that has been flavored with garlic. Serve garlic sev as an evening snack during tea time. Garlic Sev is vegan.

In a hurry? Jump to Video or Jump to Recipe

lahsun shev lasoon sev

So how have you guys been? I'm making an appearance after a gap of few weeks now.

For the first time, it is not because I was busy with work, but because I was on vacation. Finally!! The last real vacation that did not involve attending weddings or meeting family was when we went to Bali in 2017 and we were both craving some "us" time. This year we kept it local and visited North East India.

Before I went on vacation, I shared the recipe of the BEST CHOCOLATE CAKE ever!!! I hope you tried that out cause that's a keeper. But that cake, was what I wanted to make for Gee and Raj's birthday. They had asked me for totally different things.

Gee, not one with a sweet tooth and someone craving a certain savory for months now, asked me to make her Garlic Sev, the way they sell in Goa. She's been trying her luck to find something similar in Bangalore, but not succeeded. I thought I would attempt to make some for her. Whether it tastes exactly like the one she buys in Goa, it is up to her to tell, but I thought it was really really tasty and it was so simple to make.

lahsun shev lasoon sev


Garlic Sev or Lahsun Shev is deep fried savory strings made of chickpea flour that has been flavored with garlic. The dough is very simple, just a few ingredients. The dough doesn't require any real kneading, just enough to combine all the ingredients together. Then you need a sev press or any press really that can shape the sev. Using the press, release the dough straight into the hot oil and deep fry until crisp.

The amount of garlic I used gives the sev a mild garlic flavor. To get a more prominent flavor, add more garlic.

Garlic Sev stores well for 1-2 weeks in an airtight container, but, I assure you it won't last that long for you to test. This thing is so addictive, it will be gone in a jiffy. Serve garlic sev with tea during tea times or just snack day long.


lahsun shev lasoon sev


If you made this recipe, let me know! Leave a comment here or on Facebook tag your tweet with @oneteaspoonlife on Twitter and don't forget to tag your photo @oneteaspoonoflife on Instagram. You can also email me at onetspoflife@gmail.com I'd love to see what you are up to.

If you like this recipe, do not forget to share it with your friends and family! 


You can follow One Teaspoon Of Life on FacebookTwitterInstagramPinterest or you can subscribe to One Teaspoon Of Life and receive all the latest updated via Email


Video Recipe


--------------------------------------------------------------------------------------------------------------------------

Garlic Sev Recipe | How to make Lahsun Sev

lahsun shev lasoon sevGarlic Sev or Lahsun Shev is deep fried savory strings made of chickpea flour that has been flavored with garlic. Serve garlic sev as an evening snack during tea time. Garlic Sev is vegan.

Recipe Type:  Snacks
Cuisine:            Indian
Prep Time:     15 minutes
Cook time:     30 minutes
Total time:     45 minutes
Yield:                One small jar

Ingredients:


1 cup Chickpea Flour (Besan)
5 to 6 Garlic cloves
0.25 tsp Asafoetida (Hing) (Use gluten-free hing)
2 tsp Red Chilli Powder
1 tsp Turmeric Powder
1 Tbsp Oil
Salt to taste (Curd)
Oil for deep frying
Water as required

Method:


1. Blend the garlic, asafoetida, red chilli powder, turmeric powder, salt and 1 Tbsp oil with a little water into a smooth paste. The mentioned amount of garlic gives a very mild flavor, add more garlic for a more prominent garlic flavor.
2. Take the chickpea flour/besan in a large bowl and add the blended garlic masala.
3. Knead until combined. Add more water if required. If it is too sticky, add a little more chickpea flour/besan. Adjust salt or red chilli powder as required.
4. Take a chakli press or a sev press and select the sev plate of the thickness you desire. Grease the plate and the press.
5. Add in a portion of the dough to the press and stuff it in tight.
6. Heat oil for deep frying.
7. Once the oil is hot, press the sev directly into it.
8. Allow the sev to cook for 1-2 minutes on medium heat, then flip it.
9. Cook for 4-7 minutes until crisp and lightly browned.
10. Remove from heat and either place it on an absorbant paper towel or a collander.
11. Once the sev has cooled completely, gently break it into smaller pieces.
12. Store in an airtight container so that sev remains crisp.


If you liked this, you may also like:

How to make shakkarpara recipe, shankarpole recipe at www.oneteaspoonoflife.com
Shankarpole

traditional Indian chakli, savory deep fried snack
Chakli
popular Indian snack - baked flat discs made of four and spices
Baked Papdi


Read more ...

Eggless Chocolate Cake with Dark Chocolate Ganache [Video]


Rich, moist, indulgent, sinful and delectable eggless Chocolate Cake covered with a smooth dark Chocolate Ganache. This cake is perfect for birthdays and special occasions. It is easy to make and super delicious.

In a hurry? Jump to Video or Jump to Recipe

eggless chocolate cake with dark chocolate ganache

This is the BEST eggless chocolate cake EVER!!!

And the family agrees.

This year when I asked both Raj and Gee if I should bake them a cake, both of them just shooed away the thought and asked for different things. I made those other things, but it did not feel like a birthday if I did not bake a cake. So here's the best Birthday cake I ever made.

Recently, my baking has been a little bit of a failure - super healthy cakes that tasted not so delightful, a tray of freshly baked brownies that saw the floor before they saw the mouth and a cake that tasted like groundnut more than vanilla thanks to the groundnut oil I used. So this cake had to be a success. It was, after all, the birthday of the two people who make up my life.

This cake is everything you ever imagined a Chocolate Cake should be. It is eggless, yet moist. It is rich, dark and deeply chocolatey. Top it with the dark chocolate ganache and the cake becomes sinful and indulgent. Basically, this cake kicks the ass of any other birthday cake.

eggless chocolate cake with dark chocolate ganache


To make this Eggless Chocolate Cake

Firstly, we need to bake 2 layers of cake. I do not use box mixes, so this cake is made from scratch.
The cake is made from simple easily available ingredients. A few things that make this cake rich and moist:

Oil instead of butter. We want a moist and dense cake instead of a light and crumbly cake. And my pro tip, use a flavorless oil, unless you like the flavor of oil. Last time I used groundnut oil and it had an aftertaste that I could not get rid off.

Condensed milk. This is my favorite egg replacer in all eggless cakes. The condensed milk manages to hold the cake together like nothing else does. I always use sweetened condensed milk, so I tend to use less sugar instead.

Yogurt. Again, this makes it moist while adding a creaminess to the cake. You will never taste the sourness of the yogurt, but it does add another dimension to the flavor.

Coffee. Coffee has time and again been used in dark chocolate cakes, and with good reason. Coffee brings out the flavor of the chocolate and makes the cake taste more chocolatey. It enhances the darkness of the cake too, in flavor and color, if you know what I mean.

I baked the cake at night and frosted them the next day morning. The cakes need to completely cool before you frost them, else the ganache will melt. While all my cakes dome in the center, this one did not really. I mean it did, but ever so slightly. So while frosting the cakes, I sliced the top off to level them.

eggless chocolate cake with dark chocolate ganache


The cake tasted AH-MAZING with the chocolate ganache, so I really wish you make it too.

The ganache is made from only 3 ingredients, so be nice to me and yourself, and make it. Use the best quality dark chocolate bar, your favorite one. I used a regular sweetened dark chocolate bar that I eat and not cooking chocolate. I used Amul's Peru single origin dark chocolate bar and it tasted so good. Cut the chocolate into small pieces so it melts quickly. Heat the cream and pour it into the chocolate and mix it until the chocolate melts and has no lumps. If the cream isn't hot enough, the chocolate will not melt. In that case, gently melt the chocolate over a double boiler.

The chocolate I used already had sugar in it, so I added very little powdered sugar later. If you are using unsweetened or semi sweetened chocolate, add in more sugar (as desired). At this point the chocolate is molten, you can pour this over the cake if you plan to serve the cake as a single layer cake. If you want to make a two-layer cake like me, then cool the ganache slightly in the fridge so it hardens slightly and reaches a spreadable consistency. 15 mins were more than enough for me. This time may differ depending on the type of chocolate used. I suggest peeping into the refrigerator every 10 minutes. If it hardens up a lot, gently reheat it over the double boiler for a few seconds and add some milk and whisk it into submission.

I did not pipe the ganache into fancy shapes but just used the back of a spoon to create the pattern on the top of the cake. You can make any pattern you like.

The cake tastes best when slightly warmed up. Microwave any leftover slices for 10-20 seconds and enjoy an even more sinful dessert.


eggless chocolate cake with dark chocolate ganache


If you made this recipe, let me know! Leave a comment here or on Facebook tag your tweet with @oneteaspoonlife on Twitter and don't forget to tag your photo @oneteaspoonoflife on Instagram. You can also email me at onetspoflife@gmail.com I'd love to see what you are up to.


If you like this recipe, do not forget to share it with your friends and family! 


You can follow One Teaspoon Of Life on FacebookTwitterInstagramPinterest or you can subscribe to One Teaspoon Of Life and receive all the latest updated via Email


Video Recipe


--------------------------------------------------------------------------------------------------------------------------

Eggless Chocolate Cake with Dark Chocolate Ganache


eggless chocolate cake with dark chocolate ganacheRich and delectable eggless chocolate cake topped with a dark chocolate ganache.

Recipe Type:  Dessert
Cuisine:            International
Prep Time:     30 minutes
Cook time:     40 minutes
Total time:     70 minutes
Yield:                One 6" cake

Ingredients:


For the chocolate cake:


1.5 cups All Purpose Flour
0.75 cups unsweetened Cocoa Powder
1 Tbsp Baking Powder
1 cup Powdered Sugar
0.5 cup Oil
200ml sweetened Condensed Milk
0.5 cup Yogurt (Curd)
1 tsp Vanilla Essence
1 cup hot Water
1 Tbsp strong Coffee Powder

For the chocolate ganache:


250gms good quality Dark Chocolate
1 cup full fat Cream
2-3 Tbsp Powdered Sugar

Method:


To make the chocolate cake:


1. Sift the flour, cocoa powder and baking powder 1-2 times to remove lumps. Keep aside.
2. Take the powdered sugar in a large mixing bowl and add the oil. Whisk until the two are combined.
3. Add in the condensed milk, yogurt and vanilla essence and whisk until completely combined and smooth.
4. Boil the 1 cup of water and mix in the 1 Tbsp of strong coffee powder and add to the mixing bowl. Whisk to combine.
5. Add in the sifted dry ingredients by the spoonfuls and whisk to combine.
6. Grease two 6" pans and either line them with baking paper or dust them with flour.
7. Divide the batter equally between the two pans.
8. Bake for 35-40 minutes at 180 degree Celsius until an inserted toothpick comes out clean.
9. Demould the cakes and allow them to cool on a wire rack until completely cooled.

To make the chocolate ganache:


10. 30 minutes before you are ready to serve the cake, cut the dark chocolate and put it in a large mixing bowl.
11. Add in the hot cream and whisk until all the chocolate has dissolved and the ganache is smooth. If the cream was not hot enough and the chocolate did not melt completely, you can melt it gently over a double boiler.
12. Add in the powdered sugar as required and mix well.
13. Refridgerate the ganache until it hardens slightly and reaches spreadable consistency.

To assemble the chocolate cake:


14. To assemble, slice off the dome of the cake to level both of them.
15. Place one on a plate and spoon some of the ganache on it. Spread it around. Place the other cake on the first.
16. Spread the remaining ganache on the top and sides of the cake.
17. Cake is ready to serve.


If you liked this, you may also like:

How to make eggless almond chocolate brownie recipe at www.oneteaspoonoflife.com
Almond Chocolate Brownie

How to make eggless pineapple cake recipe, whipped cream frosting, eggless vanilla sponge cake, eggless cake recipe, vegetarian pineapple cake at www.oneteaspoonoflife.com One Teaspoon Of Life
Eggless Pineapple Cake
Vegan cake made with dates and walnuts
Vegan Date and Walnut Cake
Eggless Blueberry Muffins with streusel topping
Blueberry Muffin

Persian love cake is an eggless rose and cardamom flavored cake made with almond flour and semolina. Brushed with an orange syrup and topped with chopped nuts.
Almond Semolina Cake
How to make vegan chocolate cake brownies recipe at www.oneteaspoonoflife.com
Vegan Coffee Walnut Brownies


Read more ...

Milk Rusk Recipe | Sweet Bread Rusk Recipe [Video]


Milk Rusk is a twice baked sweet bread. Milk Rusk is sweet and tastes best with a hot cup of tea. Rusk is a popular tea-time snack in India.

In a hurry? Jump to Video or Jump to Recipe


How do you like your chai/tea? I like mine slightly strong with little milk and 1 tsp of organic jaggery powder, that brown chocolatey kind, with a rusk to dunk into it.

I LOVE dunking biscuits and rusks in my tea. I sometimes dunk cakes and bread too, but that's a story for another day. I've been dunking rusks for years and loved how the crispy hard rusk just melts once dunked. My snack box usually has a packet of rusk from the local bakery, coz those are the BEST!


So one Saturday, when I was relatively free, I decided to bake some myself. So there are sweet rusks and savory rusks. I am not sure if the savory one is native to only Bangalore and surrounding areas because I had never seen one before. But that's my least favorite one, so totally ignoring the existence of that one. There are 2 types of sweet rusks, the bread rusk and the cake rusk. The cake rusk is like a biscotti, where one bakes a cake first and then slices it and bakes again until it dries up and becomes a crisp sweet cake rusk. That's a recipe I still need to try. This time I tried the second recipe, which is of bread rusk. 

To make the bread rusk, one needs to bake a sweet bread first and then slice it and bake it again until it dries up to give the crispy hard rusk that we all enjoy.


About the Sweet Bread
  • Bread rusk takes a considerably longer time to make because it includes the rise time of the bread. However, this is free time as you don't need to monitor it, just leave it in a warm place to rise.
  • Sweet bread takes longer than regular bread to rise. The added sugar slows down the process, so you will have to wait longer. It took me around 4 hours to get a good rise out of the bread, it may take longer if you live in a cooler area. 

Once the bread is ready, it doesn't take very long to make the rusks if you have a large oven and a sheet pan. I had to make mine in batches, so it took me some time to bake them all.

But the wait was worth it! The satisfaction of dunking a home baked rusk exceeded the boredom of the waiting period. Happy Rusk Baking to you!!


If you made this recipe, let me know! Leave a comment here or on Facebook tag your tweet with @oneteaspoonlife on Twitter and don't forget to tag your photo @oneteaspoonoflife on Instagram. You can also email me at onetspoflife@gmail.com I'd love to see what you are up to.


If you like this recipe, do not forget to share it with your friends and family! 


You can follow One Teaspoon Of Life on FacebookTwitterInstagramPinterest or you can subscribe to One Teaspoon Of Life and receive all the latest updated via Email


Video Recipe


--------------------------------------------------------------------------------------------------------------------------

Milk Rusk Recipe | Sweet Bread Rusk Recipe


Milk Rusk is a twice baked sweet bread. Milk Rusk is sweet and tastes best with a hot cup of tea. Rusk is a popular tea-time snack in India.

Recipe Type:  Snacks
Cuisine:            Indian
Prep Time:     6 Hours
Cook time:     1 Hour
Total time:     7 Hours
Yield:                Makes 20-25


Ingredients:


2 cups All purpose flour
0.5 cup Milk Powder
3-4 Tbsp powdered Sugar
0.5 cup lukewarm Water
1 tsp Sugar
1 tsp Active Dried Yeast
1 tsp Oil
1 tsp Milk
Water as required

Method:


1. Add the 1 tsp of sugar and the active dried yeast into the lukewarm water and mix well. Keep is aside for 5-10 minutes to bloom.
2. Take the flour, milk powder and powdered sugar in a large bowl.
3. Add the yeast and mix well.
4. Knead into a smooth dough using water.
5. Coat the dough with the oil and cover and keep aside to rise until doubled. This may take 2-4 hours.
6. Once the dough has doubled, punch it down and knead it gently for 2-3 minutes.
7. Divide the dough into 2 and shape into rolls. Cover and keep aside to rise again.
8. Preheat the oven to 180 degree C.
9. Once the loaves have doubled, brush the loaves with milk and bake for 30-40 minutes until done.
10. Allow the bread to cool completely, then slice into rusk slices.
11. Preheat the oven to 180 degree C.
12. Place the rusk in a single layer in a baking tray and bake for 20-30 minutes.
13. Flip the rusks after 10 minutes.
14. Cool on a wire rack.
15. Store in an airtight container. Serve with tea or coffee.


If you liked this, you may also like:

How to make vegetarian eggless Karachi Bakery Fruit Biscuit rose cookies cranberry cookie recipe at One Teaspoon Of Life www.oneteaspoonoflife.com
Fruit Biscuit

eggless almond cookies, badam biscuits
Almond Cookies
popular Indian snack - baked flat discs made of four and spices
Baked Papdi


Read more ...