Showing posts with label bread. Show all posts

Bread Upma | Bread Fry


I'm not sure there is anything more heavenly then that warm freshly baked BREAD.. 

Fresh bread tastes amazing with just about everything, doesn't it? 
Eat it like the ITALIANS with some olive oil, balsamic vinegar and pepper. 
Or like rest of the world with BUTTER. 
JAM, anyone?

But what about stale bread. Remember buying that loaf of bread two days ago? It tasted AMAZING, right? But lying there on the counter for 2 days, it just doesn't taste that good anymore. That wonderful scent is gone, that CRUSTY crust, just went soft and that soft moist CRUMB did the exact opposite thing - it went hard. Now WHAT????

Bakers keep inventing and re-inventing the humble bread. And home cooks like us keep inventing some more in our own little kitchens especially with leftovers. This Bread Upma or Bread Fry is credited to some home cook like us (I think). 


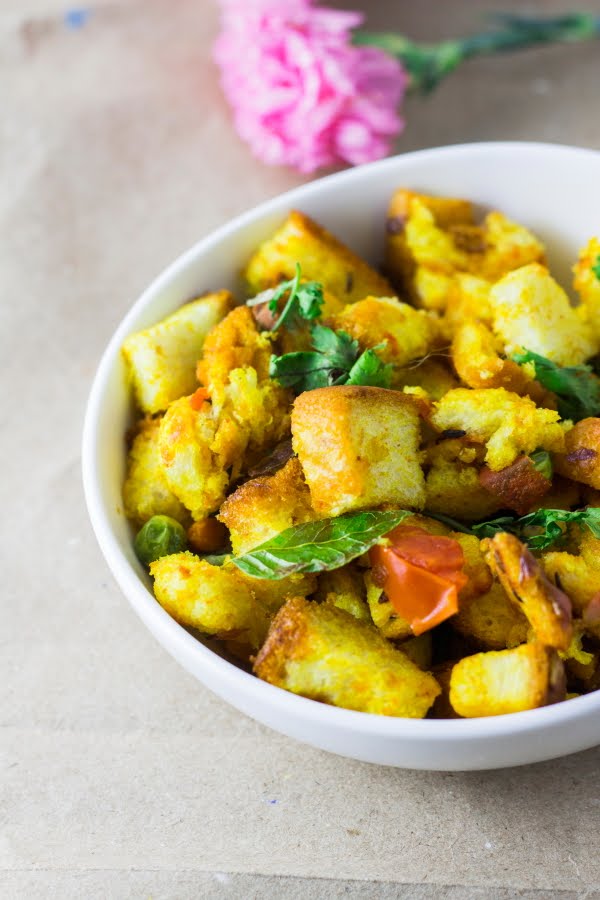
This Bread Upma is the simplest and quickest way to jazz up stale bread. Heat some oil, toss in some onions, tomatoes and add the bread. Now you can be all methodical and use a knife to cut the bread or you can be all rustic and use your hands to break the bread into smaller pieces.

I added green peas since I had them. I've added corn sometimes. Add anything that cooks quickly. After all, we don't want to spend all that time in cooking vegetables - QUICK Breakfast, remember?

I've also included step by step instructions for this easy peasy Bread Upma.

Bread Upma


Leftover bread is broken into smaller pieces and fried with onions and tomatoes to make a delicious breakfast.

Recipe Type:  Breakfast
Cuisine:          Indian
Prep Time:     10 minutes
Cook time:     20 minutes
Yield:              2 Servings

Ingredients:

4-5 Bread slices
1 small Onion
1 small Tomato
¼ cup Green Peas(Optional)
5-6 Curry Leaves
2-3 Green Chillies
A handful of fresh Coriander leaves
2 tsp Oil
½ tsp Cumin seeds
1 tsp Turmeric powder
½ tsp Sugar
Salt

Method:

Break the bread into small bite sized pieces. Alternatively, cut it into bite sized pieces.
Chop the onion and tomato finely
Slit the green chillies
Heat oil in a pan and add the cumin seeds
Once the cumin seeds splutter/ slightly brown, add the curry leaves, chopped onion and green chillies
Fry until the onions are done
Add the green peas and fry until done. Fresh green peas are generally done after frying for 2-3 mins. In case you have peas that take longer to cook, boil them separately and add to the onions and stir fry for 1 min.
Add the chopped tomato and cook for 1-2 mins
Add turmeric powder and salt
Add the bread pieces and mix well
Add the sugar and chopped coriander leaves
Read more ...

Wholewheat Tomato & Basil bread

I often miss having the Mediterranean veggie sandwich at Panera bread for lunch. Since we don't have any Panera Bread's out here, I cannot enjoy their tomato and basil bread. Which is what set me on a path to create my own. I found several recipes on the net, but I modified them to suit me. I am not so keen on cooking with maida(flour) so I use atta (whole wheat flour) more often. I also had no parmesan cheese as the recipes asked for. Also, I added the oats and the fennel just as an experiment which worked successfully. This was a yummy breakfast today morning with oodles of butter....

Tomato & Basil bread


Before first rise

After first rise


After baking
Crust & crumb
Ingredients:
Whole wheat flour / Atta – 1.5 cups
Oats – ½ cup
Tomato – 1
Basil leaves – 10-12
Fennel seeds / Saunf – 1 tbsp
Olive oil – 1 tsp
Active dry yeast – 1 tsp
Red chilli flakes – 1 tbsp
Tomato ketchup – 1-2 tbsp
Water – ¼ cup
Salt – ½ tsp
Method:
Puree the tomato and mince the basil
Warm the water and dissolve the yeast in it
Add the tomato puree, basil, crushed fennel seeds, red chilli flakes, tomato ketchup, oats and salt and mix well
Add the flour and knead until the dough is smooth and elastic. I kneaded for around 15 mins.
Grease a vessel with olive oil and place the dough in it. Turn the dough so that it is covered in oil. Cover the vessel and allow it to proof for 2 hours or until doubled in size.
Knead again for 1 min and place in the loaf tin or the baking sheet and allow it to rise for another 1 hour.
Preheat the oven to 240 degree Celsius.
Bake for around 20-25 mins.
Read more ...

Zucchini, Spinach and Onion Pizza

The GoodFood magazine put me in a zucchini pizza mood. The photo looked so delicious that I just had to eat it. Sadly, no pizza joint close to home serves you such a pizza. So it fell upon me to create one :) The magazine was courteous enough to provide a recipe for the base as well. I added the pesto and the remaining veggies to give it more volume. The recipe for the pizza base and the pesto used can be found on the blog as well.

Place the topping on the pizza base

Grate cheese and spoon olive oil

Pizza after baking
Pizza

Pizza with carrot fries and blueberry muffins


Zuccini, Spinach and Onion Pizza


Pizza with pesto sauce topped with spinach, onions and zucchini

Recipe Type:  Snacks
Cuisine:          International
Prep Time:     15 minutes
Cook time:     20 minutes
Yield:              Serves 2

Ingredients:

1 medium sized Pizza base
3/4 cup Pesto sauce
3 Cheese cubes
1 medium Zucchini
1 small Onion
A handful of Spinach leaves
1 tsp Oregano
3 Tbsp Olive oil
1 tsp Pepper
1/2 - 1 tsp Salt
1/2 tsp Rosemary (dried)

Method:

Spread the pesto on the base and grate one cheese cube and spread on it
Roughly chop the onion into large slices.
Heat 1 tbsp. olive oil and toss the onions in it until soft
Cut the zucchini into fine ribbons. I used a peeler to make the fine ribbons
Toss the zucchini with 1 tbsp. oil. Add a little salt and the pepper.
Add the oregano, rosemary and the onions
Place the spinach on the base.
Spread the zucchini and the onion mix
Grate the remaining cheese on the pizza
Spoon the remaining olive oil on the pizza
Preheat the oven to 200 degree Celsius and bake for 10-15 minutes.


Read more ...

Pizza Base (50% Whole Wheat)

I recently got a GoodFood magazine from the library, the masterclass in the book was about pizza, this inspired me to make Pizza for lunch today. The recipe called for all purpose flour, I used a mix of plain flour and whole wheat flour. The below recipe made one medium sized thick crust pizza. Split the dough to make 2 thin crust pizzas

Dough before proofing

Dough doubled in size

Spread out the dough using your hands


Ingredients:

1  cup Maida/ All Purpose Flour
1 cup Atta / Whole Wheat Flour
3/4 cup Warm water
1.5 tsp Active Dry Yeast
1/2 tsp Salt
1.5 tsp Olive Oil

Method:

Dissolve the yeast in the warm water and allow it to rest for 5 mins
Add the olive oil and the two flours and mix well
Add the salt and knead for 15-20 mins
Cover and rest for 1 hour or until doubled
Sprinkle some dough into the working surface and place the dough on it
Using your hands spread the dough into a circle
For think crust, the thickness should be as much as a pancake
For thick crust, the thickness is around 1cm
Place the dough in the baking tray
Preheat the oven to 200 degree Celsius
Use a fork and poke the dough to prevent it from puffing up and allow even cooking
Bake for 10-15 mins until a toothpick comes clean
Read more ...

Pita bread

My husband likes pita bread a lot. It is not so easily found unless we go to gourmet food stores in Bangalore. I always wanted to try making it at home. So I finally thought, this Friday evening I shall give it a try. Try was successful and hubby munched down on the whole lot :)

Pita bread with hummus


Knead into a smooth dough
 
After 2 hours, the dough has doubled it size


Divide dough into balls


Flatten out the dough


Roll out the dough to 5 mm thickness


Puffing in the oven


Puffed up pita bread


Pita bread


Enjoy pita bread with hummus


Ingredients:

Maida / Flour - 1.5 cups
Active dry yeast - 1 tsp
Warm water - 0.5 cups
Sugar - 1 tsp (Powdered) (Optional)
Olive oil - 1 tbsp (Optional)
Salt

Method:

Mix the active dry yeast in the water and let it proof for 5-10 mins.
Add 1 cup flour to it. Add salt, sugar and olive oil.
Mix well and knead.
Add the remaining flour while kneading to get a smooth dough.
Clean the vessel used to make the dough and grease it with olive oil.
Place the dough in the vessel and move around the dough so it is coated with olive oil.
Cover the vessel with a clean towel or a plastic wrap and allow to rest for 1-2 hours until the dough doubles in size.
Gently flatten the dough and move the dough to the working surface.
Divide the dough into balls. I made 4 for this quantity.
Preheat the oven to 240 degree Celsius. Keep the baking tray/ baking stone in the oven during preheat.
Using some more dry flour, gently roll out the dough ball to a thickness of about 5mm
Place the rolled out pita bread on the baking sheet and bake for 3 minutes.
It will puff up after 1-2 mins.
If it does not puff, it means the baking sheet is not hot enough. Whether it puffs or not does not matter if you are eating it with a dip.
This can be made using a tava/ griddle also, so instead of preheating the oven, heat the tava and place the pita bread on it when the tava is hot.
Remove from tava after it puffs or after 2 mins appx.
Enjoy it hot with hummus.
Read more ...

Akki rotti / Rice flour flatbread with cucumber (sautekai)

Hot hot akki rottis with fresh homemade butter… yummmmm…. What in it is not to like? Akki means rice and rotti means roti/bread. It is a flatbread or roti made of rice flour. Akki rottis can be enjoyed as breakfast, lunch or dinner. So many different things can be added or the ingredients varied a little to get various types of akki rottis, each to suit a different palate. Akki rottis are probably unique to Karnataka, and are very easily available in any darshini and sagars across Bangalore. Very easy and quick to make. Below is a recipe with cucumber or sautekai in it. Let’s go ahead and add a teaspoon of life into akki rottis… 

Akki rotti

Make balls from dough

Flatten the dough on a butter paper

Roll out the rotti using hand

Rotti after rolling

Place the rotti on the tava

Flip the rotti after one side browns

Cook on both sides


Enjoy rotti with homemade butter or chutney


Ingredients:
Akki hittu/ Rice flour – 1.5 cups
Cucumber – 1
Green chillies -1-2
Coriander leaves – a handful
Jeera/ Cumin seeds – 1 tsp
Oil – 2-3 tbsp
Salt
Warm water
Method:
Peel and grate the cucumber
Chop green chillies finely. You can slit them and remove the seeds and then chop if you find them very spicy.
Chop the coriander leaves finely.
Add the chillies and the coriander to the cucumber.
Add the rice flour and cumin seeds also to the cucumber.
Use warm water to knead it into a smooth dough.
Divide into balls.
Grease a paper or a plastic sheet. An A4 size or quarter of a single newspaper sheet should do. I avoid using newspaper as sometimes the print makes an impression on the rotti. Using a good quality butter paper is suggested.
Place the ball of dough on it and flatten it out as thinly as you can using your hands.
You can use a greased rolling pin if you find it difficult to flatten using your hands.
Heat a tava/griddle. Grease the tava.
Once the tava is hot, gently remove the rotti from the paper and place it on the tava. I gently overturn the paper in one hand and peel off the paper using the other hand.
Spoon oil onto the tava and cook until brown spots appear on both sides.
Enjoy when hot along with chutney, chutney pudi, pickle or butter.

Read more ...