Showing posts with label Summer. Show all posts

Refreshing Melon Salad Recipe | How to make Watermelon salad | Watermelon and Feta Salad [Video]


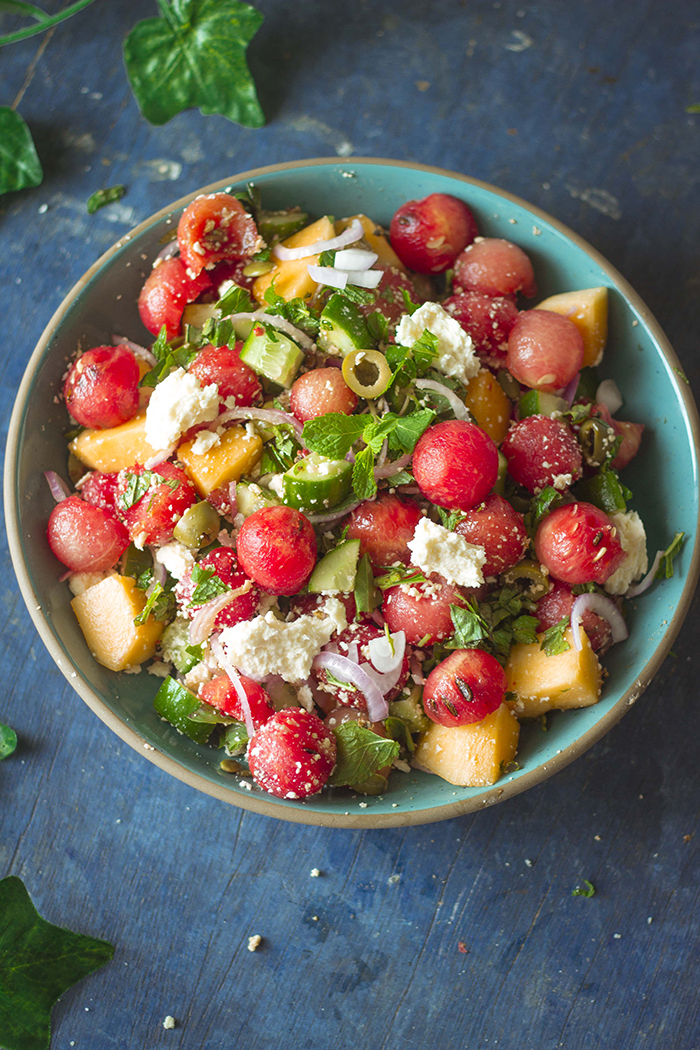
Refreshing Melon Salad with sweet and juicy watermelon and muskmelon, tossed along with onions, olives, mint leaves and feta cheese. Dressing with an instant balsamic vinegar dressing. Perfect for the hot summer days when the fruits are in season. 

In a hurry? Jump to Video or Jump to Recipe


Melon Salad Recipe


This year the temperatures started rising in March and it became so hot that I'd begun hating stepping into the kitchen. The thought of the hot stove or even hot food made me balk a few times. And at times like this, I crave a juicy sweet Watermelon that is fresh out of the fridge. And hence came this salad.

Yes, we didn't invent this salad. It's been a family favorite for quite a few years now. We've even tried a deconstructed or reconstructed fine dining version with feta smeared all over large watermelon cubes with little droplets of balsamic. No, thank you, we'd like to stick to the classics.

Summer Melon Salad

So this year, we eventually made this salad at home. And coz we did, we also added a bunch of other things we love like muskmelons or cantaloupe and pepitas. When you watch the recipe, you may find it a little busy in the bowl, but trust me, these flavors work together.

And the best part of this salad is, it's so quick to whip up. If you do as I do, prep all your fruits in advance, it cuts down on time massively. And this is a good tip, not just for the salad, but to generally eat your melons. Having a box of already cut melon just increases your chances of eating something healthy. I mean, haven't we all opened the fridge door and stared at all those boxes in there, just thinking of what we could grab and eat. Melons may just be the box you grab next time.

Summer Melon Salad


Can this Salad be Veganized?

Absolutely, yes!! Read on...

All the fruits and vegetables are already vegan/plant-based, so you are good on that front. There are just 3 ingredients you want to be careful/change - Honey, Balsamic Vinegar and Feta Cheese.
  • Swap honey with maple syrup.
  • Traditional Balsamic Vinegar is always vegan. A cheaper supermarket version may have colors and flavors added, that could end up being non-vegan. Search for a certified Balsamic that is made traditionally, or carefully research the ingredient list of the bottle you plan to buy.
  • Feta cheese, replace the feta cheese with vegan feta cheese or get creative with some smoked or flavored Tofu.
Enjoy!!

Melon Salad

If you made this recipe, let me know! Leave a comment here or on Facebook tag your tweet with @oneteaspoonlife on Twitter and don't forget to tag your photo @oneteaspoonoflife on Instagram. You can also email me at onetspoflife@gmail.com I'd love to see what you are up to.

If you like this recipe, do not forget to share it with your friends and family! 


You can follow One Teaspoon Of Life on FacebookTwitterInstagramPinterest or you can subscribe to One Teaspoon Of Life and receive all the latest updated via Email


Video Recipe


--------------------------------------------------------------------------------------------------------------------------


Refreshing Melon Salad Recipe | How to make Watermelon salad | Watermelon and Feta Salad


Melon Salad
A quick and refreshing Summer salad made of watermelon, musk melon or cantaloupe, feta cheese and dressed with balsamic vinaigrette.

Recipe Type:   Salad
Cuisine:            International
Prep Time:     30 minutes
Total time:     30 minutes
Yield:                Serves 2

Ingredients:


4 cups diced Watermelon,
1 cup diced Muskmelon,
1 Cucumber, diced,
1 small Onion, sliced,
5 to 8 Olives, sliced,
50 gms Feta Cheese,
1 cup Mint leaves,
Handful of pumpkin seeds (pepitas),
2 Tbsp Balsamic Vinegar,
1 Tbsp Honey,
1 tsp Pink peppercorns ( or Black pepper ),
Salt to taste


Method:

  1. Take a large bowl and add the watermelon, muskmelon, cucumber, onions, olives, mint leaves and pumpkin seeds.
  2. Crumble the feta cheese on top
  3. In a bowl, mix together the balsamic vinegar and honey.
  4. Pour over the salad
  5. Sprinkle salt as per taste on the salad
  6. If using pink peppercorns, gently crush them and add to the salad. If using black pepper powder, add to the salad as per taste.
  7. Mix the salad well and serve immediately.


If you liked this, you may also like:

roasted sweet potato, chickpea, quinoa salad with walnuts, pomegranate, broccoli and beans in a mustard date dressing
Roasted Sweet Potato Salad

How to make grilled cauliflower recipe, spicy grilled cauliflower recipe, roasted cauliflower recipe, how to make black rice recipe, summer recipes, one bowl recipes at www.oneteaspoonoflife.com
Grilled Cauliflower Summer Bowl
vegan healthy glutenfree chickpea salad
Chickpea Salad


Read more ...

Hagalkai Mavinkai Gojju | Bittergourd (Karela) & Raw Mango Curry Recipe [Video]


Hagalkai Mavinkai Gojju with step by step video instructions. Hagalkai Mavinkai Gojju is a curry made from bittergourd or karela and raw mangoes. This summer curry is a melting bowl of flavors, it is bitter, sweet, sour and spicy. Hagalkai Mavinkai Gojju tastes best with rice. This curry suits a vegan or plant based diet, gluten free diet and a Jain diet. 

In a hurry? Jump to Video or Jump to Recipe

Hagalkai Mavinkai Gojju Bittergourd Raw Mango Curry Karela Kacche Aam sabzi vegan gravy stew bittermelon indian


I first posted this recipe 5 years ago, in June 2015. I remember my mom was in Bangalore and we had gone vegetable shopping with her. She had gotten very excited looking at the Amtekai or Ambada (Hogplums), that were available in abundance at the vegetable shop. We had already picked up the bittergourd or karela or hagalkai and were thinking of the pairing up with the amtekai, when she felt raw mango would be a better accompaniment. So we picked up raw mangoes and bittergourd and came home and made this Gojju. Since then, I make this curry at least once every summer.

What is a Gojju?


Gojju is a curry from Karnataka that is usually sweet and sour. It has tamarind added for sourness and jaggery for sweetness. It may or may not have a coconut base.

Hagalkai Mavinkai Gojju is made using Bittergourd or Karela, that brings a hint of bitterness to the curry, the raw mangoes bring in the sourness, jaggery is added for sweetness and red chillies for the heat.

The prep...


This Gojju can convert a Karela hater. The way in which the karela is cooked brings down the bitterness to such low levels that it is no more unpleasant. The karela is peeled, cored and then salted and left aside for the bitterness to flow out. This can be done days in advance. The salted karela can be kept in the fridge for almost a week. Remove it out when you are ready to cook. The salted karela is squeezed so that the bitter juices are extracted and then can be discarded. Soaking them in water and then squeezing makes it easier to remove the juices.

The squeezed karela is then boiled until it is cooked, the water is discarded. This step removes the more of that bitterness.

Hagalkai Mavinkai Gojju Bittergourd Raw Mango Curry Karela Kacche Aam sabzi vegan gravy stew bittermelon indian

The flavors...


The remaining bitterness is balanced with the sourness of the raw mangoes. If the mangoes are not sour enough on their own, use tamarind juice. As mentioned above, the curry tastes good with any sour fruit like amtekai. So if you have any local sour fruit, you can use that.

Jaggery is added for sweetness. Use sugar if you don't have jaggery.

The Gojju has a base of coconut, rice, and lentils along with the spices. The toasted rice and urad dal help thicken the curry. Coconut further helps in mellowing down the strong flavor of the bittergourd or karela.

Hagalkai Mavinkai Gojju tastes best with rice, but if you make a thicker consistency, it can be enjoyed with roti or chapati too.

Hagalkai Mavinkai Gojju Bittergourd Raw Mango Curry Karela Kacche Aam sabzi vegan gravy stew bittermelon indian

If you made this recipe, let me know! Leave a comment here or on Facebook tag your tweet with @oneteaspoonlife on Twitter and don't forget to tag your photo @oneteaspoonoflife on Instagram. You can also email me at onetspoflife@gmail.com I'd love to see what you are up to.

If you like this recipe, do not forget to share it with your friends and family! 


You can follow One Teaspoon Of Life on FacebookTwitterInstagramPinterest or you can subscribe to One Teaspoon Of Life and receive all the latest updated via Email


Video Recipe


--------------------------------------------------------------------------------------------------------------------------


Hagalkai Mavinkai Gojju | Bittergourd (Karela) & Raw Mango Curry Recipe


Hagalkai Mavinkai Gojju Bittergourd Raw Mango Curry Karela Kacche Aam sabzi vegan gravy stew bittermelon indianHagalkai Mavinkai Gojju is a curry made from bittergourd or karela and raw mangoes. This summer curry is a melting bowl of flavors, it is bitter, sweet, sour and spicy. Hagalkai Mavinkai Gojju tastes best with rice. This curry suits a vegan or plant based diet, gluten free diet and a Jain diet.

Recipe Type:  Curry
Cuisine:            South Indian
Prep Time:     1 Hour 30 Minutes
Cook time:     45 minutes
Total time:     2 Hours 15 Minutes
Yield:                Serves 3-4

Ingredients:


2 Bitter Gourd (Karela / Hagalkai)
1 Raw Mango
0.5 cup grated Coconut
1 Tbsp Coriander Seeds
1 tsp Rice
1 tsp Urad Dal
3-4 Red Chillies
0.25 Fenugreek Seeds (Methi dana)
0.5 tsp Mustard Seeds
0.5 tsp Turmeric Powder (Haldi)
2-3 Tbsp Jaggery Powder
1 Tbsp Tamarind (Optional)
3-4 tsp Oil
Salt to taste
Water as required


Method:


1. Peel and deseed/core the bittergourd (karela /hagalkai). Cut to 0.5" to 1" pieces.
2. Add the cut bittergourd to a bowl. Add 1 tsp of salt and mix well. Keep aside for 1-2 hour. You can also keep it overnight in a box in the fridge.
3. After 1-2 hour, add 1 cup water to the bittergourd and squeeze them gently. Now take a handful out of the water and squeeze well and keep the bittergourd aside. Continue to squeeze all the bittergourd, this helps in removing the bitter juices. Once all the bittergourd is squeezed, discard the water.
4. Add the bittergourd to a kadhai or pan and water to cover it. Cover and cook until the bittergourd is cooked through. Drain the bittergourd and keep aside. Discard the water.
5. Dice the raw mango into small pieces and add to the same kadhai. Add water and cook until the mango is soft. Drain and save the water.
6. In a dry pan, add the urad dal, rice and fenugreek seeds and toast on low heat until lightly golden. Remove from heat and allow to cool.
7. Add 1 tsp oil to the pan and add the dry red chillies and roast until crisp. Remove from heat and allow to cool.
8. Add the urad dal, rice, fenugreek seeds, red chillies, grated coconut and 0.5 cup of the water in which the mango was cooked to a blender. Blend until smooth.
9. Heat the remaining oil in a kadhai for the tempering and add the mustard seeds.
10. Once the mustard seeds splutter, add the ground masala and fry on low heat for 5-6 minutes.
11. Add the turmeric powder, 1 Tbsp jaggery powder, salt and 0.5 cup water and mix well.
12. Add in the boiled bittergourd and mango.
13. Add salt and jaggery to taste if required. If the curry is not sour enough, soak the tamarind in a little warm water and squeeze out the tamarind juice and add to the curry.
14. Add more water if you want a thinner consistency.
15. Simmer on medium heat for 4-5 minutes.
16. Serve hot with rice or chapati.


If you liked this, you may also like:

Pshingiri | Saasav

Coorg Pumpkin Curry kaddu sabzi coconut vegan kumbalkai palya
Pumpkin Curry
raw mango rice
Mavinkai Chitranna
Read more ...

Pineapple Squash Recipe | How to make pineapple juice concentrate [Video]


Pineapple squash recipe with step by step photo and video instructions. Pineapple squash is a pineapple drink concentrate made from fresh fruit. Water is added to the concentrate to make an instant juice when desired. Pineapple squash is vegan, gluten-free and fits a Jain diet. It is served chilled. 

In a hurry? Jump to Video or Jump to Recipe

Instant juice made from pineapple squash

Pineapple Squash + Cold Water + Ice cubes = Summer in a glass.

I'm not a big fan of the sweltering heat of Summer, but I love all the cold drinks that come with it. My ideal summer scene would have been sitting on a shack near the beach, sipping a chilled drink and eating french fries. An evening I had in my plans but had to get postponed due to everything happening in the world at the moment.

But no regrets, because now I get to sit in my unusually quiet balcony on my bean bag without a care in the world and sip on this instant pineapple juice while I listen to all the bird activity. With all the humans inside, the birds have returned. It is nice to hear them chirping or even cawing around. I went from hating a pineapple as a child to loving it as an adult. And I love having this pineapple squash at hand these days.

Instant juice made from pineapple squash

What is pineapple squash?

Pineapple Squash is a pineapple juice concentrate that you can mix with water or plain soda to instantly make a pineapple flavored drink. It also can be used in mocktails and cocktails.


The details...

Firstly, pick the ripest and sweetest pineapples, that are really fragrant. You will need less sugar if the fruit itself is very sweet. You can peel and cube the pineapple whenever you have time and keep it in the fridge until you are ready to prepare the squash.

Use a juicer or a blender to puree the pineapples. This puree needs to be strained to remove any fiber that is present. Use a fine-mesh strainer to get the smoothest puree that is free of any large bits or unwanted fiber. 

The sugar syrup is a simple one, 2 parts sugar to 1 part water. The amount of sugar required depends on how sweet you like your drink and how sweet is your fruit. The fruit I bought was not very sweet, more on the tard side, so I needed all the sugar I used. The sugar syrup is boiled until you get a one string consistency. Once you have that, add in the strained puree and simmer on low heat for 5-8 minutes. I realized that the longer I cook the squash, the more the pineapple loses its freshness, hence I cooked it much less. However, it does need cooking, so don't skip it, especially if making large batches.

Once the squash cools down, we add lime juice to help in preservation. Although I really didn't need it, considering the squash barely lasted a week, and that too because I had a decent stock of Lemon Ice Tea already in the fridge and some store bought soft drinks.

Store the pineapple squash in a clean sterile bottle in the fridge. I prefer a glass bottle, but you can use plastic too. I'd completely avoid metal bottles.

And when you are in a mood to have pineapple juice, mix the concentrate with plain or sparkling water, throw in some ice cubes and enjoy!!

Instant juice made from pineapple squash

Instant juice made from pineapple squash


If you made this recipe, let me know! Leave a comment here or on Facebook tag your tweet with @oneteaspoonlife on Twitter and don't forget to tag your photo @oneteaspoonoflife on Instagram. You can also email me at onetspoflife@gmail.com I'd love to see what you are up to.

If you like this recipe, do not forget to share it with your friends and family! 


You can follow One Teaspoon Of Life on FacebookTwitterInstagramPinterest or you can subscribe to One Teaspoon Of Life and receive all the latest updated via Email


Video Recipe


--------------------------------------------------------------------------------------------------------------------------

Pineapple Squash Recipe | How to make Pineapple Juice Concentrate


Instant juice made from pineapple squashPineapple squash is a pineapple drink concentrate made from fresh fruit. Water is added to the concentrate to make an instant juice when desired. Pineapple squash is vegan, gluten-free and fits a Jain diet.

Recipe Type:  Beverage
Cuisine:            Indian
Prep Time:     20 minutes
Cook time:     30 minutes
Total time:     50 minutes
Yield:                500ml


Ingredients:


2 small Pineapples (600 gms), peeled and cubed
1 cup Sugar
1 cup Water
1 Tbsp Lime Juice

Method:


1. Add the peeled and cubed pineapple to a blender along with 0.25 cup of water and blend to a smooth puree.
2. Strain this puree using a fine mesh strainer and keep aside.
3. Heat the sugar and 0.5 cup water in a large sauce pan to make a simple sugar syrup. Simmer the sugar syrup until it has 1 string consistency.
4. Pour in the pureed pineapple and cook on low heat for 5-8 minutes.
5. Remove from heat and allow to cool to room temperature.
6. Add the lime juice and mix well.
7. Store in a clean glass or plastic bottle in the fridge.
8. To serve, fill 1/3rd of the glass with pineapple squash and add 2/3rd glass of cold water. Add ice cubes if desired.
9. Serve chilled.


Step by step photo instructions:


Steps to make Pineapple concentrate

Steps to make Pineapple concentrate

If you liked this, you may also like:

muskmelon sherbar
Kharbuja Panaka

raw mango drink
Aam Panna
Lemon Ice Tea
Lemon Ice Tea


Read more ...

Aam Panna Recipe | Kairi Panna Recipe [Video]


Aam Panna or Kairi Panna is a drink made from boiled raw mangoes and jaggery. Aam Panna is popularly made in summer across India.

In a hurry? Jump to Video or Jump to Recipe

raw mango drink

Aam Panna, a beverage from my school days. My best friend's mom made the best Aam Panna ever and she never forgot to share a bottle of the concentrate with me. It was she who introduced me to this tangy sweet spicy beverage made of raw mangoes that is so popular during summers.

As I write this I realize it isn't really the right time to post this. By right time, I mean right now, this instant. Because it has just rained heavily and it is so cool that all I feel the need for is a hot cup of tea. But then I had this post all ready to go with the recipe jotted down, photos edited and the video uploaded. So I decided to go ahead and post it. And anyway it may not have rained in your city and it may be the absolute perfect time for you to try this golden treat.

Aam Panna is made in several ways, as I have learnt over the years. Earlier in my blogging days, I had posted one recipe that does not require boiling of the mangoes. That recipe involves grating the raw mango and soaking it in water, allowing the flavor of the mangoes to infuse into the water. That takes a little more time and the results are markedly different. I would not rate one above the other as each has its own taste. I've also seen recipes where the raw mango is roasted on coals or a gas stove until it is charred instead of boiling the mangoes. While I have not tried this recipe, it does sound very interesting. The one I am sharing today is the most common recipe out there.

raw mango drink

To make the Aam Panna, select firm raw mangoes. The mangoes are supposed to be unripe and sour. The mangoes are boiled, either with skin or without and then the pulp is mashed in a blender along with a sugar and spices like cumin and pepper. Some folks add cardamom too, but I feel it overpowers the fragrance of the mango, so I skip it. I also replaced the sugar with powdered organic jaggery and hence the bright orange color of my Aam Panna. If you use sugar, you tend to get a more golden color. You can also add mint while blending the panna. However, I don't recommend it if you plan to store the panna for long as the mint tends to get bitter after a few days. The blended puree is a concentrate and can be stored in the fridge for the whole of Summer. When you feel like having Panna, dilute it with water until the taste feels just right and serve. You can also add muddled mint leaves or mint puree while serving. The Aam Panna can also be diluted with Soda water or sparkling water for some added zing.

A homemade panna never has a bright green color. If you want that color, you can add food coloring, but I don't recommend it.

raw mango drink


If you made this recipe, let me know! Leave a comment here or on Facebook tag your tweet with @oneteaspoonlife on Twitter and don't forget to tag your photo @oneteaspoonoflife on Instagram. You can also email me at onetspoflife@gmail.com I'd love to see what you are up to.


If you like this recipe, do not forget to share it with your friends and family! 


You can follow One Teaspoon Of Life on FacebookTwitterInstagramPinterest or you can subscribe to One Teaspoon Of Life and receive all the latest updated via Email


Video Recipe


--------------------------------------------------------------------------------------------------------------------------

Aam Panna Recipe | Kairi Panna Recipe


raw mango drinkAam Panna or Kairi Panna is a drink made from boiled raw mangoes and jaggery. Aam Panna is popularly made in summer across India.

Recipe Type:  Beverage
Cuisine:            Indian
Prep Time:     15 minutes
Cook time:     15 minutes
Total time:     30 minutes
Yield:                Makes 18-20 glasses

Ingredients:


4 Raw Mangoes
2 cups Jaggery Powder
1 Tbsp Pepper, freshly crushed
1 Tbsp Cumin Powder
0.25 tsp Black Salt
0.25 tsp Salt
Water as required

Method:


1. Pressure cook the raw mangoes until they are cooked. You can also boil them in a pot until done.
2. Allow the mangoes to cool, then peel them.
3. Squeeze out the pulp of the raw mangoes and add to a blender.
4. Add in the jaggery powder or sugar, roasted cumin powder, pepper powder, black salt and salt.
5. Blend to a smooth paste with a little water. Adjust the quantities of jaggery, spices and salt as required.
6. Store the aam panna concentrate in a glass bottle in the fridge.
7. To serve the panna, add 3-4 Tbsp of the concentrate to a glass. Add in ice cubes (optional) and cold water. Stir and serve.
8. If the panna feels less sweet after diluting with water, then add a little jaggery powder while serving.


If you liked this, you may also like:

Indian mocktail made with guava and spices
Guava Panna

muskmelon sherbar
Kharbuja Panaka
rose yogurt beverage smoothie curd flavored drink Indian Punjabi
Rose Lassi


Read more ...

Blueberry Litchi Coconut Mocktail


Summer is not yet over! Enjoy this mocktail made with sweet blueberries, fragrant litchis and healthy coconut water before it is too late.


Happy July to you!!

Can you believe we are already six months down in 2018? Time surely flies fast. 

While it is already monsoons in this part of the world, I know Summer is just starting for a few folks out there.

This mocktail was waiting to be made for a long time now. I watched a similar cocktail on TV and I was bowled. I had to make it. The only thing that was really stopping me was the unavailability of blueberries. And I finally got some plump sweet blueberries at Namdhari's over the weekend, that too at slashed prices. This was my first time eating sweet blueberries. Somehow, until date, I've only managed to get slightly sour ones and I had come to expect that blueberries never got sweeter as they ripened. But hey, they do get sweet. I'm yet to find sweet strawberries, but I now have some little hope that I may find it some day. 

I also chanced upon these extremely fragrant and flavorful litchis while I was out there. They grew at their own farm. I would never have picked up a bag of green litchis, but they let us try a few and they were so sweet, we could hardly believe it. I've only ever had red litchis. These litchis are so fragrant, I love opening my fridge just to catch a whiff!

Anyway, after the blueberries and the litchi, comes the coconut. This mocktail uses the tender coconut water - the best summer drink there is. I'm very lucky to have access to fresh tender coconuts, but if you don't, you can replace it with packaged tender coconut or young coconut water or just some Sprite or plain Soda or Sparkling water.

If the fruit you have aren't sweet enough, stir in some raw honey or sugar. I had really sweet fruits and tender coconut water, so I did not need to sweeten it any other way. Also, if you plan to make it in advance and serve it after a while, add a little lime juice or lemon juice so that it does not discolor. I had a brighter purple before I took the pics, but since I missed adding any citrus the color changed slightly. 

If you'd rather have this as a cocktail, you can add vodka or tequila. The original recipe from TV had vodka and lavender but no litchis. 

These paired really well with the Bread Pizza Cups that I shared on Friday. 


If you made this recipe, let me know! Leave a comment here or on Facebook, tag your tweet with @oneteaspoonlife on Twitter and don't forget to tag your photo #oneteaspoonoflife on Instagram. You can also email me at onetspoflife@gmail.com. I'd love to see what you are upto. 

If you like this recipe, do not forget to share it with your friends and family! 

You can follow One Teaspoon Of Life on Facebook, Twitter, Instagram, Pinterest and Google+ or you can subscribe to One Teaspoon Of Life and receive all the latest updated via Email

------------------------------------------------------------------------------------------------------------------------

Blueberry Litchi Coconut Mocktail


A non-alcoholic drink made with fresh blueberries, fragrant litchis and young tender coconut water.

Recipe Type:  Beverage
Cuisine:            International
Prep Time:     15 minutes
Cook time:     0 minutes
Total time:     15 minutes
Yield:                Serves 4

Ingredients:


1.5 cups Blueberries
10 Litchis
2 Tender Coconuts
0.5 Lime
Ice as required
Sweetner if required

Method:


1. Peel the litchis and deseed them.
2. Blend together 1 cup of blueberries, litchis and lime juice until smooth.
3. Strain if you desire.
4. Add coconut water and mix.
5. If the drink is not sweet enough for you, you can add raw honey or sugar.
6. Fill the glasses with ice and pour the drink over them. Add the remaining blueberries in each glass.
7. Serve chilled.


If you liked this, you may also like:

Indian mocktail made with guava and spices
Guava Panna

Panaka
Jamun Ice Candy
Read more ...

Sun dried Potato Chips | Aloo Chips | Aloogadde Sandige [Video]


Sun dried Potato Chips - potato slices that are dried in the sun and then deep fried and tossed in seasoning. Highly addictive!!

In a hurry? Jump to Video or Jump to Recipe

How to make sun dried potato chips recipe, batate sandige recipe, aloogadde sandige recipe, aloo chips, aloo sandge recipe, how to make aloo papad recipe, potato chips recipe at www.oneteaspoonoflife.com


The Sun dried Potato Chips are the BEST, seriously guys!!!

Who doesn't love potato chips? I'm sure even the Victoria Secrets models who are eternally on a diet wouldn't mind sneaking one in, once in a while. There are so many varieties of potato chips or crisps or whatever else you might want to call them, but I assure you, this is the best. Cause of course, you will make them yourself. And tell me if I'm wrong, but anything homemade tastes so much better than the preservative loaded air filled packet stuff. 

Recently, I was reading this really old article on Reddit about what surprised non Americans when they visited the USA, I was definitely surprised with the vastness of the country and the enormous food portions. But something that definitely got me crazy was the size of the Potato Chips packets. I think they are as tall as toddlers. Why are they so big? Are they meant to be family packs? If yes, how large is this family? Don't people get bored of the flavor after going through quarter of the packet? Or is it meant to last a month? I did not get that at all. I went a little nuts over the number of flavors though, you get every flavor under the sun.

How to make sun dried potato chips recipe, batate sandige recipe, aloogadde sandige recipe, aloo chips, aloo sandge recipe, how to make aloo papad recipe, potato chips recipe at www.oneteaspoonoflife.com


Back to the Sun, that's really the focal point today. Did I tell you how the Sun cheated us this year?We had the shortest summer ever, just ONE month. Just April. Summer came and went in the blink of an eye. Summer gets replaced by Monsoons in this part of the world and then everyday is just a dull cloudy day dotted with spells of rain. Usually, I'm a big fan of the rains, I simply love how everything turns bright green, and that fragrance when the rain hits the earth is simply divine. And rains, means deep fried deliciousness and loads of hot cups of chai. But this year I was a little disappointed. I had so many things planned for Summer, and I could barely scramble them in, in a month. But what I did manage to do , was sun dry some potatoes. 

You may have only heard of sun dried tomatoes, but believe me sun dried potatoes are even better!! And people have been doing it for ages, just not me though. This was my first and definitely not my last attempt. Potatoes barely take 3-4 days to dry and the drying makes them intense and all the more potatoey (if that were a word). 

So...

STEP 1 - Wash, peel, and slice the potatoes. 
STEP 2 - Soak the slices in salted boiling water until they are just about done.
STEP 3 - Lay them out on a cloth to dry in the sun.
STEP 4 - Deep fry them and toss them in salt and chilli powder.

Step 4 can be done months later. The chips can be stored for 3-4 months easily if stored in a clean dry air tight container. The good thing here is, you can decide how much to fry, you don't need to fry the entire batch at once and worry about them going soft, however, I assure you, that is not a problem, coz like all potato chips, these are irresistible.

How to make sun dried potato chips recipe, batate sandige recipe, aloogadde sandige recipe, aloo chips, aloo sandge recipe, how to make aloo papad recipe, potato chips recipe at www.oneteaspoonoflife.com

How to make sun dried potato chips recipe, batate sandige recipe, aloogadde sandige recipe, aloo chips, aloo sandge recipe, how to make aloo papad recipe, potato chips recipe at www.oneteaspoonoflife.com

Some tips to make sure your potato sun drying turns out to be the best...

1) Do not slice the potatoes very thin like you would for regular chips. These need to be around 2mm. 
2) As you slice the chips, put them in water so they don't darken due to oxidization.
3) The chips are soaked in boiling water until they are just about done. If you take them out too quickly, the chips will darken while drying. If you leave them in there too long, they will be completely cooked. So you need to drain them out in 5-8 minutes. Squeeze a chip in between your thumb and index finger and the chip should give when you apply a little pressure. If it does not, it still needs to be cooked, if it gives too soon, it is overcooked.
4) Dry on a cloth, not a tray or plate or paper. The chips will stick to whatever you have placed under it, and removing them from a tray or paper can be difficult. Preferably, use a white cloth or a light colored one as you don't want color running onto the chips.
5) If the chips turn black on the edges or in small spots, you can still use them, just make sure these are the ones you fry first.
6) If you don't have enough sun, place them in the shade, they will dry there as well, but will take much longer.

And last, you can flavor these chips with whatever flavor you like - curry, mint, oregano etc. Just do it immediately after frying while the chips are still hot so the flavor sticks to them. Or you can just salt them and enjoy the potato flavor to its maximum.

How to make sun dried potato chips recipe, batate sandige recipe, aloogadde sandige recipe, aloo chips, aloo sandge recipe, how to make aloo papad recipe, potato chips recipe at www.oneteaspoonoflife.com

If you made this recipe, let me know! Leave a comment here or on Facebook tag your tweet with @oneteaspoonlife on Twitter and don't forget to tag your photo #oneteaspoonoflife on Instagram. You can also email me at onetspoflife@gmail.com I'd love to see what you are upto.


If you like this recipe, do not forget to share it with your friends and family! 


You can follow One Teaspoon Of Life on FacebookTwitterInstagramPinterest or you can subscribe to One Teaspoon Of Life and receive all the latest updated via Email

Video Recipe


--------------------------------------------------------------------------------------------------------------------------

Sun dried Potato Chips


How to make sun dried potato chips recipe, batate sandige recipe, aloogadde sandige recipe, aloo chips, aloo sandge recipe, how to make aloo papad recipe, potato chips recipe at www.oneteaspoonoflife.comPotato slices that are sun dried and then deep fried and tossed in seasoning.

Recipe Type:  Snacks
Cuisine:            Indian
Prep Time:     3 days
Cook time:     10 minutes
Yield:                Serves 4-5


Ingredients:


3-4 medium sized Potatoes
Salt to taste
Red Chilli powder to taste
Water as required
Oil for deep frying

Method:


Wash and peel the potatoes.
Slice the potatoes to about 2mm thickness and immerse in water to prevent them from browning.
Boil water in a large pot, add salt.
Once it comes to a rolling boil, lower heat and add the potato slices to it. Boil for 2-3 minutes then turn off the heat.
Let the potato slices soak for 5-8 minutes. Squeeze a slice between your thumb and index finger and it should give slightly after you apply a little pressure. If it does not, allow it to soak longer. If it gives too quickly, it has overcooked, remove from water immediately.
Drain the potato chips and lay them out on a white cloth in the sun. Cover with a light muslin cloth to prevent dust from settling on to the chips. You can dry them in shade as well.
Leave it in the sun for 3-4 days or until completely dried.
Store in a clean dry air tight container. It can be stored for 3-4 months.
When you want to eat the chips, deep fry them and toss with salt and chilli powder immediately.


How to make sun dried potato chips recipe, batate sandige recipe, aloogadde sandige recipe, aloo chips, aloo sandge recipe, how to make aloo papad recipe, potato chips recipe at www.oneteaspoonoflife.com


If you liked this, you may also like:

Balekayi balekayee podi kelyachi kapa raw banana fry vegan snacks indian goan maharashtrian
Plantain Chips

Jeegujje Podi
popular Indian snack - baked flat discs made of four and spices
Baked Papdi


Read more ...