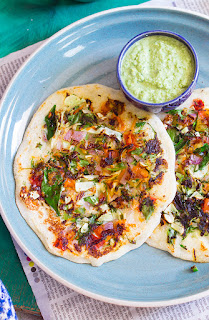
Jain Pav Bhaji has a bhaji (curry) made with raw banana or plantain. Jain Pav Bhaji is made without potatoes, onions, ginger or garlic. The bhaji is served along with buttered pav.
In a hurry? Jump to Video or Jump to Recipe

Yay! It's friday and I had an awesome evening. I logged off early for the day as I finished my work early. Which was a delight after several days of stress. I decided to take some time off for myself.
And when I want to relax and enjoy some me time, I visit food markets. Yes, nothing can excite me more than seeing the options in food and props out there. A true blue food blogger at heart. So I went to FoodHall and window shopped a lot there. Finally picked up some great looking sourdough bread and some exotic flavored cream cheese for my breakfast tomorrow. So looking forward to the morning, I can't wait for the night to fly through.
Going forward to my recipe of the day - Jain Pav Bhaji. Pav Bhaji is a popular street food that most probably originated out of Mumbai or just got super popular in Mumbai. Hence, its mostly called Mumbai Pav Bhaji. The "Bhaji" refers to a spicy curry made with mashed vegetables that is usually served with lots of butter and chopped onions and a quarter of a lime to be eaten along with a fluffy light square bread called "Pav". The bhaji is usually made of potatoes and other mixed vegetables like capsicum, carrot, onions, tomatoes etc. But this recipe is unique because it does not use any root vegetables, which are the base of a regular Mumbai Pav Bhaji.

The first "dharma" or principle of Jainism, an ancient religion in India, preaches non violence. While I was aware of Jainism, marrying a Jain guy brought me closer to this way of life. I started noticing life more where I would never have. I now make sure I look down when I walk in gardens and on garden paths, just so that I don't stamp an ant or a caterpillar. But life, in Jainism is not limited to animals or insects, it also extends to vegetables and fruits. Those who follow the religion strictly refuse to eat anything that grows below the ground. Vegetables like garlic, ginger, onions, potatoes, carrots etc. Since uprooting the plant to eat the root, actually kills the plant as well as the microorganisms that thrive underground. While my new family isn't extremely strict and follows this diet only on festivals and other good occasions, there are a few friends who live their daily lives avoiding the root vegetables.
In the past when I thought of a Jain Pav Bhaji, I always thought it was Pav Bhaji that was made without onions and garlic, it never struck me that Potato is also a no-no. This time when Raj brought a lot of home grown raw Bananas from my in-law's place, I decided to do something different with them and attempt a Jain Pav Bhaji. I had never expected it to taste so similar to the regular Mumbai Pav Bhaji. I never missed the flavor of the garlic or the onions, it tasted the same as always.


If you made this recipe, let me know! Leave a comment here or on Facebook, tag your tweet with @oneteaspoonlife on Twitter and don't forget to tag your photo @oneteaspoonoflife on Instagram. You can also email me at onetspoflife@gmail.com I'd love to see what you are upto.
If you like this recipe, do not forget to share it with your friends and family!
Video Recipe
--------------------------------------------------------------------------------------------------------------------------
Jain Pav Bhaji Recipe
Jain Pav Bhaji has a bhaji (curry) made with raw banana or plantain. Jain Pav Bhaji is made without potatoes, onions, ginger or garlic. The bhaji is served along with buttered pav.Recipe Type: Snacks
Cuisine: Indian
Prep Time: 10 minutes
Cook time: 40 minutes
Total time: 50 minutes
Yield: Serves 3-4
Author: Anupama
Ingredients:
2 Raw Banana
3 Tomatoes
1 cup Cauliflower Florets
0.5 cup Green Peas
0.5 Capsicum
2 Tbsp Oil
2-3 tsp Pav Bhaji Masala
0.5 tsp Turmeric Powder
1 tsp Red Chilli Powder
1 Lime
Handful of Coriander leaves
Salt to taste
Water as required
Butter to serve (Optional)
Method:
1. Cut the raw bananas into 3 large pieces. Add 2 cups of water and pressure cook until completely cooked.
2. Drain and allow the bananas to cool.
3. Cut the cauliflower into florets and boil them along with the green peas until cooked. This can either be pressure cooked or in a open pot.
4. Drain and keep aside.
5. Once the bananas are cool, peel the bananas and roughly mash them.
6. Puree the tomatoes in a mixer/blender.
7. Heat oil in a large frying pan. You can also use a kadhai or a large tava.
8. Once the oil is hot, add in the pureed tomatoes and cook on medium heat for 3-4 minutes. Keep stirring to prevent the tomatoes from burning.
9. Add in the turmeric powder and the pav bhaji masala. Pav bhaji masala is pretty spicy, so I recommend adding it by the spoonfuls and adjust according to taste.
10. Mix well and add in the mashed bananas, boiled cauliflower, peas and finely chopped capsicum.
11. Using a potato masher, mash the vegetables. Mash as per the consistency you want. If you want a chunky bhaji, mash roughly.
12. Add a little water and continue to mash until you get the desired consitency.
13. Add salt to taste and mix well. Add in the red chilli powder if using. You can also add more pav bhaji masala at this point. Mix well.
14. Cook on low heat for 8-10 minutes. Stir occassionally.
15. If the bhaji gets too dry, add a little water. If it is too watery, cook it longer so that the water evaporates.
16. Turn of the heat and add in the lime juice to taste.
17. Garnish with the chopped coriander leaves.
18. Add a generous spoonful of butter to each plate while serving. Skip this step if making for a vegan crowd.
19. Serve with butter toasted Pav.
If you liked this, you may also like:

 Mangalore Banana Buns