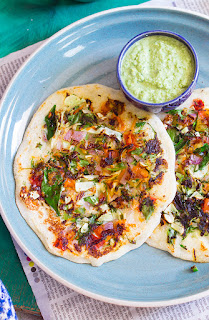
Mavinkayi Chitranna or Raw Mango Rice is a vegan South Indian sour and spicy mango flavored rice made from tart raw mangoes and leftover rice. Mango Rice takes less than 30 minutes to make. Raw Mango Rice is also gluten free.
In a hurry? Jump to Video or Jump to Recipe

A quick weeknight fix. That's exactly what this Mavinkayi Chitranna or Raw Mango Rice is.
We've had a week of thunderstorms here in Bangalore and it's been scary. I scare easy, but thunder has never scared me, but I have been pretty jumpy the last weekend. The sound was akin to the sky ripping apart and a few of these extremely loud ones even managed to wake me up. Although we've been swamped with unseasonal rains, I still believe it is Summer, because mangoes, you know. While Bangalore really doesn't have a season for most things, that is, you can find pumpkins and beets all year round, but Mangoes, come only once a year in Summer. So when Summer gives you mangoes, you make sure you make use of it to the fullest. Ripe, raw and everything in between. If you like Mangoes, as much as me, you may also enjoy these other Mango recipes:
AAM PANNA
INSTANT MANGO PICKLE
RAW MANGO GOJJU
HAGALKAI MAVINKAYI GOJJU
MANGO CHEESECAKE
FRUIT TART WITH MANGO CREAM
AAMRAS / MAVINKAYI SEEKARNE

I usually shop for the week on Saturday and then prep my veggies for the week ahead. Amidst the thunder and the crazy winds and the heavy downpour, I barely managed to get any meal prep done last weekend. So this Raw Mango Rice just pulled me through Monday. No prep really required, except may be cooking the rice.
Mavinkayi is the Kannada word for raw mangoes and Chitranna, well that's just colorful rice. In all other seasons, Chitranna is made using lemons or limes, but come Summer, tart raw mangoes are the preferred choice. Mavinkayi Chitranna is more of a South Indian fried rice in which leftover rice is tossed with a raw mangoes.
To make Mavinkayi Chitranna, use firm and tart raw mangoes. All green mangoes aren't raw, so pick carefully. Once you have the raw mangoes and some leftover rice, you are all sorted. To make the Raw Mango Rice, all we do is make a tempering of mustard seeds, a few lentils and then toss in grated raw mango along with turmeric and salt and allow the raw mango to cook down slightly. Then toss in the rice and add salt and mix well. Yes, it's as simple as that.
This tastes amazing with a side of Mango pickle, yes more mangoes, or a simple raita.
P.S. - This is a repost of a 2015 post. Only video is added and a few photos. Recipe remains the same.

If you like this recipe, do not forget to share it with your friends and family!
Video Recipe
--------------------------------------------------------------------------------------------------------------------------
Mavinkayi Chitranna Recipe | Raw Mango Rice Recipe
Mavinkayi Chitranna or Raw Mango Rice is a vegan South Indian sour and spicy mango flavored rice made from tart raw mangoes and leftover rice. Mango Rice takes less than 30 minutes to make. Raw Mango Rice is also gluten free.Recipe Type: Main
Cuisine: Indian
Prep Time: 10 minutes
Cook time: 20 minutes
Total time: 30 minutes
Yield: Serves 2-3
Ingredients:
3 cups cooked Rice
0.5 cup Raw Mango, grated
2 Tbsp Oil
0.5 tsp Mustard Seeds
1 Tbsp Urad Dal
1 Tbsp Chana Dal
1 Sprig Curry leaves
1-2 Tbsp Peanuts
1 Green Chilli, finely chopped
0.5 tsp Turmeric Powder
2 Tbsp Water
Salt to taste
Fresh grated coconut to garnish
Coriander leaves to garnish
Method:
1. Heat oil in a pan and add the mustard seeds.
2. Once the mustard seeds splutter, add in the chana dal and the urad dal and saute until lightly browned.
3. Add in the peanuts and curry leaves and fry until the peanuts are browned.
4. dd in the grated raw mango, turmeric powder, salt and a little water and cook until the mango softens slightly.
5. Add in the rice and mix well.
6. Garnish with the chopped coriander leaves and freshly grated coconut.
7. Serve hot.
If you liked this, you may also like:
|
|
|