Showing posts with label Vegan. Show all posts

Spicy Guava Cooler | Peru Panna | Guava Panna Recipe


Indian summer cooler (mocktail) made with Guava and spices!

Indian mocktail made with guava and spices

If there was another fruit, other than the mango, that screams Summer to me, it is the guava. A better part of our childhood summers was spent on guava trees. They are some of the easiest trees to climb, if you are into that stuff. We would be tree hopping all morning until it was time for lunch. Mango, guava, and so many more tree. Me not so much as Gee and my cousin.

If you've had  pleasure of plucking a fruit right from the tree and eating it then and there, you know how that feels. That fruit is so much more sweeter than what we buy outside.

After moving to Bangalore, I'm yet to spot a guava tree, but that doesn't stop me from buying and eating them. After all, it brings on nostalgia, and who doesn't love that?

This is the first time I did something other than directly eating the fruit. I made us a summer drink. Guava Panna!

Indian mocktail made with guava and spices

Panna is a spicy summer drink most commonly made from raw mangoes. Check out that recipe here.

I've used fresh guavas to make the juice, but feel free to use your favorite Guava Juice to make the same. I added a little twist to the regular guava juice to make the Guava Panna. The juice is spiced with roasted cumin powder, red chilli powder or paprika, black salt, regular salt and some sort of sweetener if the guava isn't sweet enough. I used jaggery to sweeten up my drink, hence, the slightly brownish tinge to the drink.

Use the quantity of the ingredients in the following recipe as a guiding value and adjust them according to your taste. You can add mint, lime and/or sparkling water or soda to create your own version of the Guava Panna.


Indian mocktail made with guava and spices

If you made this recipe, let me know! Leave a comment here or on Facebook, tag your tweet with @oneteaspoonlife on Twitter and don't forget to tag your photo #oneteaspoonoflife on Instagram. You can also email me at onetspoflife@gmail.com. I'd love to see what you are upto. 

If you like this recipe, do not forget to share it with your friends and family! 

You can follow One Teaspoon Of Life on Facebook, Twitter, Instagram, Pinterest and Google+ or you can subscribe to One Teaspoon Of Life and receive all the latest updated via Email

---------------------------------------------------------------------------------------------------------------------------


Indian mocktail made with guava and spicesSpicy Guava Cooler | Peru Panna | Guava Panna Recipe


Guava Panna is an Indian summer drink made with guava and spices.

Recipe Type:  Drink
Cuisine:            Indian
Prep Time:     10 minutes
Cook time:     0 minutes
Yield:                Serves 3

Ingredients:


3 glasses Guava Juice or juice of 1 large Guava
1 tsp Red Chilli Powder
2 tsp roasted Cumin Powder
1 tsp Black Salt
2-3 tsp Sugar or Jaggery (Add sugar only if juice is not sweet enough)
Squeeze of lime (Optional)
Crushed mint leaves (Optional)

Method:


1. Mix all the ingredients in a large jug.
2. Adjust the spices and sugar according to your taste.
3. Chill and serve.


Indian mocktail made with guava and spices


If you liked this, you may also like:

rose yogurt beverage smoothie curd flavored drink Indian Punjabi
Rose Lassi

Panaka
Aam Panna
Raw Mango Panna
Read more ...

Instant Mango Pickle [Video Recipe]


Quick and easy to make Indian mango pickle with video instructions. Simple and flavorful!

Instant Indian spicy pickle made with raw mangoes recipe

It's been long that we spoke about Mangoes. They are making their presence felt in the market and it's time to start giving them the attention they deserve.

I am all for enjoying the succulent sweet ripe fruit as is. But I LOVE cooking with the tart raw mango. The tartness of the raw mango is so different from that of lime or tamarind. I just find it fresher, don't you? It may be my love for the fruit talking.

Read more ...

Avocado, Cucumber, Carrot Sushi | Vegan Maki Roll [Video Recipe]


Vegan Maki Sushi Roll made by rolling avocados, cucumber and carrots in sushi rice and Nori sheets.

Avocado, cucumber, carrot vegan maki sushi roll


Remember here, I spoke of Gee going to Malaysia and shopping in super markets? It paid off, a second time!! It is she who bought me the Nori Sheets and the Sushi Rice all the way from a Japanese store in KL. (You can buy them in Gourmet stores in Bangalore or buy them online).

Well, she looves sushi. And this time she got to eat them sitting at home in her pajamas without worrying if they are really vegetarian. Win-win! I always knew of sushi as a raw fish dish. But the first time I heard of a vegan one was when I was in California and my friend wanted to make me try some. I did not get the chance to try there, but I did try it the first chance I got once I was back in Bangalore and the love affair has continued since. Every single time I see a vegan sushi on the menu, I order it. This was my first time making it at home, but it definitely won't be the last.

Avocado, cucumber, carrot vegan maki sushi roll


Avocado, cucumber, carrot vegan maki sushi roll

Making sushi is really not that difficult, if you have the correct variety of rice. A lot of recipes online say you can use quinoa or brown rice or some other variety of rice. While I'm sure you can work with them if you are a pro at sushi making. For an amateur, sushi rice works best. This rice is very different from the other varieties of rice in my pantry. It is sticky, yet the grains hold their shape. Any Indian rice when cooked to become sticky, will turn mushy and become paste like. And that is definitely a no-no for sushi making. You want to be able to identify the grains, yet have them stick to each other. I was scared when I rolled my first roll, but the rice made it impossible for me to mess it up. So say what you may, according to me it is the rice that is the hero of the sushi. Making the rice is simple, you cook it as per instructions on the packet. Then spread it out in a large bowl or plate and mix in the vinegar, sugar and salt while smashing the rice a little. Adjust the vinegar, sugar and salt to your taste.

Once your rice is ready, you can fill your rolls up with basically anything. Keep it fresh and simple. I filled my rolls with avocado, cucumber and carrots. And for a few, I threw in some sauteed mushrooms as well. The flavor of a sushi comes majorly from the rice and the nori sheets. Nori sheets give the sushi a mild fishy umami flavor. 

Serve sushi with a good quality Soy Sauce, Pickled Ginger and Wasabi paste.

Note: Sushi is usually rolled with a bamboo mat, but the technique is achievable with a kitchen towel and a plastic wrap. Watch the video for more details!

Avocado, cucumber, carrot vegan maki sushi roll

Avocado, cucumber, carrot vegan maki sushi roll

If you made this recipe, let me know! Leave a comment here or on Facebook, tag your tweet with @oneteaspoonlife on Twitter and don't forget to tag your photo #oneteaspoonoflife on Instagram. You can also email me at onetspoflife@gmail.com. I'd love to see what you are upto. 

If you like this recipe, do not forget to share it with your friends and family! 

You can follow One Teaspoon Of Life on Facebook, Twitter, Instagram, Pinterest and Google+ or you can subscribe to One Teaspoon Of Life and receive all the latest updated via Email

Video Recipe


---------------------------------------------------------------------------------------------------------------------------


Avocado Cucumber Carrot Maki Sushi Roll

Avocado, cucumber, carrot vegan maki sushi roll
Vegan Maki Sushi Roll made by rolling avocados, cucumber and carrots in sushi rice and Nori sheets.
Recipe Type:  Appetizer
Cuisine:            Japanese
Prep Time:     30 minutes
Cook time:     20 minutes
Yield:                Serves 3-4. Makes 27-30 individual rolls.

Ingredients:


3 Nori Sheets
1 cup uncooked Sushi Rice
2 cups Water
2 Tbsp Vinegar
1.5 tsp Sugar or Jaggery
0.5 tsp Salt
0.5 Avocado
1 Cucumber
1 Carrot
Wasabi paste to serve
Soy sauce to serve

Method:


Making the Sushi Rice:


1. Wash and cook the rice as per instructions on the packet. I rinsed the rice once and pressure cooked it with 2 cups of water for 10 minutes on low-medium heat.
2. Once the rice is cooked, remove it into a large steel or wooden bowl or plate.
Heat the vinegar in a small pan, add the sugar and salt. Once the sugar has dissolved, remove from heat.
3. Add the vinegar to the rice and with a wooden spoon, mix it well. The rice should be sticky, yet retain the grain structure. Allow it to cool.


Making the Avocado Cucumber Carrot Maki Sushi Roll:


4. Slice the avocado and julienne the cucumber and carrot.
5. Take a kitchen towel and spread a plastic sheet on it. I used a clean plastic packet in which I had purchased rice. I cut it into a rectangle and laid it on top of the kitchen towel.
6. Place the nori sheet, shiny side down on the plastic sheet.
7. Take 1/3rd of the rice and place it on the nori sheet. Wet your hands and spread the rice until it covers the nori sheet. Layer it as evenly as you can. It doesn't have to be perfectly even, the rolling later will ensure it spreads evenly.
8. On one edge, place 1/3rd of the cucumber, carrot and avocado.
9. Gently roll the nori sheet until the vegetables are covered. Use the kitchen towel now to compress the vegetables.
10. Continue rolling until the full nori sheet is rolled up.
11. Using the kitchen towel, compress the roll. Turn and compress again.
12. With a sharp wet knife slice the roll into individual maki rolls. Wet the knife between each slice. Do not apply pressure while slicing, make gentle to and fro motions. The roll should be sliced in 2-3 knife movements.
13. Serve with pickled ginger, soy sauce and wasabi paste.


Avocado, cucumber, carrot vegan maki sushi roll


If you liked this, you may also like:
Vegan healthy soup made with white miso, wholewheat noodles and fresh vegetables
Vegan Miso Soup

Vegan Tomato Onion Avocado Olive Mint Coriander Italian Sourdough Baguette Bread Sandwich
Breakfast Bruschetta
Baked Tofu Lettuce Wraps
Read more ...

Ram Navami special Panaka recipe | Panakam Recipe


Panaka or Panakam is a traditional Indian cooler popular during Summers in South India!!


Traditional South Indian summer cooler


Traditional South Indian summer cooler

Panaka or Panakam is a traditional Indian cooler popular during Summers in South India. It is served along with spice buttermilk and a lentil salad called kosambri during the festival of Ram Navami.

This was one of those posts with a writer's block. I did not want to write about the weather, I did not want to write about my memories or childhood. Nothing special happened this week either. So I was kind of lost.  I started to write, then deleted it at least 3 times!!

So now I have settled on just talking about the ingredients that make up this mocktail like drink called Panaka.

Traditional South Indian summer cooler

Traditional South Indian summer cooler

Panaka is sweet, mildly tangy, warm with the ginger, earthy because of tulsi or holy basil and fragrant from the freshly ground cardamom. It is very similar to a lemonade but with different proportions.

One of the main ingredients in Panaka is jaggery. Jaggery is unrefined cane sugar. The closest in texture is Muscovado sugar. Jaggery has a complex flavor profile as compared to regular refined sugar. The darker the jaggery, the more complex the flavor. Dark jaggery is the least refined and purified, while the yellow jaggery has less impurities. With people looking for more organic stuff these days, the organic brown jaggery has become very popular.

Ginger is added for its health benefits. It is known to cleanse the body of toxins. If you cannot find fresh ginger, you can substitute it with dry ginger powder. Ginger also adds an earthy flavor to the drink while making it mildly hot.

Traditional South Indian summer cooler


Cardamom is the main flavoring agent. I used fresh cardamom pods that I lightly crushed with a mortar and pestle. You can use a store bought cardamom powder, but I highly recommend making it yourself.

Tulsi or Holy Basil leaves are added for health reasons again. I did not have any readily available, so I substituted with home grown mint leaves.

The squirt of lime is optional, but recommended. Some folks use a tamarind juice instead. You can add any souring agent, just don't let it get overpowering. Panaka is much milder than a regular lemonade. The predominant flavor is from jaggery and the cardamom.

Traditional South Indian summer cooler


Traditional South Indian summer cooler


If you made this recipe, let me know! Leave a comment here or on Facebook, tag your tweet with @oneteaspoonlife on Twitter and don't forget to tag your photo #oneteaspoonoflife on Instagram. You can also email me at onetspoflife@gmail.com. I'd love to see what you are upto. 

If you like this recipe, do not forget to share it with your friends and family! 

You can follow One Teaspoon Of Life on Facebook, Twitter, Instagram, Pinterest and Google+ or you can subscribe to One Teaspoon Of Life and receive all the latest updated via Email

---------------------------------------------------------------------------------------------------------------------------

Ram Navami special Panaka recipe | Panakam Recipe


Traditional South Indian summer coolerPanaka or Panakam is a traditional Indian cooler popular during Summers in South India.

Recipe Type:  Beverage
Cuisine:            South Indian
Prep Time:     10 minutes
Cook time:     0 minutes
Yield:                Serves 6-8

Ingredients:


1.5 litres Water
1.5 cups powdered Jaggery
6-8 green Cardamoms
2-3 Tbsp grated Ginger
1 lime
A handful of Tulsi or Mint leaves

Method:


Crush the seeds of the cardamom until fine.
Add the cardamom, grated ginger, powdered jaggery and juice of 1 lime to the water and stir until the jaggery has dissolved.
Add the tulsi leaves or mint leaves.
Refrigerate until serving.
Strain before serving. Serve chilled


Traditional South Indian summer cooler


If you liked this, you may also like:

rose yogurt beverage smoothie curd flavored drink Indian Punjabi
Rose Lassi

Pudina Majjige Soda
Pudina lemon juice limonana chia basil seeds sabze ka beej
Mint Lime Cooler
Read more ...

South Indian Chana Masala


Fragrant chickpea curry made in South Indian style with fresh coconut and whole spices. 

South Indian Chickpea Curry with coconut


That South Indian blood in me, is 50% coconut. I'm sure! 

Everything tastes a little better with some coconut in it, do you agree?

Now, that we have established ourselves as fans of that brown fruit or nut, lets move on. So who like chickpeas? I know I do. 

If you are still here, then you will love this South Indian style of making Chana Masala.

South Indian Chickpea Curry with coconut

Chana Masala is a curry made with Kabuli Chana or Chickpeas or Chhole. South Indians make it differently from the North Indians. The North Indian curry is heavy on tomatoes, while the South Indian one uses coconut. If you were looking for the North Indian curry, you will like these:
Amritsari Chhole, Pindi Chhole or this slightly different Chhole Palak.

While I'm super lucky to be in the tropics, where coconuts are easily available and not very expensive, you can replace the fresh coconut here with frozen coconut or with coconut milk.
If using coconut milk, just expect a paler color as you will not be roasting the coconut.

Now, back to the dish, it is actually very simple to make. You really don't need to be a chef. But you have to know your spices. Here, I have used whole spices that I dry roasted on low heat for a few minutes and then ground along with the coconut. You can use garam masala or chhole masala, but I highly recommend grinding those whole spices, just this one time. Grated fresh coconut is also roasted on low flame until it turns a golden brown. If you are using coconut milk, you don't have to do this step. Grind the spices and the coconut. Fry it for a while, then add the chickpeas and simmer. Garnish generously with coriander leaves. 

And this Chana Masala goes so well with crusty bread, some rice or light fluffy naans. You can make this curry and serve it right away, I think it tastes better the next day. A day or so in the fridge allows the chickpeas to soak in all the flavor. 

South Indian Chickpea Curry with coconut


South Indian Chickpea Curry with coconut


If you made this recipe, let me know! Leave a comment here or on Facebook, tag your tweet with @oneteaspoonlife on Twitter and don't forget to tag your photo #oneteaspoonoflife on Instagram. You can also email me at onetspoflife@gmail.com. I'd love to see what you are upto. 

If you like this recipe, do not forget to share it with your friends and family! 

You can follow One Teaspoon Of Life on Facebook, Twitter, Instagram, Pinterest and Google+ or you can subscribe to One Teaspoon Of Life and receive all the latest updated via Email


---------------------------------------------------------------------------------------------------------------------------


South Indian Chana Masala Recipe


South Indian Chickpea Curry with coconutSouth Indian Chana Masala is a spicy curry made with chickpeas, fresh coconut and whole spices.
Recipe Type:  Main
Cuisine:            Indian
Prep Time:     15 minutes
Cook time:     60 minutes
Yield:                Serves 2-3


Ingredients:


1 cup dried Chana or 1 can Chickpeas
0.75 cups grated fresh Coconut or 1 cup thick Coconut Milk
5-7 dry Red Chillies
1 small Onion
1 Tbsp Coriander seeds
1 tsp Fennel Seeds (Saunf)
0.5 tsp Cumin Seeds (Jeera)
1-2 Cloves (Lawang)
0.5" Cinnamon (Dalchini)
1 green Cardamom (Elaichi)
4-5 Black Peppercorns (Kali mirch)
0.5 tsp Turmeric Powder
1 tsp grated Ginger
1 tsp Tamarind pulp
4 tsp Oil
A handful of fresh coriander leaves to garnish
Salt to taste
Water as required

Method:


1. Soak the dried chickpeas in water for 8-10 hours.
2. Pressure cook with a 0.5 tsp of salt until completely cooked. Do not overcook them.
3. Dry roast the coriander seeds, fennel seeds, cumin seeds, cloves, cinnamon, cardamom and pepper on low heat until fragrant. That should take around 3-5 minutes. Remove from heat and keep aside.
4. Heat 1 tsp of oil in the same pan and on medium to high heat, roast the dry red chillies until they puff up. Remove from heat and keep aside.
5. Lower the heat, and add the grated coconut (if using) to the pan and on low heat, roast the coconut until it turns a golden brown.
6. Remove from heat and allow to cool.
7. Grind together the roasted whole spices, red chillies, roasted coconut, grated ginger, tamarind, turmeric powder and chopped onion along with a little water to a smooth paste. If using coconut milk, just grind together the spices, red chillies, ginger, tamarind, turmeric powder and onion.
8. Heat the remaining oil in a pan, and add the ground paste.
9. Fry on low heat for 2-3 minutes.
10. Add the cooked chickpeas, 1 cup of water and salt. Allow to come to a boil and simmer for 8-10 minutes.
11. If using coconut milk, then add it after 5 minutes of simmering and continue to simmer until the curry reaches the desired consistency.
12. Garnish with the chopped coriander leaves.
13. Serve warm/hot with rice, bread, or flatbread of your choice.


If you liked this, you may also like:

How to make vegan thai green curry recipe, asian curry recipe, how to make thai curry without fish sauce, vegan green curry recipe at www.oneteaspoonoflife.com
Vegan Thai Green Curry

How to make goan bhaji pao, pav bhaji, alsanyache tondak at One Teaspoon Of Life www.oneteaspoonoflife.com
Goan Alsane Tonak
How to make Amritsari Chhole recipe at www.oneteaspoonoflife.com How to cook pindi chhole with tomato at One Teaspoon Of Life Vegan Chickpea Recipes
Amritsari Chhole
Read more ...

Baked Falafel Beetroot Wraps


Baked chickpea falafels and hummus in a beetroot flatbread!


Baked chickpea falafels and hummus in a beetroot flatbread

Mediterranean food has so much to offer to vegetarians - dips, salads and of course, the ever so loved 
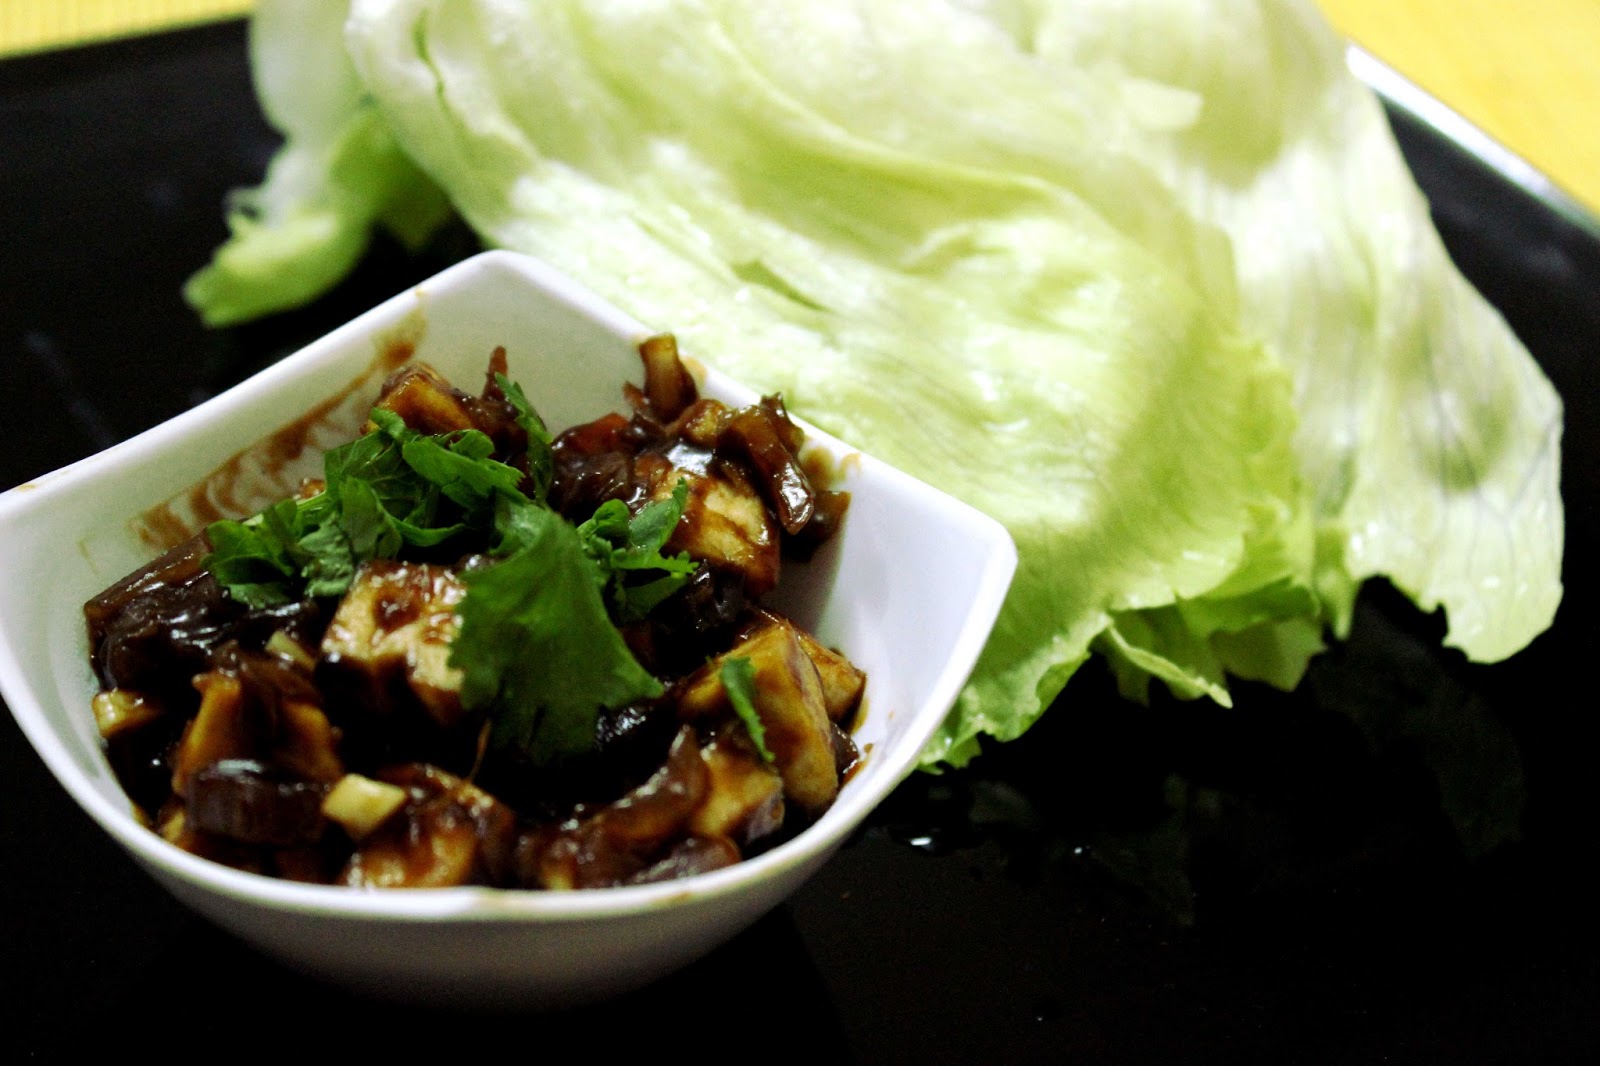
Falafels. The falafel is a great meat free option for anyone eating Mediterranean food, it is full of protein and fiber. While traditionally falafels are made with fava beans and are deep fried, I chose to make them with the easily available chickpeas and to bake them. I love fried falafels, but when one moves to eating healthy, one has to find the alternative to balance both health and flavor. And I can tell you for sure, there was no loss of flavor here!

Falafels are served in so many different ways - as an appetizer with dips, stuffed inside a pita pocket to make a sandwich or as a part of a bowl meal. I chose to serve it inside a vibrant pink beetroot wrap. 

Baked chickpea falafels and hummus in a beetroot flatbread


I have an obsession for wraps and rolls. I simply love them, they are so easy to eat and not so messy. And they are usually healthier than the sandwiches made with leavened white bread. When it comes to wraps, I always go for whole wheat. 

You will love this because:
  • Easy to eat, not messy
  • Healthy
  • Vibrant
  • You can customize it to your liking
  • Vegan
  • Delicious
To make the Baked Falafel Beetroot Wraps, I soaked dried chickpeas overnight. If you are using canned ones, you can start right away. I boiled a third of them to make hummus and used the remaining to make the falafels. I made my own hummus, just because it is so easy to make and I love the taste of fresh hummus, but you can save yourself the trouble and buy your favorite hummus.


Baked chickpea falafels and hummus in a beetroot flatbread

Baked chickpea falafels and hummus in a beetroot flatbread


For the falafels, I coarsely ground together uncooked chickpeas, fresh coriander leaves, green chillies, garlic along with coriander powder and cumin powder. Season as per taste. Add in a little flour or corn starch to help it bind better if the batter is too wet. While falafels are usually spherical, while baked it is preferred to flatten them, to increase the surface area that touches the baking sheet. The area that touches the sheet tends to crisp up, so lets increase that! If you don't have an oven, you can pan fry it with little oil. I suggest you make more than what is required, cause these taste delicious and make a great healthy snack!

For the wrap, I boiled beetroots and pureed them, then I added salt and wholewheat flour and kneaded a smooth dough with a little water. Rolled the wraps out and cooked them on a tava or griddle with a little oil. If you are too lazy to make the wrap, you can buy frozen chapatis or even use tortillas that only need to be heated up. But I definitely recommend making them fresh. They are soft and slightly sweet due to the natural sweetness of the beets. Plus they look so beautiful. You can add spice powders to the dough while kneading to jazz it up a little, just don't overpower it with a lot of them.

Finally to assemble, just spread the hummus on the flatbread, add the falafels and a simple salad of colorful peppers, cabbage or lettuce and onions. Toss in some olives or pickle if you would like. Roll it up and eat.

Baked chickpea falafels and hummus in a beetroot flatbread

If you made this recipe, let me know! Leave a comment here or on Facebook, tag your tweet with @oneteaspoonlife on Twitter and don't forget to tag your photo #oneteaspoonoflife on Instagram. You can also email me at onetspoflife@gmail.com. I'd love to see what you are upto. 

If you like this recipe, do not forget to share it with your friends and family! 

You can follow One Teaspoon Of Life on Facebook, Twitter, Instagram, Pinterest and Google+ or you can subscribe to One Teaspoon Of Life and receive all the latest updated via Email

If you liked this, you may also like:


---------------------------------------------------------------------------------------------------------------------------


Baked Falafel Beetroot Wraps


Baked chickpea falafels and hummus in a beetroot flatbreadBaked chickpea falafels with hummus and vegetables rolled in a whole wheat beetroot flatbread.

Recipe Type:  Main
Cuisine:            Mediterranean Indian Fusion
Prep Time:     8 hours (includes soaking time)
Cook time:     60 minutes
Yield:                Makes 6 wraps

Ingredients:

To make the Baked Falafels:


200 gms Chickpeas
1 Onion
2-3 Garlic Cloves
0.5 cup Coriander leaves (tightly packed)
2 Green Chillies
1 tsp Cumin powder
0.5 tsp Coriander Powder
0.5 Lime
0.5 tsp Baking Soda
1 Tbsp Corn Starch or Flour (Optional)
3 Tbsp Vegetable Oil
Salt to taste

To make the Beetroot Wrap:


2 cup Wholewheat Flour (atta)
1 large Beet root
0.5 tsp Red Chilli Powder
6 tsp Oil
Salt to taste
Water as required

To assemble the Wrap:


6 Beetroot Wraps
12 Falafels
6 Tbsp Hummus
4-5 leaves of Ice berg lettuce or Cabbage
0.5 cup julienne Capsicum
1 small Onion, sliced

Method:


To make the Baked Falafels:


Soak the chickpeas overnight or for 8-10 hours if using dried chickpeas. If using canned chickpeas, skip the soaking.
Drain out all the water and transfer the chickpeas to a food processor or a mixer.
Add the garlic, chopped onion, coriander leaves, chopped green chillies, lime juice, baking soda, cumin powder and coriander powder to the blender along with salt.
Pulse the food processor until everything is combined. Do not over process it and make it smooth and mushy. The batter has to just sticky enough to hold when pressed together.
Add corn starch or flour if the dough is too wet.
Refrigerate for 20-30 minutes.
Preheat the oven to 180 degree C.
Divide the mix into 12 equal portions.
Roll them into balls and flatten them.
Brush a baking sheet with oil. Place the falafels on the baking sheet.
Brush the falafels with oil.
Bake for 10 minutes, then flip them over and bake for another 10-12 minutes, until the falafels have browned.
Remove from the oven and keep aside.

To make the Beetroot Wraps:


Boil and peel the beetroot.
Allow it to cool and then puree it until smooth. Run through a sieve to get a smoother puree.
Transfer the uree to a large plate or bowl. Add 0.5 tsp of salt and red chilli powder and mix well.
Add in the whole wheat flour and start kneading. Add water as required.
Knead until the dough comes together.
This can be done while the falafel batter is resting in the fridge.
Divide the dough into 6 equal portions and roll them into balls.
Using a rolling pin, roll out the dough as thin as possible. Use wholewheat flour for dusting.
Heat a tava or a griddle and brush it with oil.
Cook the wrap on medium-high heat. Brush the wrap with a little oil and flip over.
When the wrap has a few brown spots, remove from heat and keep aside.
Do the same for all 6 portions.

To assemble the Baked Falafel Beetroot Wraps:


Spread hummus on the wrap.
Place the julienne capsicum, sliced onion and lettuce on the hummus.
Place 2 falafels on each wrap.
Roll and serve.


Read more ...