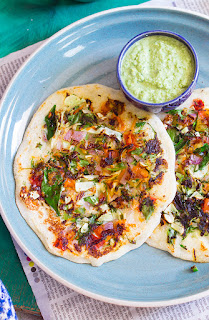
Masala Puri is a popular street food in Bangalore that is made by topping crushed crispy puris with boiled peas, spicy coconut masala gravy, finely chopped vegetables and Sev. Vegan and delicious!
In a hurry? Jump to Video or Jump to Recipe

What's the first thing that comes to your mind when you think of Street Food?
To me, it used to be Pani Puri, but since I moved to Bangalore, it has always been Masala Puri. The cozy spicy warmth of Masala Puri is perfect for these rainy evenings.
I was introduced to this by Raj. In fact, this doubled up as his dinner most days. He had a regular street vendor who made the best Masala Puri I've ever eaten. Unfortunately, the guy relocated and we never found out where. Since then I've been on the quest to find the perfect recipe to make it at home. And I arrived at this recipe. I first posted it 6 years ago, in July 2013, but the recipe was different back then. I have hence, updated the recipe and this is as close as I have gotten to the street version.

What is Masala Puri?
Masala Puri is a “chaat” or street food that originated in Karnataka. Masala Puri is spicy, warm, vegan snack that is a mix of various textures. It is made of crispy puris, green peas, a spicy gravy, sev and fresh vegetables.
The base of the Masala Puri is the crispy puris, the ones used to make Pani Puri. These puris are crushed to make a base, so you can use all the puris that did not fluff up or ones that have holes in them. If you don’t have access to puris, you can use any savory crispy base, like chips, papdi, crackers or even papads. Preferably, something plain and not flavoured.
The crushed puris are topped with boiled green peas. Dried green peas are used and never fresh peas. The taste of the two varies significantly, hence use the dried ones only. The dried peas are rehydrated overnight and then cooked with a little salt until completely cooked.
This is then topped with the masala gravy. This gravy is what flavours the masala puri. The gravy is made by blending roasted whole spices with coconut and a little of the cooked green peas. The blended paste is then salted and simmered to develop flavour. I have made different versions of the gravy, sometimes I add in the cinnamon and the cloves, and sometimes I leave it out. Which is why I have marked them optional in the recipe below. Masala Puri is always served warm to hot, so heat up the gravy before serving.
This is then topped with a mix of finely chopped vegetables like onions, tomatoes, carrots and coriander leaves and Sev. Sev is a deep fried gram flour noodles. The end result is a warm spicy bowl of comfort.

If you like this recipe, do not forget to share it with your friends and family!
Video Recipe
--------------------------------------------------------------------------------------------------------------------------
Masala Puri Recipe | Bangalore Street Food Style Masala Puri Recipe
Masala Puri is a popular street food in Bangalore that is made by topping crushed crispy puris with boiled peas, spicy coconut masala gravy, finely chopped vegetables and sev. Vegan and delicious. Recipe Type: Snacks
Cuisine: Indian
Prep Time: 8 Hours (includes soaking time)
Cook time: 45 minutes
Total time: 8 Hours 50 Minutes
Yield: Serves 3-4
Ingredients:
1 cup dried Green Peas
0.75 cup grated Coconut
1 tsp Coriander Seeds
0.5 tsp Cumin
4-5 Black Peppercorns
2 Marathi moggu
1 Mace (Japatre/ Javitri)
Pinch of Nutmeg (jayikayi)(Grated)
0.5" Cinnamon piece (Optional)
2 Cloves (Optional)
2 tsp Red Chilli Powder
Salt to taste
Water as required
1 small Onion, finely chopped
2 Tbsp Coriander leaves, finely chopped
1 Tomato, finely chopped
1 Carrot, grated
Sev to serve
20-25 Puri to serve
Method:
1. Soak the dried green peas for 8 hours. After 8 hours, boil the green peas in salted water until completely cooked.
2. To make the masala, dry roast the coriander seeds, cumin seeds, mace, nutmeg, peppercorns, marathi moggu, cinnamon (if using) and cloves (if using) for 2 minutes on low heat.
3. Grind together the roasted spices, grated coconut, 0.5 cups of cooked peas and 1 tsp red chilli powder with a little water until smooth.
4. Pour the blended masala into a kadhai and add 1 cup of water and allow to come to a boil. Add salt to taste and more red chilli powder (if required). Simmer on low heat for 8-10 minutes.
5. To assemble the masala puri, take 6-7 puris in a plate and crush them. Top with the cooked peas, masala gravy, grated carrots, chopped onion, chopped tomatoes, chopped coriander and sev.
6. Serve immediately.
If you liked this, you may also like:
|
|
|


|
|
|


|
|
|