Showing posts with label Lunch / Dinner. Show all posts

One Pot Corn Spinach Pilaf | Corn Palak Pulao Recipe [Video Recipe]


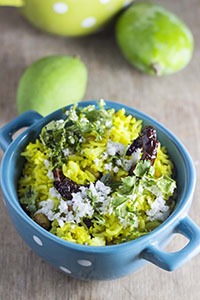
Corn Spinach Pulao - Delicately spiced Indian pilaf made with fresh spinach, sweet corn and whole spices.

Indian rice pilaf made with corn, spinach and whole spices


This Corn Spinach Pilaf / Corn Palak Pulao was long in the making.

To those who are new..ish here, we have a small balcony garden where weve been growing a few greens and vegetables. I love eating what we grow, I know it is genuinely organic. There is no pleasure greater than knowing that the food you eat is as healthy as it should be. We feed our plants with compost that we make at home again. Around 1.5 years ago, we started composting our kitchen waste and have not looked back since. Again, that is one soul satisfying venture that lets us keep garbage out of land fills while making enriching compost for our own garden and all it takes is 10 minutes of our time daily.


Indian rice pilaf made with corn, spinach and whole spices


A few weeks ago, I planted spinach in one of the grow bags out there. If you are just starting out in gardening, spinach is the first thing you should grow. It grows so easily. You plant it and water it once a day and you will see those tiny green leaves popping out in no time. And you now have a fresh supply of baby spinach ready to pluck when you want.

When I have home grown vegetables, I usually make a salad or something similar to let my veggies shine. This Corn Spinach Pulao is exactly that. It is simple, delicate, fragrant and so super easy to make. This is a classic OPOS dish - One Pot One Shot. 

To make the perfect Corn Spinach Pulao, use the best quality ingredients. This is a very simple dish, so there is nothing much to hide behind. Select the best Basmati Rice, preferably something that is long grain and aged. You can use either fresh or frozen corn. And definitely, use the freshest spinach you can get. 

Indian rice pilaf made with corn, spinach and whole spices

If you made this recipe, let me know! Leave a comment here or on Facebook, tag your tweet with @oneteaspoonlife on Twitter and don't forget to tag your photo #oneteaspoonoflife on Instagram. You can also email me at onetspoflife@gmail.com. I'd love to see what you are upto. 

If you like this recipe, do not forget to share it with your friends and family! 

You can follow One Teaspoon Of Life on Facebook, Twitter, Instagram, Pinterest and Google+ or you can subscribe to One Teaspoon Of Life and receive all the latest updated via Email

Video Recipe


---------------------------------------------------------------------------------------------------------------------------

Corn Spinach Pilaf | Corn Palak Pulao Recipe


Indian rice pilaf made with corn, spinach and whole spicesCorn Spinach Pulao is a delicately spiced Indian pilaf made with fresh spinach, sweet corn and whole spices. Vegan and gluten free.

Recipe Type:  Main
Cuisine:            Indian
Prep Time:     30 minutes
Cook time:     30 minutes
Yield:                Serves 2-3

Ingredients:


1 cup Basmati Rice
2 cups loosely packed Spinach leaves
0.5 cup Sweet Corn kernels
1 large Onion
1 tsp Ginger Garlic Paste
2 Tbsp Oil
0.5 tsp Cumin seeds
0.5 tsp Caraway seeds
1-2 Cloves
1-2 Green Cardamom
1 strand Mace
1 Bay leaf
0.5 inch Cinnamon
1.5 cup Water
Salt to taste

Method:


1. Wash the basmati rice 4-5 times until the water runs clear. Soak and keep aside for 20 minutes.
2. Slice the onions. Wash the spinach thoroughly and chop it.
3. Drain the rice and keep aside.
4. In a large thick bottomed pan, heat oil.
5. Once the oil is hot, add bay leaf and cinnamon.
6. Add all the other whole spices and fry on low heat for 1 minute.
7. Add sliced onions and fry for 1-2 minutes
8. Add ginger-garlic paste and fry until the onions turn golden brown.
9. Add chopped spinach and sweet corn. Stir fry for 1-2 minutes until the spinach wilts.
10. Add the basmati rice and water.
11. Add salt as per taste. The water should be salty when you taste it.
12. Cover and cook on low heat until the rice is cooked. It should take around 15-20 minutes.
13. Serve hot.


If you liked this, you may also like:

How to make ghee rice recipe at One Teaspoon Of Life www.oneteaspoonoflife.com
Ghee Rice

Raw Mango Rice
How to make methi rice recipe at www.oneteaspoonoflife.com How to make Fenugreek Pilaf recipe How to make Methi Pulao recipe at One Teaspoon Of Life
Methi Rice

Read more ...

South Indian Chana Masala


Fragrant chickpea curry made in South Indian style with fresh coconut and whole spices. 

South Indian Chickpea Curry with coconut


That South Indian blood in me, is 50% coconut. I'm sure! 

Everything tastes a little better with some coconut in it, do you agree?

Now, that we have established ourselves as fans of that brown fruit or nut, lets move on. So who like chickpeas? I know I do. 

If you are still here, then you will love this South Indian style of making Chana Masala.

South Indian Chickpea Curry with coconut

Chana Masala is a curry made with Kabuli Chana or Chickpeas or Chhole. South Indians make it differently from the North Indians. The North Indian curry is heavy on tomatoes, while the South Indian one uses coconut. If you were looking for the North Indian curry, you will like these:
Amritsari Chhole, Pindi Chhole or this slightly different Chhole Palak.

While I'm super lucky to be in the tropics, where coconuts are easily available and not very expensive, you can replace the fresh coconut here with frozen coconut or with coconut milk.
If using coconut milk, just expect a paler color as you will not be roasting the coconut.

Now, back to the dish, it is actually very simple to make. You really don't need to be a chef. But you have to know your spices. Here, I have used whole spices that I dry roasted on low heat for a few minutes and then ground along with the coconut. You can use garam masala or chhole masala, but I highly recommend grinding those whole spices, just this one time. Grated fresh coconut is also roasted on low flame until it turns a golden brown. If you are using coconut milk, you don't have to do this step. Grind the spices and the coconut. Fry it for a while, then add the chickpeas and simmer. Garnish generously with coriander leaves. 

And this Chana Masala goes so well with crusty bread, some rice or light fluffy naans. You can make this curry and serve it right away, I think it tastes better the next day. A day or so in the fridge allows the chickpeas to soak in all the flavor. 

South Indian Chickpea Curry with coconut


South Indian Chickpea Curry with coconut


If you made this recipe, let me know! Leave a comment here or on Facebook, tag your tweet with @oneteaspoonlife on Twitter and don't forget to tag your photo #oneteaspoonoflife on Instagram. You can also email me at onetspoflife@gmail.com. I'd love to see what you are upto. 

If you like this recipe, do not forget to share it with your friends and family! 

You can follow One Teaspoon Of Life on Facebook, Twitter, Instagram, Pinterest and Google+ or you can subscribe to One Teaspoon Of Life and receive all the latest updated via Email


---------------------------------------------------------------------------------------------------------------------------


South Indian Chana Masala Recipe


South Indian Chickpea Curry with coconutSouth Indian Chana Masala is a spicy curry made with chickpeas, fresh coconut and whole spices.
Recipe Type:  Main
Cuisine:            Indian
Prep Time:     15 minutes
Cook time:     60 minutes
Yield:                Serves 2-3


Ingredients:


1 cup dried Chana or 1 can Chickpeas
0.75 cups grated fresh Coconut or 1 cup thick Coconut Milk
5-7 dry Red Chillies
1 small Onion
1 Tbsp Coriander seeds
1 tsp Fennel Seeds (Saunf)
0.5 tsp Cumin Seeds (Jeera)
1-2 Cloves (Lawang)
0.5" Cinnamon (Dalchini)
1 green Cardamom (Elaichi)
4-5 Black Peppercorns (Kali mirch)
0.5 tsp Turmeric Powder
1 tsp grated Ginger
1 tsp Tamarind pulp
4 tsp Oil
A handful of fresh coriander leaves to garnish
Salt to taste
Water as required

Method:


1. Soak the dried chickpeas in water for 8-10 hours.
2. Pressure cook with a 0.5 tsp of salt until completely cooked. Do not overcook them.
3. Dry roast the coriander seeds, fennel seeds, cumin seeds, cloves, cinnamon, cardamom and pepper on low heat until fragrant. That should take around 3-5 minutes. Remove from heat and keep aside.
4. Heat 1 tsp of oil in the same pan and on medium to high heat, roast the dry red chillies until they puff up. Remove from heat and keep aside.
5. Lower the heat, and add the grated coconut (if using) to the pan and on low heat, roast the coconut until it turns a golden brown.
6. Remove from heat and allow to cool.
7. Grind together the roasted whole spices, red chillies, roasted coconut, grated ginger, tamarind, turmeric powder and chopped onion along with a little water to a smooth paste. If using coconut milk, just grind together the spices, red chillies, ginger, tamarind, turmeric powder and onion.
8. Heat the remaining oil in a pan, and add the ground paste.
9. Fry on low heat for 2-3 minutes.
10. Add the cooked chickpeas, 1 cup of water and salt. Allow to come to a boil and simmer for 8-10 minutes.
11. If using coconut milk, then add it after 5 minutes of simmering and continue to simmer until the curry reaches the desired consistency.
12. Garnish with the chopped coriander leaves.
13. Serve warm/hot with rice, bread, or flatbread of your choice.


If you liked this, you may also like:

How to make vegan thai green curry recipe, asian curry recipe, how to make thai curry without fish sauce, vegan green curry recipe at www.oneteaspoonoflife.com
Vegan Thai Green Curry

How to make goan bhaji pao, pav bhaji, alsanyache tondak at One Teaspoon Of Life www.oneteaspoonoflife.com
Goan Alsane Tonak
How to make Amritsari Chhole recipe at www.oneteaspoonoflife.com How to cook pindi chhole with tomato at One Teaspoon Of Life Vegan Chickpea Recipes
Amritsari Chhole
Read more ...

Baked Falafel Beetroot Wraps


Baked chickpea falafels and hummus in a beetroot flatbread!


Baked chickpea falafels and hummus in a beetroot flatbread

Mediterranean food has so much to offer to vegetarians - dips, salads and of course, the ever so loved Falafels. The falafel is a great meat free option for anyone eating Mediterranean food, it is full of protein and fiber. While traditionally falafels are made with fava beans and are deep fried, I chose to make them with the easily available chickpeas and to bake them. I love fried falafels, but when one moves to eating healthy, one has to find the alternative to balance both health and flavor. And I can tell you for sure, there was no loss of flavor here!

Falafels are served in so many different ways - as an appetizer with dips, stuffed inside a pita pocket to make a sandwich or as a part of a bowl meal. I chose to serve it inside a vibrant pink beetroot wrap. 

Baked chickpea falafels and hummus in a beetroot flatbread


I have an obsession for wraps and rolls. I simply love them, they are so easy to eat and not so messy. And they are usually healthier than the sandwiches made with leavened white bread. When it comes to wraps, I always go for whole wheat. 

You will love this because:
  • Easy to eat, not messy
  • Healthy
  • Vibrant
  • You can customize it to your liking
  • Vegan
  • Delicious
To make the Baked Falafel Beetroot Wraps, I soaked dried chickpeas overnight. If you are using canned ones, you can start right away. I boiled a third of them to make hummus and used the remaining to make the falafels. I made my own hummus, just because it is so easy to make and I love the taste of fresh hummus, but you can save yourself the trouble and buy your favorite hummus.


Baked chickpea falafels and hummus in a beetroot flatbread

Baked chickpea falafels and hummus in a beetroot flatbread


For the falafels, I coarsely ground together uncooked chickpeas, fresh coriander leaves, green chillies, garlic along with coriander powder and cumin powder. Season as per taste. Add in a little flour or corn starch to help it bind better if the batter is too wet. While falafels are usually spherical, while baked it is preferred to flatten them, to increase the surface area that touches the baking sheet. The area that touches the sheet tends to crisp up, so lets increase that! If you don't have an oven, you can pan fry it with little oil. I suggest you make more than what is required, cause these taste delicious and make a great healthy snack!

For the wrap, I boiled beetroots and pureed them, then I added salt and wholewheat flour and kneaded a smooth dough with a little water. Rolled the wraps out and cooked them on a tava or griddle with a little oil. If you are too lazy to make the wrap, you can buy frozen chapatis or even use tortillas that only need to be heated up. But I definitely recommend making them fresh. They are soft and slightly sweet due to the natural sweetness of the beets. Plus they look so beautiful. You can add spice powders to the dough while kneading to jazz it up a little, just don't overpower it with a lot of them.

Finally to assemble, just spread the hummus on the flatbread, add the falafels and a simple salad of colorful peppers, cabbage or lettuce and onions. Toss in some olives or pickle if you would like. Roll it up and eat.

Baked chickpea falafels and hummus in a beetroot flatbread

If you made this recipe, let me know! Leave a comment here or on Facebook, tag your tweet with @oneteaspoonlife on Twitter and don't forget to tag your photo #oneteaspoonoflife on Instagram. You can also email me at onetspoflife@gmail.com. I'd love to see what you are upto. 

If you like this recipe, do not forget to share it with your friends and family! 

You can follow One Teaspoon Of Life on Facebook, Twitter, Instagram, Pinterest and Google+ or you can subscribe to One Teaspoon Of Life and receive all the latest updated via Email

If you liked this, you may also like:


---------------------------------------------------------------------------------------------------------------------------


Baked Falafel Beetroot Wraps


Baked chickpea falafels and hummus in a beetroot flatbreadBaked chickpea falafels with hummus and vegetables rolled in a whole wheat beetroot flatbread.

Recipe Type:  Main
Cuisine:            Mediterranean Indian Fusion
Prep Time:     8 hours (includes soaking time)
Cook time:     60 minutes
Yield:                Makes 6 wraps

Ingredients:

To make the Baked Falafels:


200 gms Chickpeas
1 Onion
2-3 Garlic Cloves
0.5 cup Coriander leaves (tightly packed)
2 Green Chillies
1 tsp Cumin powder
0.5 tsp Coriander Powder
0.5 Lime
0.5 tsp Baking Soda
1 Tbsp Corn Starch or Flour (Optional)
3 Tbsp Vegetable Oil
Salt to taste

To make the Beetroot Wrap:


2 cup Wholewheat Flour (atta)
1 large Beet root
0.5 tsp Red Chilli Powder
6 tsp Oil
Salt to taste
Water as required

To assemble the Wrap:


6 Beetroot Wraps
12 Falafels
6 Tbsp Hummus
4-5 leaves of Ice berg lettuce or Cabbage
0.5 cup julienne Capsicum
1 small Onion, sliced

Method:


To make the Baked Falafels:


Soak the chickpeas overnight or for 8-10 hours if using dried chickpeas. If using canned chickpeas, skip the soaking.
Drain out all the water and transfer the chickpeas to a food processor or a mixer.
Add the garlic, chopped onion, coriander leaves, chopped green chillies, lime juice, baking soda, cumin powder and coriander powder to the blender along with salt.
Pulse the food processor until everything is combined. Do not over process it and make it smooth and mushy. The batter has to just sticky enough to hold when pressed together.
Add corn starch or flour if the dough is too wet.
Refrigerate for 20-30 minutes.
Preheat the oven to 180 degree C.
Divide the mix into 12 equal portions.
Roll them into balls and flatten them.
Brush a baking sheet with oil. Place the falafels on the baking sheet.
Brush the falafels with oil.
Bake for 10 minutes, then flip them over and bake for another 10-12 minutes, until the falafels have browned.
Remove from the oven and keep aside.

To make the Beetroot Wraps:


Boil and peel the beetroot.
Allow it to cool and then puree it until smooth. Run through a sieve to get a smoother puree.
Transfer the uree to a large plate or bowl. Add 0.5 tsp of salt and red chilli powder and mix well.
Add in the whole wheat flour and start kneading. Add water as required.
Knead until the dough comes together.
This can be done while the falafel batter is resting in the fridge.
Divide the dough into 6 equal portions and roll them into balls.
Using a rolling pin, roll out the dough as thin as possible. Use wholewheat flour for dusting.
Heat a tava or a griddle and brush it with oil.
Cook the wrap on medium-high heat. Brush the wrap with a little oil and flip over.
When the wrap has a few brown spots, remove from heat and keep aside.
Do the same for all 6 portions.

To assemble the Baked Falafel Beetroot Wraps:


Spread hummus on the wrap.
Place the julienne capsicum, sliced onion and lettuce on the hummus.
Place 2 falafels on each wrap.
Roll and serve.


Read more ...

Garlic and Herb Roasted Potatoes


Oven roasted potatoes flavored with crushed garlic, oregano, rosemary, paprika and salt.

oven roasted potatoes flavored with garlic and herbs


oven roasted potatoes flavored with garlic and herbs


Who doesn't love potatoes? Did you just say "Yes"? Then I suggest you pack your bags and head over to Bangalore so that I can serve you a plate of this delicious Garlic and Herb Roasted Potatoes that I cannot get enough of.

That humble little golden tuber tastes so great irrespective of how it is cooked - boiled, roasted or fried. Especially fried! I see no reason to not like it. It is also one of those vegetables that has gained such a bad reputation among dieters. But hey, a little potato never killed anybody, so dieting or no, I wasn't going to miss out on cooking or eating these luxurious purple potatoes. If you are counting calories, I'd suggest eat just a little bowl, but don't miss it!

oven roasted potatoes flavored with garlic and herbs


oven roasted potatoes flavored with garlic and herbs


Gee went to Malaysia a while ago and she picked these purple beauties there. I know right, how foodie of her. Well, when you have a food blogger for a sister, you walk in super market aisles even when on vacation. My brother in law claims he wasn't too claims he wasn't too happy about it, but hten he is a big potato person, so I don't think he has too many complaints now. Our daily calls when she was there focused more on what she ate rather than what she saw. "Ooh you saw Petronas, greattt! now, what did you eat for lunch? Tell me all about it". She got my mouth all watering, that we went out for some 100% vegetarian Malay food as soon as she was back - Mamak Mee Goreng and Nasi Goreng at Nasi and Mee. If you like Malay food (and are in Bangalore), you should check out this place.

Back to potatoes, while Indians love their potatoes, the only variety we get here is a regular white-yellow potato. The only other variety we do get is the Sweet Potato which isn't orange as most one abroad are. This is white too, with a pink skin. So Gee got really excited when she found the purple ones and immediately called me up to ask what I could make of them. What better way to celebrate a potato, than to make a Roast Potato Salad. Why you will love it:
  • So easy to make
  • Flavorful
  • Colorful
  • Pairs well with anything
  • Salty
  • Potatoes - yes, just because they are potatoes

oven roasted potatoes flavored with garlic and herbs

Potatoes are a winter or cool-season crop. So they are the freshest in winter. Most of the potatoes we get in summer are actually from cold storage. And with winter almost on its way out, this recipe is right on time. May be you still have time to go pick up this seasons potatoes. And while you are at it, pick a nice mix of them - purple, red, fingerling, gold, sweet. I added some local white potato and sweet potatoes to the make the dish a little more interesting with different colors and flavors. But if you cannot find the various varieties, just go with what you have cause there is no reason one should miss out on some serious potato action. 

While the plain salted roasted potatoes taste good, make it better with added flavors. I added crushed garlic, dried oregano, fresh rosemary, smoked paprika and salt. I rubbed the potatoes with all the herbs and garlic along with some good quality extra virgin olive oil and baked them until they crisp on the outside and soft on the inside. The trick to getting them crisp is to allow them to touch the pan, so don't overcrowd them if you want a crispy exterior on all your potatoes. 

oven roasted potatoes flavored with garlic and herbs

If you made this recipe, let me know! Leave a comment here or on Facebook, tag your tweet with @oneteaspoonlife on Twitter and don't forget to tag your photo #oneteaspoonoflife on Instagram. You can also email me at onetspoflife@gmail.com. I'd love to see what you are upto. 

If you like this recipe, do not forget to share it with your friends and family! 

You can follow One Teaspoon Of Life on Facebook, Twitter, Instagram, Pinterest and Google+ or you can subscribe to One Teaspoon Of Life and receive all the latest updated via Email

If you liked this, you may also like:


---------------------------------------------------------------------------------------------------------------------------


Garlic and Herb Roasted Potatoes


oven roasted potatoes flavored with garlic and herbs
A mix of potatoes, roasted in the oven along with crushed garlic, oregano, rosemary and paprika.


Recipe Type:  Side
Cuisine:            International
Prep Time:     15 minutes
Cook time:     45 minutes
Yield:                Serves 4-5


Ingredients:


750 grams Potato (mix different types)
3 Tbsp Olive Oil
4-5 Garlic Cloves
0.5 tsp dried Oregano
4-5 sprigs of Rosemary or 0.5 tsp fried Rosemary
1.5 tsp Salt
1 tsp smoked Paprika
A handful of fresh Coriander leaves

Method:


  1. Preheat the oven to 200 degree C.
  2. Wash the potatoes thoroughly and dry with a kitchen towel.
  3. Chop them into bite sized chunks while retaining the skin and put them into a large bowl.
  4. Crush the garlic cloves and chop it finely.
  5. Add the oil, garlic, oregano, rosemary, smoked paprika and salt to the bowl.
  6. Mix well so that the oil and seasoning coats the potatoes well.
  7. Spread the potatoes in a single layer on a baking sheet.
  8. Bake for 20 minutes.
  9. Remove the baking sheet carefully from the oven and flip the potatoes using a fork or a pair of tongs.
  10. Place it back in the oven and continue to bake for another 20-25 minutes until the potatoes are done.
  11. Taste to check for seasoning. If it is less, add it when the potatoes are hot and mix well.
  12. Garnish with chopped coriander just before serving.

oven roasted potatoes flavored with garlic and herbs


Read more ...

Roasted Vegetable Torte


Roasted Vegetable Torte is made by baking thinly sliced roasted vegetables along with herbs, spices and cheese. Oh, SO delicious, you have to make extra!

Roasted vegetable torte is a baked vegetarian pie made by layering thinly sliced vegetables, spices, herbs and cheese


Roasted vegetable torte is a baked vegetarian pie made by layering thinly sliced vegetables, spices, herbs and cheese


I gave up refined sugar for a whole year back in 2015-16 and I did not suffer from withdrawal symptoms.  But take away my internet for a week and I'm cranky all week. We had a double whammy last week. We decided that since we barely watch TV, we should disconnect our cable TV for while. That was a mutually agreed decision that we were ready to live with, after all we had internet and a prime video account. We could survive!

That was until our internet broadband provider decided, we did not need them anymore and deactivated our account by mistake and could not enable it back. After their wait time went from 2 hours to over 24 hours, we were done with the provider - Hathway. We applied for a new connection from a new provider on Sunday and are still waiting for the connection to arrive.  Until then, we are depending on connecting to the faint WiFi signals from my sister's house. Not a good week!!

No TV, no internet makes Anu an extremely cranky girl, when she is not occupied. So I've been cooking more - I even started my second attempt at a sourdough starter, I'm attempting a slow rise no knead bread. I have been walking more, reading more. We also started composting again, something we had stopped in the past few months since our apartment complex had started doing it for us. So yes, I've been trying to keep busy this last week.

Roasted vegetable torte is a baked vegetarian pie made by layering thinly sliced vegetables, spices, herbs and cheese


Roasted vegetable torte is a baked vegetarian pie made by layering thinly sliced vegetables, spices, herbs and cheese


Roasted vegetable torte is a baked vegetarian pie made by layering thinly sliced vegetables, spices, herbs and cheese


So in my keep-myself-busy week. I made this wonderful roasted vegetable torte again. It is:
  • healthy
  • fresh
  • low cal
  • vibrant
  • and delicious!

And the best part is it fit right into my healthy diet. This Roasted Vegetable Torte is made by layering thinly sliced vegetables in a baking dish with spices and cheese thrown in between.

I LOVE vegetables, do you? Let us go ahead with the thought that you are as veggie crazy as me. Otherwise why would you be here, right? This Roasted Vegetable Torte is perfect for us veggie lovers, it is bright, colorful and so full of flavor. It is so beautiful, it could almost be a center piece on the table. 

The first time I made this Torte, I made it without roasting the vegetables first, and took all the pics then, hence, the intermediate steps may not necessarily match the recipe. Apologies for that. This time, I roasted the veggies for a while before placing them in the torte tin. The difference in the end product is not in the flavor but in the texture. If you roast the vegetables before setting the torte, they will be soft and easy to eat. If you don't mind slightly crunchy vegetables, then you can skip the roasting. Although I recommend roasting if using vegetables like butternut squash or potatoes. If you are using quick cooking vegetables like zucchini, tomatoes, mushrooms and onions, you can skip the roasting.


Roasted vegetable torte is a baked vegetarian pie made by layering thinly sliced vegetables, spices, herbs and cheese

Roasted vegetable torte is a baked vegetarian pie made by layering thinly sliced vegetables, spices, herbs and cheese

Roasted vegetable torte is a baked vegetarian pie made by layering thinly sliced vegetables, spices, herbs and cheese

Roasted vegetable torte is a baked vegetarian pie made by layering thinly sliced vegetables, spices, herbs and cheese

Roasted vegetable torte is a baked vegetarian pie made by layering thinly sliced vegetables, spices, herbs and cheese

If you made this recipe, let me know! Leave a comment here or on Facebook, tag your tweet with @oneteaspoonlife on Twitter and don't forget to tag your photo #oneteaspoonoflife on Instagram. You can also email me at onetspoflife@gmail.com. I'd love to see what you are upto. 

If you like this recipe, do not forget to share it with your friends and family! 

You can follow One Teaspoon Of Life on Facebook, Twitter, Instagram, Pinterest and Google+ or you can subscribe to One Teaspoon Of Life and receive all the latest updated via Email

If you liked this, you may also like:


---------------------------------------------------------------------------------------------------------------------------

Roasted Vegetable Torte


Roasted vegetable torte is a baked vegetarian pie made by layering thinly sliced vegetables, spices, herbs and cheeseRoasted Vegetable Torte is made by layering thinly sliced vegetables in a baking pan with herbs, spices and cheese in between and baked until done.

Recipe Type:  Main
Cuisine:            International
Prep Time:     15 minutes
Cook time:     45 minutes
Yield:                Makes 2 tortes, Serves 4

Ingredients:


2 Zucchini
1 small Butternut Squash
2 firm Tomatoes
2 handfuls Spinach or Kale leaves
2 medium Brinjals or 0.5 large Eggplant
1 small Onion (optional)
1 cup grated Cheese
4 Tbsp Olive Oil
4-5 Garlic Cloves
1 tsp Oregano
1 tsp Red Chilli Flakes
Salt to taste
Pepper to taste

Method:


1. Slice all the vegetables thinly except for the spinach or kale. 
2. Preheat the oven to 200 degree C.
3. Mix salt, pepper and 2 tbsp of olive oil in a small bowl. 
4. Place the butternut squash, zucchini and brinjal on a baking sheet and brush them with oil.
5. Bake for 8-10 minutes until soft.
6. While it bakes, crush the garlic and chop it finely. Add it to the remaining oil along with red chilli flakes, oregano, a little salt and pepper.
7. Grease two 6" springform pan or a loose bottomed cake pan.
8. Start by placing the butternut squash as the lowest layer in both the pans. Then layer the zucchini, tomato, onion in both pans.
9. Drizzle a little of the garlic flavored oil. Spinkle a quarter of the cheese in each pan.
10. Layer in the fresh spinach or kale. You can chop it roughly or use it whole.
11. Place the eggplant, zucchini and butternut squash on the spinach.
12. Drizzle the remaining oil and top each pan with remaining cheese.
13. Cover loosely with an aluminium foil and bake for 8-10 minutes. Prefereably keep a tray in the lower rack to collect any juice that drips.
14. Remove the foil and bake until the cheese melts and browns. This may take 5-7 minutes.
15. Wait for 4-5 minutes before removing the torte from the pan.
16. Cut into slices using a sharp knife and serve.
Read more ...

Onion Stalk and Brinjal Curry | Eerulli Kaavu Badnekai Palya


Simple vegan stir fried dry curry made from Onion stalks and brinjals. Ready in less than 30 minutes!

Vegan stir fried dry curry made of fresh onion stalks or flowers and brinjals, Eerulli huvina palya, eerulli kaavu palya


Vegan stir fried dry curry made of fresh onion stalks or flowers and brinjals, Eerulli huvina palya, eerulli kaavu palya

Ever walked by a vegetable aisle wondering what "that" vegetable is and how one cooks it? 

Happened to me a few years ago when I saw a lot of vegetable carts on the road side stocking up on green stalks with a tiny white bulb at the end. Curiosity made me ask what it was. And I was introduced to the "Onion Stalk / Flower" or "Eerulli Kaavu"/"Eerulli Hoovu" as they call it in Bangalore. The green stalk is the onion plant with the flower at the end. If you have never seen it or tasted it, the closest thing to it would be green onions or spring onion stalks. It is never sold with the onion bulb attached. While sometimes, it can be pungent like onions, most often it is simply sweet and crunchy.

Vegan stir fried dry curry made of fresh onion stalks or flowers and brinjals, Eerulli huvina palya, eerulli kaavu palya

Vegan stir fried dry curry made of fresh onion stalks or flowers and brinjals, Eerulli huvina palya, eerulli kaavu palya

And the good news is, it is right now in season in Bangalore and you will see it stocked all over the local markets and supermarkets. 

I love cooking with seasonal vegetables. They taste so much better and are fresher than those annually available veggies. The first time I saw these onion stalks, I asked the vendor how one cooks it. He told me just stir fry it in oil and add spices. That's it! His recipe was so simple and it was tasty, if you like onions a lot. I do like onions, but I'm not a fan of a bowl full of them. So I went looking for different ways to cook it and I chanced upon this recipe by Chandrima . She added stir fried brinjals or eggplant to the fried onion stalks. Adding brinjal added some substance and texture to this dry curry. 

These onion stalks are versatile, I added them to "Thalipeeth" and it tasted really nice. I made this same curry with potatoes instead of brinjals and everyone loved that too. 

Vegan stir fried dry curry made of fresh onion stalks or flowers and brinjals, Eerulli huvina palya, eerulli kaavu palya

Vegan stir fried dry curry made of fresh onion stalks or flowers and brinjals, Eerulli huvina palya, eerulli kaavu palya


If you made this recipe, let me know! Leave a comment here or on Facebook, tag your tweet with @oneteaspoonlife on Twitter and don't forget to tag your photo #oneteaspoonoflife on Instagram. You can also email me at onetspoflife@gmail.com. I'd love to see what you are upto. 

If you like this recipe, do not forget to share it with your friends and family! 

You can follow One Teaspoon Of Life on Facebook, Twitter, Instagram, Pinterest and Google+ or you can subscribe to One Teaspoon Of Life and receive all the latest updated via Email

If you liked this, you may also like:


---------------------------------------------------------------------------------------------------------------------------


Onion Stalk and Brinjal Curry | Eerulli Kaavu Badnekai Palya


Vegan stir fried dry curry made of fresh onion stalks and brinjals. 
Vegan stir fried dry curry made of fresh onion stalks or flowers and brinjals, Eerulli huvina palya, eerulli kaavu palya


Recipe Type:  Side
Cuisine:            Indian
Prep Time:     10 minutes
Cook time:     15 minutes
Yield:                Serves 2


Ingredients:


8-10 Onion Stalks
5-6 small Brinjals
4 tsp Oil
1 tsp Turmeric Powder
1 tsp Red Chilli Powder
Salt to taste

Method:


Chop the brinjal into chunks.
Heat 2 tsp oil in a kadhai / pan.
Add the brinjals and cook on low heat until done.
Add in a little salt, turmeric powder and stir fry for 1 minute.
Chop the onion stalks into 1" pieces.
Heat the remaining oil in the kadhai and add the onion stalks.
Add salt and turmeric powder. Mix well.
Cover and cook until done. I left mine crunchy, cook longer for a softer texture.
Add in the cooked brinjal and red chilli powder.
Mix well and stir fry for 2-3 minutes.
Serve hot with rice and dal or with rotis.

Vegan stir fried dry curry made of fresh onion stalks or flowers and brinjals, Eerulli huvina palya, eerulli kaavu palya

Read more ...