Showing posts with label Jain. Show all posts

Aam Panna Recipe | Kairi Panna Recipe [Video]


Aam Panna or Kairi Panna is a drink made from boiled raw mangoes and jaggery. Aam Panna is popularly made in summer across India.

In a hurry? Jump to Video or Jump to Recipe

raw mango drink

Aam Panna, a beverage from my school days. My best friend's mom made the best Aam Panna ever and she never forgot to share a bottle of the concentrate with me. It was she who introduced me to this tangy sweet spicy beverage made of raw mangoes that is so popular during summers.

As I write this I realize it isn't really the right time to post this. By right time, I mean right now, this instant. Because it has just rained heavily and it is so cool that all I feel the need for is a hot cup of tea. But then I had this post all ready to go with the recipe jotted down, photos edited and the video uploaded. So I decided to go ahead and post it. And anyway it may not have rained in your city and it may be the absolute perfect time for you to try this golden treat.

Aam Panna is made in several ways, as I have learnt over the years. Earlier in my blogging days, I had posted one recipe that does not require boiling of the mangoes. That recipe involves grating the raw mango and soaking it in water, allowing the flavor of the mangoes to infuse into the water. That takes a little more time and the results are markedly different. I would not rate one above the other as each has its own taste. I've also seen recipes where the raw mango is roasted on coals or a gas stove until it is charred instead of boiling the mangoes. While I have not tried this recipe, it does sound very interesting. The one I am sharing today is the most common recipe out there.

raw mango drink

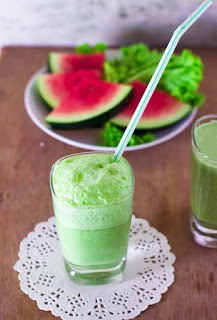
To make the Aam Panna, select firm raw mangoes. The mangoes are supposed to be unripe and sour. The mangoes are boiled, either with skin or without and then the pulp is mashed in a blender along with a sugar and spices like cumin and pepper. Some folks add cardamom too, but I feel it overpowers the fragrance of the mango, so I skip it. I also replaced the sugar with powdered organic jaggery and hence the bright orange color of my Aam Panna. If you use sugar, you tend to get a more golden color. You can also add mint while blending the panna. However, I don't recommend it if you plan to store the panna for long as the mint tends to get bitter after a few days. The blended puree is a concentrate and can be stored in the fridge for the whole of Summer. When you feel like having Panna, dilute it with water until the taste feels just right and serve. You can also add muddled mint leaves or mint puree while serving. The Aam Panna can also be diluted with Soda water or sparkling water for some added zing.

A homemade panna never has a bright green color. If you want that color, you can add food coloring, but I don't recommend it.

raw mango drink


If you made this recipe, let me know! Leave a comment here or on Facebook tag your tweet with @oneteaspoonlife on Twitter and don't forget to tag your photo @oneteaspoonoflife on Instagram. You can also email me at onetspoflife@gmail.com I'd love to see what you are up to.


If you like this recipe, do not forget to share it with your friends and family! 


You can follow One Teaspoon Of Life on FacebookTwitterInstagramPinterest or you can subscribe to One Teaspoon Of Life and receive all the latest updated via Email


Video Recipe


--------------------------------------------------------------------------------------------------------------------------

Aam Panna Recipe | Kairi Panna Recipe


raw mango drinkAam Panna or Kairi Panna is a drink made from boiled raw mangoes and jaggery. Aam Panna is popularly made in summer across India.

Recipe Type:  Beverage
Cuisine:            Indian
Prep Time:     15 minutes
Cook time:     15 minutes
Total time:     30 minutes
Yield:                Makes 18-20 glasses

Ingredients:


4 Raw Mangoes
2 cups Jaggery Powder
1 Tbsp Pepper, freshly crushed
1 Tbsp Cumin Powder
0.25 tsp Black Salt
0.25 tsp Salt
Water as required

Method:


1. Pressure cook the raw mangoes until they are cooked. You can also boil them in a pot until done.
2. Allow the mangoes to cool, then peel them.
3. Squeeze out the pulp of the raw mangoes and add to a blender.
4. Add in the jaggery powder or sugar, roasted cumin powder, pepper powder, black salt and salt.
5. Blend to a smooth paste with a little water. Adjust the quantities of jaggery, spices and salt as required.
6. Store the aam panna concentrate in a glass bottle in the fridge.
7. To serve the panna, add 3-4 Tbsp of the concentrate to a glass. Add in ice cubes (optional) and cold water. Stir and serve.
8. If the panna feels less sweet after diluting with water, then add a little jaggery powder while serving.


If you liked this, you may also like:

Indian mocktail made with guava and spices
Guava Panna

muskmelon sherbar
Kharbuja Panaka
rose yogurt beverage smoothie curd flavored drink Indian Punjabi
Rose Lassi


Read more ...

Paan Kulfi Recipe | How to make Meetha Paan Kulfi [Video]


Paan Kulfi is a frozen milk based dessert that is flavored with gulkand (rose jam) and paan (betel leaves). This kulfi is of Meetha Paan flavor. Kulfi is a traditional Indian ice-cream made from sweetened reduced milk. 

In a hurry? Jump to Video or Jump to Recipe

Meetha paan kulfi


I could not be more excited to share this kulfi with you, it is everything I wanted it to be, and it was actually better. This Paan Kulfi is the perfect marriage of two of my favorite things, meetha paan and kulfi and I just couldn't have enough of it.

Kulfi is India's contribution to the world of Ice Cream. Kulfi is denser and creamier than the commonly available ice cream. A Kulfi is made by slowly reducing the milk until it is thick, creamy and caramelized. The reduced milk, is also called Rabdi or Basundi. As the milk caramelizes, it also brings out the natural sweetness of the milk, hence, you don't need much sugar to flavor the milk.   The dessert is also amazingly delicious at this stage and I could have bowls of it if there was enough. Flavoring is then, added and then this creamy deliciousness is frozen until it is completely set.

The flavoring for my kulfi was Meetha Paan (sweet betel leaf). This is the favorite flavor in the city right now. If your restaurant is a hip and happening place, you are definitely serving something Paan flavored. I've seen Paan Kulfi, instant Paan Ice Cream made using liquid nitrogen and Paan shots.

A traditional Paan is a betel leaf smeared with limestone and then stuffed with tobacco and betel nuts. This is consumed as a digestive after a heavy meal in several parts of India and South East Asia. As this is detrimental to one's health, the meetha Paan or Sweet Paan was born. The sweet paan is made by stuffing the betel leaf with pieces of dates, fennel seeds, dry coconut (sometimes) and a sweet rose jam called gulkand. This is super delicious. While I say this, I've realized this can be an acquired taste for few.

Meetha paan kulfi


To make this Paan Kulfi, I used fresh betel leaves that I pureed and added. The betel leaf has a strong pungent taste if consumed by itself but when mixed in the dessert the flavor becomes really mild. I started off with puree of 5 leaves and then went on to add the puree of 7 more leaves, 12 in total to get a prominent taste of paan. Also, instead of gulkand, I added a Kolkata Meetha Paan Mukhwas. This is easily available online as well as in fairs and Malls in bigger cities.  If you don't have access to either of these, but have access to a ready made meetha paan from the corner shop, just grind them fine and use them.

Paan Kulfi available in restaurants has a distinct green color. This is achieved by adding a few drops of food coloring. I'm not in favour of food coloring, so I left the kulfi to its natural color.

To make the Kulfi, always use milk with a high fat content. Some folks add cornflour, milk powder or khova to hasten the thickening of the milk. I have used the traditional method of slow cooking instead. While this takes a little more time, the kulfi ends up tasting very good. You can literally keep the milk on the lowest heat possible and continue to do your work, just peeking in every once in a while to ensure it is overflowing or burning and to scrape the sides. To cook the kulfi sooner, you can also divide the milk into 2 or more pots and reduce them individually before mixing them all together and adding sugar.

I hope you love this Paan Kulfi as much as my family and I. Wishing you a very happy Summer!

Meetha paan kulfi


If you made this recipe, let me know! Leave a comment here or on Facebook tag your tweet with @oneteaspoonlife on Twitter and don't forget to tag your photo @oneteaspoonoflife on Instagram. You can also email me at onetspoflife@gmail.com I'd love to see what you are upto.


If you like this recipe, do not forget to share it with your friends and family! 


You can follow One Teaspoon Of Life on FacebookTwitterInstagramPinterest or you can subscribe to One Teaspoon Of Life and receive all the latest updated via Email


Video Recipe


--------------------------------------------------------------------------------------------------------------------------

Paan Kulfi Recipe | How to make Meetha Paan Kulfi


Meetha paan kulfiPaan Kulfi is a frozen milk based dessert that is flavored with gulkand (rose jam) and paan (betel leaves). This kulfi is of Meetha Paan flavor. Kulfi is a traditional Indian ice-cream made from sweetened reduced milk.

Recipe Type:  Dessert
Cuisine:            Indian
Prep Time:     9 Hours
Cook time:     2 Hours
Total time:     11 Hours
Yield:                Makes 8 Kulfis

Ingredients:


2 litres Full Fat Milk
0.5 cup Sugar
10-12 Betel Leaves
2-3 Tbsp Meetha Paan Mukhwas or Gulkand
1 Tbsp Almonds, chopped
1 Tbsp Cashewnuts, chopped
1 Tbsp Pistachios, chopped

Method:


1. Boil the 2 litres of milk until it comes to a rolling boil.
2. Reduce the heat to low and continue to boil.
3. Keep stirring to prevent the milk from burning.
4. Keep scraping the solidified milk from the sides of the pot and add it to the boiling milk.
5. Once the milk has reduced to half, add the sugar. Half a cup of sugar makes the kulfis pretty sweet. Add by the spoonfuls to get the right amount of sweetness.
6. Once the milk has reduced to 1/3rd the quantity and has become thick and creamy, remove from heat and allow to cool down to room temperature.
7. Puree the betel leaves (paan) with a little milk until smooth. Use 4-6 paans for a milder taste and 10-12 paans for a stronger taste.
8. After the milk has cooled, add in the chopped nuts, meetha paan mukhwas or gulkand and the paan puree. Mix well.
9. Fill into the kulfi moulds and freeze for around 2-3 hours.
10. The kulfis should be 50% set in 2-3 hours. Remove from the freezer and gently place the ice-cream stick. This step can be skipped if you are not planning to add the ice-cream stick.
11. Place the moulds back in the freezer and freeze for 8-10 hours or until completely set.
12. To demould the kulfi while serving, dip the kulfi mould in warm water, the kulfi should loosen. If using an ice-cream stick, twist the kulfi and pull it out gently. If not then place the mould on a plate and tap the mould until the kulfi comes out.
13. Serve immediately.

If you liked this, you may also like:

How to make coconut ice cream, coconut ice cream recipe, how to make ice cream without eggs, how to make ice cream without ice cream maker, naturals tender coconut ice cream recipe at www,oneteaspoonoflife.com
Tender Coconut Ice Cream

Jamun Ice Candy
How to make eggless fresh fruit tart recipe, vegetarian fruit tart recipe, fruit pie recipe, mango tart recipe at www.oneteaspoonoflife.com
Fresh Fruit Tart


Read more ...

Doddapatre Tambuli Recipe [Video]


Doddapatre Tambuli is a traditional summer curry made with coconut and curd from Karnataka. This curry is made with Mexican mint leaves or Ajwain Patta.

In a hurry? Jump to Video or Jump to Recipe


South Indian curd based curry

South Indian curd based curry

There has never been a better time to make Tambuli or Thambli as now. This summer heat calls for eating something that cools your insides.

Every region in India has a yogurt (curd) based curry that is popularly made in summer. Tambuli is one of those curries in Karnataka. It is very similar to Majjige Huli, but is much simpler and cooler. The main difference is Majjige Huli is boiled, while the Tambuli is not cooked, hence, usually needs to be consumed fresh.

Doddapatre
Doddapatre is known as Big Thyme or Mexican Mint in English, Ajwain Patta in Hindi and Karpooravalli in Tamil. It is a leaf that has a pungent and distinct aroma that is closest to the aroma of bishop's weed or ajwain, although unrelated. Some people equate the aroma to that of oregano or mint. This distinct aroma and taste becomes mild when the leaves are combined with yogurt and coconut to make the Doddapatre Tambuli.

My first interaction with this dish was at a Temple. On the coastal belt of Karnataka, there is a Lord Ganapati temple at Idagunji. When my grandfather frequented the place, one had to walk for miles together to reach it and it was hidden away tucked into a forest. I've seen the temple change from a small village temple to a quite popular one. When I used to visit the temple with my parents, it was still pretty small and the highway gave no indication to the tucked away temple. With no Google maps, one had to know the road before hand or had to ask the village folks for directions. It was here that they served a simple meal for lunch - Rice and Tambuli. It was and has been the only meal at a temple that I have relished.

South Indian curd based curry

Tambuli can be made with a variety of greens, but the recipe differs slightly with each green. Some are cooked longer while some are used raw. Doddapatre is mildly sauteed until it turn slightly yellow and wilts, this makes them milder in taste. The browned leaves are ground to a fine paste along with green chilli and fresh coconut. Whisked curd or buttermilk is added along with some salt. Then a tempering of cumin seeds and curry leaves, and Tambuli is ready to be served. Tamuli is not heated again, unlike most other curries. Tambuli is served with steamed rice.

P.S - This recipe has been reposted. The recipe was originally published in 2014. Images have been updated and a video has been added. The recipe remains the same.

South Indian curd based curry


If you made this recipe, let me know! Leave a comment here or on Facebook tag your tweet with @oneteaspoonlife on Twitter and don't forget to tag your photo @oneteaspoonoflife on Instagram. You can also email me at onetspoflife@gmail.com I'd love to see what you are upto. If you like this recipe, do not forget to share it with your friends and family! 


You can follow One Teaspoon Of Life on FacebookTwitterInstagramPinterest or you can subscribe to One Teaspoon Of Life and receive all the latest updated via Email


Video Recipe


--------------------------------------------------------------------------------------------------------------------------


Doddapatre Tambuli


South Indian curd based curryDoddapatre Tambuli is a traditional summer curry from Karnataka that is made with coconut, buttermilk or curd and doddapatre leaves, also known as Mexican mint or Ajwain Patta. This cooling curry is served with rice.

Recipe Type:  Main Course
Cuisine:          Karnataka
Prep Time:     5 minutes
Cook time:     30 minutes
Yield:              2 Servings

Ingredients:


20-25 Doddapatre Leave, chopped
0.5 cup Fresh Coconut, grated
1.5 cups Curd
1 Green Chilli
1 tsp Cumin seeds
A few Curry leaves
3 tsp Oil
Salt to taste
Water as required

Method:


1. Heat 1 tsp of oil in a pan and add the chopped doddapatre leaves.
2. Saute until the leaves wilt and turn slightly yellow.
3. Remove from heat and cool slightly.
4. Fry until the doddapatre turns slightly yellow.
5. Remove from heat and allow it to cool.
6. Grind it along with coconut, green chilli and a little water to a fine paste
7. Heat oil in the pan and add the cumin seeds. Once they brown, add the curry leaves.
8. Remove the pan from heat and add the blended paste. Mix well.
9. Add in whisked curd or buttermilk. Add salt to taste.
10. Add in more water if it is very thick.
11. Serve it with hot rice


If you liked this, you may also like:

How to make majjige huli recipe at www.oneteaspoonoflife.com
Majjige Huli

stew made with vegetables, coconut and yogurt
Avial
Indian accompaniment made with yogurt, boondi (fried gram flour balls) and spices
Boondi Raita

Read more ...

Medu Vada Recipe | Uddina Vada Recipe [Video]


Uddina Vada or Medu Vada is a popular South Indian breakfast item. Medu vada is a savory donut made from urad dal or black lentils. Medu vadas are crispy and golden brown on the outside and soft and spongy on the inside. They taste best when served with fresh coconut chutney or dunked in a spicy hot sambar.


In a hurry? Jump to Video or Jump to Recipe

medu vada medhu vada with chutney

It's raining!!!! and I'm pretty sure it is a crime to not eat crispy fried food when it rains. It isn't? Well, it should be. 

I recently mentioned in my Instagram post that Bangalore weather is as unpredictable. Summer unofficially started in early March this year and it's been blazing hot, hotter than ever, out here. Every year when it gets slightly hot, rains come and it cools off. Last year, when I tried to make a second batch of these sun dried potato chips, they caught mold due to the humidity. But this year there was no sight of rain or even a little cloud to shade us from the sun. Until now. The weather has been pretty unpredictable this week, just like Bangaloreans are used to. Heavy rains caught us off guard this week. And the evening rains are cooling down the city. And when it rains, eat all the fried food you can. 

Frankly, Bangaloreans don't need a reason to eat this scrumptious crispy vada. Vada is eaten for breakfast, snacks, and may be lunch and dinner too. A plate of idli with one vada and a piping hot cup of traditional filter coffee, a simple soul satisfying breakfast for any South Indian. But the lazy me definitely needs a reason to make them at home.

medu vada medhu vada with chutney

Uddina Vada or Medu Vada is a quintessential item on the breakfast scene of South India, not just Bangalore. The vadas are crispy golden brown on the outside, soft and spongy on the inside. When they are served piping hot with a bowl of fresh coconut chutney and a spicy bowl of sambar, one just stops talking and digs in. Contrary to popular belief, making these vadas at home is not difficult. But what can be challenging is to make that hole in the center. You cannot cut it as you would with a donut. But there are a few simple tricks to making the perfect uddina vada, hole and all.

Firstly, the batter has to be thick. As thick as it can be. The urad dal or black lentils, have to be soaked for just the right amount of time. 3-4 hours at max. More than 4 hours, and you will get a soggy batter that cannot be shaped. After soaking, completely drain the lentils and grind with as little water as possible until you have a smooth creamy batter. 

Secondly, for a crispy vada, you need to add in a little rice flour and a pinch of cooking or baking soda. Too much of the soda and you will have a very crispy vada that won't go well with the purists.

Third, the flavor givers. Add in what you like to flavor the vada. Popular ingredients include cumin, pepper, curry leaves, coconut pieces, green chillies and coriander leaves. Add what you like in them. Also, add salt at the very end, just when about to make the vada, else the batter may turn soggy.

Fourth, the hole. Making the hole isn't as complicated as it sounds. All you need is a thick batter and wet hands. Yup. Wet your hands properly and then take a dollop of the batter, use your wet fingers to make a hole and then gently drop it in the oil. If you are unable to make the hole for any reason, don't worry too much, just drop the batter in oil using a spoon. The hole is just for visual appeal and doesn't impact the taste or the texture.

Five, the frying. To get a nice crispy exterior, fry for the first one minute of high flame. Then lower the heat and allow the vada to cook on the inside. Once the vada is the golden brown, it is ready to be served.

Six, make extra. Well, this isn't a trick or tip, as much as an advise. Vadas are irresistible, always make extra.

Wishing you a vada happy weekend!!

P.S - This recipe has been reposted. The recipe was originally published in 2014. Images have been updated and a video has been added. The recipe remains the same.

medu vada medhu vada with chutney


If you made this recipe, let me know! Leave a comment here or on Facebook tag your tweet with @oneteaspoonlife on Twitter and don't forget to tag your photo @oneteaspoonoflife on Instagram. You can also email me at onetspoflife@gmail.com I'd love to see what you are upto.


If you like this recipe, do not forget to share it with your friends and family! 


You can follow One Teaspoon Of Life on FacebookTwitterInstagramPinterest or you can subscribe to One Teaspoon Of Life and receive all the latest updated via Email


Video Recipe


--------------------------------------------------------------------------------------------------------------------------

Medu Vada Recipe | Uddina Vada Recipe


medu vada medhu vada with chutneyMedu Vada is an Indian deep fried savory donut made from lentils. A popular South Indian breakfast along with Idli.

Recipe Type:  Snacks / Breakfast
Cuisine:          South Indian
Prep Time:     3-4 Hours (Including lentil soaking time)
Cook time:     20 minutes
Yield:              12 small Vada

Ingredients:


1 cup Urad Dal
1 Tbsp Rice Flour
6-8 Curry leaves, finely chopped
1 Green Chilli, finely chopped
0.5 tsp Pepper, freshly crushed
A pinch of baking soda
Salt to taste
Oil to fry
Water as required

Method:


1. Wash the urad dal and soak the dal in water for around 3-4 hours.
2. Drain the dal and grind into a fine batter. Use as less water as possible. The batter should be thick.
3. Heat oil in a kadhai to deep fry the vadas.
4. While the oil heats, add in the rice flour, green chilli, pepper, baking soda and salt. Mix well until combined. IF the dough feels watery, add a little more rice flour.
5. Once the oil is hot enough, wet your hands and take a spoonful of batter onto your fingers. Using the wet finger of the other hand, make a hole in the center. Watch the video for help on how to do this.
6. Gently drop the vada in the oil.
7. Fry on high heat for 1 minute, then lower the heat slightly and continue to cook until the vada becomes golden brown.
8. Now gently slide this batter into the oil. Stir the vada occassionally and flip it, so that it cooks evenly. Cook until golden brown on both sides.
9. Serve the vada hot with coconut chutney or sambar.


See the notes mentioned above the Video for tips on making the perfect Medu Vada.


If you liked this, you may also like:

steamed idli made from oats, instant oats idli
Oats Idli

Mangalore Banana Buns
Mangalore Buns
instant mix vegetable uttappa dosa made from rava
Instant Mix Veg Uttappa


Read more ...

Kharbuja Panaka | Muskmelon Sherbat


Kharbuja Panaka is a muskmelon based beverage that is traditionally served during the festival of Ram Navami in South India.

In a hurry? Jump to Recipe

muskmelon sherbar

Night Fury completes one year on Sunday, well, at least as per the Hindu calendar. Yay!!

Sunday, the 14th is Ram Navami. And Night Fury isn’t our dragon, although Raj almost drives it as if it is, instead it is our car. When we bought it, we thought hard on what we should name it. Did you know there are websites out there that suggest names for your car based on color, type etc. They weren’t much help though. But after one hard look at the front grille of the car, and we both thought it looked like “Toothless” smiling. If you are totally lost right now, then all my references to night fury, toothless and dragons is from the movie “How to train your dragon”. It is a very good animated movie, and you should watch it.

So now there are 2 reasons to celebrate the day, one of course cause it is Ram Navami, a festival, and second it is also birthday number 1.

Ram Navami has always been a festival that invokes mixed feelings in me. As children, my mom took/dragged us to her family temple near Mangalore as Ram Navami is celebrated with a lot of grandeur there. While the festivities were nice and grand, what killed me there was the heat. April to me marks the beginning of Summer and Summer and the tropics don’t really work well together. While the tropics are always warm, Summer can literally roast you. And with Mangalore being on the coast, the humidity is very high too. So I was always sweating buckets and rushing to hydrate myself.

The good thing was that any Ram Navami celebration always has cooling drinks being served. You are bound to find either Panaka or Majjige (buttermilk) being served to keep everyone hydrated. Last year I posted the recipe for a simple Panaka. Today I'm sharing another version - Kharbuja Panaka or Muskmelon Sherbat. To make the Kharbuja Panaka, muskmelon or cantaloupe is juiced and cardamom, lime juice, pepper and jaggery are added for flavor. Chill it and serve it along with some diced muskmelon.

If you are in the mood, you can also make this Bele Holige, that is traditionally made for all festivals in South India.

Happy Ram Navami!!


muskmelon sherbar


If you made this recipe, let me know! Leave a comment here or on Facebook tag your tweet with @oneteaspoonlife on Twitter and don't forget to tag your photo #oneteaspoonoflife on Instagram. You can also email me at onetspoflife@gmail.com I'd love to see what you are upto.

If you like this recipe, do not forget to share it with your friends and family! 


You can follow One Teaspoon Of Life on FacebookTwitterInstagramPinterest and Google+ or you can subscribe to One Teaspoon Of Life and receive all the latest updated via Email


--------------------------------------------------------------------------------------------------------------------------

Kharbuja Panaka | Muskmelon Sherbat


muskmelon sherbarKharbuja Panaka is a muskmelon based beverage that is traditionally served during the festival of Ram Navami in South India.

Recipe Type:  Beverage
Cuisine:            South Indian
Prep Time:     10 minutes
Cook time:     0 minutes
Total time:     10 minutes
Yield:                Serves 2

Ingredients:


2 cups chopped Muskmelon
0.5 Lime
2 Green Cardamom
0.25 tsp Pepper, freshly crushed
2 cups Water
Jaggery to taste
Muskmelon pieces for garnish
Ice cubes as required

Method:


1. Blend the chopped muskmelon along with lime juice, 0.5 cup water, pepper and jaggery until smooth.
2. Start by adding 2-3 tsp of jaggery and increase as per the desired sweetness.
3. Peel the cardamom and crush the seeds into a fine powder.
4. Add the cardamom, remaining water and ice cubes to the blender and give it a quick whizz.
5. Serve it chilled. Top with muskmelon pieces before serving.


If you liked this, you may also like:

Traditional South Indian summer cooler
Panaka

Pudina Majjige Soda
Indian mocktail made with guava and spices
Guava Panna


Read more ...

Bele Holige Recipe | Obbattu Recipe | Puran Poli Recipe [Video]


Bele Holige (Obbattu or Puran Poli) is a traditional Indian flatbread that is stuffed with a sweet lentil stuffing and pan fried in ghee. Popularly made for weddings and festivals.

In a hurry? Jump to Video or Jump to Recipe

Bele holige, obbattu, puran poli, sweet lentil stuffed flatbread

I confess, I have a sweet tooth. From the first drop of honey that I tasted as a baby, I’ve had that weakness for sweets.

Time has proven, that my weakness for sweets is much stronger than my will power to ignore them. So instead of fighting a losing battle, I’ve given up and let myself enjoy them. After all, there is so much chaos and bitterness everywhere, at least my stomach can be full of sweetness.

Of all the sweets I know, Holige has always been the crown jewel. You know how cakes are synonymous with weddings in the West, to a Kannadiga (people of the state of Karnataka), a holige holds the same place. When you are unmarried, a lot of the older folks in the family will inevitably ask you when you will treat them to a feast with Holige, which is nothing, but a nice way of asking you the nosy question of when will you get married. I know this from experience *rolling eyes*.

So when we were planning our wedding menu and Raj declared he hates Holige, for a fleeting moment I wondered if he was the guy for me. Here I was in love with Holige, the quintessential wedding dessert and here was my man questioning its presence it our wedding. (May be he was jealous that I’ve loved it longer, who knows?). But my mom settled it by having 2 desserts, one that he liked and one that I liked. Wise woman. And both of us were happy.

Bele holige, obbattu, puran poli, sweet lentil stuffed flatbread

Now, the Holige is not a very difficult dessert to make if you follow your instincts, but until recently, it was something that had to be made at home. No sweet shop ever stocked it, and even if they did, it was never as good as the homemade ones. But recently, I’ve seen a lot of holige shops spring up around the city and they make some really good ones there. You will know how fond people are of Holige by just looking at the crowd at these stores.

But we still love to make our own, because it is so easy and so delicious. A Holige is made of 2 components – the dough and the stuffing (also called hurna or puran). The dough can either be of only whole wheat flour (atta) or of only all purpose flour(maida) or a mix of the two. I’ve found that only whole wheat flour makes it slightly tougher in texture and only all purpose flour makes it chewier. The mix of flours works best for me. The stuffing is what gives flavor to the holige. Holige can be stuffed with a variety of things – lentils/dal, coconut, peanuts, and for the adventurous, there are dry fruits, dates and carrots too. While I love all varieties, this recipe is all about the lentil/dal or bele one. Chana Dal works best for Bele Holige.

To make the stuffing, chana dal is boiled, drained and pureed with very little water until smooth and then cooked with jaggery until it forms a thick paste. This is flavored with cardamom for the minimalist, while you can add other spices like dry ginger powder or fennel seeds powder etc. Getting the consistency of the stuffing right is what all the fuss is about in making the holige. Like I said before, follow your instincts, and you won’t falter. You should be able to take the stuffing in your hands (once cool) and shape it into a ball that holds its shape. If it sticks to your hands or doesn’t hold its shape, it needs to thicken further. Put it back on the heat and allow it to thicken. If the stuffing powders in your hands, add a little water or milk and make it thinner.

Once you have the right stuffing, the holige is very easy to make. Holige is traditionally pan fried with a lot of ghee, but to make it vegan, use vegetable oil. I’ve made it with oil too and it doesn’t affect the texture.

Holige tastes best when served warm, with lots of ghee or milk.

Bele holige, obbattu, puran poli, sweet lentil stuffed flatbread


If you made this recipe, let me know! Leave a comment here or on Facebook tag your tweet with @oneteaspoonlife on Twitter and don't forget to tag your photo @oneteaspoonoflife on Instagram. You can also email me at onetspoflife@gmail.com I'd love to see what you are upto.


If you like this recipe, do not forget to share it with your friends and family! 


You can follow One Teaspoon Of Life on FacebookTwitterInstagramPinterest or you can subscribe to One Teaspoon Of Life and receive all the latest updated via Email


Video Recipe


--------------------------------------------------------------------------------------------------------------------------

Bele Holige Recipe | Obbattu Recipe | Puran Poli Recipe


Bele holige, obbattu, puran poli, sweet lentil stuffed flatbreadBele Holige (Obbattu or Puran Poli) is a traditional Indian flatbread that is stuffed with a sweet lentil stuffing and pan fried in ghee. Popularly made for weddings and festivals.

Recipe Type:  Dessert
Cuisine:            Indian
Prep Time:     45 minutes
Cook time:     45 minutes
Total time:     90 minutes
Yield:                Makes 10 to 12 medium Holige

Ingredients:


For the Stuffing (Hurna / Puran)


1 cup Chana Dal
1.5 cups Jaggery Powder
1 tsp Cardamom Powder

For the Dough:


2 cups Wholewheat Flour
1 cup All Purpose Flour
0.5 tsp Turmeric Powder
0.25 tsp Salt
Water as required

Ghee or Oil to fry

Method:


To make the Stuffing:


1. Wash the chana dal twice in water and then soak and leave aside for 30 minutes.
2. Pressure cook the chana dal with 2-3 cups of water until it is cooked. It may take 4-5 whistles or 8-10 minutes after the pressure builds up. If not using a pressure cooker, cook the chana dal in a covered pan until completely cooked.
3. Drain the chana dal and allow it to cool.
4. Once cool, blend it into a smooth paste. Use as little water as possible.
5. Heat a non stick kadhai and add the chana dal paste to it. If you are not using a non stick kadhai, add a little ghee first and then add the chana dal paste.
6. Add in the jaggery powder and mix well. If you want a mildly sweet holige, add only 1 cup of the jaggery powder. You can taste the stuffing and add more if required.
7. Continue cooking the stuffing on low heat while stirring frequently until the stuffing thickens. It may take 15-20 minutes.
8. Add in the cardamom powder and mix well. Remove from heat and allow to cool.
9. If the stuffing feels thin in consistency after cooling, add it back to a kadhai and heat it again until it reaches the desired consistency.
10. While the stuffing cools, make the dough for the holige.

To make the Dough:


11. To make the dough, take the wholewheat flour and all purpose flour in a large bowl. Add in the turmeric powder and salt.
12. Knead it to a smooth dough with water. Add water as required.
13. Cover the dough and rest for 30 minutes.

To make the Holige:


14. To make the holige, take a lime sized ball of dough and roll it out into a small disc on a flour dusted surface.
15. Take a lime sized ball of stuffing and place it on the rolled out dough.
16. Seal the edges and roll out the holige as thin as possible. Dust the holige with flour as required.
17. Heat a tava and grease it with ghee or oil. Place the holige on it.
18. Spoon ghee or oil on the other side of the holige.
19. Cook the holige on medium to high heat until both the sides are cooked.
20. Remove from heat and serve with ghee or milk.


If you liked this, you may also like:

How to make shakkarpara recipe, shankarpole recipe at www.oneteaspoonoflife.com
Shankarpole

How to make Kadale Bele Payasa or Chana Dal Payasam at www.oneteaspoonoflife.com
Kadle Bele Payasa
How to make shavige payasa semiyan kheer vermicelli pudding recipe at www.oneteaspoonoflife.com
Shavige Payasa


Read more ...

Traditional Chakli Recipe | How to make Chakli [Video]


Chakli is a deep fried savory Indian snack that is popularly made for Diwali. Chakli is a spiral snack made from rice and black lentil (urad dal) flour and can be enjoyed in a gluten free diet. This recipe will show to how to make chakli from scratch along with a video tutorial.

In a hurry? Jump to Video or Jump to Recipe

traditional Indian chakli, savory deep fried snack

Soooo.... this post comes almost a month later than what it should have been posted. I had planned to post this Chakli recipe before Diwali, so you guys could try it for Diwali. But I totally missed it. I thought of waiting for next year to post it, but then who has the patience to wait another year. And I figured out, you don't need Diwali around to make Chakli, you can make it anytime you like. With cold weather coming our way, the demand for deep fried goodness is only going to go up. So here's the recipe for the crispy crunchy Chakli.

There are several variations of the Chakli - Palak Chakli, Butter Chakli and what my friend told me recently, there's even an Jalapeno Chakli out there. But this is the recipe for the traditional chakli.

traditional Indian chakli, savory deep fried snack

traditional Indian chakli, savory deep fried snack

Some background.

It’s been years that I have been planning to cook snacks and sweets for Diwali and restart our old tradition of visiting friends and family and sharing those delicacies with them. But for the last 2 years, I’ve been out of country for Diwali (visiting Bali and Cambodia). So while I made elaborate plans on what to cook and how to box them, it never materialized. But this Diwali was different, I was in country and better yet, I was in Goa. Gee and I split up the dishes and managed to put up two savory and two sweets on the plate. It was such a delight!

I had several ideas for the savory snack and while I had Chakli at the back of my mind, Gee picked it too. Chakli was what my mom made every Diwali when we were little and gave it to everyone in the apartment complex. And this year, I restarted that tradition.

I made Chakli several times in the last one month, I made trial batches and I made more batches for distributing. With all the Chakli making so fresh in my mind, I'm at my best to give you all the tips and tricks required to make the perfect Chakli. There are several small things that impact how your Chakli turns out, and I have included it in the Notes section at the bottom of the recipe. Who knew, that things like humidity and temperature could affect your Chakli?

There are different varieties of Chakli Press available in the market, you can buy:

  • Stainless Steel Ones -  
  • Brass ones -             
  • Wooden ones  from local markets.

traditional Indian chakli, savory deep fried snack


If you made this recipe, let me know! Leave a comment here or on Facebook tag your tweet with @oneteaspoonlife on Twitter and don't forget to tag your photo #oneteaspoonoflife on Instagram. You can also email me at onetspoflife@gmail.com I'd love to see what you are upto.


If you like this recipe, do not forget to share it with your friends and family! 


You can follow One Teaspoon Of Life on FacebookTwitterInstagramPinterest and Google+ or you can subscribe to One Teaspoon Of Life and receive all the latest updated via Email


Video Recipe


--------------------------------------------------------------------------------------------------------------------------

Traditional Chakli Recipe


traditional Indian chakli, savory deep fried snackChakli is a savory deep fried Indian snack that is popularly made for Diwali. Chakli is a crispy spiral snack made from rice and lentil flour. It is a spicy crunchy vegetarian snack.

Recipe Type:  Snacks
Cuisine:            South Indian
Prep Time:     10 hours
Cook time:     60 minutes
Total time:     10 hours 40 minutes
Yield:                80-90

Ingredients:


3 cups or 570 gms raw Rice
1 cup or 190 gms Urad Dal
0.75 cup or 75 gms Ghee
0.5 cup Oil
5 tsp Cumin Seeds
2 tsp Red Chilli Powder
1 tsp Asafoetida (Hing) (Use gluten free hing to suit a gluten free diet)
2-4 tsp Salt
3-4 cups Water
Oil to fry
Water as required

Method:


To make the Chakli Flour:


1. Wash and drain the rice. Spread it on a dry muslin cloth in a single layer to dry overnight or for 8-10 hours.
2. Once the rice is dry, dry roast it in a kadhai until all the moisture evaporates and the rice turns bright white. Roast on low flame by stirring occassionally. Do not allow the rice to change color or burn. Remove from heat and allow to cool.
3. Dry roast the urad dal on low heat until it turns pinkish-brown. The dal will turn fragrant once roasted well. Stir occassionally and do not allow the dal to burn. Remove from heat and allow to cool.
4. Once the rice and urad dal have cooled, grind it into a smooth powder in batches. You can either do this at home in a mixer or get it powdered at a mill.
5. Sieve the flour to remove any unpowdered rice or dal.
6. With the quantities used in this recipe, you should get around 750-760gms of chakli flour.

To make the Chakli:


7. Grind 3 tsp of cumin seeds into a coarse powder. Alternately you can use roasted cumin powder.
8. Add the cumin seed powder to the chakli flour.
9. Next add in the red chilli powder, remaining cumin seeds, hing and 2 tsp of salt and mix it roughly. Hing or asafoetida may contain wheat and hence avoid it if making a gluten free version.
10. Add in melted ghee and rub it in the flour.
11. Add hot oil by the spoonfuls and rub it in the flour. Squeeze a bit of the flour in your palms, if it holds the shape, you can stop adding oil. If it crumbles away, add more oil and mix.
12. Once you have added all the oil, add in water slowly and start kneading until you have a smooth dough. Adjust seasoning or spices as you continue to knead.
13. Once you have a smooth dough, cover with a wet cloth and keep aside.
14. Grease the chakli press well.
15. Take a ball of dough and stuff it in the chakli press.
16. Press out the chaklis onto a smooth plastic sheet.
17. Heat oil in a kadhai for deep frying. Add a small piece of flour to test the oil. If the piece floats up, the oil is hot enough.
18. Once the oil is hot, carefully pick up the chakli and add it to the oil. Fry in batches and do not crowd the kadhai.
19. Once you have added the first batch of chaklis, lower the heat to a minimum and allow to cook for 4-5 minutes. Depending on the quantity of oil you have in the kadhai and the stove settings, you may require more or less time than what is mentioned. Try a test batch first to get the time and temperature of the stove correct. See notes for more tips.
20. Remove from oil and place it onto a absorbent kitchen towel to cool.
21. Once cool, store in an airtight box.
22. Serve at room temperature with tea.

Notes:


  1. To make the chakli gluten free, do not add hing or asafoetida.
  2. To make the chakli vegan, you can replace ghee with oil.
  3. To make the chakli richer tasting, the oil can be replaced with ghee or butter. Butter can also be used in place of ghee or oil completely.
  4. If you are making chakli for the first time, it is better to make the dough in small batches, so that you can correct the next batch if required. Humidity and temperature in your house may change the amount of ghee/oil required in your recipe, a trial batch will help get that quantity right.
  5. If the chaklis start breaking when you try to shape them, then add more water to the dough and try again. The water can be added to small batches of dough as you go along.
  6. If the chaklis start breaking in the oil while frying, that means the amount of ghee or oil added to the dough is more than required. Add it a little dry flour and knead again.
  7. The chakli flour can be stored for 1-2 months in a dry airtight container.
  8. The chakli dough cannot be stored and it is recommended to make chakli with fresh dough.
  9. Cooking the chakli is the trickiest part, make sure the oil is hot when you drop in the chaklis, after that set the stove to sim or minimum heat. Cook on a low temperature until crispy. The high temperature gives color to the chakli while the low temperature cooks it all the way through making it crispy. It is recommended to make a few trial batches so that you get the temperature and time required in your environment.
  10. Allow the chaklis to cool completely before storing, else they may get soft.

traditional Indian chakli, savory deep fried snack


If you liked this, you may also like:

How to make shakkarpara recipe, shankarpole recipe at www.oneteaspoonoflife.com
Shankarpole

Nippattu
popular Indian snack - baked flat discs made of four and spices
Baked Papdi


Read more ...