Showing posts with label Dessert. Show all posts

Jamun Ice Candy | Jambul Ice Candy | Black Plum Popsicle


SUMMER has arrived!! Cool down with this Summer with this Jamun Ice Candy / Black Plum Popsicle!


Summer isn't SUMMER, until you've had a brain freeze from all those ice candies. I had a few ones with this Jamun Ice Candy already, not enough though. But hey, summer has just begun. I'm looking at my calendar as I write this and I realise Summer has not "just begun", we are already mid way through it. One more week to go and we are officially mid way in Mango Season. Now that I think, I've barely had mangoes this season. Need to rectify that immediately!!

Anyway back to ice candies. I'm sure all of us have fond memories of buying Rs.1 ice candies from the street vendors who came about pushing their little carts when we were kids, waaaay back in the 80s and 90s (I feel old now :( ). Fun days!! For me summer as a kid meant all play and no work, pigging out on Mangoes, climbing trees to pluck out Guavas, eating loads of ice candies and dreading that report card that was sent home somewhere around this time in April. And of course Rasna!! That concentrated sweet drink that pretty much every house hold made together at the start of summer. I know lots of kids who made ice candies by freezing Rasna in bowls. Each of us had our very own favorite Rasna flavor, I personally loved the Mango. I think I can eat anything that is mango flavored.

Hey, I've been talking of a complete different fruit here. This post is not about Mangoes, not even close to Mangoes. If mangoes is what you are looking for today, you may want to check out these recipes.

Today is all about that purple king of fruits - Jamun or Jambul. While the Mango was termed the king, this extremely healthy wild fruit was very much ignored. Nobody ever spent money to buy them, they were plucked from trees when we all went to our native places and ancestral houses for the summer. The fun part of eating Jamun has always been the purple stain it leaves on your tongue when you eat them. We always had a competition to see whose was the darkest (gross, right?, eh, what can I say, we were kids). It took a long time for people to realise the health benefits of Jamun -the most popular one being the role it plays in controlling diabetes. This increased popularity in recent times has brought the fruit to markets, albeit at an expensive price.


Apart from the health benefits and the purple tongues, there is another reason why I decided to start my ice candy season with a Jamun Ice Candy - it is not commercially available!! There is no popular ice cream brand that actually sells a Jamun Ice Candy, the only place I've ever eaten one is at a small home ice cream parlor in Karkala. I loved it so much, that this season I decided to make them.

Making Ice Candies is a child's play. Literally!! All you need to do is mix sugar, water and the fruit. I blended a part of the fruit into a puree - this is what gives that nice purple color, and I chopped the remaining into small pieces roughly. If you have moulds to make ice candies, then pour the liquid into them and place the wooden stick in the center. But if you (like me) do not have a mould, then just use any small steel glass or paper cups or even ice cube trays to make the ice candies. To get the stick to stand vertically right in the center, just cover the glass with aluminium foil or with plastic cling wrap and in the center of that make a small slit. Insert the stick in the small slit all the way through.
Freeze until completely solid and enjoy your brain freeze.


If you made this recipe, let me know! Leave a comment here or on Facebook, tag your tweet with @oneteaspoonlife on Twitter and don't forget to tag your photo #oneteaspoonoflife on Instagram. You can also email me at onetspoflife@gmail.com. I'd love to see what you are upto. 

If you like this recipe, do not forget to share it with your friends and family! 

You can follow One Teaspoon Of Life is there on Facebook, Twitter, Instagram, Pinterest and Google+ or you can subscribe to One Teaspoon Of Life and receive all the latest updated via Email (How convenient!!)


If you liked this, you may also like:


Jamun Ice Candy | Jambul Ice Candy | Black Plum Popsicle


Jamun Ice Candy | Jambul Ice Candy | Black Plum Popsicle is a 3 ingredient frozen fruit dessert made with jamun (jambul) or black plums.

Recipe Type:  Dessert
Cuisine:            Indian
Total Time:     3-4 Hours
Yield:                Makes 7-8 ice candies


Ingredients:


250 gms Jamun / Jambul / Black Plum
6 cups Water
5-6 Tbsp Sugar

Method:


Deseed all the jamuns.
Keep aside a quarter of the jamuns, and blend the rest with a little water until smooth.
Roughly chop the jamuns that were kept aside and add it to the puree.
Add water to the puree.
Add sugar by the spoonful. Stir until sugar dissolves.
Depending on the sweetness or sourness of the jamuns, the quantity of sugar required may vary.
Pour the ice candy mix into the moulds. Place the ice candy stick in the center. Freeze for 3-4 hours or until frozen completely.
If you do not have a popsicle or ice candy or a kulfi mould, you can freeze the ice candy in steel glasses or paper cups. Cover the glass with aluminium foil or plastic wrap. Make a small slit in the center and push the ice candy stick through it.
To remove the ice candy or popsicle, just run the mould or the glass under water.


Read more ...

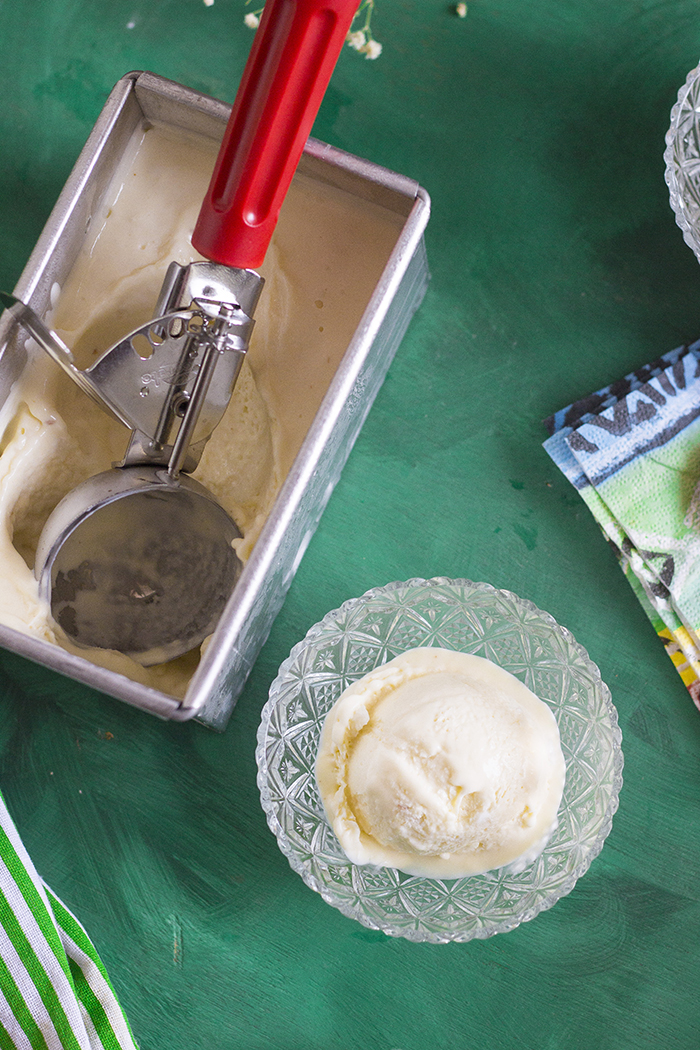
Natural's style Tender Coconut Ice Cream (without ice cream maker)


Tender Coconut Ice Cream recipe with step by step video instructions. This Naturals style Tender Coconut Ice Cream is made with only 4 ingredients and WITHOUT an ice cream maker!!! Tender Coconut Ice Cream is glutenfree and fits a Jain diet.

In a hurry? Jump to Video or Jump to Recipe


How to make coconut ice cream, coconut ice cream recipe, how to make ice cream without eggs, how to make ice cream without ice cream maker, naturals tender coconut ice cream recipe at www,oneteaspoonoflife.com

Heat Wave ALERT!! Bangalore is reeling under a heat wave right now and temperatures are soaring to mid thirty degrees C. Time to wallow in ice cream!

I have half the mind to move on to a chilled liquid diet until the heat wears off. But you know me, I wouldn't last a day without any food. So I'm doing the next best thing, well... not the next, but the BEST best thing, and that is loading up on ice cream. Chilled sweet perfection.

Tender coconut icecream

Everyone who's anyone in a town which has a Natural's Ice Cream Parlour has definitely tried their signature flavor - Tender Coconut. It's even in their logo. My family's favorite flavor. I personally die for their Custard Apple flavor but Gee and Raj love the Tender Coconut. You have to cook what the family will eat. Well, there is no cooking involved here, just like my last recipe of Bircher Muesli (Overnight Oats), which was also chilled, keeping in the spirit of Summer. 

Cut to last Saturday, while we were walking back home from one of our ridiculously long weekend walks, we picked up 4 tender coconuts from a local seller. Tender Coconut water is supposed to cool the body, and this heat definitely necessitates cooling. So the plan was to keep the coconut water in the fridge and drink it over the next few days so that we do not reach for any sugary sodas or drinks. 

I was then left with the meat or flesh of 4 coconuts. I don't mind eating it just like that or with a little jaggery, but 4 is a little too much for us to eat in a day. Light bulb moment!! Why don't I try making Tender Coconut Ice Cream! and the idea was born. I've made pop-sickles before, but never an ice cream. We usually just drive down to Natural's and buy a scoop of our favorite flavor. But Sunday was a first in my recipe book. I made Tender Coconut Ice Cream.... 

How to make coconut ice cream, coconut ice cream recipe, how to make ice cream without eggs, how to make ice cream without ice cream maker, naturals tender coconut ice cream recipe at www,oneteaspoonoflife.com

How to make coconut ice cream, coconut ice cream recipe, how to make ice cream without eggs, how to make ice cream without ice cream maker, naturals tender coconut ice cream recipe at www,oneteaspoonoflife.com

I don't own an ice cream maker and I don't know anyone who does, so this ice cream is something anyone can whip up. All you need is a whisk or a spatula. If you have a hand mixer, then you have all the power you need. This ice cream needs only 4 ingredients. Yup, that's it - FOUR!! Cream, Sugar, Coconut Meat and Coconut Water. Since there are only 4 ingredients, make sure you use fresh and the best quality you can find. 

I used fresh medium fat cream. Low fat cream may not work well. The cream needs to be chilled before use, else you may end up with butter instead of whipped cream.Whip the chilled cream until you have soft peaks. Blend a part of the coconut meat with 1/2 cup of coconut water. Fold in with the cream along with powdered sugar and chopped coconut meat. Pour in a freezer safe container and cover loosely with aluminium foil. Every 45-60 minutes for the first 3 hours, remove the ice cream from the freezer and whisk once completely and refreeze. This will prevent it from getting icy in places.
Tender coconut icecream

If you made this recipe, let me know! Leave a comment here or on Facebook, tag your tweet with @oneteaspoonlife on Twitter and don't forget to tag your photo #oneteaspoonoflife on Instagram. You can also email me at onetspoflife@gmail.com. I'd love to see what you are upto. 

If you like this recipe, do not forget to share it with your friends and family! 

You can follow One Teaspoon Of Life is there on Facebook, Twitter, Instagram, Pinterest and Google+ or you can subscribe to One Teaspoon Of Life and receive all the latest updated via Email (How convenient!!)


Video Recipe


--------------------------------------------------------------------------------------------------------------------------

Tender Coconut Ice Cream


How to make coconut ice cream, coconut ice cream recipe, how to make ice cream without eggs, how to make ice cream without ice cream maker, naturals tender coconut ice cream recipe at www,oneteaspoonoflife.comNaturals inspired Tender Coconut Ice Cream made with only 4 ingredients without an ice cream maker.

Recipe Type:  Dessert
Cuisine:            Indian
Prep Time:     30 minutes
Cook time:     0 minutes
Total time:     6 Hours 30 Minutes
Yield:                Serves 7-8


Ingredients:


400ml medium-fat Cream (chilled)
4 Tender Coconuts Meat
0.5 cup Tender Coconut Water
400gms sweetened Condensed Milk or 6-7 Tbsp Powdered Sugar

Method:


1. Blend the meat of 3 tender coconuts along with the tender coconut water to a smooth paste.
2. Chop the remaining tender coconut meat finely.
3. Whisk the chilled cream until you have soft peaks. Be careful not to over whisk, the cream will curdle into butter. If you feel the cream is getting warm, chill it for 10 minutes in the fridge and restart whisking.
4. Fold in the coconut paste, condensed milk or powdered sugar and the coconut pieces until combined.
5. Pour into a freezer safe box or baking pan. Cover with aluminium foil and place in the freezer.
6. After every hour for the first 3 hours, remove the ice cream from the freezer and whisk it again with the handheld mixer or with a spatula to prevent formation of ice crystals.
7. Leave it in the freezer until completely frozen.
8. Scoop and serve.


How to make coconut ice cream, coconut ice cream recipe, how to make ice cream without eggs, how to make ice cream without ice cream maker, naturals tender coconut ice cream recipe at www,oneteaspoonoflife.com


If you liked this, you may also like:

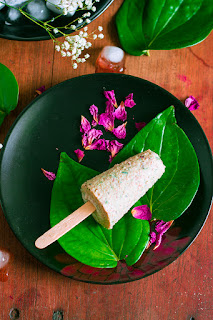
Meetha paan kulfi
Paan Kulfi

Coconut Laddoo
Blueberry Litchi Coconut Mocktail

Read more ...

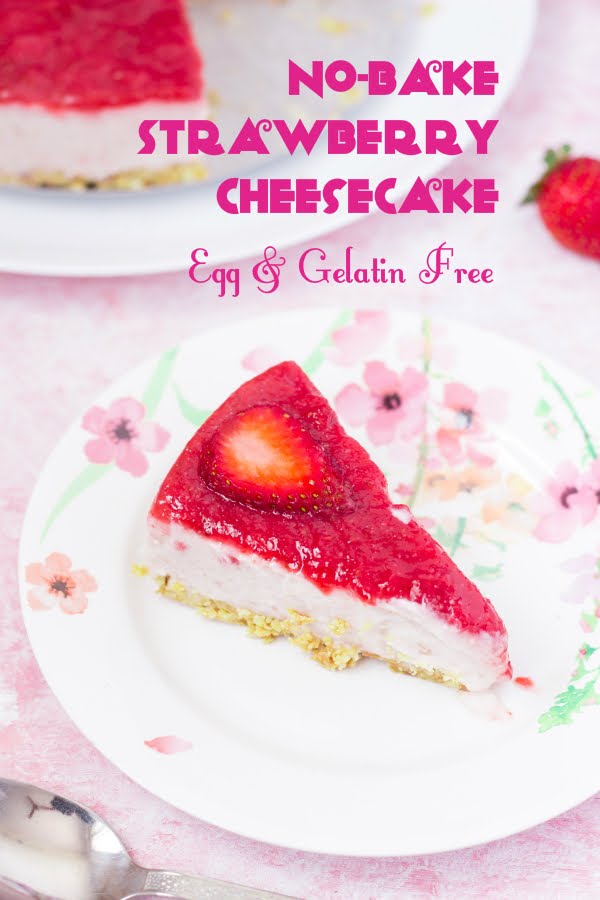
No-Bake Strawberry Cheesecake (Egg and Gelatin free)


Vegetarian Cheesecake Time!!! This no-bake Strawberry Cheesecake is Egg and Gelatin free, it is made with easily available and fresh ingredients.

vegetarian cheesecake recipe, How to make no-bake cheesecake recipe, How to make strawberry cheesecake recipe, How to make cheesecake without gelatin recipe, Eggless strawberry cheesecake recipe at www.oneteaspoonoflife.com


We are a cheesecake loving family, well almost, except Gee, her poison is a dark gooey chocolate cake. But the rest of us are ready with our forks out at the mention of a cheesecake. Blueberry, Mango, Strawberry, bring them ON!
Initially we would love to go a gourmet bakery just to eat it. But then someone mentioned that cheesecakes have gelatin in them. Gelatin is what holds it together and it does a wonderful job at it, but it is not vegetarian. So then onwards there was a non-cheesecake existence, we could see it staring at us at malls, cakeshops and bakeries but never had the heart to go buy it. Then I found this recipe for a Mango Cheesecake by Anushruti. There was hope again for us!!!


vegetarian cheesecake recipe, How to make no-bake cheesecake recipe, How to make strawberry cheesecake recipe, How to make cheesecake without gelatin recipe, Eggless strawberry cheesecake recipe at www.oneteaspoonoflife.com


vegetarian cheesecake recipe, How to make no-bake cheesecake recipe, How to make strawberry cheesecake recipe, How to make cheesecake without gelatin recipe, Eggless strawberry cheesecake recipe at www.oneteaspoonoflife.com


vegetarian cheesecake recipe, How to make no-bake cheesecake recipe, How to make strawberry cheesecake recipe, How to make cheesecake without gelatin recipe, Eggless strawberry cheesecake recipe at www.oneteaspoonoflife.com
I will be honest - making a cheesecake at home is not a simple task. It really isn't. But the rewards are BIG and TASTY and VEGETARIAN!! I had to work with this recipe multiple times to get it right, the family definitely did not mind getting to eat Strawberry Cheesecake every weekend. I wondered how long their love would last, but I got the recipe right before they got bored, so hey, that's a win for me.  

Strawberries are currently plenty in the market and pretty cheap too. So this is the right time for the cheesecake. I took Anushruti's recipe as a base and changed it to suit my ingredients along the way.
A cheesecake is made of 2 major components - Biscuit Base and the Cheese Filling.

Biscuit Base 

I used different commonly available biscuits to make the biscuit base. I experimented with Goodday, Marie, Digestive Biscuits etc, sometimes it was a combination of different varieties. My pick at the end of the day - Marie. Marie biscuit is naturally very crispy and works beautifully here. It doesn't have too much of a flavor of its own, so it doesn't interfere with the taste of the filling and just ends up adding a very buttery crunch to the whole cheesecake. You may have a different favorite, just go with it. 
I used a mix of salted and unsalted butters, I liked the mild saltiness. I wouldn't recommend using only salted butter, however, you can use only unsalted butter and may be add a pinch of salt to it if you like the saltiness or avoid the salt all together.

vegetarian cheesecake recipe, How to make no-bake cheesecake recipe, How to make strawberry cheesecake recipe, How to make cheesecake without gelatin recipe, Eggless strawberry cheesecake recipe at www.oneteaspoonoflife.com

vegetarian cheesecake recipe, How to make no-bake cheesecake recipe, How to make strawberry cheesecake recipe, How to make cheesecake without gelatin recipe, Eggless strawberry cheesecake recipe at www.oneteaspoonoflife.com

Cheese Filling 

While the biscuit base is super simple to make, getting the cheese filling right was my mount Everest. The taste was spot on from day one, but it just would not set. The cheesecake would melt right before my eyes and break my heart. Hence, multiple retries and I'm happy to tell you the below recipe worked perfectly for us. I would have probably liked it a little firmer, but I'm a little worried if adding more china grass will leave an unpleasant aftertaste. 

Making the filling takes over a day. The first step is hanging the yogurt or curd in a muslin cloth to drain all the water from it. Use a thick set curd or preferably, buy Greek Yogurt. At the end of the draining, you should have a really thick creamy yogurt. The next ingredient is Paneer, blend it in a mixer to get a creamy paneer paste. Refrain from adding water during the blending. Strain to remove lumps. Add it to the yogurt and mix well. Add the powdered sugar and mix well. P

uree the strawberries and gently heat the puree on the stove. Don't let it boil, but it needs to be hot when you add the china grass to it, else the china grass will seize and become a lump. China Grass is the trickiest ingredient of the lot. Soak it for at least 10 minutes in water before heating it up. Do not heat the china grass directly on the stove top. Use a double boiler - take a pan and add water to it. Allow the water to come to a boil, then place the bowl containing the soaked china grass and allow it to melt, stirring occasionally. Once the china grass has completely dissolved in the water, add it to the hot strawberry puree and mix well. Immediately add this to the yogurt-paneer mix. Fold in.

vegetarian cheesecake recipe, How to make no-bake cheesecake recipe, How to make strawberry cheesecake recipe, How to make cheesecake without gelatin recipe, Eggless strawberry cheesecake recipe at www.oneteaspoonoflife.com

vegetarian cheesecake recipe, How to make no-bake cheesecake recipe, How to make strawberry cheesecake recipe, How to make cheesecake without gelatin recipe, Eggless strawberry cheesecake recipe at www.oneteaspoonoflife.com


Your cheesecake filling is ready. Pour it over the chilled biscuit base and refrigerate it for 5-6 hours until it sets.

The glaze can be either poured over the cheesecake while serving, or while it is setting. Making the glaze requires you to heat the strawberry puree with sugar for a few minutes. Allow it to cool and then pour over the cheesecake. If you'd like it to set along with the cake, pour it over the cheesecake after it has been refrigerated for 1-2 hours, else, pour it while serving.

To make individual sized portions, set the cheesecake in bowls or in glasses. These are perfect if you are hosting a party.


If you made this recipe, let me know! Leave a comment here or on Facebook, tag your tweet with @oneteaspoonlife on Twitter and don't forget to tag your photo #oneteaspoonoflife on Instagram. You can also email me at onetspoflife@gmail.com. I'd love to see what you are upto. 

If you like this recipe, do not forget to share it with your friends and family! 

You can follow One Teaspoon Of Life is there on Facebook, Twitter, Instagram, Pinterest and Google+ or you can subscribe to One Teaspoon Of Life and receive all the latest updated via Email (How convenient!!)

vegetarian cheesecake recipe, How to make no-bake cheesecake recipe, How to make strawberry cheesecake recipe, How to make cheesecake without gelatin recipe, Eggless strawberry cheesecake recipe at www.oneteaspoonoflife.com

If you liked this, you may also like these other desserts:


No-Bake Strawberry Cheesecake (Egg and Gelatin Free)


vegetarian cheesecake recipe, How to make no-bake cheesecake recipe, How to make strawberry cheesecake recipe, How to make cheesecake without gelatin recipe, Eggless strawberry cheesecake recipe at www.oneteaspoonoflife.comNo-Bake Strawberry Cheesecake is an eggless and gelatin free frozen dessert made with fresh strawberries,yogurt and paneer. It is set using china grass or agar agar instead of gelatin or egg.

Recipe Type:  Dessert
Cuisine:            International
Prep Time:     45 minutes (Does not include setting time)
Cook time:     45 minutes
Yield:                Serves 6-8


Ingredients:


200gms fresh Strawberries (20-25)
400gms Greek Yogurt or Thick Full Fat Curd
200gms Paneer
10gms China Grass (Agar Agar)
1.25 cups Sugar
10-12 Digestive Biscuits
3 Tbsp unsalted Butter
1 Tbsp salted butter

Method:


To make the Biscuit Base:


Crush the biscuits until they are a coarse powder.
Add the butter to the biscuit powder and mix well.
Put the biscuit crumbs into the cake pan. You will need to use a springform cake pan or a cake pan with a detachable bottom plate. Alternately, you can also make individual sized portions in glasses.
Gently press the biscuit crumb until the bottom of the entire pan is coated evenly with it with a slight rise along the edges. Make sure there are no holes in the layer.
Keep the cake pan in the fridge for 2-3 hours. This can be done simultaneously with hanging the yogurt

To make the Strawberry Cheesecake Filling:


Tie the yogurt or curd in a muslin cloth and leave it hanging for 3-4 hours until all the water is drained from it. I left it overnight in the fridge.
Blend the paneer in a mixer/blender until smooth. Strain if required to remove lumps.
Add the creamed paneer to the hung yogurt and mix well.
Powder the sugar.
Add 1.5 cups of the powdered sugar to the yogurt-paneer mix and whisk well until combined.
Soak china grass in 3/4 cup of water for 10-15 minutes.
Heat water in a pan, once the water boils, place the bowl containing the china grass into the pan.
Do not allow the china grass to come to a boil. Stir occasionally. Continue to heat the china grass until it dissolves completely in the water. This may take 15-20 minutes.
In the meanwhile, puree 12-15 strawberries until smooth.
Add the puree to a small pan and heat it on low heat. The puree should not come to a boil but should be hot when we add the china grass.
Once the china grass has completely dissolved, add it to the hot strawberry puree and mix well.
Taste to see if you need more sugar, you can stir in more powdered sugar at this point.
Immediately pour this into the yogurt-paneer mix and fold in until combined.
Refrigerate the cheesecake for 6-7 hours until set.

To make the Strawberry Glaze:


Puree the remaining strawberries until smooth.
Heat the puree in a small pan.
Add the remaining powdered sugar by the spoonful. You may need more if the strawberries are very tart.
Simmer on low heat for 4-5 minutes.
Allow it to cool completely.
Then pour over the cheesecake evenly. Allow it to set for at least 1 hour before serving. Alternately, you can pour the glaze just before serving as well.


vegetarian cheesecake recipe, How to make no-bake cheesecake recipe, How to make strawberry cheesecake recipe, How to make cheesecake without gelatin recipe, Eggless strawberry cheesecake recipe at www.oneteaspoonoflife.com


Read more ...

Karachi Bakery Inspired Fruit Biscuits


Have you ever tried Hyderabad's famous Karachi Bakery Fruit Biscuits?

No? I suggest you go get yourself one packet right now, girl.

Yes? Aren't they super delicious? I absolutely love them... So I made them at home... Really!! Read on!

How to make vegetarian eggless Karachi Bakery Fruit Biscuit rose cookies cranberry cookie recipe at One Teaspoon Of Life www.oneteaspoonoflife.com


I had no idea I liked Rose flavored cookies until I tried the Karachi Bakery Fruit Biscuits. A colleague once got them from Hyderabad and I missed the first batch. Just to make up to all those late comers like me, he got more the next day. And I was converted!! Until then I thought I was a lover of all things chocolate, but rose suddenly rose to the top (hee hee... see my little pun there? okay, ignore it).

I absolutely love roses, not generally as a flower, I find them "meh" and over rated. But I love rose flavor! I'm all for Rose Faluda, Rose Lassi, Rose Ice cream and of course anything with Gulkand in it (Indian Rose Jam). And now Rose Cookies are added to the list.

How to make vegetarian eggless Karachi Bakery Fruit Biscuit rose cookies cranberry cookie recipe at One Teaspoon Of Life www.oneteaspoonoflife.com

How to make vegetarian eggless Karachi Bakery Fruit Biscuit rose cookies cranberry cookie recipe at One Teaspoon Of Life www.oneteaspoonoflife.com
I'm sorry that although the title says Fruit Biscuit, all I'm talking about is roses. While the biscuits or cookies have little bits of fruit in them, rose is the predominant fragrance and flavor in them. The fruit component of the biscuit is Tutti Fruiti. Tutti Fruiti are colored sweetened bits of dried papaya. Very popular in Indian desserts. If you cannot find it anywhere, you can add any dried berry like cranberries. Actually, this recipe is very similar to the Cranberry Cookie recipe with the addition of few very Indian ingredients.

One of those ingredients is the Vanilla Custard Powder. Traditionally custard is made with egg yolks, but ask any Indian how to make custard (well, almost any) and he/she will show you a little carton of Custard Powder that is completely eggless and allows any vegetarian to enjoy the flavors of a custard. There are several brands and flavors available, and while you can use any brand, I strongly recommend sticking to the vanilla flavor. If you cannot find custard powder, replace it with either milk powder or corn starch /flour. If using sweetened milk powder, remember to reduce the amount of powdered sugar used, else you may end up with a super sweet biscuit.

My recipe of fruit biscuit is a very simple recipe that any baking newbie can make. You start by creaming together butter and powdered sugar. I cannot emphasize the importance of room temperature butter enough. To get the right consistency of the dough and eventually the biscuit, you have to have butter at room temperature. Salted vs unsalted is a whole other argument. I've always used unsalted butter in baking so I cannot comment on how salted will work in this case. I assume they have the same texture, but using salted will just add a little saltiness to your biscuits. Whisk the butter and sugar until the butter is white, soft and fluffy. Then just add all the flours, tutti fruiti, cashew nuts, milk and rose essence and knead until combined. Shape into logs or into a large rectangular block like I did. Wrap it in cling wrap and store in fridge to harden a little. This just makes it easier to cut and get even shaped biscuits.

How to make vegetarian eggless Karachi Bakery Fruit Biscuit rose cookies cranberry cookie recipe at One Teaspoon Of Life www.oneteaspoonoflife.com

Bake at 180 degree C until the sides are slightly brown. Cool completely before storing in an air tight box. They will last you easily for 1-2 weeks. I really did not get any time to test the shelf life as these were over by day 4.

I can assure you the flavor of these biscuits is spot on with the Karachi Bakery Fruit Biscuits. The texture is slightly different. Mine were not as flaky and crumbly as the bakery ones, mine were more dense and crunchy. This could be because I have not used any leavening agent like baking powder or baking soda. My family loves crunchy biscuits that stay intact when dipped in tea over the crumbly ones, so we loved the texture. If you want softer ones, I suggest adding a little baking powder to a small batch of dough and seeing how it goes.

How to make vegetarian eggless Karachi Bakery Fruit Biscuit rose cookies cranberry cookie recipe at One Teaspoon Of Life www.oneteaspoonoflife.com

If you like this, you may also like:


Karachi Bakery Inspired Fruit Biscuit


Karachi Bakery inspired Fruit Biscuits are rose flavored biscuits or cookies made with dried papaya pieces called tutti fruiti.

How to make vegetarian eggless Karachi Bakery Fruit Biscuit rose cookies cranberry cookie recipe at One Teaspoon Of Life www.oneteaspoonoflife.com
Recipe Type:  Dessert
Cuisine:            Indian
Prep Time:     2.5 Hours
Cook time:     20-25 minutes
Yield:                30 biscuits


Ingredients:


100gms unsalted Butter
1 cup All Purpose Flour / Maida
1 cup + 1 Tbsp Powdered Sugar
1/2 cup Vanilla Custard Powder
3 Tbsp Tutti Fruiti
8-10 Cashew nuts
2 Tbsp Milk
1 tsp Rose Essence

Method:


Cream together butter and powdered sugar in a large bowl until soft and fluffy. Around 5-10 minutes with a electric hand mixer.
Sift in the all purpose flour and custard powder.
Add tutti fruiti, chopped cashew nuts, rose essence and milk.
Knead until combined.
Gently roll into logs using your hands and wrap in plastic cling wrap. Refridgerate for 2-3 hours until stiff.
Preheat the oven to 180 degree C.
Slice the dough into biscuits, about 5-6mm thickness.
Line the baking sheet with butter paper or parchment paper.
Place the biscuits on the sheet leaving enough space between the biscuits.
Bake for 20-25 minutes until the sides are slightly browned.
Cool on a wire rack.
Store in an air tight box.


How to make vegetarian eggless Karachi Bakery Fruit Biscuit rose cookies cranberry cookie recipe at One Teaspoon Of Life www.oneteaspoonoflife.com


Read more ...

Shavige Payasa | Semiyan Kheer | Vermicelli Pudding

Happy New Year!!!

I hope you had a great New Year's Eve!!

How to make shavige payasa semiyan kheer vermicelli pudding recipe at www.oneteaspoonoflife.com

I ended 2016 with a sweet note. Read about it here.

In our culture, we start everything new with something sweet. I'm starting the new year with this sweet treat - Vermicelli Pudding or Semiyan Kheer or Shavige Payasa. Not that I need excuses to eat desserts, but then it is January, and I have resolutions made that I don't want to break in the very first week.

So, I just had one little bowl. But what a bowl it was, rich, sweet, fragrant, everything a kheer is meant to be.

How to make shavige payasa semiyan kheer vermicelli pudding recipe at www.oneteaspoonoflife.com

Shavige Payasa is very commonly made for all festivals and is what we begin the meal with. It is one of the easiest desserts I know to make.

To make Shavige Payasa, we first need to roast the shavige or semiyan or vermicelli in ghee until golden brown. This is an important step as it prevents the vermicelli from clumping up when added to the milk. Also it imparts that rich taste of ghee to the entire kheer. You need to do this step carefully, stirring frequently and ensuring that the vermicelli does not burn. I always use wheat vermicelli that is not pre-roasted and is already broken into small pieces. I buy brands like MTR or Bambino

The second step is the dry fruits. I am a total "nut-case", I love nuts and dry fruits. I am extra generous with nuts and dry fruits when it comes to desserts and I also like to add a variety of them. This time I've used almonds, cashews, raisins and pistachios. The nuts and dry fruits need to be chopped and fried in ghee as well. Again, you need to be careful while frying in ghee. Ghee heats up quickly and you can end up with burnt nuts. So keep a watch on them. Stir frequently and keep the heat low. Fry the raisins separately as they burn quickly.

How to make shavige payasa semiyan kheer vermicelli pudding recipe at www.oneteaspoonoflife.com

After this you are pretty much done with the "work". Just boil milk, add sugar and the roasted vermicelli. Give it a good stir to separate the strands of vermicelli and then allow it to simmer on low heat until the vermicelli is cooked completely but still retains it's shape. The vermicelli will give way when squeezed. About the sugar, I'd say start with less and add more if required later. Add around 3/4th the quantity in the beginning and you can add more after the vermicelli is cooked. Somehow, a lot of people think Indian Desserts are way too sweet and avoid them. But when you make it at home, you can adjust how much sugar you add depending on your taste. So Indian desserts don't have to be sickly sweet. Once the vermicelli is cooked and the sugar adjusted, add the cardamom powder and the fried nuts and dry fruits and mix well. If you have over reduced the milk and the kheer begins to look thick, add more milk and adjust the sugar.

Shavige Payasa is usually served hot to warm, but I like it at room temperature. I enjoy it even when it is cold.

How to make shavige payasa semiyan kheer vermicelli pudding recipe at www.oneteaspoonoflife.com


If you liked this, you may also like:

  • Chana Dal Payasa - Kheer made from chana dal and coconut milk.
  • Gajar ka Halwa -  North Indian carrot pudding made with grated carrots, milk, sugar, ghee and dry fruits.


Shavige Payasa | Semiyan Kheer | Vermicelli Pudding


How to make shavige payasa semiyan kheer vermicelli pudding recipe at www.oneteaspoonoflife.comShavige Payasa | Semiyan Kheer | Vermicelli Pudding is a simple Indian dessert made by cooking ghee roasted vermicelli in milk.

Recipe Type:  Dessert
Cuisine:            Indian
Prep Time:     5 minutes
Cook time:     60 minutes
Yield:                Serves 4-5

Ingredients:


0.5 cup Vermicelli or Semiyan or Shavige
4-5 cups Milk
3-4 Tbsp Sugar
1.5 Tbsp Ghee
3 Cardamoms
5-6 Cashew Nuts
5-6 Almonds
8-10 Raisins
4-5 Pistachios

Method:


Chop the almonds, cashew nuts and pistachios.
Heat ghee in a kadhai and add the chopped nuts. Fry them until they are a gentle brown. Do not allow them to burn. Keep stirring.
Remove the nuts and keep aside.
Add the raisins and stir fry them until they puff up. Remove and keep along with the nuts.
Add the vermicelli to the kadhai and on low heat roast the vermicelli until it is golden brown. Keep stirring frequently. Remove from heat and keep aside.
In the same kadhai, add 4 cups milk and bring it to a rolling boil.
Lower the heat and add sugar and simmer for 1 minute until the sugar dissolves.
Add the vermicelli to the milk and on low heat allow it to simmer until the vermicelli is cooked. Stir occasionally so that the vermicelli does not form lumps.
The kheer is done when the vermicelli is cooked. At this point if the kheer looks very thick, add the remaining milk and you can add more sugar and cook it until the sugar dissolves.
Crush the cardamom into a powder and add to the kheer. Simmer for 1 minute after mixing well.
Add the nuts and raisins and mix well. Remove from heat.
Kheer is usually served hot, but you can serve it at room temperature or even cold. As the kheer cools it ends up thickening. You can add a little milk to loosen the kheer while serving. You can add powdered sugar to adjust the sweetness as well.


How to make shavige payasa semiyan kheer vermicelli pudding recipe at www.oneteaspoonoflife.com
Read more ...

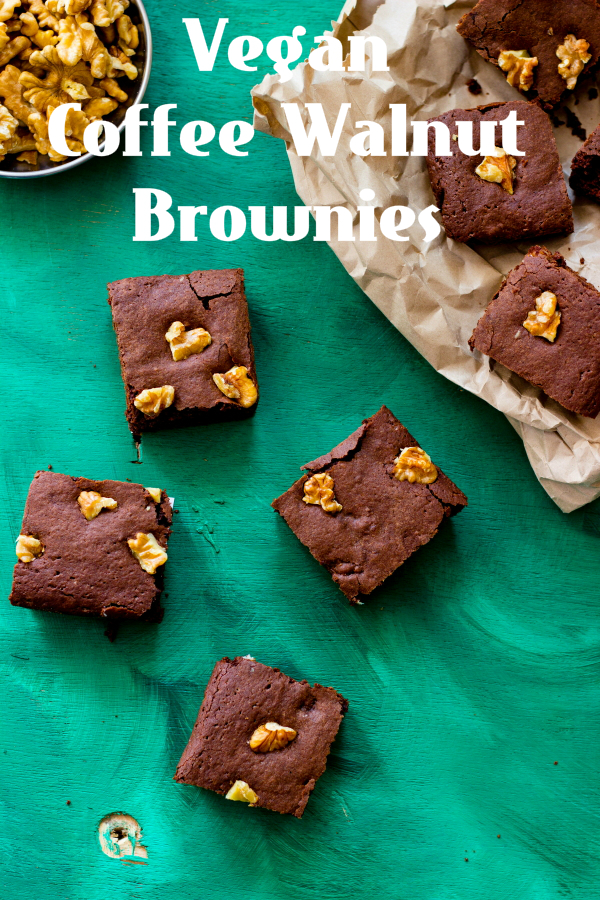
Vegan Coffee Walnut Brownies


This is my LAST post of 2016 and it's been a wonderful year, definitely better than the last 2. The year had me complaining a lot about hectic schedules but it also had me winning an award at work (yay!!), completing 5 years of a wonderful marriage, taking a memorable vacation to Cambodia with the people I love the most in the world. It has also been the year where I have blogged the most. This is my 70th post of the year. It is much less than how often I would like to write but it is a start. So while I sign off this year, I'm leaving you with a little treat to celebrate 2016 and here's wishing you all a very Happy New Year!!

How to make vegan chocolate cake brownies recipe at www.oneteaspoonoflife.com

Coffee+Chocolate+Walnuts = AMAZING moist stimulating brownie.

These brownies are good for you, really. Waaah, you think I'm just throwing it around, don't you?
1) Walnuts are good for your brain. They also shaped like them. They help in improving memory, etc etc. Well, point to be noted is they are good for you.
2) These brownies are perfect energy boosters with the added Coffee.Some think that may be bad for you, but we don't associate with coffee haters anyway. I mean, is there a tastier way for you to have coffee, than in a Brownie?
3) Everybody says chocolate is good for you, don't they? Well, here's some nice dark chocolate.   Cheers for our health!!

Have I convinced you? I do hope I have because I wouldn't want you to miss out on this little piece of heaven.

How to make vegan chocolate cake brownies recipe at www.oneteaspoonoflife.com

For once, I simply made the brownies. No birthday, no celebration, no potluck, no get together. Just cause I wanted to treat myself, (yes, myself) to a dark moist chocolatey brownie. I've worked hard all year and I deserve it. So do you!! And when something tastes so good, it really does not need excuses or occasions. Of course, I shared this with family, but it was I who cut into them while still warm (not advised, but let's be honest, who can resist warm brownies) and ate to my heart's content before sharing it with anyone.

I feel happy and good when I eat things I love and chocolate usually ranks high on the list of foods that make me happy. What is it that you love to eat? What makes you happy? Let me know, may be I have a recipe just for that.

How to make vegan chocolate cake brownies recipe at www.oneteaspoonoflife.com


If you liked this, you may also like:


Vegan Coffee Walnut Brownies


How to make vegan chocolate cake brownies recipe at www.oneteaspoonoflife.comVegan Coffee Walnut Brownies are moist cake like brownies made from chocolate, coffee and walnuts.

Recipe Type:  Dessert
Cuisine:            International
Prep Time:     30 minutes
Cook time:     25 minutes
Yield:                Makes 9

Ingredients:


100gms Semi dark vegan Chocolate (grated)
3/4 cup Flour (Maida)
1/2 cup + 2 Tbsp Water
3/4 cup Powdered Sugar
8 tsp Oil
2 Tbsp Flour
3 tsp Coffee Powder
1/4 tsp Baking Soda
3 Tbsp chopped Walnuts

Method:


Microwave the grated chocolate and 1/2 cup water on high for 30 seconds until the chocolate is soft. Whisk to combine the chocolate and the water. If doing this on the stove top, do it on low heat.
Add the coffee powder and oil to the chocolate and mix well.
Add 1/2 cup sugar and mix well.
Sift the flour and baking soda together.
Add the flour to the chocolate and mix until combined.
Add more sugar or water as required. The batter should be sticky and thick.
Add half the chopped walnuts and mix.
Preheat the oven to 180 degree C.
Grease and line the baking tin with parchment paper.
Pour the batter into the tin and sprinkle the remaining walnuts on top.
Bake for 15-18 minutes.
Remove from the tin after 10-15 minutes and pull out the parchment paper.
Allow it to cool before cutting into squares.

How to make vegan chocolate cake brownies recipe at www.oneteaspoonoflife.com

Read more ...