Showing posts with label Deep fried. Show all posts

Mangalore Buns Recipe | Banana Buns Recipe [Video]


Mangalore Buns or Banana Buns are deep fried slightly sweet puris flavored with ripe bananas.
These Mangalore buns are vegan and are popularly enjoyed as breakfast or tea time snacks.


In a hurry? Jump to Video or Jump to Recipe

Mangalore Banana Buns


Hi Peeps, how are you doing? All set for the holiday season? Plans made with family?

Holidays with family are the best, aren't they? You create so many memories that you can feel nostalgic about in the future. Most of my favorite memories are of vacations with my family. This dish of Mangalore Buns features prominently in one of my childhood vacation memories.

Memories....

Early in the 90's Indian Railways started changing all meter gauge trains to broad gauge and that meant that trains were no longer accessible to the general public. Until then, we always traveled by train to my grandma's house, a tiny village near the city of Mangalore. Then started the days of bus travel. Since the village was so tiny, there was no direct bus from Goa. We had to alight at the closest point and wait for a connecting bus, all at 5am in the morning. While waking up that early was a torture, there was a silver or rather golden lining there. Before the first connecting bus arrived, a small restaurant would open its doors and start selling breakfast and these golden Mangalore Buns were always on the menu. My mom introduced us to these buns, and what an introduction it was. My love affair with these Mangalore Buns started back then!

Till today, when we are around Mangalore, we go in search of tiny restaurants that make fresh buns. If you want to know some of my favorite places, ask me in comments.

Mangalore Banana Buns


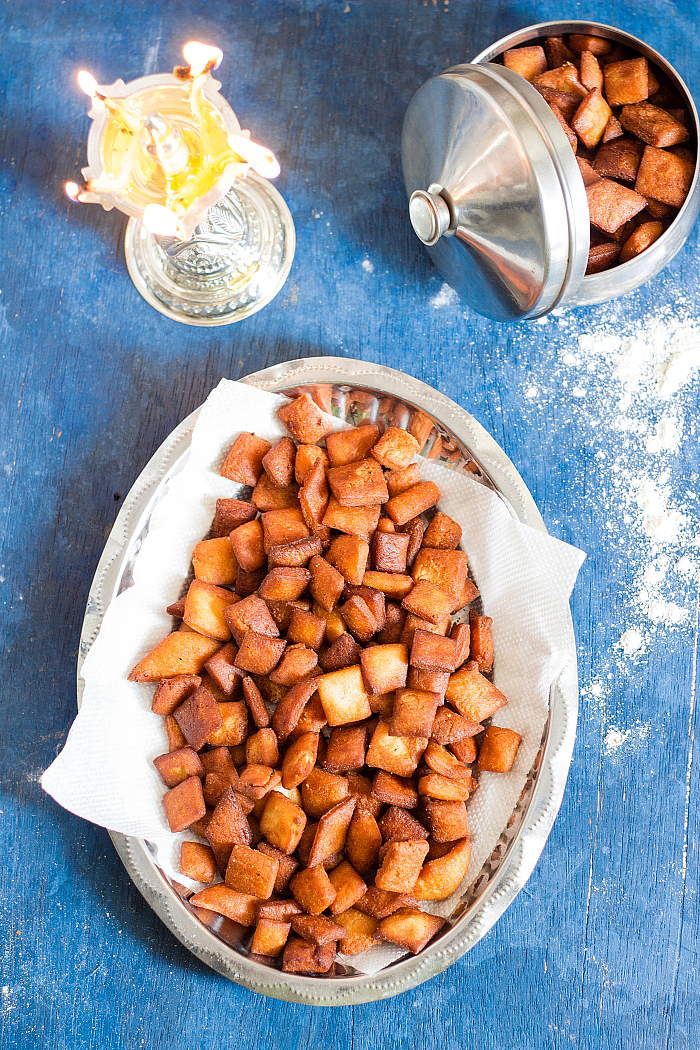
What is not to love? The buns are banana flavored and deep fried. They are more like Banana Puris. Mildly sweet with specks of cumin all over, they are just super delicious. Mangalore Buns are one of the only sweet breakfast that I enjoy, otherwise, I'm a savory breakfast girl. Mangalore Buns are commonly served with a simple coconut chutney and a piping hot sambar.

Traditionally, all purpose flour or maida is used to make the Mangalore Buns. But I usually use 50% all purpose flour and 50% wholewheat flour (atta). I've made it also with 100% wholewheat flour and it did not absolutely take away from the flavor, the texture however wasn't as spongy and the bins were slightly flat. I still did not mind that, they still tasted amazing. The dough can be rested overnight if the temperature is lower, else you can rest it in the fridge in warmer weather. These buns are a perfect way to use overripe bananas that you may have discarded otherwise. Ripe to overripe bananas work best in this recipe. Serve the buns with chutney or just plain.

Go ahead, make them this holiday season, and create your own special memories.

Fun fact - No matter whether it is just one bun or multiple, it is always called "buns". 

Mangalore Banana Buns


If you made this recipe, let me know! Leave a comment here or on Facebook tag your tweet with @oneteaspoonlife on Twitter and don't forget to tag your photo #oneteaspoonoflife on Instagram. You can also email me at onetspoflife@gmail.com I'd love to see what you are upto.


If you like this recipe, do not forget to share it with your friends and family! 


You can follow One Teaspoon Of Life on FacebookTwitterInstagramPinterest and Google+ or you can subscribe to One Teaspoon Of Life and receive all the latest updated via Email


Video Recipe


--------------------------------------------------------------------------------------------------------------------------

Mangalore Buns Recipe | Banana Buns Recipe

Mangalore Banana Buns
Mangalore buns are banana flavored deep fried buns made from either all purpose or whole wheat flour. These vegan buns are a popular breakfast around the city of Mangalore.

Recipe Type:  Breakfast
Cuisine:            Indian
Prep Time:     2.5 Hours (includes dough resting time)
Cook time:     20 minutes
Total time:     3 Hours
Yield:                Makes 10-12

Ingredients:


2 ripe Bananas
0.25 cups Curd (Yoghurt)
3 cups All Purpose Flour or Wholewheat Flour
3 Tbsp Powdered Sugar
0.25 tsp Salt
A pinch of Baking Soda
1 tsp Cumin Seeds
Oil to fry

Method:


1. Mash the bananas with powdered sugar until smooth.
2. Add in the cumin seeds, whisked curd, baking soda and salt. Mix well.
3. Add in the flour and knead into a stiff dough.
4. Apply a little oil on the dough to prevent it from drying. Cover and rest for 2-4 hours. The dough can be rested overnight too. If the weather is warm, rest in the fridge.
5. Dust the kitchen counter with some dry flour.
6. Pull out a ball of dough and roll it out on the dusted counter.
7. Heat oil for deep frying.
8. Carefully drop in the rolled out buns and fry on medium high heat until one side browns.
9. Flip over and fry until the other side browns.
10. Remove from oil and place it onto a absorbent kitchen towel to cool.
11. Serve hot or at room temperature with chutney.

If you liked this, you may also like:

How to make eggless vegetarian banana bread recipe at www.oneteaspoonoflife.com
Banana Bread

Cucumber pakoda fritter sautekayee bonda khira khire kakdi
Cucumber Pakoda
Methi Pathrode
Menthe Pathrode


Read more ...

Traditional Chakli Recipe | How to make Chakli [Video]


Chakli is a deep fried savory Indian snack that is popularly made for Diwali. Chakli is a spiral snack made from rice and black lentil (urad dal) flour and can be enjoyed in a gluten free diet. This recipe will show to how to make chakli from scratch along with a video tutorial.

In a hurry? Jump to Video or Jump to Recipe

traditional Indian chakli, savory deep fried snack

Soooo.... this post comes almost a month later than what it should have been posted. I had planned to post this Chakli recipe before Diwali, so you guys could try it for Diwali. But I totally missed it. I thought of waiting for next year to post it, but then who has the patience to wait another year. And I figured out, you don't need Diwali around to make Chakli, you can make it anytime you like. With cold weather coming our way, the demand for deep fried goodness is only going to go up. So here's the recipe for the crispy crunchy Chakli.

There are several variations of the Chakli - Palak Chakli, Butter Chakli and what my friend told me recently, there's even an Jalapeno Chakli out there. But this is the recipe for the traditional chakli.

traditional Indian chakli, savory deep fried snack

traditional Indian chakli, savory deep fried snack

Some background.

It’s been years that I have been planning to cook snacks and sweets for Diwali and restart our old tradition of visiting friends and family and sharing those delicacies with them. But for the last 2 years, I’ve been out of country for Diwali (visiting Bali and Cambodia). So while I made elaborate plans on what to cook and how to box them, it never materialized. But this Diwali was different, I was in country and better yet, I was in Goa. Gee and I split up the dishes and managed to put up two savory and two sweets on the plate. It was such a delight!

I had several ideas for the savory snack and while I had Chakli at the back of my mind, Gee picked it too. Chakli was what my mom made every Diwali when we were little and gave it to everyone in the apartment complex. And this year, I restarted that tradition.

I made Chakli several times in the last one month, I made trial batches and I made more batches for distributing. With all the Chakli making so fresh in my mind, I'm at my best to give you all the tips and tricks required to make the perfect Chakli. There are several small things that impact how your Chakli turns out, and I have included it in the Notes section at the bottom of the recipe. Who knew, that things like humidity and temperature could affect your Chakli?

There are different varieties of Chakli Press available in the market, you can buy:

  • Stainless Steel Ones -  
  • Brass ones -             
  • Wooden ones  from local markets.

traditional Indian chakli, savory deep fried snack


If you made this recipe, let me know! Leave a comment here or on Facebook tag your tweet with @oneteaspoonlife on Twitter and don't forget to tag your photo #oneteaspoonoflife on Instagram. You can also email me at onetspoflife@gmail.com I'd love to see what you are upto.


If you like this recipe, do not forget to share it with your friends and family! 


You can follow One Teaspoon Of Life on FacebookTwitterInstagramPinterest and Google+ or you can subscribe to One Teaspoon Of Life and receive all the latest updated via Email


Video Recipe


--------------------------------------------------------------------------------------------------------------------------

Traditional Chakli Recipe


traditional Indian chakli, savory deep fried snackChakli is a savory deep fried Indian snack that is popularly made for Diwali. Chakli is a crispy spiral snack made from rice and lentil flour. It is a spicy crunchy vegetarian snack.

Recipe Type:  Snacks
Cuisine:            South Indian
Prep Time:     10 hours
Cook time:     60 minutes
Total time:     10 hours 40 minutes
Yield:                80-90

Ingredients:


3 cups or 570 gms raw Rice
1 cup or 190 gms Urad Dal
0.75 cup or 75 gms Ghee
0.5 cup Oil
5 tsp Cumin Seeds
2 tsp Red Chilli Powder
1 tsp Asafoetida (Hing) (Use gluten free hing to suit a gluten free diet)
2-4 tsp Salt
3-4 cups Water
Oil to fry
Water as required

Method:


To make the Chakli Flour:


1. Wash and drain the rice. Spread it on a dry muslin cloth in a single layer to dry overnight or for 8-10 hours.
2. Once the rice is dry, dry roast it in a kadhai until all the moisture evaporates and the rice turns bright white. Roast on low flame by stirring occassionally. Do not allow the rice to change color or burn. Remove from heat and allow to cool.
3. Dry roast the urad dal on low heat until it turns pinkish-brown. The dal will turn fragrant once roasted well. Stir occassionally and do not allow the dal to burn. Remove from heat and allow to cool.
4. Once the rice and urad dal have cooled, grind it into a smooth powder in batches. You can either do this at home in a mixer or get it powdered at a mill.
5. Sieve the flour to remove any unpowdered rice or dal.
6. With the quantities used in this recipe, you should get around 750-760gms of chakli flour.

To make the Chakli:


7. Grind 3 tsp of cumin seeds into a coarse powder. Alternately you can use roasted cumin powder.
8. Add the cumin seed powder to the chakli flour.
9. Next add in the red chilli powder, remaining cumin seeds, hing and 2 tsp of salt and mix it roughly. Hing or asafoetida may contain wheat and hence avoid it if making a gluten free version.
10. Add in melted ghee and rub it in the flour.
11. Add hot oil by the spoonfuls and rub it in the flour. Squeeze a bit of the flour in your palms, if it holds the shape, you can stop adding oil. If it crumbles away, add more oil and mix.
12. Once you have added all the oil, add in water slowly and start kneading until you have a smooth dough. Adjust seasoning or spices as you continue to knead.
13. Once you have a smooth dough, cover with a wet cloth and keep aside.
14. Grease the chakli press well.
15. Take a ball of dough and stuff it in the chakli press.
16. Press out the chaklis onto a smooth plastic sheet.
17. Heat oil in a kadhai for deep frying. Add a small piece of flour to test the oil. If the piece floats up, the oil is hot enough.
18. Once the oil is hot, carefully pick up the chakli and add it to the oil. Fry in batches and do not crowd the kadhai.
19. Once you have added the first batch of chaklis, lower the heat to a minimum and allow to cook for 4-5 minutes. Depending on the quantity of oil you have in the kadhai and the stove settings, you may require more or less time than what is mentioned. Try a test batch first to get the time and temperature of the stove correct. See notes for more tips.
20. Remove from oil and place it onto a absorbent kitchen towel to cool.
21. Once cool, store in an airtight box.
22. Serve at room temperature with tea.

Notes:


  1. To make the chakli gluten free, do not add hing or asafoetida.
  2. To make the chakli vegan, you can replace ghee with oil.
  3. To make the chakli richer tasting, the oil can be replaced with ghee or butter. Butter can also be used in place of ghee or oil completely.
  4. If you are making chakli for the first time, it is better to make the dough in small batches, so that you can correct the next batch if required. Humidity and temperature in your house may change the amount of ghee/oil required in your recipe, a trial batch will help get that quantity right.
  5. If the chaklis start breaking when you try to shape them, then add more water to the dough and try again. The water can be added to small batches of dough as you go along.
  6. If the chaklis start breaking in the oil while frying, that means the amount of ghee or oil added to the dough is more than required. Add it a little dry flour and knead again.
  7. The chakli flour can be stored for 1-2 months in a dry airtight container.
  8. The chakli dough cannot be stored and it is recommended to make chakli with fresh dough.
  9. Cooking the chakli is the trickiest part, make sure the oil is hot when you drop in the chaklis, after that set the stove to sim or minimum heat. Cook on a low temperature until crispy. The high temperature gives color to the chakli while the low temperature cooks it all the way through making it crispy. It is recommended to make a few trial batches so that you get the temperature and time required in your environment.
  10. Allow the chaklis to cool completely before storing, else they may get soft.

traditional Indian chakli, savory deep fried snack


If you liked this, you may also like:

How to make shakkarpara recipe, shankarpole recipe at www.oneteaspoonoflife.com
Shankarpole

Nippattu
popular Indian snack - baked flat discs made of four and spices
Baked Papdi


Read more ...

Sun dried Potato Chips | Aloo Chips | Aloogadde Sandige [Video]


Sun dried Potato Chips - potato slices that are dried in the sun and then deep fried and tossed in seasoning. Highly addictive!!

In a hurry? Jump to Video or Jump to Recipe

How to make sun dried potato chips recipe, batate sandige recipe, aloogadde sandige recipe, aloo chips, aloo sandge recipe, how to make aloo papad recipe, potato chips recipe at www.oneteaspoonoflife.com


The Sun dried Potato Chips are the BEST, seriously guys!!!

Who doesn't love potato chips? I'm sure even the Victoria Secrets models who are eternally on a diet wouldn't mind sneaking one in, once in a while. There are so many varieties of potato chips or crisps or whatever else you might want to call them, but I assure you, this is the best. Cause of course, you will make them yourself. And tell me if I'm wrong, but anything homemade tastes so much better than the preservative loaded air filled packet stuff. 

Recently, I was reading this really old article on Reddit about what surprised non Americans when they visited the USA, I was definitely surprised with the vastness of the country and the enormous food portions. But something that definitely got me crazy was the size of the Potato Chips packets. I think they are as tall as toddlers. Why are they so big? Are they meant to be family packs? If yes, how large is this family? Don't people get bored of the flavor after going through quarter of the packet? Or is it meant to last a month? I did not get that at all. I went a little nuts over the number of flavors though, you get every flavor under the sun.

How to make sun dried potato chips recipe, batate sandige recipe, aloogadde sandige recipe, aloo chips, aloo sandge recipe, how to make aloo papad recipe, potato chips recipe at www.oneteaspoonoflife.com


Back to the Sun, that's really the focal point today. Did I tell you how the Sun cheated us this year?We had the shortest summer ever, just ONE month. Just April. Summer came and went in the blink of an eye. Summer gets replaced by Monsoons in this part of the world and then everyday is just a dull cloudy day dotted with spells of rain. Usually, I'm a big fan of the rains, I simply love how everything turns bright green, and that fragrance when the rain hits the earth is simply divine. And rains, means deep fried deliciousness and loads of hot cups of chai. But this year I was a little disappointed. I had so many things planned for Summer, and I could barely scramble them in, in a month. But what I did manage to do , was sun dry some potatoes. 

You may have only heard of sun dried tomatoes, but believe me sun dried potatoes are even better!! And people have been doing it for ages, just not me though. This was my first and definitely not my last attempt. Potatoes barely take 3-4 days to dry and the drying makes them intense and all the more potatoey (if that were a word). 

So...

STEP 1 - Wash, peel, and slice the potatoes. 
STEP 2 - Soak the slices in salted boiling water until they are just about done.
STEP 3 - Lay them out on a cloth to dry in the sun.
STEP 4 - Deep fry them and toss them in salt and chilli powder.

Step 4 can be done months later. The chips can be stored for 3-4 months easily if stored in a clean dry air tight container. The good thing here is, you can decide how much to fry, you don't need to fry the entire batch at once and worry about them going soft, however, I assure you, that is not a problem, coz like all potato chips, these are irresistible.

How to make sun dried potato chips recipe, batate sandige recipe, aloogadde sandige recipe, aloo chips, aloo sandge recipe, how to make aloo papad recipe, potato chips recipe at www.oneteaspoonoflife.com

How to make sun dried potato chips recipe, batate sandige recipe, aloogadde sandige recipe, aloo chips, aloo sandge recipe, how to make aloo papad recipe, potato chips recipe at www.oneteaspoonoflife.com

Some tips to make sure your potato sun drying turns out to be the best...

1) Do not slice the potatoes very thin like you would for regular chips. These need to be around 2mm. 
2) As you slice the chips, put them in water so they don't darken due to oxidization.
3) The chips are soaked in boiling water until they are just about done. If you take them out too quickly, the chips will darken while drying. If you leave them in there too long, they will be completely cooked. So you need to drain them out in 5-8 minutes. Squeeze a chip in between your thumb and index finger and the chip should give when you apply a little pressure. If it does not, it still needs to be cooked, if it gives too soon, it is overcooked.
4) Dry on a cloth, not a tray or plate or paper. The chips will stick to whatever you have placed under it, and removing them from a tray or paper can be difficult. Preferably, use a white cloth or a light colored one as you don't want color running onto the chips.
5) If the chips turn black on the edges or in small spots, you can still use them, just make sure these are the ones you fry first.
6) If you don't have enough sun, place them in the shade, they will dry there as well, but will take much longer.

And last, you can flavor these chips with whatever flavor you like - curry, mint, oregano etc. Just do it immediately after frying while the chips are still hot so the flavor sticks to them. Or you can just salt them and enjoy the potato flavor to its maximum.

How to make sun dried potato chips recipe, batate sandige recipe, aloogadde sandige recipe, aloo chips, aloo sandge recipe, how to make aloo papad recipe, potato chips recipe at www.oneteaspoonoflife.com

If you made this recipe, let me know! Leave a comment here or on Facebook tag your tweet with @oneteaspoonlife on Twitter and don't forget to tag your photo #oneteaspoonoflife on Instagram. You can also email me at onetspoflife@gmail.com I'd love to see what you are upto.


If you like this recipe, do not forget to share it with your friends and family! 


You can follow One Teaspoon Of Life on FacebookTwitterInstagramPinterest or you can subscribe to One Teaspoon Of Life and receive all the latest updated via Email

Video Recipe


--------------------------------------------------------------------------------------------------------------------------

Sun dried Potato Chips


How to make sun dried potato chips recipe, batate sandige recipe, aloogadde sandige recipe, aloo chips, aloo sandge recipe, how to make aloo papad recipe, potato chips recipe at www.oneteaspoonoflife.comPotato slices that are sun dried and then deep fried and tossed in seasoning.

Recipe Type:  Snacks
Cuisine:            Indian
Prep Time:     3 days
Cook time:     10 minutes
Yield:                Serves 4-5


Ingredients:


3-4 medium sized Potatoes
Salt to taste
Red Chilli powder to taste
Water as required
Oil for deep frying

Method:


Wash and peel the potatoes.
Slice the potatoes to about 2mm thickness and immerse in water to prevent them from browning.
Boil water in a large pot, add salt.
Once it comes to a rolling boil, lower heat and add the potato slices to it. Boil for 2-3 minutes then turn off the heat.
Let the potato slices soak for 5-8 minutes. Squeeze a slice between your thumb and index finger and it should give slightly after you apply a little pressure. If it does not, allow it to soak longer. If it gives too quickly, it has overcooked, remove from water immediately.
Drain the potato chips and lay them out on a white cloth in the sun. Cover with a light muslin cloth to prevent dust from settling on to the chips. You can dry them in shade as well.
Leave it in the sun for 3-4 days or until completely dried.
Store in a clean dry air tight container. It can be stored for 3-4 months.
When you want to eat the chips, deep fry them and toss with salt and chilli powder immediately.


How to make sun dried potato chips recipe, batate sandige recipe, aloogadde sandige recipe, aloo chips, aloo sandge recipe, how to make aloo papad recipe, potato chips recipe at www.oneteaspoonoflife.com


If you liked this, you may also like:

Balekayi balekayee podi kelyachi kapa raw banana fry vegan snacks indian goan maharashtrian
Plantain Chips

Jeegujje Podi
popular Indian snack - baked flat discs made of four and spices
Baked Papdi


Read more ...

Cucumber Pakoda or Khire ka Pakoda

Cucumber Pakoda or Khira Pakoda is my latest offering in the junk-food-meets-healthy-food recipes.

Cucumber pakoda fritter sautekayee bonda khira khire kakdi

I've grown up on cooked cucumbers more than uncooked ones. I know, not a lot of you have heard of cooking cucumbers. But if you are from around Mangalore, you know your cucumbers well. My mom used cucumbers in sambar, palya, kadabu and my favorite -Akki Rotti.

I've recently started experimenting with cucumbers. I've made Cucumber Dhokla recently. But never in my wildest thoughts had I imagined I would be making Cucumber Pakodas and ENJOYING it too !!!

Cucumber pakoda fritter sautekayee bonda khira khire kakdi

I was introduced to them recently at a temple that refrains from using root vegetables. I was unaware of this fact and very unsuspectingly ate it assuming they were potato pakodas. I was pleasantly surprised that they were cucumber. I have been waiting to make them since then. Saturday was the perfect day. It was raining. Well, it'd been raining the whole last week, and heavily, I must add. Eating pakodas and sipping hot tea is my favorite thing to do when it rains.

Cucumber pakoda fritter sautekayee bonda khira khire kakdi

So on Saturday, I dragged my bean bag as close to the balcony, that little spray of rain on my face gets me all excited. Took my plate of cucumber pakodas and my steaming hot cup of tea and plonked on it. I also had this really exciting English Regency romance novel by Sophia Nash that made a perfect read considering the stormy weather outside. Ah! Simple pleasures of life. 

Cucumber pakoda fritter sautekayee bonda khira khire kakdi

Let's get back to the Cucumber Pakoda. This pakoda is made just like all the other pakodas, only this time instead of an onion or a potato, we dip sliced cucumber into the batter and fry it. I used regular cucumbers that we use in salads. Not the Mangalore Cucumber. Preferably, use something that has a lower water content to get an even tastier pakoda.

The batter is very simple. Take some gram flour or besan and add salt, red chilli powder, salt and water to get a smooth batter. The consistency of the batter should be thick enough to coat the cucumbers. I added ajwain or carom seeds as I love the flavor in pakodas. You can skip this or replace it with coriander powder or cumin seeds. I also added a pinch of baking soda, this can be avoided too. 

Cucumber pakoda fritter sautekayee bonda khira khire kakdi

Sprinkle chat masala while serving or serve it with some delicious mint coriander chutney.

Send me an email or leave me a comment on this Post or Facebook or Tweet to me if you tried these awesome pakodas. I love hearing from my readers, so write to me.

Cucumber Pakodas or Khire ka Pakoda


Cucumber pakoda fritter sautekayee bonda khira khire kakdi
Cucumber slices dipped in a batter made of besan or gram flour and spices and deep fried until golden brown.

Recipe Type:  Appetizer
Cuisine:            Indian
Prep Time:     10 minutes
Cook time:     20 minutes
Yield:                Serves 2-3

Ingredients:


1 Cucumber
4-5 Tbsp Besan or Gram Flour
1 tsp Red Chilli Powder
1/4 tsp Ajwain seeds or Carom seeds
1/2 cup Water
Salt to taste
Pinch of Baking soda
Oil to fry
1/2 tsp Chat Masala(Optional)


Method:


Slice the cucumber into thin slices.
Mix together the besan, red chilli powder, ajwain seeds, baking soda and salt.
Add water by the spoonfuls until you get a batter of desired consistency. The batter should be thick enough to coat the cucumbers.
Heat oil in a deep pan or kadhai. To test if the oil is hot enough, drop a small spoonful of batter in the oil. If it immediately rises to the top, then the oil is ready for frying the pakodas.
Dip the cucumbers in the batter and carefully drop them into the oil.
Cook them on medium heat until one side is golden brown. Flip the pakodas and cook until the other side is done.
It takes around 3-5 minutes per pakoda. Cook them in batches and do not crowd the pan.
Sprinkle some chat masala over them and serve hot with mint coriander chutney or ketchup.
Read more ...

Maggi Pakoda | Instant Noodle Fritters with Step by Step Photo Instructions


Maggi Pakoda recipe with step by step video instructions. Maggi Pakodas are deep fried fritters made using Maggi instant noodles, chickpea flour (besan) and a few spices. Maggi Pakoda are instant noodles fritters and any instant noodles can be used. Maggi Pakoda are perfect for snacking on a rainy evening. They go famously with a hot cup of chai.


In a hurry? Jump to Video or Jump to Recipe


maggi instant noodles fritters fried pakoda chickpeas besan

Every time it rains, I want something hot and spicy (and mostly fried). What I crave when it rains, I crave more when we are out on a long drive during rains. For all those health food eaters out there, this post is most definitely not for you, unless of course you occasionally binge on some DELICIOUS fried food. This is one of those one-time INDULGENCE recipes that just makes you wish it rains every day.

On a different note, has an idea gotten stuck in your head and grown into a tree until you can no longer resist it? Something like “Inception”? On one of these long-drive-in-rain, I imagined what would a “Maggi Pakoda” taste like. And after that, nothing tasted good enough on that drive. I wanted MAGGI PAKODA, that’s it! And I thought I was being very inventive and all with my idea of Maggi pakoda until I heard it has already been around in Delhi for a long time. Those Delhi-ites definitely know their fried food.

maggi instant noodles fritters fried pakoda chickpeas besan

Maggi is an instant noodle brand from Nestle. And since it was the first instant noodle brand in the Indian market and remained the sole one for many many years, instant noodles are synonymous with Maggi for most of us. So when I say Maggi, you can think of ANY instant noodles. Any noodles you like.

The first time I went to Rohtang Pass in the Himalayas to see snow, I was pleasantly surprised to find little shacks selling Maggi at that altitude. Absolutely loved eating Maggi while our teeth chattered with the chill in the air. The next time I went to Rohtang, I was actually looking forward to eating Maggi up there. Maggi, Chai, and the mountains felt like heaven.

maggi instant noodles fritters fried pakoda chickpeas besan

How many of you out there have had hot hot Maggi when you’ve gone to a cold cold place? Let me know your story.

These pakodas have that warmth of noodles and the crispiness of the pakodas all combined in one. Perfect for rainy evenings. You can use any instant noodles, Chinese flavored, Thai flavored, Chicken flavored, as I said anything. Just cook the noodles as usual, add the chickpea flour or besan, mix and deep fry.

maggi instant noodles fritters fried pakoda chickpeas besan


If you made this recipe, let me know! Leave a comment here or on Facebook tag your tweet with @oneteaspoonlife on Twitter and don't forget to tag your photo @oneteaspoonoflife on Instagram. You can also email me at onetspoflife@gmail.com I'd love to see what you are up to.

If you like this recipe, do not forget to share it with your friends and family! 


You can follow One Teaspoon Of Life on FacebookTwitterInstagramPinterest or you can subscribe to One Teaspoon Of Life and receive all the latest updated via Email


Video Recipe


--------------------------------------------------------------------------------------------------------------------------

Maggi Pakoda or Instant Noodle Fritters

maggi instant noodles fritters fried pakoda chickpeas besan
Maggi Pakodas are deep fried fritters made using Maggi instant noodles, chickpea flour (besan) and a few spices. Maggi Pakoda are instant noodles fritters and any instant noodles can be used. Maggi Pakoda are perfect for snacking on a rainy evening.

Recipe Type:  Snacks
Cuisine:            Indian
Prep Time:     10 mins
Cook time:     30 mins
Yield:                12 pakodas

Ingredients:


1 packets Maggi Instant Noodles
3 Tbsp Chickpea Flour or Besan
1 tsp Red Chilli Powder
1 tsp Garam MAsala (if not using the tastemaker)
2 Tbsp Coriander Leaves, finely chopped
1-2 tsp Chaat Masala (Optional)
Water as required
Salt to taste
Oil  to deep fry

Method:


1. Boil 2 cups of water in a sauce pan and add 1 tsp of Oil to it.
2. Add the instant noodles to the water and cook until the noodles are done. Do not add the taste maker to it.
3. Once the noodles are cooked, drain the water and rinse them with cold water to stop the cooking.
4. Mix in the taste maker or 1 tsp Garam Masala, red chilli pwoder, salt and coriander leaves.
5. Add the chickpea flour or besan and mix until combined.
6. Add more salt and chilli powder if required.
7. Heat Oil in a deep pan for frying.
8. Divide the noodles into small portions.
9. Once the oil is hot, carefully dump the portions in the oil.
10. Fry on medium to high heat. Flip the pakodas once the lower side is partially set. Keep stirring the pakodas until all sides are browned and cooked. Remove from heat once the pakodas are crisp and golden brown.
11. Sprinkle chaat masala (optional).
12. Serve hot with ketchup.


If you liked this, you may also like:

Cucumber pakoda fritter sautekayee bonda khira khire kakdi
Cucumber Pakoda

how to make vegetable cutlets recipe, aloo tikki recipe, vegan cutlet recipe, beetroot cutlet recipe at www.oneteaspoonoflife.com
Veg Cutlet
masala vada, ambode, chana dal vada recipe
Masala Vada
Read more ...

Shankarpali / Shankarpole / Shakarpara (Video Recipe)


How to make shakkarpara recipe, shankarpole recipe at www.oneteaspoonoflife.com

Aren't road trips so much fun??? :D

Not knowing where you may end up, what you may end up eating is so thrilling.

We, hubby dearest and I, have more differences than similarities, but in this one matter we are made for each other. Come long weekend, and off we go. No clue of the destination, only the direction. No planning, no hotel booked, no real map in hand and no real food to eat. All we have is a hurriedly packed bag of clothes, my trusted camera, bottles of water and of course, my iPod and we are all set.

How to make shakkarpara recipe, shankarpole recipe at www.oneteaspoonoflife.com


We've done instant trips to Ooty, Wayanad and our latest was to Belur. We had a long long weekend last week. I miss it already, We started on the most peaceful day of the year - Oct 2nd, with our basic necessities dumped in the car. When we started out we weren't sure if we were planning to go north or west. Finally thought of west and I'd never seen ShravanBelgola, so that became Destination number 1, With some Kunigal Tatte idlis in our tummies, we scaled the hill to see the Bahubali statue. 

Halebeedu became destination number 2. The beautiful architecture of that temple puts to shame even the best architects today I think. The workmanship is awesome. If you haven't seen it, it's time to visit. Belur was our next destination. Similar to Halebeedu, the architecture is simply amazing. The only sad thing was by the time we reached Belur, night had fallen, so we could not really spend a lot of time there.

Bangalore was 5 hours away, it was 7pm, crazy as we are, we decided we should go ahead instead of returning, So off we went to Karkala, hubby dearest's hometown and spent our extremely looong weekend there.

How to make shakkarpara recipe, shankarpole recipe at www.oneteaspoonoflife.com

Back to my recipe now, Monday was a holiday for me. Alone on a holiday gets boring sometimes, So what better to occupy myself than cook, right? I've been wanting to make Shankapali for a long time now. This is a traditional Maharastrian fried sweet made especially during the festival of lights - Diwali. 

I'd gotten multiple recipes from my mom, mom in law, sister, her mom in law etc. I think you get the picture. I finally mixed them up and made my own recipe that turned out pretty great. Really! And I could not believe it is so easy to make. Only tricky thing is the temperature of the oil, Once you get that correct, you needn't worry about anything, 

The below recipe makes 150-200. Don't worry, they are sooo yummy, they won't last too long. They stay fresh for weeks in stored in air tight container.


How to make shakkarpara recipe, shankarpole recipe at www.oneteaspoonoflife.com


Video Recipe


If you made this recipe, let me know! Leave a comment here or on Facebook, tag your tweet with @oneteaspoonlife on Twitter and don't forget to tag your photo #oneteaspoonoflife on Instagram. You can also email me at onetspoflife@gmail.com. I'd love to see what you are upto. 

If you like this recipe, do not forget to share it with your friends and family! 

You can follow One Teaspoon Of Life is there on Facebook, Twitter, Instagram, Pinterest and Google+ or you can subscribe to One Teaspoon Of Life and receive all the latest updated via Email (How convenient!!)


If you liked this, you may also like:

  • Modak - Steamed dumplings stuffed with coconut and jaggery.
  • Khova Peda - Peda (fudge) made with milk from scratch.
  • Coconut Laddoo - Easy to make laddoos with only 4 ingredients.


Shankarpali / Shankarpole / Shakarpara


How to make shakkarpara recipe, shankarpole recipe at www.oneteaspoonoflife.comLight and crisp bite sized sweet snacks 

Recipe Type:  Dessert / Snacks
Cuisine:          Indian
Prep Time:     60 minutes (Includes resting of dough)
Cook time:     60 minutes
Yield:              250-300

Ingredients:


6-7 cups Maida / All purpose flour
3/4 cup Chiroti rava / Fine semolina
1 cup Milk
1 cup Ghee / Clarified butter
2.5-3 cups Powdered Sugar
1 tsp Salt
Oil for deep frying

Method:


Mix the milk and ghee and microwave on high for 30 seconds until the ghee melts. You can do this on stove too, just don't heat it too long or the mix may curdle. If the ghee is already liquid, skip this step.
Add the sugar to this mix and stir until it dissolves.
Add salt, semolina and the flour by the spoonfuls. Stir to remove lumps.
Once all the flour is added, knead the dough using your hands for 2-3 mins until it is one shiny mass.
If after kneading the dough, you feel it isn't sweet enough, then take a little milk and dissolve the required amount of sugar in it.Add this to the dough and knead well. Add a little more flour if needed.
Cover and allow it to rest for at least half hour.
Divide the dough into smaller balls and roll them out to approximately 3-5 mm thickness
Cut into diamond shape with each side of appx 1.5-2cm. You can use the crimped cutter, pizza cutter or a knife. Don't worry if the shape or size is not consistent. It does not change the taste.
Heat oil in a thick bottomed kadhai.
The oil should not be too hot or too cold. I test fried a couple to get the temperature right. Between Low to Medium heat works well. If the oil is too hot, the shankarpali will turn brown but will not be cooked, too low will make them oily.
Remove them when they turn golden brown and crisp.


Read more ...