Instant Ragi Dosa

Continuing with my Instant recipes with this Instant Ragi Dosa. It is an instant dosa or crepe  made with rava or semolina and ragi flour (finger millet flour).

How to make instant ragi dosa or finger millet crepe at www.oneteaspoonoflife.com

As much as I love Bangalore, I also love getting out of Bangalore once in a while. There are but only a few roads that lead out. One of them is the Mysore road. I'm not too fond of the Bangalore-Mysore highway. Too many speed breakers and way too many vehicles. Barely feels like you have left Bangalore. But it has some silver lining, in the form of the various eating joints all along the way. There is this Kamat restaurant on the way where I first ate the Ragi Dosa. And it was love at first bite. Crispy dosa served with some coconut chutney. I'd never imagined Ragi could taste sooo good.

I'd had ragi in the form of Ragi Rotti or the Ragi Mudde, but never the Ragi Dosa. I simply loved it and when we came back, I was off to buy Ragi Flour to make it. Ragi Dosa is made exactly like the Rava Dosa, only the rice flour is replaced with ragi flour.

How to make instant ragi dosa or finger millet crepe at www.oneteaspoonoflife.com

Ragi Dosa is perfect for those mornings when you haven't planned ahead for breakfast. All you do is mix stuff together and throw them on a hot griddle or tava. Yup no spreading it with love like the regular Dosa or pancake, you have to throw it on and let it take the shape it likes. No obsessing over the round shape. 

It is also perfect for that 5pm hunger of mine. A great alternative to all that fried stuff around. 

Making awesomely crispy Ragi Dosa requires patience, something I lack, so sometimes I'm just okay with soft ones. But I have the following tips to making a great Ragi Dosa. The same work for Rava Dosa as well.

  • Mix and make the dosa immediately. Do not leave it to soak. Soaking allows the rava or semolina to soak up all the water and it won't get crisp.
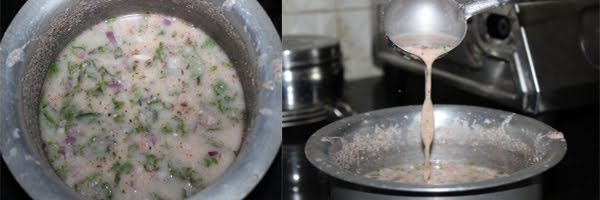
  • The batter needs to be thin. Make a few and try, you will know if you need to add more water. The consistency should be similar to that of buttermilk.
  • Pour the batter when the tava or the griddle is really hot and then lower the heat and leave it to crisp up.
  • Don't skimp on the oil. The dosa needs oil to crisp up, at least 1-2 tsp per Dosa. Oil-less Ragi Dosa is just not as tasty. 
  • I add onions, curry leaves, cumin seeds, coriander leaves and chilli. A well seasoned Ragi Dosa does not even need any accompaniments, it tastes delicious on its own. All these are optional and you can leave them out to make a plain Ragi Dosa

How to make instant ragi dosa or finger millet crepe at www.oneteaspoonoflife.com


How to make instant ragi dosa or finger millet crepe at www.oneteaspoonoflife.com
Buttermilk consistency Batter
How to make instant ragi dosa or finger millet crepe at www.oneteaspoonoflife.com
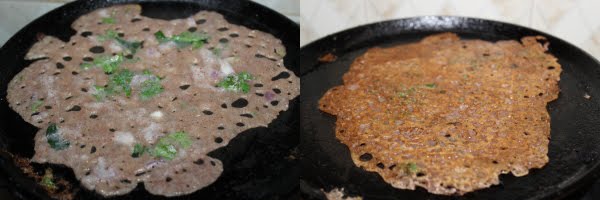
Spoon the mixture on a hot tava. Flip when browned.


Instant Ragi Dosa


Instant dosa made with Ragi flour and Semolina

Recipe Type:  Breakfast
Cuisine:            South Indian
Prep Time:     10 minutes
Cook time:     30 minutes
Yield:                5-6 Dosas

Ingredients:


1/2 cup Semolina (Rava)
1/4 cup Ragi flour
1 Tbsp All purpose flour (Maida)
1 Tbsp Yogurt (Curd)
1 small Onion (finely chopped)
5-6 Curry leaves
2 Tbsp Coriander leaves (chopped)
1 tsp Red chilli powder
1 tsp Cumin seeds
1.5 cups Water
Salt
Oil for frying

Method:


Mix together all the ingredients except oil and whisk until free of lumps
Heat a tava and grease it
Pour spoonfuls of the batter on the tava
Allow it to cook on low flame
Spoon oil on the dosa
Once the dosa is cooked, it will leave the sides of the tava, else use a spatula to loosen the dosa from the tava
Flip and cook for 1 minute
Serve hot with chutney


Read more ...

Instant Paneer Tikka (Vegan Option Available)


I absolutely LOVE these Instant Paneer Tikkas. Just what I needed to brighten up a really boring week.

instant quick paneer tikka masala grilled capsicum pepper tomato spices
I've been bored to death this week. A continuing bus strike meant me not going to office. I had to work from home. Alone!! So boring. I miss talking to people. All alone at home means I talk to myself or my TV talks to me. Not so entertaining, really.

I love meeting up my friends at work in the morning over an extended tea break and chatting away. We talk about everything, from real serious technical stuff to light hearted sitcoms. I miss these "Tea Sessions", as we call it, the most. It's my best part of the day in office. There are times I go to office early just so as to reach in time for Tea.

So as I prepared myself for yet another ALONE Tea Session (Sigh), I decided to add some spice into it with something so tasty that I forget I am alone.

instant quick paneer tikka masala grilled capsicum pepper tomato spices

When I am dull or bored, I cook. Cooking wakes me up like nothing else can. And especially trying something new is always so much more exciting. I looked through my fridge and I had - Capsicum and Paneer and some Cherry Tomatoes. An idea formed. Voila - Instant Paneer Tikkas.

These Paneer Tikkas need no overnight marination or complicated setup. They took hardly 30 minutes from start to finish. Now that's INSTANT in my dictionary.

I used what I had in my fridge - Capsicum, Tomato and Paneer. You can use anything with the Paneer. The usual combinations are Capsicum, Onion or Tomato. But you can get creative and may be pop in a mushroom or a thick slice of Zucchini.

instant quick paneer tikka masala grilled capsicum pepper tomato spices

I liked the idea of individual sized portions, hence I used toothpicks. You can use real skewers to pile on all your favorite things on it. For it to be as Instant as mine, use quick cooking ingredients only, If you want to skewer on Potato or Corn, you may probably want to parboil them first. that makes it a little less instant-ty, but definitely not any less tasty.

For the marination, use thick yogurt or curd, I tend to always have at least a bowl of homemade yogurt in the fridge, so no worries there for me. If the curd or yogurt you have is thin, then place it in a tea strainer or a muslin cloth for around half hour to let the whey drain off and you will have nice thick curd. I've used a bunch of spice powders to made the marinade. If you want it to be even more instant, use store bought Tandoori Masala and it will taste just as good.

instant quick paneer tikka masala grilled capsicum pepper tomato spices

Paneer Tikka is always grilled. I grilled mine in the oven. But if you do not have any means of grilling it, then you can shallow fry them. Just don't cook it for very long, they will lose that silky smooth texture of the paneer.

If you are a Vegan, you can replace the Paneer with Tofu and the yogurt with some Lime juice.


Instant Paneer Tikkas


instant quick paneer tikka masala grilled capsicum pepper tomato spicesPaneer, Capsicum and Tomato coated in an instant marinade of spices and grilled. 

Recipe Type:  Snacks / Appetizer
Cuisine:            North Indian
Prep Time:     10 minutes
Cook time:     20 minutes
Yield:                9 Tikkas

Ingredients:


For the Tikka:


100 gms Paneer (use Tofu for a vegan option)
1 small Capsicum or Bell Pepper
1 Cherry Tomato per Tikka (Optional)
3/4-1 tsp Oil per Paneer Tikka

For the Marinade:


2 Tbsp thick Yogurt or Curd (use 1-2 tsp lime juice for a vegan option)
1.5 tsp Ginger Garlic Paste
1.5 Tbsp Besan or Gram Flour
1/4 tsp Cumin powder
1/2 tsp Coriander powder
1/2 tsp Red Chilli Powder
1/4 tsp Garam Masala
1/4 tsp Amchur or Dried Mango Powder (Skip if using lime juice or if the yogurt is very sour)
1/4 tsp Chaat Masala (Optional)
A pinch of Hing or Asafoetida
Salt to taste

Method:


Mix together all the ingredients for the marinade.
Cut the Paneer into individual bite sized cubes. Cut the Capsicum to the same size as the Paneer.
Add the paneer and capsicum to the marinade and mix well.
Skewer the capsicum, paneer and the cherry tomato onto the toothpick.
Place them in a greased grilling sheet or pan.
Spoon a little oil over each of the Paneer Tikkas.
Grill them for 10-15 minutes, turning them every 3-4 minutes.
They are ready when they char slightly.
Serve hot with some mint chutney.
Read more ...

Instant Rava Idli


I had an INDULGENT weekend. I-N-D-U-L-G-E-N-T!!!

I'm spelling out stuff, so I guess you get the picture.

Spicy Biryani lunch, Cheesy Pasta for dinner, Deep fried Bread Rolls for snacks and a heavenly TRIPLE Chocolate Milkshake, I’ve had it all. And I cooked none of it. Nada. 
I’m sure it will take me a month to work it off. Sigh!!

How to make MTR style instant rava idli at www.oneteaspoonoflife.com


All those guilty pleasures made me want to eat a healthier breakfast this Monday morning. I’d never been a Rava Idli fan, regular Idli, give it to me anyday and I’ll eat it. But I wondered why would one eat that hard lump of rava (semolina) for any meal? This was until I made my own.

Eye opener – Rava Idli does not have to be a hard lump. It can be soft like the regular rice Idlis. It can actually be delicious.

All credit goes to Gee, my sis. Someday she got the MTR instant rava idli packet and made it and repeatedly kept telling me how good they had become. MTR is a legendary restaurant in Bangalore that actually invented the Rava Idli when there was food shortage during a war. A place you should visit for some rich South Indian food.

The restaurant rocks, but I won’t accept defeat from a packet. Na-ah.

How to make MTR style instant rava idli at www.oneteaspoonoflife.com

So I made just to show her that she can make equally good Rava Idlis with just the ingredients she has at home. I had no plans of liking them at all. It was just a competition with the packet, that’s IT. (I'm competitive that way). At least that’s what I thought, until I ate them. I mean if I make them, I have to taste it, right? And what a pleasant surprise it was. Soft smooth Rava Idli. And so easy to make as well. No overnight soaking, no overnight fermenting. Just mix and steam.

I'm always on a lookout for breakfast recipes. And they obviously have to be HEALTHY and EASY to make. These Rava Idlis satisfy all my criteria. So they have been back on the menu time and again since that day. 

How to make MTR style instant rava idli at www.oneteaspoonoflife.com

Some additional steps that you may have to do if making your own healthy Rava Idlis, and it is totally worth it:

  • Toast the Rava / Semolina - You can either toast it when you decide to make the Rava Idlis or you can toast the rava whenever you have time and store it. Toasting helps increase the shelf life of rava. You can then use it instantly while making Upma too.
  • Grate a carrot, Chop a chilli - Yup, you will need to grate a carrot and chop some chilli and coriander. 
  • Tempering - Heat a little oil, throw in some lentils (dals), mustard seeds, curry leaves and chilli. This is seriously a 10 seconds job.
  • Mix once - Mix tempering with the rava.
The rest is exactly like the packet. Mix in the ingredients. Allow it to rest for some time. Then steam them as usual. Ta-da - Instant soft smooth Rava Idli.


Instant Rava Idli


How to make MTR style instant rava idli at www.oneteaspoonoflife.comPopular South Indian instant steamed breakfast cakes made from semolina or rava and yogurt.

Recipe Type:  Breakfast
Cuisine:            South Indian
Prep Time:     30 minutes
Cook time:     30 minutes
Yield:                8 Idlis

Ingredients:


1.25 cups Semolina or Upma Rava
1 cup Yogurt (Curd)
1 small Carrot
1/4 tsp Baking Soda
2-3 tsp Oil
1/2 tsp Mustard seeds
1 tsp Urad Dal
1 tsp Chana Dal
8-10 Curry leaves
1 Tbsp chopped Coriander leaves
1 chopped Green Chilli
1/2 cup Water
Salt to taste 
Oil to grease

Method:


Toast the rava in a kadhai on low flame for 8-10 minutes. Stir frequently to avoid burning. Remove it into a large bowl once done.
Heat oil in the kadhai and add mustard seeds to it.
Once the mustard seeds splutter, add the urad dal and the chana dal.
Once the dals brown slightly, add the curry leaves and chilli. Pour this tempering to the toasted rava.
Mix well and allow to cool.
Once the rava has cooled, add grated carrot, yogurt, chopped coriander, baking soda and salt and mix well.
Add water by the spoonful. The consistency of the batter should be similar to the regular idli batter.
Leave aside for 10-15 minutes.
In the meanwhile, prepare the idli steamer. The water in the steamer should be boiling when we put in the idli, else the idli will become hard.
Now grease the idli mould, and pour in the batter.
Steam for 10-15 minutes.
Serve hot with chutney or sagu.


Read more ...

OneTeaspoonOfLife is a Yummly Publisher

This post is unlike the rest of my posts. There is no recipe in here, there is no story in here. I wanted you all to know OneTeaspoonOfLife is now a Yummly Publisher. Yay!!!

Yummly puts all the recipes in the world in your pocket (in their own words).

The Yum button has been around for over a month now. You can click it to add my recipes to your own Recipe Box on Yummly.

My Yummly personal page will also have all my yummy recipes, you can Yum them from there as well.


Read more ...

Gobi Manchurian Pizza


You heard that right! Gobi Manchurian Pizza!!!

Your favorite starter "Gobi Manchurian" as a Pizza topping. Dinner does not get better than this!!!

cauliflower gobi manchurian pizza whole wheat italian indian chinese fusion

I try to cook healthy an eat healthy most of the times. My regular lunch or dinner is chapati with some vegetables. But then, there are some days (or nights) that all I want to do is indulge. Friday night was just that - Indulgence Night. 

This Pizza was a product of circumstances. Seriously, I had no choice. Na ah. 
I had (still have) lots of cauliflower. I had Mozzarella left over from my UBER-ly delicious Stuffed Potato Skins. Remember those? And I had a small little Capsicum growing in my pot. TA-DA - Gobi Manchurian Pizza.

I love LOVE Gobi Manchurian. The chef that invented it was pure Genius. What a perfect starter to any meal! At any given time, in a restaurant, I believe at least 50% of the people order Gobi Manchurian as a starter. Except in those fancy fine-dines. I wonder what people order there.


cauliflower gobi manchurian pizza whole wheat italian indian chinese fusion

I've been told this dish - the Gobi Manchurian Pizza is not my invention (Darn those eye-opener friends!!). To my credit, this Gobi Manchurian Pizza recipe is totally mine. I made Gobi Manchurian the way I always make it, the only difference being I did not simmer the cauliflower with the sauce, instead I just layered them on the Pizza base.

The Pizza was a super hit. This Gobi Manchurian Pizza brings together the best of 2 cuisines (or is it 3) - Indo-Chinese and Italian.

I'm sure everyone knows about Italian Cuisine and Pizzas. No intro needed there. 

Now, the Gobi Manchurian is a purely Indian take on Chinese cuisine. It consists of batter coated cauliflower florets that are deep fried until they are crispy golden brown (I suggest you make extra, they taste awesome just like that). If that wasn't enough of BANG, there is the sauce. The sauce is soy-based and is full of flavors of soy sauce, chilli, ginger and garlic. Getting an idea?


To make the Gobi Manchurian Pizza, I made a whole wheat and honey pizza base. That is 100% whole wheat, nothing else. I have not followed the traditional way of making a pizza base - 2 rises, then either rolling or stretching. I have done it more like - rise, roll, rise. This gave me a nice thick base. If you plan on making a thin crust, then you may need to adjust the dough quantities to match that and your pan size. My directions below are for a 10" thick base Pizza. You can also freeze part of the dough for a later day.

After making the base, I then layered with that delicious spicy sauce and dropped the cauliflower all around. Grated some cheese and VOILA! the Gobi Manchurian Pizza is already ready to be devoured.

I know this does not sound like a weekday kinda meal, when you come back from office battling all that traffic and the rains. The number of ingredients and the number of steps sound daunting. When you start making it you will see that the number of unique ingredients isn't really much. And I've written a very detailed recipe to make your cooking easier. I assure you, there is a time and a place to make this Pizza. I actually made it in like 2 hrs on a Friday night. And the 2 hrs was all rising of the base. The actual cooking took way less.


This Gobi Manchurian Pizza is perfect for you:

If you like quirky fusion food that is delicious.

If you love Asian or Indo-Chinese flavors

If you love Pizza


Gobi Manchurian Pizza


cauliflower gobi manchurian pizza whole wheat italian indian chinese fusionFusion pizza topped with fried cauliflower and Manchurian sauce. 

Recipe Type:  Main
Cuisine:            Fusion
Prep Time:     2 Hours
Cook time:     50 minutes
Yield:                Serves 2

Ingredients:


For the Pizza Base:


2 cups Whole wheat flour or Atta
1 tsp Active Dry Yeast
1 Tbsp Honey
1 Tbsp + 2 tsp Olive Oil
2-3 cups warm Water
1 tsp Salt

For the Gobi / Cauliflower:


2.5 cups Cauliflower florets
4-5 Tbsp Cornflour
1.5 tsp Soy Sauce
1 tsp Ginger Garlic Paste
1 tsp Chilli Sauce
1/2 tsp Tomato Ketchup
1/2-1 cup Water
Salt to taste
Oil to fry

For the Manchurian Sauce:


Leftover batter from the Gobi / Cauliflower
1 Onion
1/2 Capsicum
1 Tbsp finely chopped Garlic
1 tsp Ginger Garlic Paste
1 tsp Soy sauce
1 tsp Chilli sauce
2 tsp Oil
1 cup Water
Salt to taste

For assembling:


Pizza Base
Fried Gobi / Cauliflower
Manchurian Sauce
2 Tbsp Olive Oil
1 Tbsp chopped Coriander
Mozzarella or Pizza cheese

Method:


To make the Pizza Base:


Add the active dry yeast to 1 cup of warm water along with the honey. Allow it to rest for 5-10 minutes.
Once it is foamy, add it to the whole wheat flour along with 1 Tbsp olive oil and salt and knead into a smooth dough. Knead for around 5-10 minutes.
Now coat the dough with the remaining olive oil and place in a clean bowl. Cover the bowl loosely with a plate of a towel and keep in a warm place to rise. It should double up in size. Mine took around 1 hour.
Once it is doubled in size, punch it down, and roll it into a pizza base. Roll according to if you want a thick base or a thin base. I made a thick 10" base.
Oil the pan in which you will cook the base, and place the rolled out base, prick it with a fork. Cover and keep it in a warm place for its 2nd rise for 30 minutes.
Preheat the oven to 200 degree Celsius and bake the base for 12-15 minutes.

To make the fried Gobi / Cauliflower:


This can be made when the base is kept for rising.
In a large bowl, mix together the cornflour, ginger garlic paste, soy sauce, chilli sauce, tomato ketchup, salt and add water by the spoonfuls. We need a medium consistency batter that can coat the cauliflower. I did not need the full cup of Water.
Heat oil in a frying pan. I shallow fried the florets, you can deep fry them.
Once the oil is hot, dip the cauliflower in the batter and drop them in the oil.
Fry until golden brown and crispy on the outside and the cauliflower is cooked on the inside.

To make the Manchurian Sauce:


Heat oil in a pan and add sliced onions and chopped garlic. Fry until the onions are translucent.
Add the sliced capsicum and fry for another 1-2 minutes.
Add the leftover batter from the cauliflower. If there is none leftover, mix together 1 Tbsp cornflour in 1/4 cup of water and add it. You may need to increase the quantity of the sauces accordingly.
Add the ginger garlic paste, soy sauce, tomato ketchup, chilli sauce, salt and 1/4 cup of water and mix well. Add more sauce if required.
Allow it to cook 3-4 minutes. You may need to add more water in as cornflour thickens on cooking.

To make the Pizza:


Spread the sauce on the base.
Place the fried cauliflower all on top of the sauce.
Sprinkle the chopped coriander leaves.
Grate cheese to cover the pizza.
Drizzle over the Olive Oil.
Bake in a 200 degree Celsius preheated oven for 5-8 minutes until the cheese melts.
Serve hot.


Read more ...